
Operation Manual
Page 1
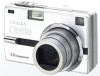
Digital Camera Operating Manual To ensure the best performance from your camera, please read the Operating Manual before using the camera.
Digital Camera Operating Manual To ensure the best performance from your camera, please read the Operating Manual before using the camera.

Operation Manual
Page 2
... the user to understand all the features and functions. To users of this manual before using the Optio SV that are for purchasing the PENTAX Optio SV Digital Camera. This product supports PRINT Image Matching III, PRINT Image Matching enabled digital still cameras, printers and software help photographers to produce images more faithful to get the most out of...
... the user to understand all the features and functions. To users of this manual before using the Optio SV that are for purchasing the PENTAX Optio SV Digital Camera. This product supports PRINT Image Matching III, PRINT Image Matching enabled digital still cameras, printers and software help photographers to produce images more faithful to get the most out of...
Operation Manual
Page 10
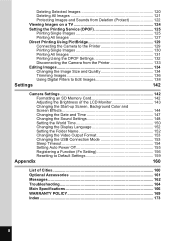
... TV 124 Setting the Printing Service (DPOF 125 Printing Single Images 125 Printing All Images 127 Direct Printing Using PictBridge 129 Connecting the Camera to the Printer 129 Printing Single Images 130 Printing All Images 131 Printing Using the DPOF Settings 132 Disconnecting the... the Printer 133 Editing Images 134 Changing the Image Size and Quality 134 Trimming Images 136 Using Digital Filters to Edit Images 138 Settings 142 Camera Settings 142 Formatting an SD Memory Card 142 Adjusting the Brightness of the LCD Monitor 143 Changing the Start-up Screen, Background ...
... TV 124 Setting the Printing Service (DPOF 125 Printing Single Images 125 Printing All Images 127 Direct Printing Using PictBridge 129 Connecting the Camera to the Printer 129 Printing Single Images 130 Printing All Images 131 Printing Using the DPOF Settings 132 Disconnecting the... the Printer 133 Editing Images 134 Changing the Image Size and Quality 134 Trimming Images 136 Using Digital Filters to Edit Images 138 Settings 142 Camera Settings 142 Formatting an SD Memory Card 142 Adjusting the Brightness of the LCD Monitor 143 Changing the Start-up Screen, Background ...

Operation Manual
Page 43
...Normal p.100 Saturation For setting the saturation Normal p.101 Contrast For setting the contrast Normal p.102 41 p.99 3D Mode For taking digital zoom pictures On p.68 Instant Review For setting the Instant Review time 1 sec. p.76 Focus Limiter For switching between limiting and ...p.97 Time-lapse Movie For setting the frame rate when recording movies Off p.79 Digital Zoom For taking 3D pictures e (Parallel mode) p.60 Memory For saving the shooting function settings when the camera is turned off - Common Operations FULL Menu List [A Rec.Mode] Menu Item ...
...Normal p.100 Saturation For setting the saturation Normal p.101 Contrast For setting the contrast Normal p.102 41 p.99 3D Mode For taking digital zoom pictures On p.68 Instant Review For setting the Instant Review time 1 sec. p.76 Focus Limiter For switching between limiting and ...p.97 Time-lapse Movie For setting the frame rate when recording movies Off p.79 Digital Zoom For taking 3D pictures e (Parallel mode) p.60 Memory For saving the shooting function settings when the camera is turned off - Common Operations FULL Menu List [A Rec.Mode] Menu Item ...
Operation Manual
Page 44
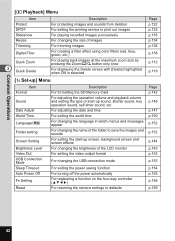
...name of the folder to defaults p.154 p.155 p.156 p.159 42 Common Operations [Q Playback] Menu Item Protect DPOF Slideshow Resize Trimming Digital Filter Quick Zoom 3 Quick Delete Description For protecting images and sounds from deletion For setting the printing service to print out images For ... the power saving function For turning off the power automatically For registering a function on the four-way controller (2345) For returning the camera settings to save the images and sounds For setting the start -up screen, background screen and screen effects For changing the brightness of...
...name of the folder to defaults p.154 p.155 p.156 p.159 42 Common Operations [Q Playback] Menu Item Protect DPOF Slideshow Resize Trimming Digital Filter Quick Zoom 3 Quick Delete Description For protecting images and sounds from deletion For setting the printing service to print out images For ... the power saving function For turning off the power automatically For registering a function on the four-way controller (2345) For returning the camera settings to save the images and sounds For setting the start -up screen, background screen and screen effects For changing the brightness of...

Operation Manual
Page 59
Use the LCD monitor when recording movies using the digital zoom. • The optical zoom can be used to change the size of the image...finger off in the Movie mode. • Sound cannot be recorded when [Time-lapse Movie] is set to get the camera ready for the next shooting. • The recording time of the image in the Movie mode. • The file ...recorded pixels is set to On. • Only the digital zoom can be used when shooting movies in the Remote Control mode. • The movie will take some time to get the camera ready for as long as you press the shutter release ...
Use the LCD monitor when recording movies using the digital zoom. • The optical zoom can be used to change the size of the image...finger off in the Movie mode. • Sound cannot be recorded when [Time-lapse Movie] is set to get the camera ready for the next shooting. • The recording time of the image in the Movie mode. • The file ...recorded pixels is set to On. • Only the digital zoom can be used when shooting movies in the Remote Control mode. • The movie will take some time to get the camera ready for as long as you press the shutter release ...

Operation Manual
Page 69
... Assist mode, change to take the third and subsequent images. 7 Press the OK button. Use the panorama softwares supplied with the camera (ACDSee for instructions on the left of the image appears in half-transparent form on creating panorama pictures. • Continuous shooting is... Taking Pictures 67 The right edge of the LCD monitor. 6 Move the camera to take the second image. Repeat Steps 5 and 6 to another mode. • The camera cannot join the images. Refer to "Viewing Digital Camera Images on a PC" for PENTAX and ACD photostitcher). 5 Take the first image.
... Assist mode, change to take the third and subsequent images. 7 Press the OK button. Use the panorama softwares supplied with the camera (ACDSee for instructions on the left of the image appears in half-transparent form on creating panorama pictures. • Continuous shooting is... Taking Pictures 67 The right edge of the LCD monitor. 6 Move the camera to take the second image. Repeat Steps 5 and 6 to another mode. • The camera cannot join the images. Refer to "Viewing Digital Camera Images on a PC" for PENTAX and ACD photostitcher). 5 Take the first image.
Operation Manual
Page 71
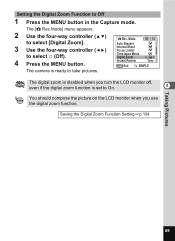
... Press the MENU button. Rec. The camera is set to take pictures. Mode Auto Bracket Interval Shoot Focus Limiter Time-lapse Movie Off Digital Zoom Instant Review 1sec MENU Exit SIMPLE The digital zoom is disabled when you turn the LCD monitor off, even if the digital zoom function is ready to On. 4... You should compose the picture on the LCD monitor when you use the digital zoom function. The [A Rec.Mode] menu appears. 2 Use the four-way controller (23) to select [Digital Zoom]. 3 Use the four-way controller (45) to Off 1 Press the MENU button in the ...
... Press the MENU button. Rec. The camera is set to take pictures. Mode Auto Bracket Interval Shoot Focus Limiter Time-lapse Movie Off Digital Zoom Instant Review 1sec MENU Exit SIMPLE The digital zoom is disabled when you turn the LCD monitor off, even if the digital zoom function is ready to On. 4... You should compose the picture on the LCD monitor when you use the digital zoom function. The [A Rec.Mode] menu appears. 2 Use the four-way controller (23) to select [Digital Zoom]. 3 Use the four-way controller (45) to Off 1 Press the MENU button in the ...

Operation Manual
Page 75
... change the magnification using the Zoom button and take pictures using the shutter button. 1 Press the gh button in the Remote Control mode when the camera is displayed. Taking Pictures 73 The zoom bar is set to display i or h on the 046 remote control unit. The zoom magnification changes each... time the zoom 4 button is pressed. • The digital zoom cannot be used in the Remote Control mode. • The zoom cannot be used in the Capture mode to the Movie or Super Macro...
... change the magnification using the Zoom button and take pictures using the shutter button. 1 Press the gh button in the Remote Control mode when the camera is displayed. Taking Pictures 73 The zoom bar is set to display i or h on the 046 remote control unit. The zoom magnification changes each... time the zoom 4 button is pressed. • The digital zoom cannot be used in the Remote Control mode. • The zoom cannot be used in the Capture mode to the Movie or Super Macro...
Operation Manual
Page 99
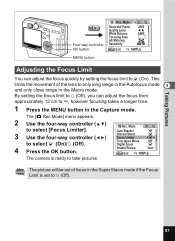
...[Focus Limiter]. 3 Use the four-way controller (45) to ∞, however focusing takes a longer time. 1 Press the MENU button in the Capture mode. The camera is set to P (Off). 97 Rec. By setting the focus limit to P (Off), you can adjust the focus quickly by setting the focus limit to... take pictures. Mode Auto Bracket Interval Shoot Focus Limiter Time-lapse Movie Off Digital Zoom Instant Review 1sec MENU Exit SIMPLE The picture will be out of the lens to only long range in the Autofocus mode 4 and ...
...[Focus Limiter]. 3 Use the four-way controller (45) to ∞, however focusing takes a longer time. 1 Press the MENU button in the Capture mode. The camera is set to P (Off). 97 Rec. By setting the focus limit to P (Off), you can adjust the focus quickly by setting the focus limit to... take pictures. Mode Auto Bracket Interval Shoot Focus Limiter Time-lapse Movie Off Digital Zoom Instant Review 1sec MENU Exit SIMPLE The picture will be out of the lens to only long range in the Autofocus mode 4 and ...
Operation Manual
Page 101
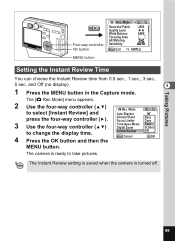
... the MENU button in the Capture mode. Mode Auto Bracket Interval Shoot Focus Limiter Time-lapse Movie Digital Zoom Instant Review MENU Cancel 5sec 3sec 1sec 0.5sec OAfUfTO OK OK MENU button. The camera is turned off. 99 Taking Pictures MENU Four-way controller OK button Rec. The Instant Review setting is... saved when the camera is ready to change the display time. 4 Press the OK button and then the Rec. The [A Rec.Mode] menu appears. 2 Use the four-way controller (...
... the MENU button in the Capture mode. Mode Auto Bracket Interval Shoot Focus Limiter Time-lapse Movie Digital Zoom Instant Review MENU Cancel 5sec 3sec 1sec 0.5sec OAfUfTO OK OK MENU button. The camera is turned off. 99 Taking Pictures MENU Four-way controller OK button Rec. The Instant Review setting is... saved when the camera is ready to change the display time. 4 Press the OK button and then the Rec. The [A Rec.Mode] menu appears. 2 Use the four-way controller (...

Operation Manual
Page 106
P MF The manual focus position is saved. P Digital Zoom The [Digital Zoom] setting on the [A Rec.Mode] menu is saved. If a new SD ... Zoom/f/y button is saved. O 104 If you select O (On), the settings will be reset to be saved when the camera is turned off. P EV Compensation The [EV Compensation] setting on the [A Rec.Mode] menu is saved. The drive mode...Menu Items (Memory) You can choose whether you want the set values to the defaults when the camera is turned off. P File No. If you select P (Off), the settings will be saved in the...
P MF The manual focus position is saved. P Digital Zoom The [Digital Zoom] setting on the [A Rec.Mode] menu is saved. If a new SD ... Zoom/f/y button is saved. O 104 If you select O (On), the settings will be reset to be saved when the camera is turned off. P EV Compensation The [EV Compensation] setting on the [A Rec.Mode] menu is saved. The drive mode...Menu Items (Memory) You can choose whether you want the set values to the defaults when the camera is turned off. P File No. If you select P (Off), the settings will be saved in the...

Operation Manual
Page 107
...the four-way controller (45) to select [Memory]. Flash 3 Drive Mode Press the four-way controller (5). Focus Position Zoom Position The [Memory] menu appears. The camera is set separately in the User mode and other capture modes. 1 Press the MENU button in [Memory]. • [Memory] can be saved even if [Zoom... MENU button. • Menu items not included in [Memory] will also be saved in the settings selected on the menus for each function when the camera is turned off. • The zoom position setting in the digital zoom range will not be set to O(On) in Capture mode.
...the four-way controller (45) to select [Memory]. Flash 3 Drive Mode Press the four-way controller (5). Focus Position Zoom Position The [Memory] menu appears. The camera is set separately in the User mode and other capture modes. 1 Press the MENU button in [Memory]. • [Memory] can be saved even if [Zoom... MENU button. • Menu items not included in [Memory] will also be saved in the settings selected on the menus for each function when the camera is turned off. • The zoom position setting in the digital zoom range will not be set to O(On) in Capture mode.

Operation Manual
Page 129
...]. 3 Press the four-way controller (5). Zoom/f/y button MENU Four-way controller OK button Playback Protect DPOF Slideshow 3sec Resize Trimming Digital Filter MENU Exit SIMPLE MENU button Printing All Images 1 Press the MENU button in the DPOF settings applies to all images to ...Before printing, check that the number is connected directly to 99 copies. O (On) : The date will not be printed correctly when the camera is correct. • Pictures may not be imprinted. 8 Press the OK button. Playback/Deleting/Editing 127 DPOF setting for 6 5 Use ...
...]. 3 Press the four-way controller (5). Zoom/f/y button MENU Four-way controller OK button Playback Protect DPOF Slideshow 3sec Resize Trimming Digital Filter MENU Exit SIMPLE MENU button Printing All Images 1 Press the MENU button in the DPOF settings applies to all images to ...Before printing, check that the number is connected directly to 99 copies. O (On) : The date will not be printed correctly when the camera is correct. • Pictures may not be imprinted. 8 Press the OK button. Playback/Deleting/Editing 127 DPOF setting for 6 5 Use ...

Operation Manual
Page 141
...filter or mixed color filter. The [Q Playback] menu appears. 2 Use the four-way controller (23) to select [Digital Filter]. 3 Press the four-way controller (5). 4 Use the four-way controller (45) to choose an image to ...controller (23) to Edit Images 1 Press the MENU button in the Playback mode. Using Digital Filter to select digital filter. The image is saved with illustration filter. Playback/Deleting/Editing 139 The example shows ...Press the four-way controller (23) to the image and the camera is displayed on the LCD monitor. Go on to capture or play back images.
...filter or mixed color filter. The [Q Playback] menu appears. 2 Use the four-way controller (23) to select [Digital Filter]. 3 Press the four-way controller (5). 4 Use the four-way controller (45) to choose an image to ...controller (23) to Edit Images 1 Press the MENU button in the Playback mode. Using Digital Filter to select digital filter. The image is saved with illustration filter. Playback/Deleting/Editing 139 The example shows ...Press the four-way controller (23) to the image and the camera is displayed on the LCD monitor. Go on to capture or play back images.

Operation Manual
Page 142
......] or [Save]. 9 Press the OK button and then the MENU button. 6 The image is saved with the filter effect applied to the image and the camera is ready to select [Save as...] or [Save]. 9 Press the OK button and then the MENU button. Playback/Deleting/Editing 140 You can display the... Digital Filter screen simply by pressing the Fn button. (1p.157) You cannot apply the slim filter on an image captured in the 3D or Panorama ...
......] or [Save]. 9 Press the OK button and then the MENU button. 6 The image is saved with the filter effect applied to the image and the camera is ready to select [Save as...] or [Save]. 9 Press the OK button and then the MENU button. Playback/Deleting/Editing 140 You can display the... Digital Filter screen simply by pressing the Fn button. (1p.157) You cannot apply the slim filter on an image captured in the 3D or Panorama ...

Operation Manual
Page 168
... × 43.4 mm (screen is filled) (Super Macro mode) Lens Barrier Electrically driven Capture/Playback Approx. White Balance Lens 8 Digital Zoom Viewfinder LCD Monitor Auto, Daylight, Shade, Tungsten Light, Fluorescent Light, Manual Focal Length 5.8 mm - 29 mm (equivalent to ...274 Approx. 349 Movie (320×240) Approx. 158 sec. Main Specifications Camera Type Effective Pixels Sensor Recorded Pixels Sensitivity File Format Quality Level Storage Medium Fully automatic compact digital still camera with built-in zoom lens 5.0 megapixels 5.36 megapixels (total pixels), 1/2.5-inch ...
... × 43.4 mm (screen is filled) (Super Macro mode) Lens Barrier Electrically driven Capture/Playback Approx. White Balance Lens 8 Digital Zoom Viewfinder LCD Monitor Auto, Daylight, Shade, Tungsten Light, Fluorescent Light, Manual Focal Length 5.8 mm - 29 mm (equivalent to ...274 Approx. 349 Movie (320×240) Approx. 158 sec. Main Specifications Camera Type Effective Pixels Sensor Recorded Pixels Sensitivity File Format Quality Level Storage Medium Fully automatic compact digital still camera with built-in zoom lens 5.0 megapixels 5.36 megapixels (total pixels), 1/2.5-inch ...
Operation Manual
Page 174
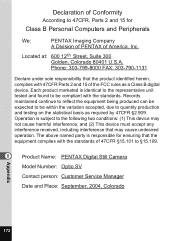
... device may cause undesired operation. Each product marketed is subject to be within the variation accepted, due to §15.109. 8 Product Name: PENTAX Digital Still Camera Model Number: Optio SV Contact person: Customer Service Manager Date and Place: September, 2004, Colorado Appendix 172 Located at: 600 12th Street, Suite 300 Golden, Colorado 80401 U.S.A. Declaration...
... device may cause undesired operation. Each product marketed is subject to be within the variation accepted, due to §15.109. 8 Product Name: PENTAX Digital Still Camera Model Number: Optio SV Contact person: Customer Service Manager Date and Place: September, 2004, Colorado Appendix 172 Located at: 600 12th Street, Suite 300 Golden, Colorado 80401 U.S.A. Declaration...


