
Operation Manual
Page 3
... become exposed as there is a danger of receiving an electric shock. • Wrapping the strap of the camera around your nearest PENTAX service center. The use of an AC adapter other than that specified exclusively for exclusive use with this product. Warning Caution... These symbols indicate that small children do not under any other irregularity, stop using the camera immediately, remove the battery or disconnect the AC adapter...
... become exposed as there is a danger of receiving an electric shock. • Wrapping the strap of the camera around your nearest PENTAX service center. The use of an AC adapter other than that specified exclusively for exclusive use with this product. Warning Caution... These symbols indicate that small children do not under any other irregularity, stop using the camera immediately, remove the battery or disconnect the AC adapter...
Operation Manual
Page 4
...come in contact with skin or clothes, wash the affected areas thoroughly with your mouth. Continuing to get inside the product, consult a PENTAX Service Center. Also, be careful of the battery leakage should happen to use the product can cause a fire or electrical shock. This can cause a fire or electrical shock. &#..., do not rub them. Flush your eyes with clean water and get on the flash when it is discharging as there is a risk of the camera heat up during removal. • Some portions of burns. • Do not discharge the flash while it is 100-240 V AC. • Do ...
...come in contact with skin or clothes, wash the affected areas thoroughly with your mouth. Continuing to get inside the product, consult a PENTAX Service Center. Also, be careful of the battery leakage should happen to use the product can cause a fire or electrical shock. This can cause a fire or electrical shock. &#..., do not rub them. Flush your eyes with clean water and get on the flash when it is discharging as there is a risk of the camera heat up during removal. • Some portions of burns. • Do not discharge the flash while it is 100-240 V AC. • Do ...

Operation Manual
Page 5
... • Do not place heavy objects on female connector body (with a specified IEC nonindustrial type configuration) or the equivalent. • Do not use the battery charging stand to the equipment, fire or electrical shock. • Wipe off the plug of the power cord if it is still plugged in the ... stand. • Do not plug in . • Remove the battery and unplug the AC plug cord when not using . This can cause a fire. If the AC plug cord becomes damaged, consult a PENTAX Service Center. • Do not short or touch the output terminals of hazards, use the product can cause an ...
... • Do not place heavy objects on female connector body (with a specified IEC nonindustrial type configuration) or the equivalent. • Do not use the battery charging stand to the equipment, fire or electrical shock. • Wipe off the plug of the power cord if it is still plugged in the ... stand. • Do not plug in . • Remove the battery and unplug the AC plug cord when not using . This can cause a fire. If the AC plug cord becomes damaged, consult a PENTAX Service Center. • Do not short or touch the output terminals of hazards, use the product can cause an ...
Operation Manual
Page 8
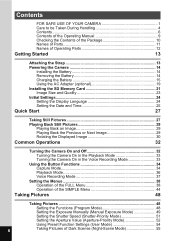
...Package 10 Names of Parts 11 Names of Operating Parts 12 Getting Started 13 Attaching the Strap 13 Powering the Camera 14 Installing the Battery 14 Removing the Battery 14 Charging the Battery 15 Using the AC Adapter (optional 19 Installing the SD Memory Card 21 Image Size and Quality 23 Initial...Back the Previous or Next Image 29 Rotating the Displayed Image 30 Common Operations 32 Turning the Camera On and Off 32 Turning the Camera On in the Playback Mode 33 Turning the Camera On in the Voice Recording Mode 33 Using the Button Functions 34 Capture Mode 34 Playback ...
...Package 10 Names of Parts 11 Names of Operating Parts 12 Getting Started 13 Attaching the Strap 13 Powering the Camera 14 Installing the Battery 14 Removing the Battery 14 Charging the Battery 15 Using the AC Adapter (optional 19 Installing the SD Memory Card 21 Image Size and Quality 23 Initial...Back the Previous or Next Image 29 Rotating the Displayed Image 30 Common Operations 32 Turning the Camera On and Off 32 Turning the Camera On in the Playback Mode 33 Turning the Camera On in the Voice Recording Mode 33 Using the Button Functions 34 Capture Mode 34 Playback ...

Operation Manual
Page 12
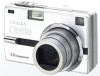
Checking the Contents of the Package Camera Optio SV Strap O-ST20 (∗) Software (CD-ROM) S-SW23 AV cable I-AVC7 (∗) USB cable I-USB17 (∗) Rechargeable lithium-ion battery D-LI8 (∗) Battery charging stand D-BC23 (∗) AC plug cord D-CO2 (∗) 32 MB SD Memory Card Operating Manual (this manual) Operating Manual (PC Connection Manual) Items marked with an asterisk (∗) are also available as optional accessories. For other optional accessories, refer to "Optional Accessories" (p.161). 10
Checking the Contents of the Package Camera Optio SV Strap O-ST20 (∗) Software (CD-ROM) S-SW23 AV cable I-AVC7 (∗) USB cable I-USB17 (∗) Rechargeable lithium-ion battery D-LI8 (∗) Battery charging stand D-BC23 (∗) AC plug cord D-CO2 (∗) 32 MB SD Memory Card Operating Manual (this manual) Operating Manual (PC Connection Manual) Items marked with an asterisk (∗) are also available as optional accessories. For other optional accessories, refer to "Optional Accessories" (p.161). 10

Operation Manual
Page 13
Names of Parts Front Back Shutter release button Remote control receiver/ Self-timer lamp Power switch Flash Speaker Lens USB/AV terminal Microphone Strap lug DC input terminal Terminal cover Viewfinder Focus status lamp (green) Mode dial Flash status lamp (red) LCD monitor Battery charging stand terminal Battery/Card cover Tripod socket 11
Names of Parts Front Back Shutter release button Remote control receiver/ Self-timer lamp Power switch Flash Speaker Lens USB/AV terminal Microphone Strap lug DC input terminal Terminal cover Viewfinder Focus status lamp (green) Mode dial Flash status lamp (red) LCD monitor Battery charging stand terminal Battery/Card cover Tripod socket 11
Operation Manual
Page 16
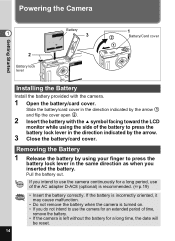
... the direction indicated by the arrow. 3 Close the battery/card cover. Removing the Battery 1 Release the battery by the arrow 1 and flip the cover open 2 . 2 Insert the battery with the camera. 1 Open the battery/card cover. Powering the Camera Getting Started 1 2 Battery lock lever Battery 3 1 2 Battery/Card cover 1 Installing the Battery Install the battery provided with the 2 symbol facing toward the LCD...
... the direction indicated by the arrow. 3 Close the battery/card cover. Removing the Battery 1 Release the battery by the arrow 1 and flip the cover open 2 . 2 Insert the battery with the camera. 1 Open the battery/card cover. Powering the Camera Getting Started 1 2 Battery lock lever Battery 3 1 2 Battery/Card cover 1 Installing the Battery Install the battery provided with the 2 symbol facing toward the LCD...
Operation Manual
Page 17
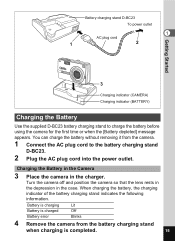
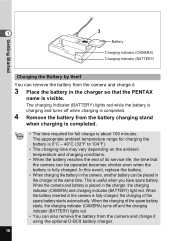
... the first time or when the [Battery depleted] message appears. When charging the battery, the charging indicator of the battery charging stand indicates the following information. Charging the Battery in the Camera 3 Place the camera in the case. Battery is charging Lit Battery is completed. 15 Turn the camera off and position the camera so that the lens rests in...
... the first time or when the [Battery depleted] message appears. When charging the battery, the charging indicator of the battery charging stand indicates the following information. Charging the Battery in the Camera 3 Place the camera in the case. Battery is charging Lit Battery is completed. 15 Turn the camera off and position the camera so that the lens rests in...
Operation Manual
Page 18
... PENTAX name is charging and turns off and the charging indicator (BATTERY) lights red. • You can be operated becomes shorter even when the battery is placed in the camera is useful when you have spare battery. In this event, replace the battery. • When charging the battery in the camera, another battery can also remove the battery from the camera...
... PENTAX name is charging and turns off and the charging indicator (BATTERY) lights red. • You can be operated becomes shorter even when the battery is placed in the camera is useful when you have spare battery. In this event, replace the battery. • When charging the battery in the camera, another battery can also remove the battery from the camera...
Operation Manual
Page 19
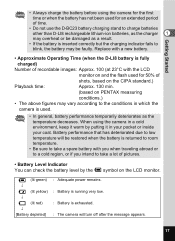
... due to low temperature will turn off after the message appears. 17 Getting Started • Always charge the battery before using the camera in a cold environment, keep it in which the camera is used for an extended period of shots, based on the CIPA standard.) Playback time: Approx. 130 min... or to a cold region, or if you intend to take a lot of pictures. • Battery Level Indicator You can check the battery level by putting it warm by the # symbol on PENTAX measuring conditions.) • The above figures may vary according to the conditions in your pocket or inside...
... due to low temperature will turn off after the message appears. 17 Getting Started • Always charge the battery before using the camera in a cold environment, keep it in which the camera is used for an extended period of shots, based on the CIPA standard.) Playback time: Approx. 130 min... or to a cold region, or if you intend to take a lot of pictures. • Battery Level Indicator You can check the battery level by putting it warm by the # symbol on PENTAX measuring conditions.) • The above figures may vary according to the conditions in your pocket or inside...

Operation Manual
Page 20
• Recycling Batteries This symbol indicates that the battery is recyclable. Getting Started 18 Cover the terminals with insulating tape and take the 1 battery to a store displaying this symbol.
• Recycling Batteries This symbol indicates that the battery is recyclable. Getting Started 18 Cover the terminals with insulating tape and take the 1 battery to a store displaying this symbol.

Operation Manual
Page 22
Getting Started Precautions When Using the Battery Charging Stand or AC Adapter To avoid the risk of the battery charging stand and AC adapter. 20 Refer to page 166 for the specifications of fire or electric shock when using the battery charging stand or AC adapter, be sure to read the section on "FOR SAFE USE OF 1 YOUR CAMERA" on page 1.
Getting Started Precautions When Using the Battery Charging Stand or AC Adapter To avoid the risk of the battery charging stand and AC adapter. 20 Refer to page 166 for the specifications of fire or electric shock when using the battery charging stand or AC adapter, be sure to read the section on "FOR SAFE USE OF 1 YOUR CAMERA" on page 1.

Operation Manual
Page 23
... are recorded on the SD Memory Card. • Make sure that the camera is facing toward the LCD monitor and push the card in memory and the selected image size and quality. (1p.23) 21 Slide the battery/card cover in the direction indicated by the arrow 1 and flip the cover..." (p.142) for instructions on the capacity of the SD Memory Card or built-in until it clicks. 3 Close the battery/card cover. The number of recordable images varies depending on formatting. 1 Open the battery/card cover. Installing the SD Memory Card SD Memory Card 1 2 3 1 2 To remove the 1 card, push in ...
... are recorded on the SD Memory Card. • Make sure that the camera is facing toward the LCD monitor and push the card in memory and the selected image size and quality. (1p.23) 21 Slide the battery/card cover in the direction indicated by the arrow 1 and flip the cover..." (p.142) for instructions on the capacity of the SD Memory Card or built-in until it clicks. 3 Close the battery/card cover. The number of recordable images varies depending on formatting. 1 Open the battery/card cover. Installing the SD Memory Card SD Memory Card 1 2 3 1 2 To remove the 1 card, push in ...
Operation Manual
Page 24
... Started Precautions When Using an SD Memory Card • Make sure that have compatibility with your nearest PENTAX service center. 22 Keep it to format unused cards or cards that the camera is turned off before opening the battery/card cover. • The SD Memory Card is not used on another... camera. If it may be exposed to rapid changes in temperature or to condensation. • When using an...
... Started Precautions When Using an SD Memory Card • Make sure that have compatibility with your nearest PENTAX service center. 22 Keep it to format unused cards or cards that the camera is turned off before opening the battery/card cover. • The SD Memory Card is not used on another... camera. If it may be exposed to rapid changes in temperature or to condensation. • When using an...

Operation Manual
Page 42
... to the settings will not be saved. • The menu is turned on), any changes you turn the camera off incorrectly (such as by removing the battery while the camera is exited automatically approximately one minute after pressing the OK button to exit the menu, if you have made to capture or play...
... to the settings will not be saved. • The menu is turned on), any changes you turn the camera off incorrectly (such as by removing the battery while the camera is exited automatically approximately one minute after pressing the OK button to exit the menu, if you have made to capture or play...
Operation Manual
Page 48
..., video output format, and world time). Common Operations • The menu setting is saved even when the camera is turned off incorrectly (such as by removing the battery while the camera is turned on), any changes you return to their default setting (excluding language/ , folder, start-up screen..., screen effect, brightness of setting in the USER mode. 46 If the camera is turned off or switched to the...
..., video output format, and world time). Common Operations • The menu setting is saved even when the camera is turned off incorrectly (such as by removing the battery while the camera is turned on), any changes you return to their default setting (excluding language/ , folder, start-up screen..., screen effect, brightness of setting in the USER mode. 46 If the camera is turned off or switched to the...

Operation Manual
Page 74
... four meters away from the remote control unit to the camera approximately 30,000 times. i The self-timer lamp blinks quickly and the picture is taken immediately. Contact your nearest PENTAX customer service center if the battery needs changing. (A charge is required for the Remote Control...LCD monitor. Focusing may be compromised if you move the camera while the self-timer lamp is blinking. • The buttons on the camera can be sent from the front of the Battery for changing the battery.) 72 Life of the camera. h The picture is taken after approximately three seconds....
... four meters away from the remote control unit to the camera approximately 30,000 times. i The self-timer lamp blinks quickly and the picture is taken immediately. Contact your nearest PENTAX customer service center if the battery needs changing. (A charge is required for the Remote Control...LCD monitor. Focusing may be compromised if you move the camera while the self-timer lamp is blinking. • The buttons on the camera can be sent from the front of the Battery for changing the battery.) 72 Life of the camera. h The picture is taken after approximately three seconds....
Operation Manual
Page 84
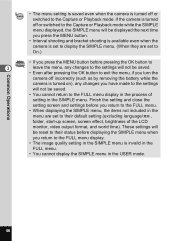
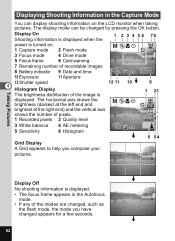
... display mode can display shooting information on . 046 1 Capture mode 2 Flash mode 3 Focus mode 4 Drive mode 5 Focus frame 6 Card warning 7 Remaining number of recordable images 8 Battery indicator 9 Date and time 1/200 7/ 7/2004 F2.8 --0.6 3:00 PM 10 Exposure 11 Aperture 12 Shutter speed 4 Histogram Display 12 11 10 The brightness distribution of...
... display mode can display shooting information on . 046 1 Capture mode 2 Flash mode 3 Focus mode 4 Drive mode 5 Focus frame 6 Card warning 7 Remaining number of recordable images 8 Battery indicator 9 Date and time 1/200 7/ 7/2004 F2.8 --0.6 3:00 PM 10 Exposure 11 Aperture 12 Shutter speed 4 Histogram Display 12 11 10 The brightness distribution of...
Operation Manual
Page 116
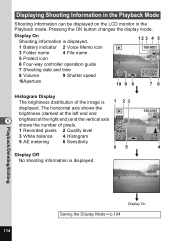
Display On Shooting information is displayed. 12 3 4 5 1 Battery indicator 2 Voice Memo icon 100-0001 3 Folder name 4 File name 5 Protect icon 6 Four-way controller operation guide 7 Shooting date and time 8 Volume 9 Shutter speed 1/200 ...
Display On Shooting information is displayed. 12 3 4 5 1 Battery indicator 2 Voice Memo icon 100-0001 3 Folder name 4 File name 5 Protect icon 6 Four-way controller operation guide 7 Shooting date and time 8 Volume 9 Shutter speed 1/200 ...

Operation Manual
Page 131
... return to the PictBridge menu. Select the images you attach an external cartridge), the display may be valid. Direct Printing Using PictBridge By connecting the camera to a printer that supports PictBridge using a PC. Select Printing Mode Print All Print One DPOF AUTOPRINT OK OK While the... want to print and the number of printer, not all the settings made on the camera after it has been connected to the printer. • You are changed (such as paper size and DPOF settings) may be damaged if the battery runs out of power while the camera is connected to the printer.
... return to the PictBridge menu. Select the images you attach an external cartridge), the display may be valid. Direct Printing Using PictBridge By connecting the camera to a printer that supports PictBridge using a PC. Select Printing Mode Print All Print One DPOF AUTOPRINT OK OK While the... want to print and the number of printer, not all the settings made on the camera after it has been connected to the printer. • You are changed (such as paper size and DPOF settings) may be damaged if the battery runs out of power while the camera is connected to the printer.
