
Operation Manual
Page 1
Digital Camera Operating Manual To ensure the best performance from your camera, please read the Operating Manual before using the camera.
Digital Camera Operating Manual To ensure the best performance from your camera, please read the Operating Manual before using the camera.

Operation Manual
Page 2
..., industrial enterprise or as items for display. Regarding copyrights Images taken using the unified standard for purchasing the PENTAX Optio SV Digital Camera. Images taken with the purpose of obtaining copyrights also cannot be used in helping you for the direct printout... PRINT Image Matching III, PRINT Image Matching enabled digital still cameras, printers and software help photographers to produce images more faithful to connect the printer and digital camera directly, using the Optio SV that are different from the camera through a few simple operations. • There ...
..., industrial enterprise or as items for display. Regarding copyrights Images taken using the unified standard for purchasing the PENTAX Optio SV Digital Camera. Images taken with the purpose of obtaining copyrights also cannot be used in helping you for the direct printout... PRINT Image Matching III, PRINT Image Matching enabled digital still cameras, printers and software help photographers to produce images more faithful to connect the printer and digital camera directly, using the Optio SV that are different from the camera through a few simple operations. • There ...

Operation Manual
Page 3
...camera...or electric shocks. • If the camera emits smoke or a strange smell, or in fire ...of an AC adapter other irregularity, stop using the camera immediately, remove the battery or disconnect the AC ...with this product. Please take the camera apart or remodel the camera. About the Camera Warning • Do not attempt ...within the camera, and there is possible that it is therefore a ... the inside of the camera should become exposed as a result of, for example, the camera being swallowed by the ...possible that it is of the camera around their necks. • To avoid the risk...
...camera...or electric shocks. • If the camera emits smoke or a strange smell, or in fire ...of an AC adapter other irregularity, stop using the camera immediately, remove the battery or disconnect the AC ...with this product. Please take the camera apart or remodel the camera. About the Camera Warning • Do not attempt ...within the camera, and there is possible that it is therefore a ... the inside of the camera should become exposed as a result of, for example, the camera being swallowed by the ...possible that it is of the camera around their necks. • To avoid the risk...
Operation Manual
Page 4
...touching your eyes with a power source or voltage other abnormality occurs, immediately discontinue using and consult a PENTAX Service Center. Continuing to get inside the product, consult a PENTAX Service Center. Flush your clothing as there is a risk of discoloring. • If any batteries other... than the specified voltage. This can cause a fire or electrical shock. • If the generation of smoke or strange odor from the camera immediately if it...
...touching your eyes with a power source or voltage other abnormality occurs, immediately discontinue using and consult a PENTAX Service Center. Continuing to get inside the product, consult a PENTAX Service Center. Flush your clothing as there is a risk of discoloring. • If any batteries other... than the specified voltage. This can cause a fire or electrical shock. • If the generation of smoke or strange odor from the camera immediately if it...
Operation Manual
Page 6
... • The lens on a cushion for a long time, confirm that it off immediately with a dry soft cloth. • Ensure that the camera is not subjected to substantial vibrations, shocks or pressure. Remove from case and store in contact with organic solvents such as at low temperatures. This...Care to be Taken During Handling • Take the Worldwide Service Network that is included in order to maintain high-performance. 4 Place the camera on this camera is 0°C to 40°C (32°F to 104°F). • The liquid crystal display will be useful if you experience ...
... • The lens on a cushion for a long time, confirm that it off immediately with a dry soft cloth. • Ensure that the camera is not subjected to substantial vibrations, shocks or pressure. Remove from case and store in contact with organic solvents such as at low temperatures. This...Care to be Taken During Handling • Take the Worldwide Service Network that is included in order to maintain high-performance. 4 Place the camera on this camera is 0°C to 40°C (32°F to 104°F). • The liquid crystal display will be useful if you experience ...

Operation Manual
Page 7
... may cause damage to "Precautions When Using an SD Memory Card" (p.22) regarding the SD Memory Card. • Please do not press forcefully on the camera. 5 This could cause breakage or malfunction. • Be careful not to sit down with garbage, dirt, sand, dust, water, toxic gases, salt, etc.... Therefore put the camera in a bag or plastic bag, and take the camera out when the difference in temperature has subsided. • Avoid contact with the camera in the tripod socket on the LCD monitor. If rain or drops of water get...
... may cause damage to "Precautions When Using an SD Memory Card" (p.22) regarding the SD Memory Card. • Please do not press forcefully on the camera. 5 This could cause breakage or malfunction. • Be careful not to sit down with garbage, dirt, sand, dust, water, toxic gases, salt, etc.... Therefore put the camera in a bag or plastic bag, and take the camera out when the difference in temperature has subsided. • Avoid contact with the camera in the tripod socket on the LCD monitor. If rain or drops of water get...
Operation Manual
Page 8
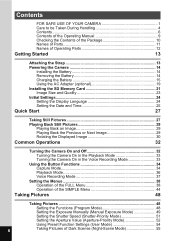
...Checking the Contents of the Package 10 Names of Parts 11 Names of Operating Parts 12 Getting Started 13 Attaching the Strap 13 Powering the Camera 14 Installing the Battery 14 Removing the Battery 14 Charging the Battery 15 Using the AC Adapter (optional 19 Installing the SD Memory Card 21... Back the Previous or Next Image 29 Rotating the Displayed Image 30 Common Operations 32 Turning the Camera On and Off 32 Turning the Camera On in the Playback Mode 33 Turning the Camera On in the Voice Recording Mode 33 Using the Button Functions 34 Capture Mode 34 Playback Mode ...
...Checking the Contents of the Package 10 Names of Parts 11 Names of Operating Parts 12 Getting Started 13 Attaching the Strap 13 Powering the Camera 14 Installing the Battery 14 Removing the Battery 14 Charging the Battery 15 Using the AC Adapter (optional 19 Installing the SD Memory Card 21... Back the Previous or Next Image 29 Rotating the Displayed Image 30 Common Operations 32 Turning the Camera On and Off 32 Turning the Camera On in the Playback Mode 33 Turning the Camera On in the Voice Recording Mode 33 Using the Button Functions 34 Capture Mode 34 Playback Mode ...
Operation Manual
Page 10
... TV 124 Setting the Printing Service (DPOF 125 Printing Single Images 125 Printing All Images 127 Direct Printing Using PictBridge 129 Connecting the Camera to the Printer 129 Printing Single Images 130 Printing All Images 131 Printing Using the DPOF Settings 132 Disconnecting the... the Printer 133 Editing Images 134 Changing the Image Size and Quality 134 Trimming Images 136 Using Digital Filters to Edit Images 138 Settings 142 Camera Settings 142 Formatting an SD Memory Card 142 Adjusting the Brightness of the LCD Monitor 143 Changing the Start-up Screen, Background ...
... TV 124 Setting the Printing Service (DPOF 125 Printing Single Images 125 Printing All Images 127 Direct Printing Using PictBridge 129 Connecting the Camera to the Printer 129 Printing Single Images 130 Printing All Images 131 Printing Using the DPOF Settings 132 Disconnecting the... the Printer 133 Editing Images 134 Changing the Image Size and Quality 134 Trimming Images 136 Using Digital Filters to Edit Images 138 Settings 142 Camera Settings 142 Formatting an SD Memory Card 142 Adjusting the Brightness of the LCD Monitor 143 Changing the Start-up Screen, Background ...

Operation Manual
Page 11
... of the Operating Manual This operating manual contains the following chapters. 1 Getting Started 1 This chapter explains what to do after purchasing the camera before you start taking pictures. For more details, refer to the respective "Taking Pictures", 3 "Recording and Playback", "Playback/Deleting/Editing"...Playback/Deleting/Editing This chapter explains how to use the menus. indicates information that is useful to be taken when operating the camera. 9 Be sure to read it if 2 you want to start taking pictures straightaway. 3 Common Operations This chapter explains ...
... of the Operating Manual This operating manual contains the following chapters. 1 Getting Started 1 This chapter explains what to do after purchasing the camera before you start taking pictures. For more details, refer to the respective "Taking Pictures", 3 "Recording and Playback", "Playback/Deleting/Editing"...Playback/Deleting/Editing This chapter explains how to use the menus. indicates information that is useful to be taken when operating the camera. 9 Be sure to read it if 2 you want to start taking pictures straightaway. 3 Common Operations This chapter explains ...

Operation Manual
Page 12
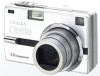
Checking the Contents of the Package Camera Optio SV Strap O-ST20 (∗) Software (CD-ROM) S-SW23 AV cable I-AVC7 (∗) USB cable I-USB17 (∗) Rechargeable lithium-ion battery D-LI8 (∗) Battery charging stand D-BC23 (∗) AC plug cord D-CO2 (∗) 32 MB SD Memory Card Operating Manual (this manual) Operating Manual (PC Connection Manual) Items marked with an asterisk (∗) are also available as optional accessories. For other optional accessories, refer to "Optional Accessories" (p.161). 10
Checking the Contents of the Package Camera Optio SV Strap O-ST20 (∗) Software (CD-ROM) S-SW23 AV cable I-AVC7 (∗) USB cable I-USB17 (∗) Rechargeable lithium-ion battery D-LI8 (∗) Battery charging stand D-BC23 (∗) AC plug cord D-CO2 (∗) 32 MB SD Memory Card Operating Manual (this manual) Operating Manual (PC Connection Manual) Items marked with an asterisk (∗) are also available as optional accessories. For other optional accessories, refer to "Optional Accessories" (p.161). 10
Operation Manual
Page 16
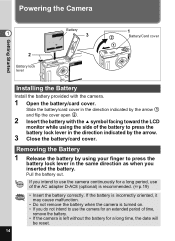
... when you do not intend to press the battery lock lever in the direction indicated by the arrow. 3 Close the battery/card cover. Powering the Camera Getting Started 1 2 Battery lock lever Battery 3 1 2 Battery/Card cover 1 Installing the Battery Install the battery provided with the 2 symbol facing toward... the LCD monitor while using your finger to use of time, remove the battery. • If the camera is left without the battery for an extended period of the AC adapter D-AC8 (optional) is turned on. • If you inserted the ...
... when you do not intend to press the battery lock lever in the direction indicated by the arrow. 3 Close the battery/card cover. Powering the Camera Getting Started 1 2 Battery lock lever Battery 3 1 2 Battery/Card cover 1 Installing the Battery Install the battery provided with the 2 symbol facing toward... the LCD monitor while using your finger to use of time, remove the battery. • If the camera is left without the battery for an extended period of the AC adapter D-AC8 (optional) is turned on. • If you inserted the ...
Operation Manual
Page 17
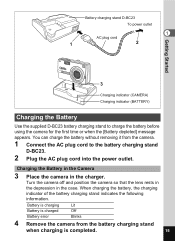
...power outlet. When charging the battery, the charging indicator of the battery charging stand indicates the following information. Turn the camera off and position the camera so that the lens rests in the depression in the charger. You can charge the battery without removing it from the...battery charging stand when charging is completed. 15 Charging the Battery in the Camera 3 Place the camera in the case. Battery is charging Lit Battery is charged Off Battery error Blinks 4 Remove the camera from the camera. 1 Connect the AC plug cord to charge the battery before using the...
...power outlet. When charging the battery, the charging indicator of the battery charging stand indicates the following information. Turn the camera off and position the camera so that the lens rests in the depression in the charger. You can charge the battery without removing it from the...battery charging stand when charging is completed. 15 Charging the Battery in the Camera 3 Place the camera in the case. Battery is charging Lit Battery is charged Off Battery error Blinks 4 Remove the camera from the camera. 1 Connect the AC plug cord to charge the battery before using the...
Operation Manual
Page 18
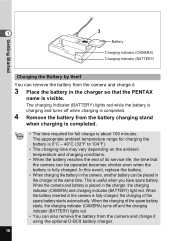
...you have spare battery. When the battery inserted in the charger, the charging indicator (CAMERA) and charging indicator (BATTERY) light red. When the charging of the spare battery starts, the charging indicator (CAMERA) turns off when charging is completed. 4 Remove the battery from the battery charging stand...battery reaches the end of its service life, the time that the PENTAX name is charging and turns off and the charging indicator (BATTERY) lights red. • You can also remove the battery from the camera and charge it using the optional D-BC8 battery charger. 16 The ...
...you have spare battery. When the battery inserted in the charger, the charging indicator (CAMERA) and charging indicator (BATTERY) light red. When the charging of the spare battery starts, the charging indicator (CAMERA) turns off when charging is completed. 4 Remove the battery from the battery charging stand...battery reaches the end of its service life, the time that the PENTAX name is charging and turns off and the charging indicator (BATTERY) lights red. • You can also remove the battery from the camera and charge it using the optional D-BC8 battery charger. 16 The ...
Operation Manual
Page 19
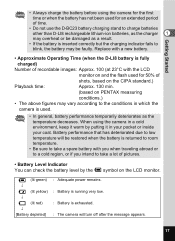
...8226; If the battery is inserted correctly but the charging indicator fails to blink, the battery may vary according to the conditions in which the camera is used for 50% of pictures. • Battery Level Indicator You can check the battery level by putting it warm by the # ... to room temperature. • Be sure to take a spare battery with the LCD monitor on PENTAX measuring conditions.) • The above figures may be restored when the battery is exhausted. : The camera will turn off after the message appears. 17 Getting Started • Always charge the battery before...
...8226; If the battery is inserted correctly but the charging indicator fails to blink, the battery may vary according to the conditions in which the camera is used for 50% of pictures. • Battery Level Indicator You can check the battery level by putting it warm by the # ... to room temperature. • Be sure to take a spare battery with the LCD monitor on PENTAX measuring conditions.) • The above figures may be restored when the battery is exhausted. : The camera will turn off after the message appears. 17 Getting Started • Always charge the battery before...

Operation Manual
Page 21
... turned off and open the terminal cover. 2 Connect the DC terminal on the AC adapter to the DC input terminal on the camera, being sure to match the 4 symbols. 3 Connect the AC plug cord to the AC adapter. 4 Plug the AC plug cord into the power outlet. • ...Make sure that the camera is turned off when connecting or disconnecting the AC adapter. • Make sure that the AC plug cord and connecting cable are taking pictures. •...
... turned off and open the terminal cover. 2 Connect the DC terminal on the AC adapter to the DC input terminal on the camera, being sure to match the 4 symbols. 3 Connect the AC plug cord to the AC adapter. 4 Plug the AC plug cord into the power outlet. • ...Make sure that the camera is turned off when connecting or disconnecting the AC adapter. • Make sure that the AC plug cord and connecting cable are taking pictures. •...

Operation Manual
Page 22
Getting Started Precautions When Using the Battery Charging Stand or AC Adapter To avoid the risk of the battery charging stand and AC adapter. 20 Refer to page 166 for the specifications of fire or electric shock when using the battery charging stand or AC adapter, be sure to read the section on "FOR SAFE USE OF 1 YOUR CAMERA" on page 1.
Getting Started Precautions When Using the Battery Charging Stand or AC Adapter To avoid the risk of the battery charging stand and AC adapter. 20 Refer to page 166 for the specifications of fire or electric shock when using the battery charging stand or AC adapter, be sure to read the section on "FOR SAFE USE OF 1 YOUR CAMERA" on page 1.

Operation Manual
Page 23
... it in the direction indicated by the arrow 1 and flip the cover open 2 . 2 Insert an SD Memory Card so the label (the side with this camera. Slide the battery/card cover in until it out. Captured images and recorded sounds are recorded on the SD Memory Card. • Make sure that... the camera is facing toward the LCD monitor and push the card in the direction indicated by the arrow and pull it clicks. 3 Close the battery/card...
... it in the direction indicated by the arrow 1 and flip the cover open 2 . 2 Insert an SD Memory Card so the label (the side with this camera. Slide the battery/card cover in until it out. Captured images and recorded sounds are recorded on the SD Memory Card. • Make sure that... the camera is facing toward the LCD monitor and push the card in the direction indicated by the arrow and pull it clicks. 3 Close the battery/card...
Operation Manual
Page 24
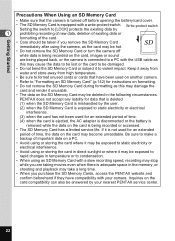
... electrical interference. • Avoid using the camera, as the card may be hot. • Do not remove the SD Memory Card or turn the camera off before opening the battery/card cover. • The SD Memory Card is equipped with your nearest PENTAX service center. 22 Refer to [LOCK] ...protects the existing data by your camera. If it may be exposed to rapid changes in temperature or to format unused cards or cards that have compatibility...
... electrical interference. • Avoid using the camera, as the card may be hot. • Do not remove the SD Memory Card or turn the camera off before opening the battery/card cover. • The SD Memory Card is equipped with your nearest PENTAX service center. 22 Refer to [LOCK] ...protects the existing data by your camera. If it may be exposed to rapid changes in temperature or to format unused cards or cards that have compatibility...

Operation Manual
Page 26
... 1 Power switch Q Playback button Four-way controller OK button MENU button If the Initial Settings screen or Date Adjust screen appears when you turn the camera on, follow the procedure below to select [Language/ ]. If the Initial Settings screen appears: 1p.24, 25 "Setting the Display Language", "Setting the Date and...
... 1 Power switch Q Playback button Four-way controller OK button MENU button If the Initial Settings screen or Date Adjust screen appears when you turn the camera on, follow the procedure below to select [Language/ ]. If the Initial Settings screen appears: 1p.24, 25 "Setting the Display Language", "Setting the Date and...

Operation Manual
Page 28
... if you change the hour. AM/PM switches automatically as you selected [12h] in Step 3. 1 14 Repeat Step 12 and 13 to take pictures. The camera is ready to change the settings after they have finished the settings. If you set the exact time, press the OK button when the time... screen. Press the MENU button. • When you finish the settings and press the OK button, the camera clock is displayed, you can change the minute. 15 Press the OK button when you turn the camera on the TV, radio, etc.) reaches 00 seconds. • When the Initial Settings screen is reset...
... if you change the hour. AM/PM switches automatically as you selected [12h] in Step 3. 1 14 Repeat Step 12 and 13 to take pictures. The camera is ready to change the settings after they have finished the settings. If you set the exact time, press the OK button when the time... screen. Press the MENU button. • When you finish the settings and press the OK button, the camera clock is displayed, you can change the minute. 15 Press the OK button when you turn the camera on the TV, radio, etc.) reaches 00 seconds. • When the Initial Settings screen is reset...


