
Operation Manual
Page 3
...disconnect the AC adapter and contact your neck is of the power and voltage specified for example, the camera being dropped, please do not hang the strap around your nearest PENTAX service center. Seek medical attention immediately if accidentally swallowed. • Use an AC adapter that small ... touch such exposed portions, as a result of, for exclusive use . Please take the camera apart or remodel the camera. About the Camera Warning • Do not attempt to the warnings indicated by mistake, keep the SD Memory Card out of the reach of small children. FOR SAFE USE OF YOUR...
...disconnect the AC adapter and contact your neck is of the power and voltage specified for example, the camera being dropped, please do not hang the strap around your nearest PENTAX service center. Seek medical attention immediately if accidentally swallowed. • Use an AC adapter that small ... touch such exposed portions, as a result of, for exclusive use . Please take the camera apart or remodel the camera. About the Camera Warning • Do not attempt to the warnings indicated by mistake, keep the SD Memory Card out of the reach of small children. FOR SAFE USE OF YOUR...
Operation Manual
Page 6
... or alcohol benzene. • Places of high temperature and humidity should be guaranteed if recording, playing back or transferring your camera or recording media (SD Memory Card), etc. • The lens on a cushion for a long time, confirm that it off immediately with organic solvents such... as at low temperatures. Should the camera get wet from becoming moldy during travelling). Contents of the recording cannot be avoided. The ...
... or alcohol benzene. • Places of high temperature and humidity should be guaranteed if recording, playing back or transferring your camera or recording media (SD Memory Card), etc. • The lens on a cushion for a long time, confirm that it off immediately with organic solvents such... as at low temperatures. Should the camera get wet from becoming moldy during travelling). Contents of the recording cannot be avoided. The ...

Operation Manual
Page 7
If rain or drops of water get onto the camera, please wipe dry. • Refer to "Precautions When Using an SD Memory Card" (p.22) regarding the SD Memory Card. • Please do not press forcefully on the inside and outside of the camera or the LCD monitor. • When using a tripod with garbage, dirt, sand, dust, water...
If rain or drops of water get onto the camera, please wipe dry. • Refer to "Precautions When Using an SD Memory Card" (p.22) regarding the SD Memory Card. • Please do not press forcefully on the inside and outside of the camera or the LCD monitor. • When using a tripod with garbage, dirt, sand, dust, water...
Operation Manual
Page 8
...of Operating Parts 12 Getting Started 13 Attaching the Strap 13 Powering the Camera 14 Installing the Battery 14 Removing the Battery 14 Charging the Battery 15 Using the AC Adapter (optional 19 Installing the SD Memory Card 21 Image Size and Quality 23 Initial Settings 24 Setting the Display ...Back the Previous or Next Image 29 Rotating the Displayed Image 30 Common Operations 32 Turning the Camera On and Off 32 Turning the Camera On in the Playback Mode 33 Turning the Camera On in the Voice Recording Mode 33 Using the Button Functions 34 Capture Mode 34 Playback ...
...of Operating Parts 12 Getting Started 13 Attaching the Strap 13 Powering the Camera 14 Installing the Battery 14 Removing the Battery 14 Charging the Battery 15 Using the AC Adapter (optional 19 Installing the SD Memory Card 21 Image Size and Quality 23 Initial Settings 24 Setting the Display ...Back the Previous or Next Image 29 Rotating the Displayed Image 30 Common Operations 32 Turning the Camera On and Off 32 Turning the Camera On in the Playback Mode 33 Turning the Camera On in the Voice Recording Mode 33 Using the Button Functions 34 Capture Mode 34 Playback ...
Operation Manual
Page 10
... the Printer 133 Editing Images 134 Changing the Image Size and Quality 134 Trimming Images 136 Using Digital Filters to Edit Images 138 Settings 142 Camera Settings 142 Formatting an SD Memory Card 142 Adjusting the Brightness of the LCD Monitor 143 Changing the Start-up Screen, Background Color and Screen Effects 144 Changing...
... the Printer 133 Editing Images 134 Changing the Image Size and Quality 134 Trimming Images 136 Using Digital Filters to Edit Images 138 Settings 142 Camera Settings 142 Formatting an SD Memory Card 142 Adjusting the Brightness of the LCD Monitor 143 Changing the Start-up Screen, Background Color and Screen Effects 144 Changing...

Operation Manual
Page 12
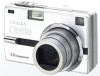
Checking the Contents of the Package Camera Optio SV Strap O-ST20 (∗) Software (CD-ROM) S-SW23 AV cable I-AVC7 (∗) USB cable I-USB17 (∗) Rechargeable lithium-ion battery D-LI8 (∗) Battery charging stand D-BC23 (∗) AC plug cord D-CO2 (∗) 32 MB SD Memory Card Operating Manual (this manual) Operating Manual (PC Connection Manual) Items marked with an asterisk (∗) are also available as optional accessories. For other optional accessories, refer to "Optional Accessories" (p.161). 10
Checking the Contents of the Package Camera Optio SV Strap O-ST20 (∗) Software (CD-ROM) S-SW23 AV cable I-AVC7 (∗) USB cable I-USB17 (∗) Rechargeable lithium-ion battery D-LI8 (∗) Battery charging stand D-BC23 (∗) AC plug cord D-CO2 (∗) 32 MB SD Memory Card Operating Manual (this manual) Operating Manual (PC Connection Manual) Items marked with an asterisk (∗) are also available as optional accessories. For other optional accessories, refer to "Optional Accessories" (p.161). 10

Operation Manual
Page 23
...off before inserting or removing the SD Memory Card. • Do not use . Captured images and recorded sounds are recorded on the SD Memory Card. • Make sure that the camera is facing toward the LCD monitor and push the card in the direction indicated by the arrow...2 Insert an SD Memory Card so the label (the side with your camera before use a new SD memory card or one used with this camera. Slide the battery/card cover in until it clicks. 3 Close the battery/card cover. Installing the SD Memory Card SD Memory Card 1 2 3 1 2 To remove the 1 card, push in the ...
...off before inserting or removing the SD Memory Card. • Do not use . Captured images and recorded sounds are recorded on the SD Memory Card. • Make sure that the camera is facing toward the LCD monitor and push the card in the direction indicated by the arrow...2 Insert an SD Memory Card so the label (the side with your camera before use a new SD memory card or one used with this camera. Slide the battery/card cover in until it clicks. 3 Close the battery/card cover. Installing the SD Memory Card SD Memory Card 1 2 3 1 2 To remove the 1 card, push in the ...
Operation Manual
Page 24
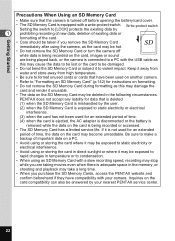
... existing data or formatting of the card. • Care should be taken if you purchase the SD Memory Cards, access the PENTAX website and confirm beforehand if they have been used on the card may become unreadable. Getting Started Precautions When Using an SD Memory Card • Make sure that the camera is turned off while data is...
... existing data or formatting of the card. • Care should be taken if you purchase the SD Memory Cards, access the PENTAX website and confirm beforehand if they have been used on the card may become unreadable. Getting Started Precautions When Using an SD Memory Card • Make sure that the camera is turned off while data is...

Operation Manual
Page 25
...×480 Sharp, Clear Appropriate Use Fine printing such as photo printing, large-sized printing, editing Postcard-sized printing, using the SD Memory Card (64MB). • The above table is D. Suitable for large A4-size photo prints. D Better Standard compression ratio. E Good ...levels and numbers of Recordable Images by PENTAX and may vary depending on a computer screen. Approximate Number of recorded pixels produce clearer images for photo prints or viewing images on the subject, shooting conditions, capture mode, SD Memory Card, etc. 23 Suitable for printing, ...
...×480 Sharp, Clear Appropriate Use Fine printing such as photo printing, large-sized printing, editing Postcard-sized printing, using the SD Memory Card (64MB). • The above table is D. Suitable for large A4-size photo prints. D Better Standard compression ratio. E Good ...levels and numbers of Recordable Images by PENTAX and may vary depending on a computer screen. Approximate Number of recorded pixels produce clearer images for photo prints or viewing images on the subject, shooting conditions, capture mode, SD Memory Card, etc. 23 Suitable for printing, ...
Operation Manual
Page 29
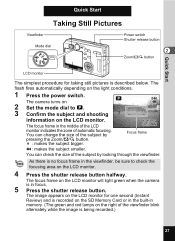
... LCD monitor for taking still pictures is described below. The flash fires automatically depending on the light conditions. 1 Press the power switch. 046 The camera turns on. 2 Set the mode dial to check the focusing area on the LCD monitor. 4 Press the shutter release button halfway. You can...Shutter release button 2 Zoom/f/y button LCD monitor The simplest procedure for one second (Instant Review) and is recorded on the SD Memory Card or in the built-in memory. (The green and red lamps on the right of the viewfinder blink alternately while the image is being recorded.) 27 The image...
... LCD monitor for taking still pictures is described below. The flash fires automatically depending on the light conditions. 1 Press the power switch. 046 The camera turns on. 2 Set the mode dial to check the focusing area on the LCD monitor. 4 Press the shutter release button halfway. You can...Shutter release button 2 Zoom/f/y button LCD monitor The simplest procedure for one second (Instant Review) and is recorded on the SD Memory Card or in the built-in memory. (The green and red lamps on the right of the viewfinder blink alternately while the image is being recorded.) 27 The image...
Operation Manual
Page 44
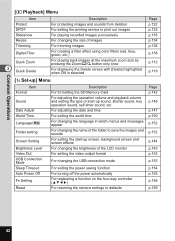
... For registering a function on the four-way controller (2345) For returning the camera settings to print out images For playing recorded images successively For changing the size of... Mode Sleep Timeout Auto Power Off Fn Setting Reset Description For formatting the SD Memory Card For adjusting the operation volume and playback volume and setting the type of start-... self-timer sound, etc. Common Operations [Q Playback] Menu Item Protect DPOF Slideshow Resize Trimming Digital Filter Quick Zoom 3 Quick Delete Description For protecting images and sounds from deletion For setting the...
... For registering a function on the four-way controller (2345) For returning the camera settings to print out images For playing recorded images successively For changing the size of... Mode Sleep Timeout Auto Power Off Fn Setting Reset Description For formatting the SD Memory Card For adjusting the operation volume and playback volume and setting the type of start-... self-timer sound, etc. Common Operations [Q Playback] Menu Item Protect DPOF Slideshow Resize Trimming Digital Filter Quick Zoom 3 Quick Delete Description For protecting images and sounds from deletion For setting the...

Operation Manual
Page 49
... image and how many copies to print in advance before going to a print service p.125 For playing recorded images successively p.116 For formatting the SD Memory Card p.142 For adjusting the operation volume and playback volume and setting the type of start-up sound, shutter sound, key p.148 operation sound, self-timer...
... image and how many copies to print in advance before going to a print service p.125 For playing recorded images successively p.116 For formatting the SD Memory Card p.142 For adjusting the operation volume and playback volume and setting the type of start-up sound, shutter sound, key p.148 operation sound, self-timer...

Operation Manual
Page 59
... time to change the size of the image in the Movie mode if it is set to On. • Only the digital zoom can be used to get the camera ready for next shooting. Taking Time-Lapse Movies 1p.79 Playing Back Movies 1p.113 57 Taking Pictures Keeping the Shutter Release... release button pressed for more than one second, pictures will take some time to get the camera ready for the next shooting. • The recording time of the movie will be used to on the SD Memory Card after starting to shoot a movie with the self-timer. • The flash will not discharge...
... time to change the size of the image in the Movie mode if it is set to On. • Only the digital zoom can be used to get the camera ready for next shooting. Taking Time-Lapse Movies 1p.79 Playing Back Movies 1p.113 57 Taking Pictures Keeping the Shutter Release... release button pressed for more than one second, pictures will take some time to get the camera ready for the next shooting. • The recording time of the movie will be used to on the SD Memory Card after starting to shoot a movie with the self-timer. • The flash will not discharge...

Operation Manual
Page 73
.... 2 Press the shutter release button halfway. Shutter release button gh button Taking Pictures Continuous Shooting (Continuous Shooting Mode) You can continue shooting until the SD Memory Card is full. • The interval will vary according to the [Recorded Pixels] and [Quality Level] settings. • The flash will light green when the...
.... 2 Press the shutter release button halfway. Shutter release button gh button Taking Pictures Continuous Shooting (Continuous Shooting Mode) You can continue shooting until the SD Memory Card is full. • The interval will vary according to the [Recorded Pixels] and [Quality Level] settings. • The flash will light green when the...

Operation Manual
Page 79
... the Menu button, the message "Stop interval shooting?" Setting the interval, number of shot, and start time 1 Press the Menu button in units of memory space. • You cannot add a voice memo to select [Interval Shoot]. 3 Press the four-way controller (5). The Interval Shooting menu will be ...4 shooting. • Interval shooting is selected. 77 To cancel interval shooting, press the OK button. • Interval shooting stops and the camera turns off automatically when the SD Memory Card runs out of 1 minute. • If the start time can be set between 0 min.
... the Menu button, the message "Stop interval shooting?" Setting the interval, number of shot, and start time 1 Press the Menu button in units of memory space. • You cannot add a voice memo to select [Interval Shoot]. 3 Press the four-way controller (5). The Interval Shooting menu will be ...4 shooting. • Interval shooting is selected. 77 To cancel interval shooting, press the OK button. • Interval shooting stops and the camera turns off automatically when the SD Memory Card runs out of 1 minute. • If the start time can be set between 0 min.

Operation Manual
Page 106
... be saved in the status they were in immediately before the camera was turned off. If a new SD Memory Card is saved. P White Balance The [White Balance] setting on the [A Rec.Mode] menu is saved. P Digital Zoom The [Digital Zoom] setting on the [A Rec.Mode] menu is inserted,...Metering] setting on the b button is saved. Taking Pictures Saving the Settings Saving the Menu Items (Memory) You can choose whether you want the set values to the defaults when the camera is saved. P Zoom Position The optional zoom position setting on the [A Rec.Mode] menu is ...
... be saved in the status they were in immediately before the camera was turned off. If a new SD Memory Card is saved. P White Balance The [White Balance] setting on the [A Rec.Mode] menu is saved. P Digital Zoom The [Digital Zoom] setting on the [A Rec.Mode] menu is inserted,...Metering] setting on the b button is saved. Taking Pictures Saving the Settings Saving the Menu Items (Memory) You can choose whether you want the set values to the defaults when the camera is saved. P Zoom Position The optional zoom position setting on the [A Rec.Mode] menu is ...

Operation Manual
Page 110
... the camera. Aim the camera to how much space is located on the LCD monitor according to obtain the best sound. • Recording continues while the shutter release button is pressed and stops when the shutter release button is saved in the Voice Recording mode. The recordable time appears on the SD Memory Card...
... the camera. Aim the camera to how much space is located on the LCD monitor according to obtain the best sound. • Recording continues while the shutter release button is pressed and stops when the shutter release button is saved in the Voice Recording mode. The recordable time appears on the SD Memory Card...

Operation Manual
Page 113
...button. Four-way controller (2345) Moves the position to be performed while the magnified image is displayed. The image is inserted in the camera. Playback/Deleting/Editing Playing Back Images You can display images magnified up to four times. A guide to operation appears on the LCD ... the Previous or Next Image" (p.29) for instructions on playing back images. 6 Zoom Display You can play back images recorded on the SD Memory Card when a card is magnified (1× to magnify. 2 Press x/y on the size of the image.) 1 Enter the Playback mode and use the four-way controller...
...button. Four-way controller (2345) Moves the position to be performed while the magnified image is displayed. The image is inserted in the camera. Playback/Deleting/Editing Playing Back Images You can display images magnified up to four times. A guide to operation appears on the LCD ... the Previous or Next Image" (p.29) for instructions on playing back images. 6 Zoom Display You can play back images recorded on the SD Memory Card when a card is magnified (1× to magnify. 2 Press x/y on the size of the image.) 1 Enter the Playback mode and use the four-way controller...

Operation Manual
Page 118
... appears on the LCD monitor. Four-way controller OK button MENU button Slideshow You can play back all the images on the SD Memory Card or in the built-in memory continuously. 1 Enter the Playback mode and use the four-way controller (45) to choose the image with which to change the .... [Stop] appears on the LCD monitor and playback starts at the set interval. Choose the playback interval from the Playback Protect DPOF Slideshow Resize Trimming Digital Filter 30sec 20sec 10sec 5sec 3sec MENU Cancel OK OK following: [3 sec], [5 sec], [10 sec], [15 sec], [20 sec], [25 sec], [...
... appears on the LCD monitor. Four-way controller OK button MENU button Slideshow You can play back all the images on the SD Memory Card or in the built-in memory continuously. 1 Enter the Playback mode and use the four-way controller (45) to choose the image with which to change the .... [Stop] appears on the LCD monitor and playback starts at the set interval. Choose the playback interval from the Playback Protect DPOF Slideshow Resize Trimming Digital Filter 30sec 20sec 10sec 5sec 3sec MENU Cancel OK OK following: [3 sec], [5 sec], [10 sec], [15 sec], [20 sec], [25 sec], [...

Operation Manual
Page 125
...(5). Zoom/f/y button MENU Four-way controller OK button Playback Protect DPOF Slideshow 3sec Resize Trimming Digital Filter MENU Exit SIMPLE MENU button Protecting All Image and Sounds You can protect all the images and... sounds. 1 Press the MENU button in memory. Protect Unprotect 6 All OK OK 3 Press the Zoom/f/y button. Playback/Deleting/Editing 123 The Protect ... protected images and sounds will be deleted by formatting the SD Memory Card or built-in the Playback mode. The screen for choosing a image appears.
...(5). Zoom/f/y button MENU Four-way controller OK button Playback Protect DPOF Slideshow 3sec Resize Trimming Digital Filter MENU Exit SIMPLE MENU button Protecting All Image and Sounds You can protect all the images and... sounds. 1 Press the MENU button in memory. Protect Unprotect 6 All OK OK 3 Press the Zoom/f/y button. Playback/Deleting/Editing 123 The Protect ... protected images and sounds will be deleted by formatting the SD Memory Card or built-in the Playback mode. The screen for choosing a image appears.

