User Manual
Page 4
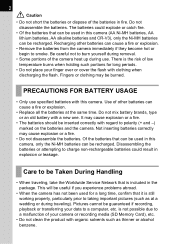
... for long periods. • Do not place your finger over or cover the flash with organic solvents such as at the same time. is included in the package. The batteries could result in this camera (AA Ni-MH batteries, AA lithium batteries, AA alkaline batteries and CR-V3),... to smoke. Of the batteries that can be guaranteed if recording, playback or transferring your camera or recording media (SD Memory Card), etc. • Do not clean the product with clothing when discharging the flash. PRECAUTIONS FOR BATTERY USAGE • Only use . Pictures cannot be recharged. Fingers or...
... for long periods. • Do not place your finger over or cover the flash with organic solvents such as at the same time. is included in the package. The batteries could result in this camera (AA Ni-MH batteries, AA lithium batteries, AA alkaline batteries and CR-V3),... to smoke. Of the batteries that can be guaranteed if recording, playback or transferring your camera or recording media (SD Memory Card), etc. • Do not clean the product with clothing when discharging the flash. PRECAUTIONS FOR BATTERY USAGE • Only use . Pictures cannot be recharged. Fingers or...
User Manual
Page 7
... the Shooting Scene 51 Using a Zoom Lens 53 Using the Built-in Flash 54 Other Shooting Modes 58 Continuous Shooting 58 Self-Timer Shooting 60 Remote Control Shooting (Remote Control F: Sold Separately) ........64 Using Mirror Up Function to Prevent Camera Shake 67 Playing Back Still Pictures 68 Playing Back Images 68 Enlarging...
... the Shooting Scene 51 Using a Zoom Lens 53 Using the Built-in Flash 54 Other Shooting Modes 58 Continuous Shooting 58 Self-Timer Shooting 60 Remote Control Shooting (Remote Control F: Sold Separately) ........64 Using Mirror Up Function to Prevent Camera Shake 67 Playing Back Still Pictures 68 Playing Back Images 68 Enlarging...
User Manual
Page 9
...DA, D FA , FA J, FA and F Lens Compatibility with the Built-in Flash 158 Using an External Flash (Optional 160 Settings During Playback 167 Changing Playback Display Method 167 Setting the Slideshow Display Interval 168 Camera Settings 169 Formatting the SD Memory Card 169 Turning the Beep On and Off 170 ... 175 Setting Auto Power Off 176 Selecting the Folder Name 176 Resetting the File Number 177 Setting the Display Instant Review and Digital Preview 177 Resetting to Default Settings 179 Resetting Rec. Mode/Playback/Set-up Menu 179 Resetting the Custom Function Menu 180
...DA, D FA , FA J, FA and F Lens Compatibility with the Built-in Flash 158 Using an External Flash (Optional 160 Settings During Playback 167 Changing Playback Display Method 167 Setting the Slideshow Display Interval 168 Camera Settings 169 Formatting the SD Memory Card 169 Turning the Beep On and Off 170 ... 175 Setting Auto Power Off 176 Selecting the Folder Name 176 Resetting the File Number 177 Setting the Display Instant Review and Digital Preview 177 Resetting to Default Settings 179 Resetting Rec. Mode/Playback/Set-up Menu 179 Resetting the Custom Function Menu 180
User Manual
Page 17
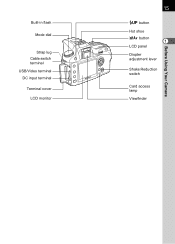
Built-in flash Mode dial Strap lug Cable switch terminal USB/Video terminal DC input terminal Terminal cover LCD monitor 15 K button Hot shoe mc button 1 LCD panel Diopter adjustment lever Shake Reduction switch Card access lamp Viewfinder Before Using Your Camera
Built-in flash Mode dial Strap lug Cable switch terminal USB/Video terminal DC input terminal Terminal cover LCD monitor 15 K button Hot shoe mc button 1 LCD panel Diopter adjustment lever Shake Reduction switch Card access lamp Viewfinder Before Using Your Camera
User Manual
Page 18
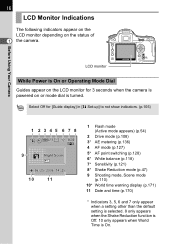
S 1600 9 Night Scene 06 / 25 / 2006 14 : 25 10 11 1 Flash mode (Active mode appears) (p.54) 2 Drive mode (p.108) 3* AE metering (p.136) 4 AF mode (p.127) 5* AF point switching (p.128) 6* White balance (p.118) 7* Sensitivity (p.121) 8* Shake Reduction .... 16 LCD Monitor Indications The following indicators appear on the LCD monitor depending on or mode dial is turned. Select Off for 3 seconds when the camera is powered on the status of 1 the camera. Before Using Your Camera LCD monitor While Power is On.
S 1600 9 Night Scene 06 / 25 / 2006 14 : 25 10 11 1 Flash mode (Active mode appears) (p.54) 2 Drive mode (p.108) 3* AE metering (p.136) 4 AF mode (p.127) 5* AF point switching (p.128) 6* White balance (p.118) 7* Sensitivity (p.121) 8* Shake Reduction .... 16 LCD Monitor Indications The following indicators appear on the LCD monitor depending on or mode dial is turned. Select Off for 3 seconds when the camera is powered on the status of 1 the camera. Before Using Your Camera LCD monitor While Power is On.
User Manual
Page 19
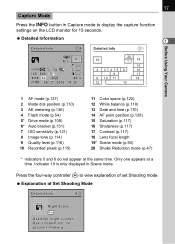
... 06 / 25 / 2006 14 : 25 20 19 1 14 15 2 3456 16 7 8 17 9 10 11 18 12 13 Before Using Your Camera 1 AF mode (p.127) 2 Mode dial position (p.110) 3 AE metering (p.136) 4 Flash mode (p.54) 5* Drive mode (p.108) 6* Auto bracket (p.151) 7 ISO sensitivity (p.121) 8 Image tone (p.114) 9 Quality level (p.116) 10 Recorded pixels...
... 06 / 25 / 2006 14 : 25 20 19 1 14 15 2 3456 16 7 8 17 9 10 11 18 12 13 Before Using Your Camera 1 AF mode (p.127) 2 Mode dial position (p.110) 3 AE metering (p.136) 4 Flash mode (p.54) 5* Drive mode (p.108) 6* Auto bracket (p.151) 7 ISO sensitivity (p.121) 8 Image tone (p.114) 9 Quality level (p.116) 10 Recorded pixels...
User Manual
Page 20
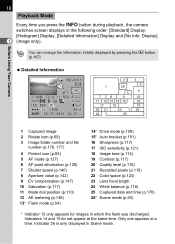
You can change the information initially displayed by pressing the Q button. (p.167) Before Using Your Camera Detailed Information 100-0001 AF. S 1 / 2000 F2 . 8 + 1 . 5EV ISO 800 sRGB 40mm 06 / 25 / 2006 14 : 25 2 1 26 5 7 8 9 11 12 13 14 15 17 ... information (p.128) 7 Shutter speed (p.140) 8 Aperture value (p.142) 9 EV compensation (p.147) 10 Saturation (p.117) 11 Mode dial position (p.110) 12 AE metering (p.136) 13* Flash mode (p.54) 14* Drive mode (p.108) 15* Auto bracket (p.151) 16 Sharpness (p.117) 17 ISO sensitivity (p.121) 18 Image tone (p.114) 19 Contrast (p.117) 20...
You can change the information initially displayed by pressing the Q button. (p.167) Before Using Your Camera Detailed Information 100-0001 AF. S 1 / 2000 F2 . 8 + 1 . 5EV ISO 800 sRGB 40mm 06 / 25 / 2006 14 : 25 2 1 26 5 7 8 9 11 12 13 14 15 17 ... information (p.128) 7 Shutter speed (p.140) 8 Aperture value (p.142) 9 EV compensation (p.147) 10 Saturation (p.117) 11 Mode dial position (p.110) 12 AE metering (p.136) 13* Flash mode (p.54) 14* Drive mode (p.108) 15* Auto bracket (p.151) 16 Sharpness (p.117) 17 ISO sensitivity (p.121) 18 Image tone (p.114) 19 Contrast (p.117) 20...
User Manual
Page 22
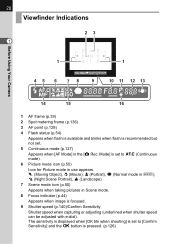
20 Viewfinder Indications 23 1 1 1 45 6 7 8 9 10 11 12 13 Before Using Your Camera 14 15 16 1 AF frame (p.39) 2 Spot metering frame (p.136) 3 AF point (p.128) 4 Flash status (p.54) Appears when flash is available and blinks when flash is pressed. (p.126) The sensitivity is displayed when [OK btn when shooting] is set to [Confirm Sensitivity...
20 Viewfinder Indications 23 1 1 1 45 6 7 8 9 10 11 12 13 Before Using Your Camera 14 15 16 1 AF frame (p.39) 2 Spot metering frame (p.136) 3 AF point (p.128) 4 Flash status (p.54) Appears when flash is available and blinks when flash is pressed. (p.126) The sensitivity is displayed when [OK btn when shooting] is set to [Confirm Sensitivity...

User Manual
Page 23
... used for autofocus lightens superimposed when the shutter release button is pressed halfway. (p.128) • When [OK btn when shooting] is shown. Before Using Your Camera 12 Number of recordable images/EV compensation Show the number of recordable images with the appropriate exposure value appears if exposure mode is a. (p.144) 13... recordable images is set to [Confirm Sensitivity] in the [A Custom Setting] menu, press the 4 button to display the sensitivity in use. Blinks slowly when compensating flash output. 1 Blinks quickly when compensating exposure and...
... used for autofocus lightens superimposed when the shutter release button is pressed halfway. (p.128) • When [OK btn when shooting] is shown. Before Using Your Camera 12 Number of recordable images/EV compensation Show the number of recordable images with the appropriate exposure value appears if exposure mode is a. (p.144) 13... recordable images is set to [Confirm Sensitivity] in the [A Custom Setting] menu, press the 4 button to display the sensitivity in use. Blinks slowly when compensating flash output. 1 Blinks quickly when compensating exposure and...
User Manual
Page 24
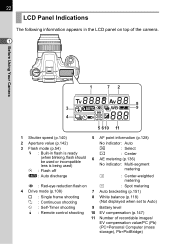
... following information appears in the LCD panel on top of the camera. 1 Before Using Your Camera 1 72 8 3 9 4 5 610 11 1 Shutter speed (p.140) 5 AF point information (p.128) 2 Aperture value (p.142) No indicator: Auto 3 Flash mode (p.54) V : Select b : Built-in flash is ready M : Center (when blinking, flash should be used or incompatible lens is being used) 6 AE...
... following information appears in the LCD panel on top of the camera. 1 Before Using Your Camera 1 72 8 3 9 4 5 610 11 1 Shutter speed (p.140) 5 AF point information (p.128) 2 Aperture value (p.142) No indicator: Auto 3 Flash mode (p.54) V : Select b : Built-in flash is ready M : Center (when blinking, flash should be used or incompatible lens is being used) 6 AE...
User Manual
Page 29
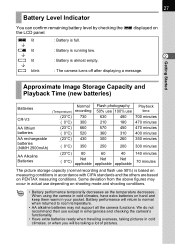
...Playback time 700 minutes 470 minutes 470 minutes 400 minutes 350 minutes 300 minutes 140 minutes 70 minutes The picture storage capacity (normal recording and flash use depending on the LCD panel. { lit ¶ : Battery is full. } lit : Battery is running low. ¶ 2... traveling overseas, taking pictures in actual use 50%) is almost empty. ¶ ? blink : The camera turns off after displaying a message. lit : Battery is based on PENTAX measuring conditions. 27 Battery Level Indicator You can confirm remaining battery level by checking the { displayed on shooting...
...Playback time 700 minutes 470 minutes 470 minutes 400 minutes 350 minutes 300 minutes 140 minutes 70 minutes The picture storage capacity (normal recording and flash use depending on the LCD panel. { lit ¶ : Battery is full. } lit : Battery is running low. ¶ 2... traveling overseas, taking pictures in actual use 50%) is almost empty. ¶ ? blink : The camera turns off after displaying a message. lit : Battery is based on PENTAX measuring conditions. 27 Battery Level Indicator You can confirm remaining battery level by checking the { displayed on shooting...
User Manual
Page 43
... 47 Selecting the Appropriate Capturing Mode for Scenes 50 Using a Zoom Lens 53 Using the Built-in Flash 54 Other Shooting Modes 58 Playing Back Still Pictures 68 Connecting the Camera to ensure successful capturing. Flash OFF mode) and Scene mode to AV Equipment .........75 Processing Images with Filters 76 Deleting Images 79...
... 47 Selecting the Appropriate Capturing Mode for Scenes 50 Using a Zoom Lens 53 Using the Built-in Flash 54 Other Shooting Modes 58 Playing Back Still Pictures 68 Connecting the Camera to ensure successful capturing. Flash OFF mode) and Scene mode to AV Equipment .........75 Processing Images with Filters 76 Deleting Images 79...
User Manual
Page 46
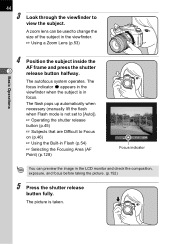
.... The focus indicator ] appears in focus. The picture is in the viewfinder when the subject is taken. The flash pops up automatically when necessary (manually lift the flash when Flash mode is not set to [Auto]). 1 Operating the shutter release button (p.45) 1 Subjects that are Difficult to...before taking the picture. (p.152) 5 Press the shutter release button fully. A zoom lens can be used to Focus on (p.46) 1 Using the Built-in Flash (p.54) 1 Selecting the Focusing Area (AF Point) (p.128) Focus indicator You can preview the image in the viewfinder. 1 Using a Zoom Lens (p.53)...
.... The focus indicator ] appears in focus. The picture is in the viewfinder when the subject is taken. The flash pops up automatically when necessary (manually lift the flash when Flash mode is not set to [Auto]). 1 Operating the shutter release button (p.45) 1 Subjects that are Difficult to...before taking the picture. (p.152) 5 Press the shutter release button fully. A zoom lens can be used to Focus on (p.46) 1 Using the Built-in Flash (p.54) 1 Selecting the Focusing Area (AF Point) (p.128) Focus indicator You can preview the image in the viewfinder. 1 Using a Zoom Lens (p.53)...
User Manual
Page 50
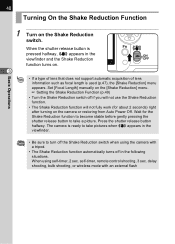
... the viewfinder. • Be sure to take a picture. When the shutter release button is pressed halfway, k appears in the following situations. When using the camera with an external flash 48 Turning On the Shake Reduction Function Basic Operations 1 3 Turn on . • If a type of lens that does not support automatic acquisition of...
... the viewfinder. • Be sure to take a picture. When the shutter release button is pressed halfway, k appears in the following situations. When using the camera with an external flash 48 Turning On the Shake Reduction Function Basic Operations 1 3 Turn on . • If a type of lens that does not support automatic acquisition of...
User Manual
Page 52
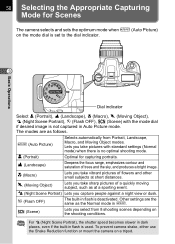
... indicator. 3 Basic Operations Dial indicator Select = (Portrait), s (Landscape), q (Macro), \ (Moving Object), . (Night Scene Portrait), a (Flash OFF), H (Scene) with standard settings (Normal mode) when there is deactivated. The modes are the same as follows. Optimal for Scenes The camera selects and sets the optimum mode when I (Auto Picture) on a tripod. I . s (Landscape) Deepens the...
... indicator. 3 Basic Operations Dial indicator Select = (Portrait), s (Landscape), q (Macro), \ (Moving Object), . (Night Scene Portrait), a (Flash OFF), H (Scene) with standard settings (Normal mode) when there is deactivated. The modes are the same as follows. Optimal for Scenes The camera selects and sets the optimum mode when I (Auto Picture) on a tripod. I . s (Landscape) Deepens the...
User Manual
Page 53
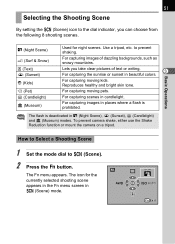
... can choose from the following 8 shooting scenes. For capturing scenes in A (Night Scene), K (Sunset), D (Candlelight) and E (Museum) modes. The flash is prohibited. Use a tripod, etc. For capturing moving kids. For capturing images of text or writing. 3 For capturing the sunrise or sunset in beautiful colors... Shooting Scene 1 Set the mode dial to prevent shaking. The icon for night scenes. To prevent camera shake, either use the Shake Reduction function or mount the camera on a tripod. OK AUTO Fn Exit 51 Selecting the Shooting Scene By setting the H (Scene)...
... can choose from the following 8 shooting scenes. For capturing scenes in A (Night Scene), K (Sunset), D (Candlelight) and E (Museum) modes. The flash is prohibited. Use a tripod, etc. For capturing moving kids. For capturing images of text or writing. 3 For capturing the sunrise or sunset in beautiful colors... Shooting Scene 1 Set the mode dial to prevent shaking. The icon for night scenes. To prevent camera shake, either use the Shake Reduction function or mount the camera on a tripod. OK AUTO Fn Exit 51 Selecting the Shooting Scene By setting the H (Scene)...
User Manual
Page 56
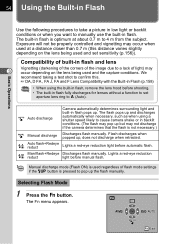
... controlled and vignetting may 3 occur depending on the lens being used and set aperture lens ring to cause camera shake or in flash is not necessary.) h Manual discharge Discharges flash manually. 54 Using the Built-in Flash Basic Operations Use the following procedures to take a picture in low light or backlit conditions or when...
... controlled and vignetting may 3 occur depending on the lens being used and set aperture lens ring to cause camera shake or in flash is not necessary.) h Manual discharge Discharges flash manually. 54 Using the Built-in Flash Basic Operations Use the following procedures to take a picture in low light or backlit conditions or when...

User Manual
Page 57
... If Auto discharge is set , E appears on the LCD panel. The Flash options screen appears. 55 Flash Mode Auto discharge When the mode dial is set to take a picture. The camera is selected in flash pops up . The built-in H (Scene) mode. 2 Press the ...shutter release button halfway. 2 Press the four-way controller (n). The flash is deactivated when A (Night Scene), K (Sunset), D (Candlelight) or E (Museum) is ready ...
... If Auto discharge is set , E appears on the LCD panel. The Flash options screen appears. 55 Flash Mode Auto discharge When the mode dial is set to take a picture. The camera is selected in flash pops up . The built-in H (Scene) mode. 2 Press the ...shutter release button halfway. 2 Press the four-way controller (n). The flash is deactivated when A (Night Scene), K (Sunset), D (Candlelight) or E (Museum) is ready ...
User Manual
Page 58
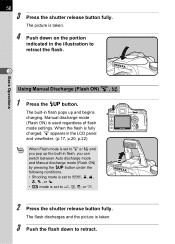
... fully charged, h appears in the LCD panel and viewfinder. (p.17, p.20, p.22) When Flash mode is set to g or i and you can switch between Auto discharge mode and Manual discharge mode (Flash ON) by pressing the K button under the following conditions. • Shooting mode is set to I, =, s, q, ...\, or .. • H mode is taken. 3 Push the flash down on the portion indicated in flash pops up the built-in flash, you pop up and begins charging. Manual discharge mode (Flash ON) is taken. 4 Push down to i, B, C, or E. 2 Press the shutter release button fully....
... fully charged, h appears in the LCD panel and viewfinder. (p.17, p.20, p.22) When Flash mode is set to g or i and you can switch between Auto discharge mode and Manual discharge mode (Flash ON) by pressing the K button under the following conditions. • Shooting mode is set to I, =, s, q, ...\, or .. • H mode is taken. 3 Push the flash down on the portion indicated in flash pops up the built-in flash, you pop up and begins charging. Manual discharge mode (Flash ON) is taken. 4 Push down to i, B, C, or E. 2 Press the shutter release button fully....
User Manual
Page 59
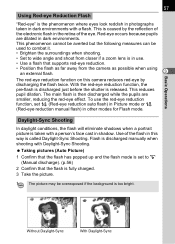
... where eyes look reddish in photographs taken in use the red-eye reduction function, set to wide angle and shoot from the camera as possible when using an external flash. 3 The red-eye reduction function on this way is called Daylight-Sync Shooting. This phenomenon cannot be averted but the following measures...
... where eyes look reddish in photographs taken in use the red-eye reduction function, set to wide angle and shoot from the camera as possible when using an external flash. 3 The red-eye reduction function on this way is called Daylight-Sync Shooting. This phenomenon cannot be averted but the following measures...