User Manual
Page 1
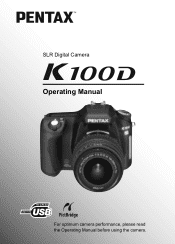
SLR Digital Camera Operating Manual For optimum camera performance, please read the Operating Manual before using the camera.
SLR Digital Camera Operating Manual For optimum camera performance, please read the Operating Manual before using the camera.

User Manual
Page 2
...this manual safe, as it can be used without permission according to their respective owners. PRINT Image Matching enabled digital still cameras, printers and software help photographers to produce images more faithful to the rights as installations generating strong electromagnetic radiation ... unified standard for the direct printout of items on taking pictures even for purchasing the PENTAX q Digital Camera. The PRINT Image Matching logo is a trademark of all the camera's capabilities. Please read this manual are not PRINT Image Matching III compliant. PRINT Image...
...this manual safe, as it can be used without permission according to their respective owners. PRINT Image Matching enabled digital still cameras, printers and software help photographers to produce images more faithful to the rights as installations generating strong electromagnetic radiation ... unified standard for the direct printout of items on taking pictures even for purchasing the PENTAX q Digital Camera. The PRINT Image Matching logo is a trademark of all the camera's capabilities. Please read this manual are not PRINT Image Matching III compliant. PRINT Image...
User Manual
Page 3
... the exclusive AC adapter with the telephoto lens may damage your nearest PENTAX service center. Seek medical attention immediately if a memory card is accidentally...small children. There is dangerous. Using an AC adapter not exclusive to dropping or otherwise damaging the camera, never touch the exposed portion. Take care that small children do not hang the strap over their ...necks. • Do not look directly at the sun through the camera with the telephoto lens attached, as smoke or a strange odor, stop use immediately, remove the batteries or...
... the exclusive AC adapter with the telephoto lens may damage your nearest PENTAX service center. Seek medical attention immediately if a memory card is accidentally...small children. There is dangerous. Using an AC adapter not exclusive to dropping or otherwise damaging the camera, never touch the exposed portion. Take care that small children do not hang the strap over their ...necks. • Do not look directly at the sun through the camera with the telephoto lens attached, as smoke or a strange odor, stop use immediately, remove the batteries or...
User Manual
Page 4
...properly, particularly prior to taking important pictures (such as thinner or alcohol benzene. Fingers or clothing may be recharged. Use of the camera heat up during traveling). It may cause explosion or a fire. • Do not disassemble the batteries. Do not disassemble the ...batteries. Not inserting batteries correctly may cause explosion or a fire. • The batteries should be guaranteed if recording, playback or transferring your camera or recording media (SD Memory Card), etc. • Do not clean the product with a new one. Recharging other batteries can be...
...properly, particularly prior to taking important pictures (such as thinner or alcohol benzene. Fingers or clothing may be recharged. Use of the camera heat up during traveling). It may cause explosion or a fire. • Do not disassemble the batteries. Do not disassemble the ...batteries. Not inserting batteries correctly may cause explosion or a fire. • The batteries should be guaranteed if recording, playback or transferring your camera or recording media (SD Memory Card), etc. • Do not clean the product with a new one. Recharging other batteries can be...
User Manual
Page 5
... remove dust accumulated on the lens or viewfinder. Use a cushion to the PENTAX PHOTO Browser 3/PENTAX PHOTO Laboratory 3 Operating Manual (Windows users: p.9, Mac OS users: p.10) for camera use a spray blower for your bag or a plastic bag, removing the camera after temperature of motorcycles, automobiles, or ships. • The temperature range for more slowly...
... remove dust accumulated on the lens or viewfinder. Use a cushion to the PENTAX PHOTO Browser 3/PENTAX PHOTO Laboratory 3 Operating Manual (Windows users: p.9, Mac OS users: p.10) for camera use a spray blower for your bag or a plastic bag, removing the camera after temperature of motorcycles, automobiles, or ships. • The temperature range for more slowly...
User Manual
Page 6
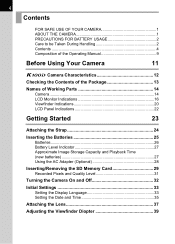
... be Taken During Handling 2 Contents 4 Composition of the Operating Manual 9 Before Using Your Camera 11 q Camera Characteristics 12 Checking the Contents of the Package 13 Names of Working Parts 14 Camera 14 LCD Monitor Indications 16 Viewfinder Indications 20 LCD Panel Indications 22 Getting Started 23 Attaching ...27 Using the AC Adapter (Optional 28 Inserting/Removing the SD Memory Card 29 Recorded Pixels and Quality Level 31 Turning the Camera On and Off 32 Initial Settings 33 Setting the Display Language 33 Setting the Date and Time 35 Attaching the Lens 37 Adjusting...
... be Taken During Handling 2 Contents 4 Composition of the Operating Manual 9 Before Using Your Camera 11 q Camera Characteristics 12 Checking the Contents of the Package 13 Names of Working Parts 14 Camera 14 LCD Monitor Indications 16 Viewfinder Indications 20 LCD Panel Indications 22 Getting Started 23 Attaching ...27 Using the AC Adapter (Optional 28 Inserting/Removing the SD Memory Card 29 Recorded Pixels and Quality Level 31 Turning the Camera On and Off 32 Initial Settings 33 Setting the Display Language 33 Setting the Date and Time 35 Attaching the Lens 37 Adjusting...
User Manual
Page 7
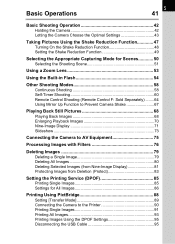
...Continuous Shooting 58 Self-Timer Shooting 60 Remote Control Shooting (Remote Control F: Sold Separately) ........64 Using Mirror Up Function to Prevent Camera Shake 67 Playing Back Still Pictures 68 Playing Back Images 68 Enlarging Playback Images 70 Nine-Image Display 71 Slideshow 73 Connecting the... (DPOF 85 Printing Single Images 85 Settings for All Images 86 Printing Using PictBridge 88 Setting [Transfer Mode 89 Connecting the Camera to the Printer 90 Printing Single Images 91 Printing All Images 93 Printing Images Using the DPOF Settings 95 Disconnecting the USB Cable ...
...Continuous Shooting 58 Self-Timer Shooting 60 Remote Control Shooting (Remote Control F: Sold Separately) ........64 Using Mirror Up Function to Prevent Camera Shake 67 Playing Back Still Pictures 68 Playing Back Images 68 Enlarging Playback Images 70 Nine-Image Display 71 Slideshow 73 Connecting the... (DPOF 85 Printing Single Images 85 Settings for All Images 86 Printing Using PictBridge 88 Setting [Transfer Mode 89 Connecting the Camera to the Printer 90 Printing Single Images 91 Printing All Images 93 Printing Images Using the DPOF Settings 95 Disconnecting the USB Cable ...
User Manual
Page 9
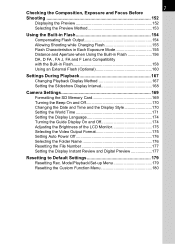
...-in Flash 158 Using an External Flash (Optional 160 Settings During Playback 167 Changing Playback Display Method 167 Setting the Slideshow Display Interval 168 Camera Settings 169 Formatting the SD Memory Card 169 Turning the Beep On and Off 170 Changing the Date and Time and the Display Style 170... Output Format 175 Setting Auto Power Off 176 Selecting the Folder Name 176 Resetting the File Number 177 Setting the Display Instant Review and Digital Preview 177 Resetting to Default Settings 179 Resetting Rec. Mode/Playback/Set-up Menu 179 Resetting the Custom Function Menu 180
...-in Flash 158 Using an External Flash (Optional 160 Settings During Playback 167 Changing Playback Display Method 167 Setting the Slideshow Display Interval 168 Camera Settings 169 Formatting the SD Memory Card 169 Turning the Beep On and Off 170 Changing the Date and Time and the Display Style 170... Output Format 175 Setting Auto Power Off 176 Selecting the Folder Name 176 Resetting the File Number 177 Setting the Display Instant Review and Digital Preview 177 Resetting to Default Settings 179 Resetting Rec. Mode/Playback/Set-up Menu 179 Resetting the Custom Function Menu 180
User Manual
Page 11
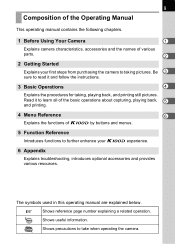
... and provides various resources. Shows precautions to take when operating the camera. Shows useful information. 9 Composition of the Operating Manual This operating manual contains the following chapters. 1 Before Using Your Camera 1 Explains camera characteristics, accessories and the names of q by buttons and menus.... 5 Function Reference Introduces functions to further enhance your first steps from purchasing the camera to taking , playing back, and printing still pictures. The symbols used in this operating manual are explained below. 1 Shows...
... and provides various resources. Shows precautions to take when operating the camera. Shows useful information. 9 Composition of the Operating Manual This operating manual contains the following chapters. 1 Before Using Your Camera 1 Explains camera characteristics, accessories and the names of q by buttons and menus.... 5 Function Reference Introduces functions to further enhance your first steps from purchasing the camera to taking , playing back, and printing still pictures. The symbols used in this operating manual are explained below. 1 Shows...
User Manual
Page 13
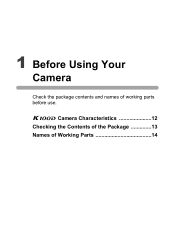
q Camera Characteristics 12 Checking the Contents of the Package 13 Names of working parts before use. 1 Before Using Your Camera Check the package contents and names of Working Parts 14
q Camera Characteristics 12 Checking the Contents of the Package 13 Names of working parts before use. 1 Before Using Your Camera Check the package contents and names of Working Parts 14
User Manual
Page 14
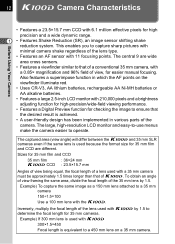
... monitor with 210,000 pixels and a brightness adjusting function for high-precision/wide-field viewing performance. • Features a Digital Preview function for 35 mm cameras. The captured area (view angle) will differ between the q and 35 mm SLR cameras even if the same lens is equivalent to that of a conventional 35 mm... camera, with a 0.85× magnification and 96% field of view, for 35 mm film and CCD are different. To obtain an angle of ...
... monitor with 210,000 pixels and a brightness adjusting function for high-precision/wide-field viewing performance. • Features a Digital Preview function for 35 mm cameras. The captured area (view angle) will differ between the q and 35 mm SLR cameras even if the same lens is equivalent to that of a conventional 35 mm... camera, with a 0.85× magnification and 96% field of view, for 35 mm film and CCD are different. To obtain an angle of ...
User Manual
Page 15
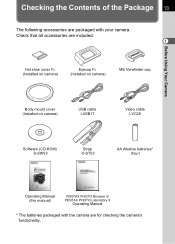
... 13 The following accessories are packaged with the camera are included. 1 Hot shoe cover FK (Installed on camera) Eyecup FO (Installed on camera) ME Viewfinder cap Before Using Your Camera Body mount cover (Installed on camera) USB cable I-USB17 Video cable I-VC28 Software... (CD-ROM) S-SW53 Strap O-ST53 AA Alkaline batteries* (four) Operating Manual (this manual) PENTAX PHOTO Browser 3/ PENTAX PHOTO ...
... 13 The following accessories are packaged with the camera are included. 1 Hot shoe cover FK (Installed on camera) Eyecup FO (Installed on camera) ME Viewfinder cap Before Using Your Camera Body mount cover (Installed on camera) USB cable I-USB17 Video cable I-VC28 Software... (CD-ROM) S-SW53 Strap O-ST53 AA Alkaline batteries* (four) Operating Manual (this manual) PENTAX PHOTO Browser 3/ PENTAX PHOTO ...
User Manual
Page 16
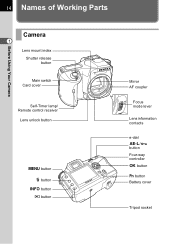
14 Names of Working Parts Before Using Your Camera Camera 1 Lens mount index Shutter release button Main switch Card cover Self-Timer lamp/ Remote control receiver Lens unlock button 3 button i button M button Q button Mirror AF coupler Focus mode lever Lens information contacts e-dial L/Z button Four-way controller 4 button { button Battery cover Tripod socket
14 Names of Working Parts Before Using Your Camera Camera 1 Lens mount index Shutter release button Main switch Card cover Self-Timer lamp/ Remote control receiver Lens unlock button 3 button i button M button Q button Mirror AF coupler Focus mode lever Lens information contacts e-dial L/Z button Four-way controller 4 button { button Battery cover Tripod socket
User Manual
Page 17
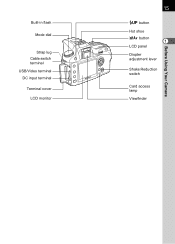
Built-in flash Mode dial Strap lug Cable switch terminal USB/Video terminal DC input terminal Terminal cover LCD monitor 15 K button Hot shoe mc button 1 LCD panel Diopter adjustment lever Shake Reduction switch Card access lamp Viewfinder Before Using Your Camera
Built-in flash Mode dial Strap lug Cable switch terminal USB/Video terminal DC input terminal Terminal cover LCD monitor 15 K button Hot shoe mc button 1 LCD panel Diopter adjustment lever Shake Reduction switch Card access lamp Viewfinder Before Using Your Camera
User Manual
Page 18
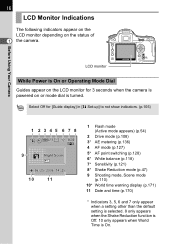
... Time is turned. 16 LCD Monitor Indications The following indicators appear on the LCD monitor depending on or mode dial is On. Before Using Your Camera LCD monitor While Power is On or Operating Mode Dial Guides appear on the LCD monitor for [Guide display] in [H Set-up] to not show...
... Time is turned. 16 LCD Monitor Indications The following indicators appear on the LCD monitor depending on or mode dial is On. Before Using Your Camera LCD monitor While Power is On or Operating Mode Dial Guides appear on the LCD monitor for [Guide display] in [H Set-up] to not show...
User Manual
Page 19
... seconds. S ISO 800 sRGB 40mm 06 / 25 / 2006 14 : 25 20 19 1 14 15 2 3456 16 7 8 17 9 10 11 18 12 13 Before Using Your Camera 1 AF mode (p.127) 2 Mode dial position (p.110) 3 AE metering (p.136) 4 Flash mode (p.54) 5* Drive mode (p.108) 6* Auto bracket (p.151) 7 ISO sensitivity (p.121) 8 Image tone (p.114...
... seconds. S ISO 800 sRGB 40mm 06 / 25 / 2006 14 : 25 20 19 1 14 15 2 3456 16 7 8 17 9 10 11 18 12 13 Before Using Your Camera 1 AF mode (p.127) 2 Mode dial position (p.110) 3 AE metering (p.136) 4 Flash mode (p.54) 5* Drive mode (p.108) 6* Auto bracket (p.151) 7 ISO sensitivity (p.121) 8 Image tone (p.114...
User Manual
Page 20
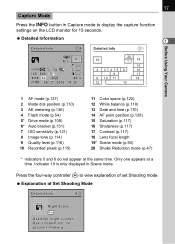
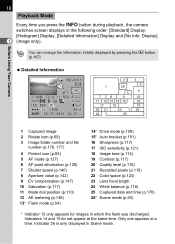
... same time. You can change the information initially displayed by pressing the Q button. (p.167) Before Using Your Camera Detailed Information 100-0001 AF. 18 Playback Mode Every time you press the M button during playback, the camera switches screen displays in the following order: [Standard] Display, [Histogram] Display, [Detailed Information] Display and [No...
... same time. You can change the information initially displayed by pressing the Q button. (p.167) Before Using Your Camera Detailed Information 100-0001 AF. 18 Playback Mode Every time you press the M button during playback, the camera switches screen displays in the following order: [Standard] Display, [Histogram] Display, [Detailed Information] Display and [No...

User Manual
Page 21
19 Histogram Display 1 2 100-0046 3 1 Before Using Your Camera 4 1 Capture quality (Image file type) 2 Image folder number and file number (p.176, p.177) 3 Protect icon (p.83) 4 Histogram (p.167) • Areas where blooming overexposure occurred blink if [Bright Portion] warning is set to On in [Plybk dsply mthd] in the [Q Playback] menu. (p.167) • Press the four-way controller (mn) in the histogram display to move the histogram display position up or down.
19 Histogram Display 1 2 100-0046 3 1 Before Using Your Camera 4 1 Capture quality (Image file type) 2 Image folder number and file number (p.176, p.177) 3 Protect icon (p.83) 4 Histogram (p.167) • Areas where blooming overexposure occurred blink if [Bright Portion] warning is set to On in [Plybk dsply mthd] in the [Q Playback] menu. (p.167) • Press the four-way controller (mn) in the histogram display to move the histogram display position up or down.
User Manual
Page 22
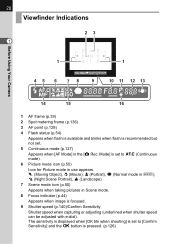
... Portrait), s (Landscape) 7 Scene mode icon (p.50) Appears when taking pictures in the [A Rec. 20 Viewfinder Indications 23 1 1 1 45 6 7 8 9 10 11 12 13 Before Using Your Camera 14 15 16 1 AF frame (p.39) 2 Spot metering frame (p.136) 3 AF point (p.128) 4 Flash status (p.54) Appears when flash is available and blinks when flash...
... Portrait), s (Landscape) 7 Scene mode icon (p.50) Appears when taking pictures in the [A Rec. 20 Viewfinder Indications 23 1 1 1 45 6 7 8 9 10 11 12 13 Before Using Your Camera 14 15 16 1 AF frame (p.39) 2 Spot metering frame (p.136) 3 AF point (p.128) 4 Flash status (p.54) Appears when flash is available and blinks when flash...

User Manual
Page 23
... when the shutter release button is pressed halfway. (p.128) • When [OK btn when shooting] is available or in the viewfinder. (p.126) Before Using Your Camera 12 Number of recordable images/EV compensation Show the number of recordable images with current quality and recorded pixel setting. 21 10 Aperture value (p.142...
... when the shutter release button is pressed halfway. (p.128) • When [OK btn when shooting] is available or in the viewfinder. (p.126) Before Using Your Camera 12 Number of recordable images/EV compensation Show the number of recordable images with current quality and recorded pixel setting. 21 10 Aperture value (p.142...


