
Operation Manual
Page 2
... of items on display. Please take care, as there are even cases where limitations are placed on the recorded image. Although the level of functioning pixels is manufactured using the camera in the Copyright Act, and care should not. Regarding PictBridge PictBridge allows the user to connect the printer and digital camera directly, using the PENTAX Digital Camera that the illustrations and the display screen of the LCD monitor in...
... of items on display. Please take care, as there are even cases where limitations are placed on the recorded image. Although the level of functioning pixels is manufactured using the camera in the Copyright Act, and care should not. Regarding PictBridge PictBridge allows the user to connect the printer and digital camera directly, using the PENTAX Digital Camera that the illustrations and the display screen of the LCD monitor in...

Operation Manual
Page 7
... Installing the Batteries 20 Using the AC Adapter with a Household Power Supply 23 Using the AC Adapter Abroad 24 Installing the SD Memory Card 26 Recorded Pixels and Quality Level of Still Pictures 29 Recorded Pixels and Frame Rate of Movies 31 Turning the Camera On and Off 32 Playback Only Mode 33 Initial Settings 34 Setting the Display Language 34 Setting the Date and Time 36 Quick Start 38 Taking Still Pictures 38 Playing Back Still Pictures 40 Playing Back Images 40 Playing...
... Installing the Batteries 20 Using the AC Adapter with a Household Power Supply 23 Using the AC Adapter Abroad 24 Installing the SD Memory Card 26 Recorded Pixels and Quality Level of Still Pictures 29 Recorded Pixels and Frame Rate of Movies 31 Turning the Camera On and Off 32 Playback Only Mode 33 Initial Settings 34 Setting the Display Language 34 Setting the Date and Time 36 Quick Start 38 Taking Still Pictures 38 Playing Back Still Pictures 40 Playing Back Images 40 Playing...

Operation Manual
Page 8
... Your Pictures 64 Using the Zoom 66 Setting the Exposure (EV Compensation 68 Displaying Shooting Information in Capture Mode 69 Setting the Shooting Functions 71 Selecting the Focus Mode 71 Selecting the Flash Mode 73 Selecting the Recorded Pixels 75 Selecting the Quality Level 77 Adjusting the White Balance 78 Changing the Focusing Area 80 Setting the Sensitivity 81 Setting the Instant Review Time (Instant Review 82 Setting the Image Sharpness (Sharpness 83 Setting the Color Saturation (Saturation 84 Setting the Image...
... Your Pictures 64 Using the Zoom 66 Setting the Exposure (EV Compensation 68 Displaying Shooting Information in Capture Mode 69 Setting the Shooting Functions 71 Selecting the Focus Mode 71 Selecting the Flash Mode 73 Selecting the Recorded Pixels 75 Selecting the Quality Level 77 Adjusting the White Balance 78 Changing the Focusing Area 80 Setting the Sensitivity 81 Setting the Instant Review Time (Instant Review 82 Setting the Image Sharpness (Sharpness 83 Setting the Color Saturation (Saturation 84 Setting the Image...

Operation Manual
Page 9
... Zoom Playback 96 Displaying Shooting Information in Playback Mode 98 Slideshow 99 Playing Back Movies 101 Playing Back a Movie 101 Connecting the Camera to AV Equipment 102 Deleting Images 103 Deleting Single Images/Sound Files 103 Deleting Selected Images and Sound Files (from Nine-Image Display 105 Deleting All Images 107 Protecting Images and Sound Files from Deletion (Protect) ........ 108 Editing and Printing Images 110 Editing Images 110 Changing the Image Size and Quality (Resize 110 Trimming Images 112 Copying Images and Sound Files 113 Setting the Printing Service...
... Zoom Playback 96 Displaying Shooting Information in Playback Mode 98 Slideshow 99 Playing Back Movies 101 Playing Back a Movie 101 Connecting the Camera to AV Equipment 102 Deleting Images 103 Deleting Single Images/Sound Files 103 Deleting Selected Images and Sound Files (from Nine-Image Display 105 Deleting All Images 107 Protecting Images and Sound Files from Deletion (Protect) ........ 108 Editing and Printing Images 110 Editing Images 110 Changing the Image Size and Quality (Resize 110 Trimming Images 112 Copying Images and Sound Files 113 Setting the Printing Service...
Operation Manual
Page 13
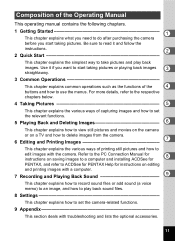
... common operations such as the functions of the 4 buttons and how to use the menus. Use it and follow the instructions. 2 2 Quick Start This chapter explains the simplest way to take pictures and play back sound files. 8 Settings This chapter explains how to set the relevant functions. 5 Playing Back and Deleting Images 6 This chapter explains how to view still pictures and movies on the camera or on editing and printing images with a computer. 7 Recording and Playing Back Sound...
... common operations such as the functions of the 4 buttons and how to use the menus. Use it and follow the instructions. 2 2 Quick Start This chapter explains the simplest way to take pictures and play back sound files. 8 Settings This chapter explains how to set the relevant functions. 5 Playing Back and Deleting Images 6 This chapter explains how to view still pictures and movies on the camera or on editing and printing images with a computer. 7 Recording and Playing Back Sound...

Operation Manual
Page 20
...:25 A9 A10 A1 Playback mode (p.55) A2 Folder number (p.136) A3 File number A4 Protect icon (p.108) A5 Voice memo icon (p.128) A6 Battery indicator (p.22) A7 Volume icon (p.128) A8 Memory status (p.32) + : Built-in memory (without card) a : SD Memory Card r : Card is write-protected A9 Captured date and time (p.36) A10 Four-way controller guide A11 Key lock icon (p.58) B1 Bright portion (blinks red) (p.17) B2 Recorded pixels (p.75) B3 Quality (p.77) B4 White balance (p.78) B5 Sensitivity...
...:25 A9 A10 A1 Playback mode (p.55) A2 Folder number (p.136) A3 File number A4 Protect icon (p.108) A5 Voice memo icon (p.128) A6 Battery indicator (p.22) A7 Volume icon (p.128) A8 Memory status (p.32) + : Built-in memory (without card) a : SD Memory Card r : Card is write-protected A9 Captured date and time (p.36) A10 Four-way controller guide A11 Key lock icon (p.58) B1 Bright portion (blinks red) (p.17) B2 Recorded pixels (p.75) B3 Quality (p.77) B4 White balance (p.78) B5 Sensitivity...

Operation Manual
Page 23
... and the camera is turned on , flash used for 50% of the batteries and insert them into the camera. • Image Storage Capacity, Movie Recording Time, Sound Recording Time, and Playback Time (at 23°C with LCD monitor on , the message [Battery depleted] may appear. Getting Started • Use the AC adapter kit K-AC51 (optional) if you do not intend to use the camera for a long time, remove the batteries. Wipe the ends of the shots, and...
... and the camera is turned on , flash used for 50% of the batteries and insert them into the camera. • Image Storage Capacity, Movie Recording Time, Sound Recording Time, and Playback Time (at 23°C with LCD monitor on , the message [Battery depleted] may appear. Getting Started • Use the AC adapter kit K-AC51 (optional) if you do not intend to use the camera for a long time, remove the batteries. Wipe the ends of the shots, and...

Operation Manual
Page 28
... instructions on another location. 26 Getting Started Installing the SD Memory Card SD Memory 1 Card socket 1 SD Memory 2 Card This camera uses an SD Memory Card. Captured images and sound files are saved in the built-in memory if a card is not inserted. (p.32) • Be sure to use this camera to back up important data in the camera. The still picture storage capacity varies depending on the SD Memory Card if a card is turned off before inserting or removing...
... instructions on another location. 26 Getting Started Installing the SD Memory Card SD Memory 1 Card socket 1 SD Memory 2 Card This camera uses an SD Memory Card. Captured images and sound files are saved in the built-in memory if a card is not inserted. (p.32) • Be sure to use this camera to back up important data in the camera. The still picture storage capacity varies depending on the SD Memory Card if a card is turned off before inserting or removing...

Operation Manual
Page 30
... important data on compatible SD Memory Cards, visit the PENTAX website or contact your nearest PENTAX Service Center. 28 If it may become unreadable. PENTAX does not accept any liability for a long time. (4) when the card is ejected or the batteries are being recorded or accessed. • The SD Memory Card has a limited service life. Write-protect switch r appears on the card may be deleted in the following circumstances. Setting the switch to LOCK protects...
... important data on compatible SD Memory Cards, visit the PENTAX website or contact your nearest PENTAX Service Center. 28 If it may become unreadable. PENTAX does not accept any liability for a long time. (4) when the card is ejected or the batteries are being recorded or accessed. • The SD Memory Card has a limited service life. Write-protect switch r appears on the card may be deleted in the following circumstances. Setting the switch to LOCK protects...

Operation Manual
Page 40
... the LCD monitor turns green if the subject is called Still Picture Capture Mode. 2 Confirm the subject and shooting information on the LCD monitor for taking still pictures is saved to the SD Memory Card or built-in memory. (p.39) Press the Green button to switch to the Green Mode and let the camera set all the shooting functions automatically. In this manual, this is in focus. 4 Press the shutter release button fully. You can change the...
... the LCD monitor turns green if the subject is called Still Picture Capture Mode. 2 Confirm the subject and shooting information on the LCD monitor for taking still pictures is saved to the SD Memory Card or built-in memory. (p.39) Press the Green button to switch to the Green Mode and let the camera set all the shooting functions automatically. In this manual, this is in focus. 4 Press the shutter release button fully. You can change the...

Operation Manual
Page 50
..., the picture is saved and the camera returns to capture status. MENU Exit : Exits the menu and returns to Step 3. 48 The 3 button function differs depending on the screen. To Cancel the Changes and Continue with the current setting. The setting is saved and the camera returns to playback status. 3 To Save the Setting and Continue with Menu Operations 6 Press the 4 button or the four-way controller (4). To Save the Setting and Begin Playback of Images...
..., the picture is saved and the camera returns to capture status. MENU Exit : Exits the menu and returns to Step 3. 48 The 3 button function differs depending on the screen. To Cancel the Changes and Continue with the current setting. The setting is saved and the camera returns to playback status. 3 To Save the Setting and Continue with Menu Operations 6 Press the 4 button or the four-way controller (4). To Save the Setting and Begin Playback of Images...

Operation Manual
Page 51
... the defaults when the camera is reset. [A Rec. Common Operations Menu List This displays the items that can be set values of the shooting function or return to the defaults when the p.86 camera is turned off Sharpness For choosing sharp or soft outlines p.83 Saturation For setting the color saturation p.84 Contrast For setting the image contrast level p.85 Use the Green Mode to enjoy easy picture-taking still pictures and recording movies. Item...
... the defaults when the camera is reset. [A Rec. Common Operations Menu List This displays the items that can be set values of the shooting function or return to the defaults when the p.86 camera is turned off Sharpness For choosing sharp or soft outlines p.83 Saturation For setting the color saturation p.84 Contrast For setting the image contrast level p.85 Use the Green Mode to enjoy easy picture-taking still pictures and recording movies. Item...

Operation Manual
Page 52
... formatting the SD Memory Card or built-in memory p.129 Sound For adjusting the playback volume and setting the start-up sound, shutter sound, key operation sound and self-timer sound p.130 Start-up Screen For setting the start-up screen p.132 Date Adjust For adjusting the date, time, and date and time styles p.133 Language/ For setting the language in which menus and messages appear p.135 3 Folder Name For choosing how names are assigned to folders for storing images and sound files p.136 USB Connection For setting the USB cable connection (to PC or printer...
... formatting the SD Memory Card or built-in memory p.129 Sound For adjusting the playback volume and setting the start-up sound, shutter sound, key operation sound and self-timer sound p.130 Start-up Screen For setting the start-up screen p.132 Date Adjust For adjusting the date, time, and date and time styles p.133 Language/ For setting the language in which menus and messages appear p.135 3 Folder Name For choosing how names are assigned to folders for storing images and sound files p.136 USB Connection For setting the USB cable connection (to PC or printer...

Operation Manual
Page 75
... the Flash Mode Taking Pictures Flash Modes , Auto The flash discharges automatically depending on the 4 light conditions. c Auto + Red-eye This mode reduces the phenomenon of the brightness. The flash mode changes each time the button is set to s. • A pre-flash discharges when using the red-eye reduction function. • In A mode, you can also change the setting using the four-way controller (23). 2 Press the 4 button. Use this mode to capture status with the selected flash mode. b Flash On The flash discharges regardless of red eyes...
... the Flash Mode Taking Pictures Flash Modes , Auto The flash discharges automatically depending on the 4 light conditions. c Auto + Red-eye This mode reduces the phenomenon of the brightness. The flash mode changes each time the button is set to s. • A pre-flash discharges when using the red-eye reduction function. • In A mode, you can also change the setting using the four-way controller (23). 2 Press the 4 button. Use this mode to capture status with the selected flash mode. b Flash On The flash discharges regardless of red eyes...

Operation Manual
Page 80
... shooting. 4 White Balance F Auto G Daylight The camera adjusts the white balance automatically. 2, 3, 4 5 1, 6 MENU Adjusting the White Balance Rec. J Fluores. Light Use this mode when taking pictures under electric or other tungsten light. Mode 1/3 6M Recorded Pixels Quality Level AWB White Balance Focusing Area ISO AUTO Sensitivity MENU Exit R C Taking Pictures You can take pictures in natural colors by adjusting the white balance according to capture status with the current setting. The [A Rec. The White Balance setting is saved. 6 Press the MENU button. Mode...
... shooting. 4 White Balance F Auto G Daylight The camera adjusts the white balance automatically. 2, 3, 4 5 1, 6 MENU Adjusting the White Balance Rec. J Fluores. Light Use this mode when taking pictures under electric or other tungsten light. Mode 1/3 6M Recorded Pixels Quality Level AWB White Balance Focusing Area ISO AUTO Sensitivity MENU Exit R C Taking Pictures You can take pictures in natural colors by adjusting the white balance according to capture status with the current setting. The [A Rec. The White Balance setting is saved. 6 Press the MENU button. Mode...
Operation Manual
Page 88
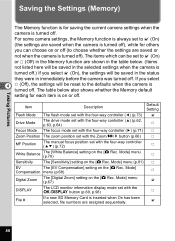
... zoom position set with the Zoom/w/x button (p.66) P MF Position The manual focus position set with the 4/W button (p.69, p.98) P File # If a new SD Memory Card is inserted when On has been selected, file numbers are saved or not when the camera is turned off.) If you can be saved in the table below also shows whether the Memory default setting for each item is on or off. Taking Pictures Saving the Settings (Memory) The Memory function...
... zoom position set with the Zoom/w/x button (p.66) P MF Position The manual focus position set with the 4/W button (p.69, p.98) P File # If a new SD Memory Card is inserted when On has been selected, file numbers are saved or not when the camera is turned off.) If you can be saved in the table below also shows whether the Memory default setting for each item is on or off. Taking Pictures Saving the Settings (Memory) The Memory function...

Operation Manual
Page 149
...exceeded normal operating limits while recording a movie. Deleting This message appears when deleting an image or sound file. It disappears after the image is recorded or the setting is protected. Appendix 147 This message appears when the internal temperature of the SD Memory Card while taking pictures. Camera cannot display this image You are impossible due to display or copy the images on the card using rechargeable batteries, charge the batteries. (p.22) Memory card full The SD Memory Card is write-protected. (p.28) Compression error This message appears...
...exceeded normal operating limits while recording a movie. Deleting This message appears when deleting an image or sound file. It disappears after the image is recorded or the setting is protected. Appendix 147 This message appears when the internal temperature of the SD Memory Card while taking pictures. Camera cannot display this image You are impossible due to display or copy the images on the card using rechargeable batteries, charge the batteries. (p.22) Memory card full The SD Memory Card is write-protected. (p.28) Compression error This message appears...
Operation Manual
Page 152
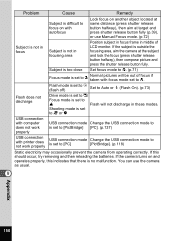
Problem Cause Remedy Subject is difficult to focus on with focus mode set to q. If the subject is no malfunction. You can use Manual Focus mode. (p.72) Subject is not in focus Subject is set to s Flash will be out of LCD monitor. Shooting mode is set to C or y USB connection with computer does not work properly USB connection mode Change the USB connection mode to is set to [PictBridge] [PC]. (p.137) USB connection with printer does not work properly USB connection mode Change the USB connection mode to...
Problem Cause Remedy Subject is difficult to focus on with focus mode set to q. If the subject is no malfunction. You can use Manual Focus mode. (p.72) Subject is not in focus Subject is set to s Flash will be out of LCD monitor. Shooting mode is set to C or y USB connection with computer does not work properly USB connection mode Change the USB connection mode to is set to [PictBridge] [PC]. (p.137) USB connection with printer does not work properly USB connection mode Change the USB connection mode to...

Operation Manual
Page 155
...., 2 sec. Type Auto flash with red-eye reduction function Flash Modes Auto (at low illumination), Flash Off, Flash On, Auto + Red-eye, Flash On + Red-eye, (Slow synchronization is possible only in Night Scene mode) Effective Range Wide: Approx. 0.4 m - 4.0 m (Standard Output Sensitivity: in Auto condition) Tele: Approx. 0.4 m - 2.5 m (Standard Output Sensitivity: in memory or SD Recording Time Memory Card is full Type Electronic/mechanical shutter Speed Approx. 1/1500 sec. - 4 sec. Exposure Mechanism Shooting Modes Movie Shutter Flash Drive Modes Self-timer Power Supply AE...
...., 2 sec. Type Auto flash with red-eye reduction function Flash Modes Auto (at low illumination), Flash Off, Flash On, Auto + Red-eye, Flash On + Red-eye, (Slow synchronization is possible only in Night Scene mode) Effective Range Wide: Approx. 0.4 m - 4.0 m (Standard Output Sensitivity: in Auto condition) Tele: Approx. 0.4 m - 2.5 m (Standard Output Sensitivity: in memory or SD Recording Time Memory Card is full Type Electronic/mechanical shutter Speed Approx. 1/1500 sec. - 4 sec. Exposure Mechanism Shooting Modes Movie Shutter Flash Drive Modes Self-timer Power Supply AE...

Operation Manual
Page 163
... Installing batteries 20 Instant Review 39, 82 L Language 34, 135 M 3 button 43, 45 Macro q 71 Magnify y 96 Manual Focus 71 Manual K 78 Memory 86 N Nine-image display f ........ 94 NTSC 138 Number of pixels 75 Number of recordable images 30 O 4/W button .... 43, 45 Optional accessory 146 P PAL 138 Photo processing lab ........ 115 PictBridge 118 Playback 40, 93, 101, 126, 128 Playback Mode Palette ....... 55 Playback Only Mode 33 Playing back movies ......... 101 Playing back sounds ......... 126 Power saving 139 Power supply...
... Installing batteries 20 Instant Review 39, 82 L Language 34, 135 M 3 button 43, 45 Macro q 71 Magnify y 96 Manual Focus 71 Manual K 78 Memory 86 N Nine-image display f ........ 94 NTSC 138 Number of pixels 75 Number of recordable images 30 O 4/W button .... 43, 45 Optional accessory 146 P PAL 138 Photo processing lab ........ 115 PictBridge 118 Playback 40, 93, 101, 126, 128 Playback Mode Palette ....... 55 Playback Only Mode 33 Playing back movies ......... 101 Playing back sounds ......... 126 Power saving 139 Power supply...


