
Operation Manual
Page 5
... temperatures or high humidity. Pictures and sound cannot be swallowed by mistake. USE SPECIFIED CHARGER ONLY. - DO NOT EXPOSE TO HIGH TEMP. (140°F / 60°C). Seek medical attention immediately if a memory card is accidentally swallowed. About the Battery and Charger • Storing the battery fully charged may be guaranteed if recording, playback or transferring your camera or recording media (SD Memory Card), etc. DO NOT SHORT...
... temperatures or high humidity. Pictures and sound cannot be swallowed by mistake. USE SPECIFIED CHARGER ONLY. - DO NOT EXPOSE TO HIGH TEMP. (140°F / 60°C). Seek medical attention immediately if a memory card is accidentally swallowed. About the Battery and Charger • Storing the battery fully charged may be guaranteed if recording, playback or transferring your camera or recording media (SD Memory Card), etc. DO NOT SHORT...

Operation Manual
Page 9
... Mode 176 Red-Eye Reduction 179 Trailing Curtain Sync 180 Connecting an External Flash with an Extension Cord 180 Multiple Flash Shooting Using Extension Cords 181 Contrast-Control-Sync Flash 182 X-sync Socket 183 Shooting Settings 185 Setting the File Format 186 Setting the JPEG Recorded Pixels 186 Setting the JPEG Quality Level 187 Setting the File Format 188 Setting the White Balance 191 Fine-tuning the White Balance 193 Adjusting the White Balance Manually 194 Adjusting the White Balance with Color Temperature 196 Saving the White Balance Setting of a Captured Image...
... Mode 176 Red-Eye Reduction 179 Trailing Curtain Sync 180 Connecting an External Flash with an Extension Cord 180 Multiple Flash Shooting Using Extension Cords 181 Contrast-Control-Sync Flash 182 X-sync Socket 183 Shooting Settings 185 Setting the File Format 186 Setting the JPEG Recorded Pixels 186 Setting the JPEG Quality Level 187 Setting the File Format 188 Setting the White Balance 191 Fine-tuning the White Balance 193 Adjusting the White Balance Manually 194 Adjusting the White Balance with Color Temperature 196 Saving the White Balance Setting of a Captured Image...

Operation Manual
Page 10
... Frequently Used Settings 207 Saving the Settings 207 Checking the Saved USER Settings 208 Using Saved USER Settings 209 Changing the Settings 209 Resetting to Default Settings 210 Playback Functions 211 Playback Functions Operation 212 Playback Mode Palette Setting Items 212 Playback Menu Setting Items 213 Enlarging Images 214 Displaying Multiple Images 216 Multi-image Display Screen 216 Displaying Images by Folder 217 Displaying Images by Shooting Date (Calendar display 218 Joining Multiple Images (Index 219 Slideshow 222 Setting the Slideshow Display 222 Starting the...
... Frequently Used Settings 207 Saving the Settings 207 Checking the Saved USER Settings 208 Using Saved USER Settings 209 Changing the Settings 209 Resetting to Default Settings 210 Playback Functions 211 Playback Functions Operation 212 Playback Mode Palette Setting Items 212 Playback Menu Setting Items 213 Enlarging Images 214 Displaying Multiple Images 216 Multi-image Display Screen 216 Displaying Images by Folder 217 Displaying Images by Shooting Date (Calendar display 218 Joining Multiple Images (Index 219 Slideshow 222 Setting the Slideshow Display 222 Starting the...

Operation Manual
Page 11
... Size 262 Setting the Guide Display Time 262 Setting the Status Screen Display 262 Setting the Display for Instant Review 263 Adjusting the Brightness of the Monitor 264 Adjusting the Color of the Monitor 265 Setting the Electronic Level Display 266 Setting the Folder Name/File Number Naming Convention ... 267 Selecting the Folder Name 267 Selecting the File Number Setting 267 Setting the File Name 268 Setting the Power Setting 270 Setting Auto Power Off 270 Selecting a Battery 270 Setting the DPOF Settings 273 Setting USB Connection Mode 275 Setting...
... Size 262 Setting the Guide Display Time 262 Setting the Status Screen Display 262 Setting the Display for Instant Review 263 Adjusting the Brightness of the Monitor 264 Adjusting the Color of the Monitor 265 Setting the Electronic Level Display 266 Setting the Folder Name/File Number Naming Convention ... 267 Selecting the Folder Name 267 Selecting the File Number Setting 267 Setting the File Name 268 Setting the Power Setting 270 Setting Auto Power Off 270 Selecting a Battery 270 Setting the DPOF Settings 273 Setting USB Connection Mode 275 Setting...

Operation Manual
Page 17
... mm lens on the Q features a PENTAX original system which allow you to prioritize a battery and use its full power before switching to get the best camera performance for 35 mm film and CMOS sensor are different. Inversely, multiply the focal length of a picture. Example) To capture the same image as when changing the composition of the lens used with vertical shutter release 1 button. Example...
... mm lens on the Q features a PENTAX original system which allow you to prioritize a battery and use its full power before switching to get the best camera performance for 35 mm film and CMOS sensor are different. Inversely, multiply the focal length of a picture. Example) To capture the same image as when changing the composition of the lens used with vertical shutter release 1 button. Example...

Operation Manual
Page 25
... Flash Mode (p.72) 16 Drive Mode (p.82) 17 White Balance (p.191) 18 Custom Image (p.205) 19 File Format (p.188) 20 JPEG Recorded Pixels (p.186) 21 JPEG Quality (p.187) 22 Flash Exposure Compensation (p.76) 23 Adjust White Balance (p.193) 24 AF point (p.122) 25 Remaining image storage capacity Status screen 1 (All of the indications are displayed here for explanatory purposes. The Actual display may differ.) Before Using Your Camera P USER SHIFT 1/2000 1600 ISO AUTO...
... Flash Mode (p.72) 16 Drive Mode (p.82) 17 White Balance (p.191) 18 Custom Image (p.205) 19 File Format (p.188) 20 JPEG Recorded Pixels (p.186) 21 JPEG Quality (p.187) 22 Flash Exposure Compensation (p.76) 23 Adjust White Balance (p.193) 24 AF point (p.122) 25 Remaining image storage capacity Status screen 1 (All of the indications are displayed here for explanatory purposes. The Actual display may differ.) Before Using Your Camera P USER SHIFT 1/2000 1600 ISO AUTO...

Operation Manual
Page 51
... direction of the arrow (1) and then lift it to open (2). 1 2 3 Insert the card all the way with the SD Memory Card label toward the monitor. Inserting/Removing the SD Memory 49 Card Getting Started This camera uses either an SD Memory Card or an SDHC Memory Card. (Both cards are referred to as SD Memory Cards hereafter.) Make sure the camera is unused or 2 has been used on formatting. • Use a high-speed memory card when recording movies...
... direction of the arrow (1) and then lift it to open (2). 1 2 3 Insert the card all the way with the SD Memory Card label toward the monitor. Inserting/Removing the SD Memory 49 Card Getting Started This camera uses either an SD Memory Card or an SDHC Memory Card. (Both cards are referred to as SD Memory Cards hereafter.) Make sure the camera is unused or 2 has been used on formatting. • Use a high-speed memory card when recording movies...

Operation Manual
Page 59
..., error messages, etc. MENU Cancel 2 OK OK If the [Date Adjustment] screen appears, set the language displayed on the monitor. Follow the procedure below to set the date and time by following : English, French, German, Spanish, Portuguese, Italian, Dutch, Danish, Swedish, Finnish, Polish, Czech, Hungarian, Turkish, Greek, Russian, Korean, Chinese (traditional/ simplified) and Japanese. 1 Use the four-way controller (2345) to be set again when turning your camera...
..., error messages, etc. MENU Cancel 2 OK OK If the [Date Adjustment] screen appears, set the language displayed on the monitor. Follow the procedure below to set the date and time by following : English, French, German, Spanish, Portuguese, Italian, Dutch, Danish, Swedish, Finnish, Polish, Czech, Hungarian, Turkish, Greek, Russian, Korean, Chinese (traditional/ simplified) and Japanese. 1 Use the four-way controller (2345) to be set again when turning your camera...

Operation Manual
Page 85
... recording size of automatic correction in the [A Rec. p.146 Interval Shooting Sets the interval shooting. p.144 Composition Adjust. p.203 Press the 3 button in Capture mode to A. p.186 JPEG Quality*2 Sets the image quality for JPEG shooting. Selects Program Line. p.151 HDR Capture*2 A2 Digital Filter*2 Enables the capture of magnification occurring due to lens properties. Mode 1-4] menu. Shooting Functions Menu Item Function Page Exposure Mode*1 Sets the exposure mode when the mode dial is set to display...
... recording size of automatic correction in the [A Rec. p.146 Interval Shooting Sets the interval shooting. p.144 Composition Adjust. p.203 Press the 3 button in Capture mode to A. p.186 JPEG Quality*2 Sets the image quality for JPEG shooting. Selects Program Line. p.151 HDR Capture*2 A2 Digital Filter*2 Enables the capture of magnification occurring due to lens properties. Mode 1-4] menu. Shooting Functions Menu Item Function Page Exposure Mode*1 Sets the exposure mode when the mode dial is set to display...

Operation Manual
Page 89
... an assist light when using the autofocus in Wireless Mode. p.225 Shooting Functions When set to [On], if the focus mode is 4 set to release shutter while the built-in flash is 35. AF Adjustment Adjusts the AF focusing position. p.121 37. p.294 p.290 LCD Panel Illumination Sets whether to save rotation information when shooting. - p.177 32. p.225 34. Sets whether to illuminate the LCD panel. Auto Image Rotation Sets whether to l and a manual focus lens is charging...
... an assist light when using the autofocus in Wireless Mode. p.225 Shooting Functions When set to [On], if the focus mode is 4 set to release shutter while the built-in flash is 35. AF Adjustment Adjusts the AF focusing position. p.121 37. p.294 p.290 LCD Panel Illumination Sets whether to save rotation information when shooting. - p.177 32. p.225 34. Sets whether to illuminate the LCD panel. Auto Image Rotation Sets whether to l and a manual focus lens is charging...

Operation Manual
Page 119
... displayed in the [A Custom Setting 1] menu. (p.126) Shooting While the Exposure is Automatically Changed Auto Bracket is a function for which the maximum aperture varies depending on the focal length. The Q button, 3 button or M button is changed - The lens is pressed - Each time the shutter release button is pressed, 3 or 5 shots are performed, AE lock is locked. Set in B (Green), p (Bulb) or M (Flash X-sync Speed) mode. • When any of shutter speed and aperture value changes depending on the zooming position...
... displayed in the [A Custom Setting 1] menu. (p.126) Shooting While the Exposure is Automatically Changed Auto Bracket is a function for which the maximum aperture varies depending on the focal length. The Q button, 3 button or M button is changed - The lens is pressed - Each time the shutter release button is pressed, 3 or 5 shots are performed, AE lock is locked. Set in B (Green), p (Bulb) or M (Flash X-sync Speed) mode. • When any of shutter speed and aperture value changes depending on the zooming position...

Operation Manual
Page 162
..." recorded pixels. Use the four-way controller (2345) to move the display area, and press the | (Green) button to return the display to 2, 4, 6, 8 or 10 times. Images captured in the [A Rec. Shooting Functions Recording Movies You can check the depth of frames shot per second (fps), monaural audio, and the file format set to change the settings during Live View. The picture is taken. • When the focus mode is set to l and [Autofocus Mode...
..." recorded pixels. Use the four-way controller (2345) to move the display area, and press the | (Green) button to return the display to 2, 4, 6, 8 or 10 times. Images captured in the [A Rec. Shooting Functions Recording Movies You can check the depth of frames shot per second (fps), monaural audio, and the file format set to change the settings during Live View. The picture is taken. • When the focus mode is set to l and [Autofocus Mode...

Operation Manual
Page 193
... White Approx. 4,200K L Fluorescent Light Warm White Approx. 3,000K I Tungsten Light For use when taking pictures under fluorescent lighting. Approx. 5,400K Use this to manually adjust the white K Manual balance according to your images. Temperature You can save three settings. - *1 The color temperature (K) is the function for adjusting the color of the light source in flash. It reduces Approx. 2,850K the reddish color tones in a picture. ^ Cloudy For use when taking pictures on cloudy days. K Color Use figures to set to F (Auto...
... White Approx. 4,200K L Fluorescent Light Warm White Approx. 3,000K I Tungsten Light For use when taking pictures under fluorescent lighting. Approx. 5,400K Use this to manually adjust the white K Manual balance according to your images. Temperature You can save three settings. - *1 The color temperature (K) is the function for adjusting the color of the light source in flash. It reduces Approx. 2,850K the reddish color tones in a picture. ^ Cloudy For use when taking pictures on cloudy days. K Color Use figures to set to F (Auto...

Operation Manual
Page 269
... the [R Set-up 2] menu (p.254). 1234 Brightness Level LCD Color Tuning Video Out HDMI Out USB Connection Folder Name File Name MENU Cancel ±0 NTSC Auto MSC Date IPMEGNPTX OK OK Selecting the File Number Setting You can select a method for assigning the folder names for folders with pictures taken on which the picture was taken are divided into folders of 500 images each time a new folder is created for [File No.] in [Memory] (p.281...
... the [R Set-up 2] menu (p.254). 1234 Brightness Level LCD Color Tuning Video Out HDMI Out USB Connection Folder Name File Name MENU Cancel ±0 NTSC Auto MSC Date IPMEGNPTX OK OK Selecting the File Number Setting You can select a method for assigning the folder names for folders with pictures taken on which the picture was taken are divided into folders of 500 images each time a new folder is created for [File No.] in [Memory] (p.281...

Operation Manual
Page 278
... when connecting the Q to the computer via USB, standardized as a memory device. By simply connecting a device that support PTP without installing a dedicated driver. PTP (Picture Transfer Protocol) A protocol that handles devices connected to your computer. 9 Changing Additional Settings Also indicates a standard for controlling USB devices with this driver. 276 MSC and PTP MSC (Mass Storage Class) A general-purpose driver program that allows transfer of digital images and control of digital cameras via USB as ISO...
... when connecting the Q to the computer via USB, standardized as a memory device. By simply connecting a device that support PTP without installing a dedicated driver. PTP (Picture Transfer Protocol) A protocol that handles devices connected to your computer. 9 Changing Additional Settings Also indicates a standard for controlling USB devices with this driver. 276 MSC and PTP MSC (Mass Storage Class) A general-purpose driver program that allows transfer of digital images and control of digital cameras via USB as ISO...
Operation Manual
Page 299
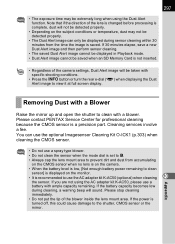
... sensor is turned off, this could cause damage to the shutter, CMOS sensor or the mirror. If 30 minutes elapse, save a new Dust Alert image and then perform sensor cleaning. • The saved Dust Alert image cannot be displayed in Playback mode. • Dust Alert image cannot be saved when an SD Memory Card is saved. Note that if the direction of the lens is changed before...
... sensor is turned off, this could cause damage to the shutter, CMOS sensor or the mirror. If 30 minutes elapse, save a new Dust Alert image and then perform sensor cleaning. • The saved Dust Alert image cannot be displayed in Playback mode. • Dust Alert image cannot be saved when an SD Memory Card is saved. Note that if the direction of the lens is changed before...

Operation Manual
Page 309
... of the viewfinder. Replace with available space on the SD space or delete unwanted images. (p.49, Memory Card p.79) Recording Wait until charging is not in the focusing area Position the subject in the focus frame in the up position, take a close picture. Troubleshooting 307 In rare cases, the camera may not operate correctly due to focus on moving objects or scenery shot through a window or a net...
... of the viewfinder. Replace with available space on the SD space or delete unwanted images. (p.49, Memory Card p.79) Recording Wait until charging is not in the focusing area Position the subject in the focus frame in the up position, take a close picture. Troubleshooting 307 In rare cases, the camera may not operate correctly due to focus on moving objects or scenery shot through a window or a net...

Operation Manual
Page 310
... set to a computer. Mode 4] menu to k (On). (p.132) The Shake Reduction function is not set properly If a lens for which focal length information cannot be effective when panning or shooting night scenes, etc. Try different exposure modes. Turn off the close Shake Reduction function and use a tripod. Appendix 308 10 Problem The autofocus does not work AE lock function does not operate The flash does not discharge The USB connection...
... set to a computer. Mode 4] menu to k (On). (p.132) The Shake Reduction function is not set properly If a lens for which focal length information cannot be effective when panning or shooting night scenes, etc. Try different exposure modes. Turn off the close Shake Reduction function and use a tripod. Appendix 308 10 Problem The autofocus does not work AE lock function does not operate The flash does not discharge The USB connection...

Operation Manual
Page 313
... Exposure Mode Shutter Lens Mount Lens Used Autofocus System Viewfinder Viewfinder Indication LCD Panel Display Preview Function Single frame, multi-image display, zoom display (up to 32 times, scrolling possible), image comparison, rotating, calendar display, folder display, slideshow, histogram, bright/dark area, resize, cropping, index (Thumbnail/Square/Random1/Random2/Random3/ Bubble) A, B Green, e Hyper-program, K Sensitivity priority, b Shutter priority, c Aperture priority, L Shutter & Aperture priority, a Hyper-manual, p Bulb, M Flash X-sync Speed, C Movie Electronically controlled...
... Exposure Mode Shutter Lens Mount Lens Used Autofocus System Viewfinder Viewfinder Indication LCD Panel Display Preview Function Single frame, multi-image display, zoom display (up to 32 times, scrolling possible), image comparison, rotating, calendar display, folder display, slideshow, histogram, bright/dark area, resize, cropping, index (Thumbnail/Square/Random1/Random2/Random3/ Bubble) A, B Green, e Hyper-program, K Sensitivity priority, b Shutter priority, c Aperture priority, L Shutter & Aperture priority, a Hyper-manual, p Bulb, M Flash X-sync Speed, C Movie Electronically controlled...
Operation Manual
Page 325
...) Mode 98 T L (Shutter & Aperture Priority) Mode 104 Text Size 58, 262 Toning (Custom Image) ....... 205 Toy Camera (Digital Filter 153, 241 Trailing Curtain Sync .... 170, 180 Tungsten Light (White Balance 191 TV 233 b (Shutter Priority) mode ... 100 U USB Connection 275 USER 207 Using Aperture Ring 294 V Video jack 233 10 Video Output Format 234 Video terminal 233 Viewfinder 31, 55 Vignetting 72, 318 W Water Color (Digital Filter) ... 242 White Balance 191, 318 Wireless Mode (Flash) ......... 176 World Time 258...
...) Mode 98 T L (Shutter & Aperture Priority) Mode 104 Text Size 58, 262 Toning (Custom Image) ....... 205 Toy Camera (Digital Filter 153, 241 Trailing Curtain Sync .... 170, 180 Tungsten Light (White Balance 191 TV 233 b (Shutter Priority) mode ... 100 U USB Connection 275 USER 207 Using Aperture Ring 294 V Video jack 233 10 Video Output Format 234 Video terminal 233 Viewfinder 31, 55 Vignetting 72, 318 W Water Color (Digital Filter) ... 242 White Balance 191, 318 Wireless Mode (Flash) ......... 176 World Time 258...

