
TH61PHW6 User Guide
Page 1
SPTOAWNEDRBYON INPUT + - English TQBC0644 Please keep this product, please read these instructions completely. ® PLASMA DISPLAY High Definition Plasma Display Operating Instructions R G - TH-61PHW6 For assistance in the USA, please call : 1-888-VIEW-PTV(843-9788) or e-mail us at : consumerproducts@panasonic.com or visit us at www.panasonic.com (U.S.A.) Before connecting, operating or adjusting this manual for future reference. VOL Model No.
SPTOAWNEDRBYON INPUT + - English TQBC0644 Please keep this product, please read these instructions completely. ® PLASMA DISPLAY High Definition Plasma Display Operating Instructions R G - TH-61PHW6 For assistance in the USA, please call : 1-888-VIEW-PTV(843-9788) or e-mail us at : consumerproducts@panasonic.com or visit us at www.panasonic.com (U.S.A.) Before connecting, operating or adjusting this manual for future reference. VOL Model No.

TH61PHW6 User Guide
Page 4
...-VIEW-PTV(843-9788) or e-mail us at : consumerproducts@panasonic.com or visit us at www.panasonic.com (U.S.A.) Table of your set , please read these instructions. Retain your purchase receipt also, and note down the model number and serial number of Contents Important Safety Instructions 3 FCC STATEMENT 5 Safety Precautions 6 Accessories 8 Accessories Supplied 8 Optional Accessories 8 Remote Control Batteries 9 Basic Controls 10 Connections / Cable fixing band 11 Speakers connection 12 AV Input Terminals connection...
...-VIEW-PTV(843-9788) or e-mail us at : consumerproducts@panasonic.com or visit us at www.panasonic.com (U.S.A.) Table of your set , please read these instructions. Retain your purchase receipt also, and note down the model number and serial number of Contents Important Safety Instructions 3 FCC STATEMENT 5 Safety Precautions 6 Accessories 8 Accessories Supplied 8 Optional Accessories 8 Remote Control Batteries 9 Basic Controls 10 Connections / Cable fixing band 11 Speakers connection 12 AV Input Terminals connection...

TH61PHW6 User Guide
Page 5
... turning the equipment off and on, the user is no special notation has been made of still pictures include logos, video games, computer images, teletext and images displayed in a residential installation. FCC CAUTION: To assure continued compliance, use only shielded interface cables when connecting to the following measures: • Reorient or relocate the receiving antenna. • Increase the separation between the equipment and receiver. • Connect...
... turning the equipment off and on, the user is no special notation has been made of still pictures include logos, video games, computer images, teletext and images displayed in a residential installation. FCC CAUTION: To assure continued compliance, use only shielded interface cables when connecting to the following measures: • Reorient or relocate the receiving antenna. • Increase the separation between the equipment and receiver. • Connect...

TH61PHW6 User Guide
Page 6
... the wall socket plate is loose, they should not be made. 6 If damage to operate on top of time, unplug the power cord from the Plasma Display, unplug the power cord immediately. • Continuous use If a problem occurs (such as it repaired at the rear. If water or foreign objects get inside the Plasma Display, please consult an Authorized Service Center. Safety Precautions WARNING Set up...
... the wall socket plate is loose, they should not be made. 6 If damage to operate on top of time, unplug the power cord from the Plasma Display, unplug the power cord immediately. • Continuous use If a problem occurs (such as it repaired at the rear. If water or foreign objects get inside the Plasma Display, please consult an Authorized Service Center. Safety Precautions WARNING Set up...

TH61PHW6 User Guide
Page 7
.... Placing any body parts are manufactured by Matsushita Electric Industrial Co., Ltd.) • Pedestal TY-ST61PHW6 • Wall-hanging bracket (Vertical) ....... Be sure to carry out set-up dust on the Plasma Display. Disconnect the power plug from becoming dusty. • Built-up . Wipe the panel surface gently using the Plasma Display Do not bring your hands, face or objects close . Burns or personal injuries can...
.... Placing any body parts are manufactured by Matsushita Electric Industrial Co., Ltd.) • Pedestal TY-ST61PHW6 • Wall-hanging bracket (Vertical) ....... Be sure to carry out set-up dust on the Plasma Display. Disconnect the power plug from becoming dusty. • Built-up . Wipe the panel surface gently using the Plasma Display Do not bring your hands, face or objects close . Burns or personal injuries can...

TH61PHW6 User Guide
Page 8
Accessories Accessories Supplied Check that you have the Accessories and items shown Operating Instruction book Remote Control Transmitter EUR646533 INPUT SURROUND VOL N R PICTURE SOUND SET UP PICTURE POS. /SIZE ASPECT PC OFF TIMER PLASMA DISPLAY Batteries for the Remote Control Transmitter (AA(R6) Battery × 2) Warranty Fixing bands TMME203× 2 AC cord Optional Accessories • Pedestal TY-ST61PHW6 • Wall hanging bracket TY-WK61PV1 For assembling Full instructions are supplied with each of the optional accessories for use with this Plasma Display. 8
Accessories Accessories Supplied Check that you have the Accessories and items shown Operating Instruction book Remote Control Transmitter EUR646533 INPUT SURROUND VOL N R PICTURE SOUND SET UP PICTURE POS. /SIZE ASPECT PC OFF TIMER PLASMA DISPLAY Batteries for the Remote Control Transmitter (AA(R6) Battery × 2) Warranty Fixing bands TMME203× 2 AC cord Optional Accessories • Pedestal TY-ST61PHW6 • Wall hanging bracket TY-WK61PV1 For assembling Full instructions are supplied with each of the optional accessories for use with this Plasma Display. 8

TH61PHW6 User Guide
Page 9
must match the markings in reverse until the lock snaps. Always use Incorrect installation can cause battery leakage and corrosion that will damage the remote control transmitter. Observe the following precautions: 1. Battery replacement is necessary when the remote control acts sporadically or stops operating the Plasma Display. 9 Two "AA" size Helpful Hint: For frequent remote control users, replace old batteries with "Alkaline"). 4. Do not mix battery...
must match the markings in reverse until the lock snaps. Always use Incorrect installation can cause battery leakage and corrosion that will damage the remote control transmitter. Observe the following precautions: 1. Battery replacement is necessary when the remote control acts sporadically or stops operating the Plasma Display. 9 Two "AA" size Helpful Hint: For frequent remote control users, replace old batteries with "Alkaline"). 4. Do not mix battery...

TH61PHW6 User Guide
Page 10
... a fixed period. STAND-BY(ON/OFF) button The Plasma Display must first be preset to switch to display the current system status. Press this button to turn the High Definition Plasma Display OFF to select VIDEO (S VIDEO), COMPONENT/RGB, PC input signal modes sequentially. (see page 18). The Plasma Display can be plugged into the wall outlet.) • STAND-BY .....Red • POWER-ON.....Green INPUT button (VIDEO(S VIDEO), COMPONENT/RGB, PC Mode Selection) Press the "INPUT" button to STAND-BY mode. The setting changes...
... a fixed period. STAND-BY(ON/OFF) button The Plasma Display must first be preset to switch to display the current system status. Press this button to turn the High Definition Plasma Display OFF to select VIDEO (S VIDEO), COMPONENT/RGB, PC input signal modes sequentially. (see page 18). The Plasma Display can be plugged into the wall outlet.) • STAND-BY .....Red • POWER-ON.....Green INPUT button (VIDEO(S VIDEO), COMPONENT/RGB, PC Mode Selection) Press the "INPUT" button to STAND-BY mode. The setting changes...

TH61PHW6 User Guide
Page 13
... S VIDEO COMPONENT / RGB Input connection Component signals (Y, PB, PR ) connection (DVD Player) Y PB PR L R Y, PB, PR 3×RCA video cables AUDIO 2×RCA audio cables R L AUDIO VD HD PR/CR/R PB/CB/B Y/G COMPONENT/RGB IN Notes: (1) Change the "COMPONENT / RGB-IN" setting in the "SET UP" menu to L/R sockets Note: Additional equipment and cables shown are not supplied with this set . AV Input connection VIDEO signal connection (VCR) Audio R OUT L Video OUT AUDIO-VIDEO Video input to RCA socket 3×RCA audio video cables Audio input...
... S VIDEO COMPONENT / RGB Input connection Component signals (Y, PB, PR ) connection (DVD Player) Y PB PR L R Y, PB, PR 3×RCA video cables AUDIO 2×RCA audio cables R L AUDIO VD HD PR/CR/R PB/CB/B Y/G COMPONENT/RGB IN Notes: (1) Change the "COMPONENT / RGB-IN" setting in the "SET UP" menu to L/R sockets Note: Additional equipment and cables shown are not supplied with this set . AV Input connection VIDEO signal connection (VCR) Audio R OUT L Video OUT AUDIO-VIDEO Video input to RCA socket 3×RCA audio video cables Audio input...

TH61PHW6 User Guide
Page 15
... aspect mode is set the horizontal and vertical scanning frequencies for PC signals which can be input are those with a horizontal scanning frequency of 15.5 to 110 kHz and vertical scanning frequency of 48 to 120 Hz. (However, the image will need to make setting changes to the computer at the time of connection. (4) Some PC models cannot be connected to the set. (5) There is no need to use an adapter...
... aspect mode is set the horizontal and vertical scanning frequencies for PC signals which can be input are those with a horizontal scanning frequency of 15.5 to 110 kHz and vertical scanning frequency of 48 to 120 Hz. (However, the image will need to make setting changes to the computer at the time of connection. (4) Some PC models cannot be connected to the set. (5) There is no need to use an adapter...

TH61PHW6 User Guide
Page 17
... Power ON parameters, and lastly an ETX signal in that order. If there are transmitted, be controlled by mistake, this display responds to come from the computer starts Command with this set by this unit) RG1 PC mode Notes: (1) If multiple commands are no parameters, then the parameter signal does not need to be sent. COMPUTER RS-232C straight cable SERIAL Connections...
... Power ON parameters, and lastly an ETX signal in that order. If there are transmitted, be controlled by mistake, this display responds to come from the computer starts Command with this set by this unit) RG1 PC mode Notes: (1) If multiple commands are no parameters, then the parameter signal does not need to be sent. COMPUTER RS-232C straight cable SERIAL Connections...
TH61PHW6 User Guide
Page 18
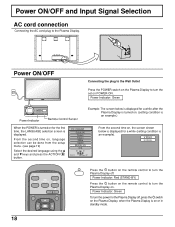
....) When the POWER is displayed. Power Indicator: Red (STAND-BY) Press the button on for a while (setting condition is on . Power Indicator: Green R - Power Indicator: Green To turn the Plasma Display on or in standby mode. 18 VOL + Connecting the plug to the Wall Outlet Press the POWER switch on the Plasma Display to turn the power for the Plasma Display off . VIDEO NORMAL INPUT SURROUND VOL N R Press the button on , language selection can be done from the setup menu. (see page...
....) When the POWER is displayed. Power Indicator: Red (STAND-BY) Press the button on for a while (setting condition is on . Power Indicator: Green R - Power Indicator: Green To turn the Plasma Display on or in standby mode. 18 VOL + Connecting the plug to the Wall Outlet Press the POWER switch on the Plasma Display to turn the power for the Plasma Display off . VIDEO NORMAL INPUT SURROUND VOL N R Press the button on , language selection can be done from the setup menu. (see page...

TH61PHW6 User Guide
Page 19
...: For COMPONENT INPUT (see page 33) VIDEO COMPONENT PC For RGB INPUT (see page 32) VIDEO RGB PC INPUT SURROUND VOL N R Selecting the On-Screen Menu Language INPUT SURROUND VOL N R PICTURE SOUND SET UP SET UP press to the Plasma Display. SET UP COMPONENT/RGB-IN SELECT RGB SIGNAL SCREENSAVER OSD LANGUAGE ENGLISH (US) 19 Input signals will change as a VCR which has been connected to display the SET UP menu. Selectable languages...
...: For COMPONENT INPUT (see page 33) VIDEO COMPONENT PC For RGB INPUT (see page 32) VIDEO RGB PC INPUT SURROUND VOL N R Selecting the On-Screen Menu Language INPUT SURROUND VOL N R PICTURE SOUND SET UP SET UP press to the Plasma Display. SET UP COMPONENT/RGB-IN SELECT RGB SIGNAL SCREENSAVER OSD LANGUAGE ENGLISH (US) 19 Input signals will change as a VCR which has been connected to display the SET UP menu. Selectable languages...

TH61PHW6 User Guide
Page 20
..../SIZE NORMALIZE NORMAL H-POS H-SIZE V-POS V-SIZE CLOCK PHASE PICTURE SOUND SET UP PICTURE POS. /SIZE ASPECT PC OFF TIMER PLASMA DISPLAY 20 PICTURE POS./SIZE NORMALIZE H-POS H-SIZE V-POS V-SIZE NORMAL During "RGB" and "PC" input signal modes. On-Screen Menu Display from Remote Control To PICTURE adjust menu (see page 29) VIDEO component input signal PICTURE NORMALIZE NORMAL PICTURE MENU PICTURE BRIGHTNESS COLOR TINT SHARPNESS COLOR TEMP ADVANCED SETTINGS NORMALIZE ADJUST SELECT STANDARD 0 0 0 0 0 NORMAL ON RETURN To ADVANCED SETTINGS menu (see next page) ADVANCED SETTINGS...
..../SIZE NORMALIZE NORMAL H-POS H-SIZE V-POS V-SIZE CLOCK PHASE PICTURE SOUND SET UP PICTURE POS. /SIZE ASPECT PC OFF TIMER PLASMA DISPLAY 20 PICTURE POS./SIZE NORMALIZE H-POS H-SIZE V-POS V-SIZE NORMAL During "RGB" and "PC" input signal modes. On-Screen Menu Display from Remote Control To PICTURE adjust menu (see page 29) VIDEO component input signal PICTURE NORMALIZE NORMAL PICTURE MENU PICTURE BRIGHTNESS COLOR TINT SHARPNESS COLOR TEMP ADVANCED SETTINGS NORMALIZE ADJUST SELECT STANDARD 0 0 0 0 0 NORMAL ON RETURN To ADVANCED SETTINGS menu (see next page) ADVANCED SETTINGS...

TH61PHW6 User Guide
Page 21
... B" settings. More W/B HIGH B Adjusts the white balance for dark red areas. A Adjust the white balance of the image in turn to make the adjustment. (2) The adjustment values are returned to adjust. C Repeat steps A and B to the factory settings. 21 Less More W/B LOW R Adjusts the white balance for light blue areas. Helpful Hint ( N / NORMALIZE Normalization) While the "ADVANCED SETTINGS" menu is displayed, if either the N button on the remote control is pressed at any time...
... B" settings. More W/B HIGH B Adjusts the white balance for dark red areas. A Adjust the white balance of the image in turn to make the adjustment. (2) The adjustment values are returned to adjust. C Repeat steps A and B to the factory settings. 21 Less More W/B LOW R Adjusts the white balance for light blue areas. Helpful Hint ( N / NORMALIZE Normalization) While the "ADVANCED SETTINGS" menu is displayed, if either the N button on the remote control is pressed at any time...

TH61PHW6 User Guide
Page 23
PC OFF TIMER PLASMA DISPLAY 23 ASPECT Controls The Plasma Display will allow you to "FULL" mode, and switching is not possible. For a 525i (480i), 625i (575i), 525p (480p) and 625p (575p) signal input during "COMPONENT" input signal mode, the mode is set to enjoy viewing the picture at its maximum size, including wide screen cinema format picture. INPUT SURROUND VOL N R PICTURE SOUND SET UP PICTURE POS. /SIZE ASPECT ASPECT ASPECT button The aspect mode changes each time the ASPECT button is memorized...
PC OFF TIMER PLASMA DISPLAY 23 ASPECT Controls The Plasma Display will allow you to "FULL" mode, and switching is not possible. For a 525i (480i), 625i (575i), 525p (480p) and 625p (575p) signal input during "COMPONENT" input signal mode, the mode is set to enjoy viewing the picture at its maximum size, including wide screen cinema format picture. INPUT SURROUND VOL N R PICTURE SOUND SET UP PICTURE POS. /SIZE ASPECT ASPECT ASPECT button The aspect mode changes each time the ASPECT button is memorized...

TH61PHW6 User Guide
Page 27
... power is turned off or volume level is pressed during "NORMALIZE", then all adjustment values are memorized separately for each item. Helpful Hint ( N / NORMALIZE Normalization) While the "SOUND" menu is displayed, if either the N button on the remote control is pressed at any time or the (ACTION button) is changed. 27 Press this button to adjust each SOUND mode (STANDARD, AUTO). INPUT SURROUND VOL N R PICTURE SOUND SET UP PICTURE BASS Adjusts low sounds TREBLE Adjusts high sounds...
... power is turned off or volume level is pressed during "NORMALIZE", then all adjustment values are memorized separately for each item. Helpful Hint ( N / NORMALIZE Normalization) While the "SOUND" menu is displayed, if either the N button on the remote control is pressed at any time or the (ACTION button) is changed. 27 Press this button to adjust each SOUND mode (STANDARD, AUTO). INPUT SURROUND VOL N R PICTURE SOUND SET UP PICTURE BASS Adjusts low sounds TREBLE Adjusts high sounds...

TH61PHW6 User Guide
Page 33
.... N R PICTURE SOUND SET UP PICTURE POS. /SIZE ASPECT SET UP COMPONENT/RGB-IN SELECT RGB SIGNAL SCREENSAVER OSD LANGUAGE ENGLISH (US) COMPONENT RGB R Press to select the "COMPONENT / RGB IN SELECT". Press (ACTION) button SIGNAL 3D Y/C FILTER (NTSC) COLOR SYSTEM Panasonic AUTO (4:3) [ VIDEO ] ON AUTO NORMAL Note: When on, this setting only affects NTSC input signals. 33 INPUT SURROUND 2 VOL Press to exit from adjust mode. 3D Y/C FILTER - For NTSC Video images...
.... N R PICTURE SOUND SET UP PICTURE POS. /SIZE ASPECT SET UP COMPONENT/RGB-IN SELECT RGB SIGNAL SCREENSAVER OSD LANGUAGE ENGLISH (US) COMPONENT RGB R Press to select the "COMPONENT / RGB IN SELECT". Press (ACTION) button SIGNAL 3D Y/C FILTER (NTSC) COLOR SYSTEM Panasonic AUTO (4:3) [ VIDEO ] ON AUTO NORMAL Note: When on, this setting only affects NTSC input signals. 33 INPUT SURROUND 2 VOL Press to exit from adjust mode. 3D Y/C FILTER - For NTSC Video images...

TH61PHW6 User Guide
Page 36
... outlet Not switched on PICTURE and BRIGHTNESS/Volume setting (Check by pressing the power switch or stand-by rotation of still pictures include logos, video games, computer images, teletext and images displayed in 4:3 mode. Whirring sounds can cause a permanent after -image on the remote control.) No Picture Normal Sound If a signal with a cooling fan to dissipate heat generated during normal from fixed image use .The whirring sound is displayed. Note: The permanent after -image to display fixed images for service, determine...
... outlet Not switched on PICTURE and BRIGHTNESS/Volume setting (Check by pressing the power switch or stand-by rotation of still pictures include logos, video games, computer images, teletext and images displayed in 4:3 mode. Whirring sounds can cause a permanent after -image on the remote control.) No Picture Normal Sound If a signal with a cooling fan to dissipate heat generated during normal from fixed image use .The whirring sound is displayed. Note: The permanent after -image to display fixed images for service, determine...

TH61PHW6 User Guide
Page 37
Specifications Power Source Power Consumption Maximum Stand-by condition Power off condition Plasma Display panel Contrast Ratio Screen size Operating condition Temperature Humidity Applicable signals Color System Scanning format PC signals Connection terminals AV COMPONENT/RGB PC SERIAL SPEAKERS (6 ohm) 120 V AC, 50/60 Hz 8.5 A 2.8 W 1.7 W Drive method AC type 61-inch, 16:9 aspect ratio 3000:1 1,352 mm (W) × 760 mm (H) × 1,551 mm (diagonal) No. of pixels 1,049,088 (1,366 (W) × 768 (H)) [4,098...
Specifications Power Source Power Consumption Maximum Stand-by condition Power off condition Plasma Display panel Contrast Ratio Screen size Operating condition Temperature Humidity Applicable signals Color System Scanning format PC signals Connection terminals AV COMPONENT/RGB PC SERIAL SPEAKERS (6 ohm) 120 V AC, 50/60 Hz 8.5 A 2.8 W 1.7 W Drive method AC type 61-inch, 16:9 aspect ratio 3000:1 1,352 mm (W) × 760 mm (H) × 1,551 mm (diagonal) No. of pixels 1,049,088 (1,366 (W) × 768 (H)) [4,098...


