
TH42PWD4UY User Guide
Page 5
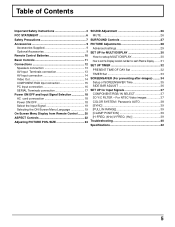
... and Input Signal Selection 18 COMPONENT/RGB/ IN SELECT 37 AC cord conncection 18 3D Y/C FILTER - For NTSC Video images 37 Power ON/OFF 18 COLOR SYSTEM / Panasonic AUTO 38 Select the Input Signal 19 [SYNC 39 Selecting the ON-Screen Menu Language 19 [PULL IN RANGE 39 On-Screen Menu Display from Remote Control ........ 20 [CLAMP POSITION 39 ASPECT Controls 22 [H-FREQ. (kHz)/V-FREQ. (Hz 39 Adjusting PICTURE POS./SIZE 24 Troubleshooting 40 Specifications 42 5
... and Input Signal Selection 18 COMPONENT/RGB/ IN SELECT 37 AC cord conncection 18 3D Y/C FILTER - For NTSC Video images 37 Power ON/OFF 18 COLOR SYSTEM / Panasonic AUTO 38 Select the Input Signal 19 [SYNC 39 Selecting the ON-Screen Menu Language 19 [PULL IN RANGE 39 On-Screen Menu Display from Remote Control ........ 20 [CLAMP POSITION 39 ASPECT Controls 22 [H-FREQ. (kHz)/V-FREQ. (Hz 39 Adjusting PICTURE POS./SIZE 24 Troubleshooting 40 Specifications 42 5
TH42PWD4UY User Guide
Page 7
... Plasma Display is suspected, have it repaired at an Authorized Service Center. If using the pedestal (optional accessory), leave a space of 3 15/16" (10 cm) or more at the top, left and right, and 3/4" (1.9 cm) or more at the rear. Do not do anything that need to the cable is dropped, or if the cabinet becomes damaged, disconnect the power cord plug...
... Plasma Display is suspected, have it repaired at an Authorized Service Center. If using the pedestal (optional accessory), leave a space of 3 15/16" (10 cm) or more at the top, left and right, and 3/4" (1.9 cm) or more at the rear. Do not do anything that need to the cable is dropped, or if the cabinet becomes damaged, disconnect the power cord plug...
TH42PWD4UY User Guide
Page 8
... Electric Industrial Co., Ltd.) • Speakers TY-SP42PWD3W • Pedestal TY-ST42PT3-K • Wall stand TY-ST42PW1 • Mobile stand TY-ST42PF3 • Wall-habging bracket (vertical TY-WK42PV1 • Wall-hanging bracket (angled TY-WK42PR1 • Ceiling unit TY-CE42PS1 • Wall-hanging bracket for PDP with a dry cloth. • Do not allow a still picture to be displayed for long periods in heat damages...
... Electric Industrial Co., Ltd.) • Speakers TY-SP42PWD3W • Pedestal TY-ST42PT3-K • Wall stand TY-ST42PW1 • Mobile stand TY-ST42PF3 • Wall-habging bracket (vertical TY-WK42PV1 • Wall-hanging bracket (angled TY-WK42PR1 • Ceiling unit TY-CE42PS1 • Wall-hanging bracket for PDP with a dry cloth. • Do not allow a still picture to be displayed for long periods in heat damages...

TH42PWD4UY User Guide
Page 9
... Operating Instruction book Remote Control Transmitter EUR646525 INPUT SURROUND VOL N R PICTURE SOUND SET UP PICTURE POS. /SIZE ASPECT PC OFF TIMER PLASMA DISPLAY Batteries for the Remote Control Transmitter (AA(R6) Battery × 2) Warranty Ferrite core J0KF00000018 × 2 Fixing bands TMME187 × 2 AC cord Optional Accessories • Speakers • Pedestal TY-SP42PWD3W TY-ST42PT3-K • Wall stand TY-ST42PW1 • Mobile stand TY-ST42PF3 • Wall-hanging bracket (vertical) TY-WK42PV1 • Wall-hanging bracket (angled...
... Operating Instruction book Remote Control Transmitter EUR646525 INPUT SURROUND VOL N R PICTURE SOUND SET UP PICTURE POS. /SIZE ASPECT PC OFF TIMER PLASMA DISPLAY Batteries for the Remote Control Transmitter (AA(R6) Battery × 2) Warranty Ferrite core J0KF00000018 × 2 Fixing bands TMME187 × 2 AC cord Optional Accessories • Speakers • Pedestal TY-SP42PWD3W TY-ST42PT3-K • Wall stand TY-ST42PW1 • Mobile stand TY-ST42PF3 • Wall-hanging bracket (vertical) TY-WK42PV1 • Wall-hanging bracket (angled...

TH42PWD4UY User Guide
Page 10
..., heat or burn used battery with a new one. 3. must match the markings in reverse until the lock snaps. Replace the cove and slide in the compartment). 3. Two "AA" size Helpful Hint: For frequent remote control users, replace old batteries with "Alkaline"). 4. Batteries should always be replaced as shown in the battery compartment. (Polarity + or - Turn the transmitter face down. Install the batteries...
..., heat or burn used battery with a new one. 3. must match the markings in reverse until the lock snaps. Replace the cove and slide in the compartment). 3. Two "AA" size Helpful Hint: For frequent remote control users, replace old batteries with "Alkaline"). 4. Batteries should always be replaced as shown in the battery compartment. (Polarity + or - Turn the transmitter face down. Install the batteries...

TH42PWD4UY User Guide
Page 11
... used to switch OFF TIMER button directly to select VIDEO(S VIDEO)/COMPONENT or RGB/PC input signal modes sequentially. When three minutes remain, "Off timer 3" will light. • Power-OFF ..... Stand-by (ON/OFF) button The Plasma Display must first be preset to switch to select VIDEO(S VIDEO)/ COMPONENT or RGB/PC input signal modes sequentially. (see page 19) INPUT Sound mute On/Off (see page 26) SURROUND Volume Adjustment OFF TIMER 90 3 1 VIDEO(S VIDEO)/COMPONENT, RGB/PC mode 2 Aspect mode...
... used to switch OFF TIMER button directly to select VIDEO(S VIDEO)/COMPONENT or RGB/PC input signal modes sequentially. When three minutes remain, "Off timer 3" will light. • Power-OFF ..... Stand-by (ON/OFF) button The Plasma Display must first be preset to switch to select VIDEO(S VIDEO)/ COMPONENT or RGB/PC input signal modes sequentially. (see page 19) INPUT Sound mute On/Off (see page 26) SURROUND Volume Adjustment OFF TIMER 90 3 1 VIDEO(S VIDEO)/COMPONENT, RGB/PC mode 2 Aspect mode...
TH42PWD4UY User Guide
Page 13
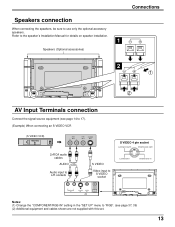
Speakers connection When connecting the speakers, be sure to "RGB". (see page 37, 39) (2) Additional equipment and cables shown are not supplied with this set. 13 Refer to the speaker's Installation Manual for details on speaker installation. 1 Speakers (Optional accessories) Connections 2 1 2 AV Input Terminals connection Connect the signal source equipment (see page 14 to 17). (Example) When connecting an S VIDEO VCR (S VIDEO VCR) Audio OUT R L Video OUT S VIDEO OUT 2×RCA audio cables AUDIO Audio input to L/R sockets S VIDEO Video input to S VIDEO socket S VIDEO 4 pin...
Speakers connection When connecting the speakers, be sure to "RGB". (see page 37, 39) (2) Additional equipment and cables shown are not supplied with this set. 13 Refer to the speaker's Installation Manual for details on speaker installation. 1 Speakers (Optional accessories) Connections 2 1 2 AV Input Terminals connection Connect the signal source equipment (see page 14 to 17). (Example) When connecting an S VIDEO VCR (S VIDEO VCR) Audio OUT R L Video OUT S VIDEO OUT 2×RCA audio cables AUDIO Audio input to L/R sockets S VIDEO Video input to S VIDEO socket S VIDEO 4 pin...
TH42PWD4UY User Guide
Page 16
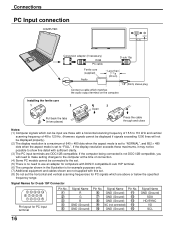
.../2B-compatible, you will need to make setting changes to the computer at the time of connection. (4) Some PC models cannot be connected to the set. (5) There is no need to use an adapter for computers with DOS/V compatible D-sub 15P terminal. (6) The computer shown in two places) Press the cable through and close Notes: (1) Computer signals which can be input are DDC1/2B-compatible. If the display resolution exceeds...
.../2B-compatible, you will need to make setting changes to the computer at the time of connection. (4) Some PC models cannot be connected to the set. (5) There is no need to use an adapter for computers with DOS/V compatible D-sub 15P terminal. (6) The computer shown in two places) Press the cable through and close Notes: (1) Computer signals which can be input are DDC1/2B-compatible. If the display resolution exceeds...

TH42PWD4UY User Guide
Page 17
... cable to connect the computer to PON command only. 17 DAM RG1 None NORM ZOOM FULL JUST SELF PC mode Screen mode select (toggle) NORMAL (4:3) ZOOM FULL JUST Panasonic AUTO With the power off, this display responds to the Plasma Display. (2) The computers shown is for RS-232C The SERIAL terminal conforms to the RS-232C interface specification, so that order. Communication parameters Signal...
... cable to connect the computer to PON command only. 17 DAM RG1 None NORM ZOOM FULL JUST SELF PC mode Screen mode select (toggle) NORMAL (4:3) ZOOM FULL JUST Panasonic AUTO With the power off, this display responds to the Plasma Display. (2) The computers shown is for RS-232C The SERIAL terminal conforms to the RS-232C interface specification, so that order. Communication parameters Signal...

TH42PWD4UY User Guide
Page 18
... button on the remote control to turn the power for a while (setting condition is displayed. STANDBY G POWER ON TY-42PWD4 Power Indicator Remote Control Sensor Example: The screen below is displayed for the Plasma Display off Power Indicator: Red (standby) Press the button on the remote control to turn the Plasma Display off , press the switch on the Plasma Display, when the Plasma Display is on or in standby mode. Power ON/OFF and Input Signal Selection AC cord connection Connecting the AC cord plug to the Wall Outlet R - Power ON/OFF Connecting...
... button on the remote control to turn the power for a while (setting condition is displayed. STANDBY G POWER ON TY-42PWD4 Power Indicator Remote Control Sensor Example: The screen below is displayed for the Plasma Display off Power Indicator: Red (standby) Press the button on the remote control to turn the Plasma Display off , press the switch on the Plasma Display, when the Plasma Display is on or in standby mode. Power ON/OFF and Input Signal Selection AC cord connection Connecting the AC cord plug to the Wall Outlet R - Power ON/OFF Connecting...
TH42PWD4UY User Guide
Page 19
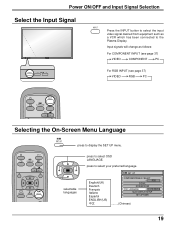
... DISPLAY SETUP SET UP TIMER .........(Chinese) 19 press to display the SET UP menu. STANDBY G POWER ON INPUT - VOL + INPUT Press the INPUT button to select the input video signal desired from equipment such as follows: For COMPONENT INPUT (see page 37) VIDEO RGB PC INPUT SURROUND VOL N R Selecting the On-Screen Menu Language INPUT SURROUND VOL N R PICTURE SOUND SET UP SET UP press to select your preferred language. Input signals will change as a VCR which has been connected to...
... DISPLAY SETUP SET UP TIMER .........(Chinese) 19 press to display the SET UP menu. STANDBY G POWER ON INPUT - VOL + INPUT Press the INPUT button to select the input video signal desired from equipment such as follows: For COMPONENT INPUT (see page 37) VIDEO RGB PC INPUT SURROUND VOL N R Selecting the On-Screen Menu Language INPUT SURROUND VOL N R PICTURE SOUND SET UP SET UP press to select your preferred language. Input signals will change as a VCR which has been connected to...
TH42PWD4UY User Guide
Page 20
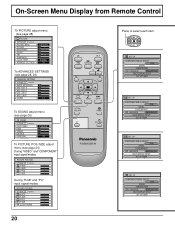
... 20 INPUT SURROUND VOL N R PICTURE SOUND SET UP PICTURE POS. /SIZE ASPECT PC OFF TIMER PLASMA DISPLAY Press to select each item. On-Screen Menu Display from Remote Control To PICTURE adjust menu (see page 28) PICTURE NORMALIZE NORMAL PICTURE MENU PICTURE BRIGHTNESS COLOR TINT SHARPNESS COLOR TEMP ADVANCED SETTINGS STANDARD 0 0 0 0 0 NORMAL ON To ADVANCED SETTINGS (see page 28, 29) ADVANCED SETTINGS NORMALIZE NORMAL BLACK EXTENSION W/B HIGH R W/B HIGH B W/B LOW R W/B LOW B GAMMA 0 0 0 0 0 2. 2 To SOUND adjust menu (see page 26) SOUND NORMALIZE NORMAL AUDIO MENU...
... 20 INPUT SURROUND VOL N R PICTURE SOUND SET UP PICTURE POS. /SIZE ASPECT PC OFF TIMER PLASMA DISPLAY Press to select each item. On-Screen Menu Display from Remote Control To PICTURE adjust menu (see page 28) PICTURE NORMALIZE NORMAL PICTURE MENU PICTURE BRIGHTNESS COLOR TINT SHARPNESS COLOR TEMP ADVANCED SETTINGS STANDARD 0 0 0 0 0 NORMAL ON To ADVANCED SETTINGS (see page 28, 29) ADVANCED SETTINGS NORMALIZE NORMAL BLACK EXTENSION W/B HIGH R W/B HIGH B W/B LOW R W/B LOW B GAMMA 0 0 0 0 0 2. 2 To SOUND adjust menu (see page 26) SOUND NORMALIZE NORMAL AUDIO MENU...
TH42PWD4UY User Guide
Page 21
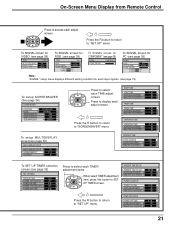
... 39) SIGNAL [ PC ] SYNC H & V PULL-IN RANGE NARROW CLAMP POSITION H-FREQ. 31.5 kHz V-FREQ. 60.0 Hz Note: "SIGNAL" setup menu displays different setting condition for each input signals. (see page 19) To setup SCREENSAVER (See page 34) SCREENSAVER FUNCTION MODE SHOW DURATION SAVER DURATION SIDE BAR ADJUST WHITE BAR SCROLL INTERVAL 0:00 0:00 BRIGHT To setup MULTIDISPLAY screen(see page 32) SET UP TIMER PRESENT TIME 0:52 POWER ON...
... 39) SIGNAL [ PC ] SYNC H & V PULL-IN RANGE NARROW CLAMP POSITION H-FREQ. 31.5 kHz V-FREQ. 60.0 Hz Note: "SIGNAL" setup menu displays different setting condition for each input signals. (see page 19) To setup SCREENSAVER (See page 34) SCREENSAVER FUNCTION MODE SHOW DURATION SAVER DURATION SIDE BAR ADJUST WHITE BAR SCROLL INTERVAL 0:00 0:00 BRIGHT To setup MULTIDISPLAY screen(see page 32) SET UP TIMER PRESENT TIME 0:52 POWER ON...

TH42PWD4UY User Guide
Page 22
... TIMER PLASMA DISPLAY 22 For a 525i (480i), 625i (575i) signal input during "COMPONENT" input signal mode, the mode is set to enjoy viewing the picture at its maximum size, including wide screen cinema format picture. INPUT SURROUND VOL N R PICTURE SOUND SET UP PICTURE POS. /SIZE ASPECT ASPECT ASPECT button The aspect mode changes each time the ASPECT button is memorized separately for each input terminal (VIDEO, COMPONENT, RGB and PC). NORMAL ZOOM FULL Panasonic AUTO JUST Notes: (1) During RGB and PC input signal modes...
... TIMER PLASMA DISPLAY 22 For a 525i (480i), 625i (575i) signal input during "COMPONENT" input signal mode, the mode is set to enjoy viewing the picture at its maximum size, including wide screen cinema format picture. INPUT SURROUND VOL N R PICTURE SOUND SET UP PICTURE POS. /SIZE ASPECT ASPECT ASPECT button The aspect mode changes each time the ASPECT button is memorized separately for each input terminal (VIDEO, COMPONENT, RGB and PC). NORMAL ZOOM FULL Panasonic AUTO JUST Notes: (1) During RGB and PC input signal modes...

TH42PWD4UY User Guide
Page 24
PICTURE POS./SIZE NORMALIZE H-POS H-SIZE V-POS V-SIZE NORMAL PICTURE POS./SIZE NORMALIZE NORMAL H-POS H-SIZE V-POS V-SIZE CLOCK PHASE 3 Press to select H-POS/H-SIZE/V-POS/ V-SIZE/CLOCK PHASE. During "VIDEO" and "COMPONENT" input signal modes. INPUT SURROUND VOL N R PICTURE SOUND SET UP PICTURE POS. /SIZE ASPECT PC OFF TIMER PLASMA DISPLAY R Press to display the PICTURE POS./ SIZE menu. Notes: (1) Adjustment details are memorized separately for different input signal formats (Adjustments for component signals are memorized for 525i (480i), 625i (575i), 525p (480p...
PICTURE POS./SIZE NORMALIZE H-POS H-SIZE V-POS V-SIZE NORMAL PICTURE POS./SIZE NORMALIZE NORMAL H-POS H-SIZE V-POS V-SIZE CLOCK PHASE 3 Press to select H-POS/H-SIZE/V-POS/ V-SIZE/CLOCK PHASE. During "VIDEO" and "COMPONENT" input signal modes. INPUT SURROUND VOL N R PICTURE SOUND SET UP PICTURE POS. /SIZE ASPECT PC OFF TIMER PLASMA DISPLAY R Press to display the PICTURE POS./ SIZE menu. Notes: (1) Adjustment details are memorized separately for different input signal formats (Adjustments for component signals are memorized for 525i (480i), 625i (575i), 525p (480p...

TH42PWD4UY User Guide
Page 26
... reactivated when power is turned off or volume level is pressed during "NORMALIZE", then all adjustment values are returned to the factory settings. SOUND Adjustment 1 SOUND Press to display the Sound menu. 2 Select to mute the sound. AUTO Automatically controls proper volume level. Press this button to adjust each item. INPUT SURROUND VOL N R PICTURE SOUND SET UP BASS Adjusts low sounds TREBLE Adjusts high sounds BALANCE Adjusts left and right volumes SOUND NORMALIZE NORMAL AUDIO MENU BASS TREBLE BALANCE SURROUND SURROUND...
... reactivated when power is turned off or volume level is pressed during "NORMALIZE", then all adjustment values are returned to the factory settings. SOUND Adjustment 1 SOUND Press to display the Sound menu. 2 Select to mute the sound. AUTO Automatically controls proper volume level. Press this button to adjust each item. INPUT SURROUND VOL N R PICTURE SOUND SET UP BASS Adjusts low sounds TREBLE Adjusts high sounds BALANCE Adjusts left and right volumes SOUND NORMALIZE NORMAL AUDIO MENU BASS TREBLE BALANCE SURROUND SURROUND...

TH42PWD4UY User Guide
Page 28
... time or the (ACTION button) is displayed, if either the N button on the Remote Control to display the PICTURE menu. 2 Select to adjust each item. This menu selects higher than normal levels of BRIGHTNESS and PICTURE. ADVANCED SETTINGS ON Enables fine picture adjustment at the picture behind the menu. ADVANCED SETTINGS NORMALIZE NORMAL BLACK EXTENSION W/B HIGH R W/B HIGH B W/B LOW R W/B LOW B GAMMA 0 0 0 0 0 2. 2 ADVANCED SETTINGS OFF Displays images with settings of the selected PICTURE menu to enter ADVANCED SETTINGS mode...
... time or the (ACTION button) is displayed, if either the N button on the Remote Control to display the PICTURE menu. 2 Select to adjust each item. This menu selects higher than normal levels of BRIGHTNESS and PICTURE. ADVANCED SETTINGS ON Enables fine picture adjustment at the picture behind the menu. ADVANCED SETTINGS NORMALIZE NORMAL BLACK EXTENSION W/B HIGH R W/B HIGH B W/B LOW R W/B LOW B GAMMA 0 0 0 0 0 2. 2 ADVANCED SETTINGS OFF Displays images with settings of the selected PICTURE menu to enter ADVANCED SETTINGS mode...

TH42PWD4UY User Guide
Page 29
... remote control unit, while the "Advanced settings" menu is displayed, if either the N button is pressed at any time or the (Access button) is increased with a bright picture or reduced with a dark picture. Adjust for dark blue areas. ADVANCED SETTINGS Item BLACK EXTENSION Effect Less More Details Adjusts the dark shades of dark pictures such as follows. More W/B HIGH B Less Adjusts the white balance for dark red areas. A Adjust the white...
... remote control unit, while the "Advanced settings" menu is displayed, if either the N button is pressed at any time or the (Access button) is increased with a bright picture or reduced with a dark picture. Adjust for dark blue areas. ADVANCED SETTINGS Item BLACK EXTENSION Effect Less More Details Adjusts the dark shades of dark pictures such as follows. More W/B HIGH B Less Adjusts the white balance for dark red areas. A Adjust the white...

TH42PWD4UY User Guide
Page 37
... match the signals from the "SET UP" menu during VIDEO input signal mode. ("SIGNAL [VIDEO]" menu is displayed.) Press to select the "3D Y/C FILTER (NTSC)" Press to set ON/OFF. SET UP COMPONENT/RGB-IN SELECT RGB SIGNAL SCREENSAVER OSD LANGUAGE ENGLISH (US) MULTI DISPLAY SETUP SET UP TIMER PICTURE POS. /SIZE ASPECT COMPONENT RGB R Press to exit from adjust mode. Press (ACTION) button SIGNAL 3D Y/C FILTER (NTSC) COLOR SYSTEM Panasonic AUTO (4:3) [ VIDEO ] ON AUTO NORMAL 37 SET UP COMPONENT...
... match the signals from the "SET UP" menu during VIDEO input signal mode. ("SIGNAL [VIDEO]" menu is displayed.) Press to select the "3D Y/C FILTER (NTSC)" Press to set ON/OFF. SET UP COMPONENT/RGB-IN SELECT RGB SIGNAL SCREENSAVER OSD LANGUAGE ENGLISH (US) MULTI DISPLAY SETUP SET UP TIMER PICTURE POS. /SIZE ASPECT COMPONENT RGB R Press to exit from adjust mode. Press (ACTION) button SIGNAL 3D Y/C FILTER (NTSC) COLOR SYSTEM Panasonic AUTO (4:3) [ VIDEO ] ON AUTO NORMAL 37 SET UP COMPONENT...

TH42PWD4UY User Guide
Page 42
... (high impedance) EXTERNAL CONTROL TERMINAL (D-SUB9PIN) RS-232C COMPATIBLE 16W [8 W + 8 W] (10 % THD) For TY-SP42PWD3W only 42 Specifications Power Source Power Consumption Maximum Stand-by condition Power off condition Plasma Display panel Contrast Ratio Brightness Capability Screen size Operating condition Temperature Humidity Applicable signals Color System Scanning format PC signals Connection terminals AV COMPONENT/RGB PC SERIAL SPEAKERS (6 Ω) TH-42PWD4 120 V AC, 50/60 Hz 395 W 1.8 W 1.6 W Drive method AC type 42-inch, 16:9 aspect ratio...
... (high impedance) EXTERNAL CONTROL TERMINAL (D-SUB9PIN) RS-232C COMPATIBLE 16W [8 W + 8 W] (10 % THD) For TY-SP42PWD3W only 42 Specifications Power Source Power Consumption Maximum Stand-by condition Power off condition Plasma Display panel Contrast Ratio Brightness Capability Screen size Operating condition Temperature Humidity Applicable signals Color System Scanning format PC signals Connection terminals AV COMPONENT/RGB PC SERIAL SPEAKERS (6 Ω) TH-42PWD4 120 V AC, 50/60 Hz 395 W 1.8 W 1.6 W Drive method AC type 42-inch, 16:9 aspect ratio...


