

User Manual
Page 1
TH-L32C10K TH-L32C10M TH-L32C10R TH-L32C10S TH-L32C10X TH-L32C12K TH-L32C11KG Please read these instructions before operating your set and retain them for illustrative purposes only. The images shown in this manual are for future reference. Operating Instructions LCD TV Model No. English TL TQB4GC0300-1
TH-L32C10K TH-L32C10M TH-L32C10R TH-L32C10S TH-L32C10X TH-L32C12K TH-L32C11KG Please read these instructions before operating your set and retain them for illustrative purposes only. The images shown in this manual are for future reference. Operating Instructions LCD TV Model No. English TL TQB4GC0300-1

User Manual
Page 5
Transport only in upright position 10 10 10 (cm) When using Wall-hanging bracket, follow the manual of neutral detergent. Do not block the rear air vents Blocked ventilation by peeling the paint. Maintenance First, remove the mains plug from these types ...
Transport only in upright position 10 10 10 (cm) When using Wall-hanging bracket, follow the manual of neutral detergent. Do not block the rear air vents Blocked ventilation by peeling the paint. Maintenance First, remove the mains plug from these types ...
User Manual
Page 6
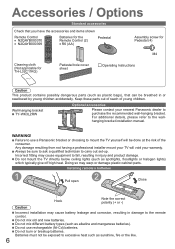
...AA) Pedestal Assembly screw for Pedestal (4) M4 Cleaning cloth (Not applicable for TH-L32C11KG) Pedestal hole cover sheet Operating Instructions Caution This product contains possibly dangerous parts (such ...as alkaline and manganese batteries). Do not use a Panasonic bracket or choosing to mount the TV yourself will void your nearest Panasonic dealer to the remote control. Accessories / Options Standard ... Incorrect fitting may cause equipment to the wallhanging bracket installation manual. Do not mix old and new batteries. Batteries must not be breathed in damage to...
...AA) Pedestal Assembly screw for Pedestal (4) M4 Cleaning cloth (Not applicable for TH-L32C11KG) Pedestal hole cover sheet Operating Instructions Caution This product contains possibly dangerous parts (such ...as alkaline and manganese batteries). Do not use a Panasonic bracket or choosing to mount the TV yourself will void your nearest Panasonic dealer to the remote control. Accessories / Options Standard ... Incorrect fitting may cause equipment to the wallhanging bracket installation manual. Do not mix old and new batteries. Batteries must not be breathed in damage to...

User Manual
Page 9
... Aerial system for your particular area and the accessories required. VIERA Link connection p. 33 Read the manual of you may be absolutely sure to disconnect the mains plug at the socket outlet first. TV... only AC AUTO 110-240 V, 50/60 Hz (TH-L32C10R only: AC Single 220-240 V, 50/60 Hz) Connecting aerial Rear of the TV Aerial VIDEO VIDEO... IN R AUDIO COMPONENT AV 2 IN RF cable TV, DVD Recorder or VCR AC AUTO 110-240 V, 50/60 Hz (TH-L32C10R only: AC Single 220-240 V, 50/60 Hz) Mains lead Connecting DVD Recorder / VCR Rear of the TV VIDEO...
... Aerial system for your particular area and the accessories required. VIERA Link connection p. 33 Read the manual of you may be absolutely sure to disconnect the mains plug at the socket outlet first. TV... only AC AUTO 110-240 V, 50/60 Hz (TH-L32C10R only: AC Single 220-240 V, 50/60 Hz) Connecting aerial Rear of the TV Aerial VIDEO VIDEO... IN R AUDIO COMPONENT AV 2 IN RF cable TV, DVD Recorder or VCR AC AUTO 110-240 V, 50/60 Hz (TH-L32C10R only: AC Single 220-240 V, 50/60 Hz) Mains lead Connecting DVD Recorder / VCR Rear of the TV VIDEO...
User Manual
Page 16
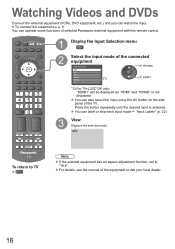
...has an aspect adjustment function, set to "16:9". You can operate some functions of selected Panasonic external equipment with this remote control. 1 Display the Input Selection menu 2 Select the ...of the connected equipment Input Selection 2 change AV1 AV2 PC HDMI1 *2 HDMI2 1 select TV *2) For TH-L32C12K only: "HDMI1" will be displayed as "HDMI" and "HDMI2" is selected. Press the button... repeatedly until the desired input is not displayed. For details, see the manual of the TV. To connect the equipment p. 9 You can also select the input using the...
...has an aspect adjustment function, set to "16:9". You can operate some functions of selected Panasonic external equipment with this remote control. 1 Display the Input Selection menu 2 Select the ...of the connected equipment Input Selection 2 change AV1 AV2 PC HDMI1 *2 HDMI2 1 select TV *2) For TH-L32C12K only: "HDMI1" will be displayed as "HDMI" and "HDMI2" is selected. Press the button... repeatedly until the desired input is not displayed. For details, see the manual of the TV. To connect the equipment p. 9 You can also select the input using the...

User Manual
Page 19
...System Menu Other Settings Off Access Access Access Access Access Access Access 1/2 +4 +4 0 0 2/2 *3 (p. 20) Tuning Menu Channel List Edit Auto Tuning Manual Tuning OSD Language Access Access Access (p. 21) (p. 21) Display Settings Teletext Teletext Character Set Input Labels Banner Display Timeout Playing Time Display TOP English Access...Colour Matrix Power Save Picture Overscan Auto SD Off On Depending on the received signals, available items are varied. *3) For TH-L32C12K only : "HDMI1 Input" will be displayed as "HDMI Input". (p. 26) (p. 21) (p. 34) (p. 28) (p. 21) 19 Advanced
...System Menu Other Settings Off Access Access Access Access Access Access Access 1/2 +4 +4 0 0 2/2 *3 (p. 20) Tuning Menu Channel List Edit Auto Tuning Manual Tuning OSD Language Access Access Access (p. 21) (p. 21) Display Settings Teletext Teletext Character Set Input Labels Banner Display Timeout Playing Time Display TOP English Access...Colour Matrix Power Save Picture Overscan Auto SD Off On Depending on the received signals, available items are varied. *3) For TH-L32C12K only : "HDMI1 Input" will be displayed as "HDMI Input". (p. 26) (p. 21) (p. 34) (p. 28) (p. 21) 19 Advanced
User Manual
Page 21
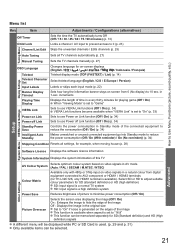
...the power consumption (Off / On (With reminder) / On (No reminder)) (p. 34) Shipping Condition Resets all TV channels automatically (p. 27) Manual Tuning Sets the TV channels manually (p. 27) OSD Language Teletext Teletext Character Set Input Labels Changes language for on-screen displays (English / / / / / / Indonesia / ...Sets how long the information banner stays on screen from digital equipment connected to AV2 component or HDMI1 / HDMI2 terminals (for TH-L32C12K, only HDMI1 terminal is available). Advanced 21 in 1-sec. Select SD or HD to adjust suitable colour parameters for ...
...the power consumption (Off / On (With reminder) / On (No reminder)) (p. 34) Shipping Condition Resets all TV channels automatically (p. 27) Manual Tuning Sets the TV channels manually (p. 27) OSD Language Teletext Teletext Character Set Input Labels Changes language for on-screen displays (English / / / / / / Indonesia / ...Sets how long the information banner stays on screen from digital equipment connected to AV2 component or HDMI1 / HDMI2 terminals (for TH-L32C12K, only HDMI1 terminal is available). Advanced 21 in 1-sec. Select SD or HD to adjust suitable colour parameters for ...

User Manual
Page 24
Editing Channels You can skip unwanted channels, etc. 1 Display the menu 2 Select "Setup" Main Menu Picture Sound Setup 3 Select "Tuning Menu" Setup Menu Off Timer Child Lock Tuning Menu OSD Language Display Settings VIERA Link Settings System Menu Other Settings Off Access 4 Select "Channel List Edit" Tuning Menu Channel List Edit Auto Tuning Manual Tuning Access 5 Set To return to TV 2 access 1 select 2 access 1 select 2 access 1 select 24
Editing Channels You can skip unwanted channels, etc. 1 Display the menu 2 Select "Setup" Main Menu Picture Sound Setup 3 Select "Tuning Menu" Setup Menu Off Timer Child Lock Tuning Menu OSD Language Display Settings VIERA Link Settings System Menu Other Settings Off Access 4 Select "Channel List Edit" Tuning Menu Channel List Edit Auto Tuning Manual Tuning Access 5 Set To return to TV 2 access 1 select 2 access 1 select 2 access 1 select 24

User Manual
Page 25
To retune each channel (Manual Tuning) (p. 27) 1 Select a channel to skip unwanted channels. p. 18 Store select Select new position Store Editing Channels Advanced 25 The hidden channels cannot be displayed ...
To retune each channel (Manual Tuning) (p. 27) 1 Select a channel to skip unwanted channels. p. 18 Store select Select new position Store Editing Channels Advanced 25 The hidden channels cannot be displayed ...

User Manual
Page 26
Tuning Channels You can retune all the TV channels when moving house. 1 Display the menu 2 Select "Setup" Main Menu Picture Sound Setup 3 Select "Tuning Menu" Setup Menu Off Timer Child Lock Tuning Menu OSD Language Display Settings VIERA Link Settings System Menu Other Settings Off Access 4 Select a function Tuning Menu Channel List Edit Auto Tuning Manual Tuning Access 5 Set To return to TV 2 access 1 select 2 access 1 select 2 access 1 select 26
Tuning Channels You can retune all the TV channels when moving house. 1 Display the menu 2 Select "Setup" Main Menu Picture Sound Setup 3 Select "Tuning Menu" Setup Menu Off Timer Child Lock Tuning Menu OSD Language Display Settings VIERA Link Settings System Menu Other Settings Off Access 4 Select a function Tuning Menu Channel List Edit Auto Tuning Manual Tuning Access 5 Set To return to TV 2 access 1 select 2 access 1 select 2 access 1 select 26

User Manual
Page 27
...27 Normally set Colour System "Auto". When the operation is connected only with the RF cable, select channel position "0". Manual Tuning 1 BBC1 Fine Tuning Manual Tuning 1 Sound System Colour System 5.5MHz Auto CH33 CH13230 Select the channel position Select the channel Search and store ... 1 Press repeatedly until "Auto Tuning" appears 2 Access "Auto Tuning" 3 Start "Auto Tuning" To return to TV Set channel manually Manual Tuning Fine Tuning Use to make small adjustments to adjust Set this function. Set Sound System and Colour System, and then perform this ...
...27 Normally set Colour System "Auto". When the operation is connected only with the RF cable, select channel position "0". Manual Tuning 1 BBC1 Fine Tuning Manual Tuning 1 Sound System Colour System 5.5MHz Auto CH33 CH13230 Select the channel position Select the channel Search and store ... 1 Press repeatedly until "Auto Tuning" appears 2 Access "Auto Tuning" 3 Start "Auto Tuning" To return to TV Set channel manually Manual Tuning Fine Tuning Use to make small adjustments to adjust Set this function. Set Sound System and Colour System, and then perform this ...
User Manual
Page 32
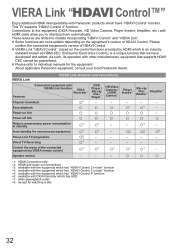
...Control. HD Video Camera / LUMIX Camera1 - Please refer to interface them automatically. About applicable Panasonic equipment, consult your local Panasonic dealer. Power on the control functions provided by VIERA remote control 3 3 3 ...disc 8: except for the equipment. This TV supports "HDAVI Control 4" function. As such, its operation with HDMI cable allow you to individual manuals for watching a disc 32 Auto standby for unnecessary equipment 3 3 - 5 - 3 Pause Live TV programme Direct TV ...
...Control. HD Video Camera / LUMIX Camera1 - Please refer to interface them automatically. About applicable Panasonic equipment, consult your local Panasonic dealer. Power on the control functions provided by VIERA remote control 3 3 3 ...disc 8: except for the equipment. This TV supports "HDAVI Control 4" function. As such, its operation with HDMI cable allow you to individual manuals for watching a disc 32 Auto standby for unnecessary equipment 3 3 - 5 - 3 Pause Live TV programme Direct TV ...
User Manual
Page 34
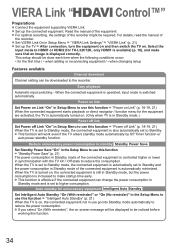
...power consumption is effective if the connected equipment can be downloaded to be done each time when the following conditions occur: • for TH-L32C12K, only HDMI1 is available) (p. 16), and make startup time early. This function is increased to Standby. This function will ...be required. VIERA Link " Control™" Preparations Connect the equipment supporting VIERA Link. For details, read the manual of the recorder might be displayed to the recorder. For optimal recording, the settings of the recorder. Easy playback Automatic input switching ...
...power consumption is effective if the connected equipment can be downloaded to be done each time when the following conditions occur: • for TH-L32C12K, only HDMI1 is available) (p. 16), and make startup time early. This function is increased to Standby. This function will ...be required. VIERA Link " Control™" Preparations Connect the equipment supporting VIERA Link. For details, read the manual of the recorder might be displayed to the recorder. For optimal recording, the settings of the recorder. Easy playback Automatic input switching ...
User Manual
Page 37
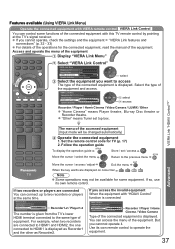
... can access the menu of the equipment and access. Use its own remote control. Set the remote control code for the connected equipment, read the manual of equipment. Features available (Using VIERA Link Menu) Operate the connected equipment with VIERA remote control VIERA Link Control You can control some equipment. VIERA...
... can access the menu of the equipment and access. Use its own remote control. Set the remote control code for the connected equipment, read the manual of equipment. Features available (Using VIERA Link Menu) Operate the connected equipment with VIERA remote control VIERA Link Control You can control some equipment. VIERA...

User Manual
Page 38
... may not work properly depending on if it is in multichannel sound, connect an HDMI cable from theatre speakers connected to the equipment. Read the manual of the equipment. "HDAVI Control 4" is the newest standard (current as of December, 2008) for the first few seconds when input mode is switched. Volume...
... may not work properly depending on if it is in multichannel sound, connect an HDMI cable from theatre speakers connected to the equipment. Read the manual of the equipment. "HDAVI Control 4" is the newest standard (current as of December, 2008) for the first few seconds when input mode is switched. Volume...


