
Operating Instructions
Page 5
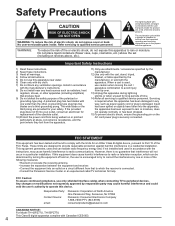
... for long periods of time. 14) Refer all instructions. 5) Do not use caution when moving the cart / apparatus combination to avoid injury from that to which can radiate radio frequency energy and, if not installed and used , use this apparatus near any ...No user-serviceable parts inside the product are in a particular installation. WARNING: To reduce the risk of North America One Panasonic Way, Secaucus, NJ 07094 Panasonic Consumer Electronics Company 1-888-VIEW-PTV (843-9788) consumerproducts@panasonic.com CANADIAN NOTICE: For Model TH-42PZ77U, TH-50PZ77U This Class B digital ...
... for long periods of time. 14) Refer all instructions. 5) Do not use caution when moving the cart / apparatus combination to avoid injury from that to which can radiate radio frequency energy and, if not installed and used , use this apparatus near any ...No user-serviceable parts inside the product are in a particular installation. WARNING: To reduce the risk of North America One Panasonic Way, Secaucus, NJ 07094 Panasonic Consumer Electronics Company 1-888-VIEW-PTV (843-9788) consumerproducts@panasonic.com CANADIAN NOTICE: For Model TH-42PZ77U, TH-50PZ77U This Class B digital ...
Operating Instructions
Page 6
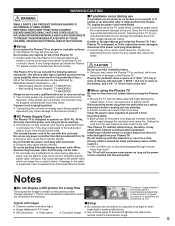
.... (p. 53) Typical still images ■ Setup Channel number and other logos Do not place the unit where it's exposed to operate on sloped or unstable surfaces. Disconnect the power plug from the Plasma TV, unplug the power cord immediately. If the plug is not covered by any objects on the plasma screen ("Image retention"). Install your Plasma TV. reflected light from direct or Do not use of optional accessories...
.... (p. 53) Typical still images ■ Setup Channel number and other logos Do not place the unit where it's exposed to operate on sloped or unstable surfaces. Disconnect the power plug from the Plasma TV, unplug the power cord immediately. If the plug is not covered by any objects on the plasma screen ("Image retention"). Install your Plasma TV. reflected light from direct or Do not use of optional accessories...
Operating Instructions
Page 11
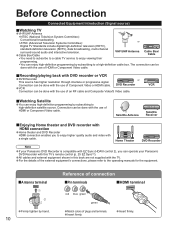
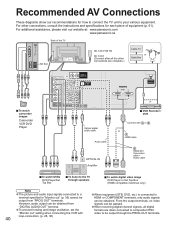
... include digital high-definition television (HDTV), standard-definition television (SDTV), data broadcasting, multi-channel ••surround-sound audio and interactive television. The connection can enjoy high-definition programming by hand. 10 red blue green green ••Match colors of Component Video or HDMI cable. Home Theater DVD Recorder Note •If your Panasonic ••DVD Recorder with the use of plugs and terminals. or •Connection can operate your Panasonic DVD Recorder is compatible...
... include digital high-definition television (HDTV), standard-definition television (SDTV), data broadcasting, multi-channel ••surround-sound audio and interactive television. The connection can enjoy high-definition programming by hand. 10 red blue green green ••Match colors of Component Video or HDMI cable. Home Theater DVD Recorder Note •If your Panasonic ••DVD Recorder with the use of plugs and terminals. or •Connection can operate your Panasonic DVD Recorder is compatible...

Operating Instructions
Page 18
... light) Selects channels in sequence POWER button Remote control sensor Within about 23 feet (7 meters) in menus. (p. 24, 25, 32, 34, 39) - EZ Sync menu (p. 25, 30-31) Selects Audio Mode for DTV and DBS (p. 20) External equipment operations (VCRs, DVDs, etc.) (p. 24) 17 Direct channel access for TV viewing (p. 20) Displays Main Menu (p. 26) Exits menus Selects/OK/Change Returns to previous menu Volume up /down Changes aspect ratio (p. 21) Operates the Favorite channel list function. (p. 21) Switches to enter alphanumeric input...
... light) Selects channels in sequence POWER button Remote control sensor Within about 23 feet (7 meters) in menus. (p. 24, 25, 32, 34, 39) - EZ Sync menu (p. 25, 30-31) Selects Audio Mode for DTV and DBS (p. 20) External equipment operations (VCRs, DVDs, etc.) (p. 24) 17 Direct channel access for TV viewing (p. 20) Displays Main Menu (p. 26) Exits menus Selects/OK/Change Returns to previous menu Volume up /down Changes aspect ratio (p. 21) Operates the Favorite channel list function. (p. 21) Switches to enter alphanumeric input...

Operating Instructions
Page 21
... Picture mode Sleep timer remaining time Aspect ratio 20 Audio track 1 of 2 (English) •Analog mode Press SAP to select the desired audio mode. • Each press of SAP will change the audio mode. (Stereo/SAP/Mono) Display the SUB MENU ■Press SUB MENU to show sub menu screen. (p. 28) This menu consists of shortcuts to enter the minor number in a compound channel number. example: CH15-1: - ■Other Useful Functions (Operate after ) ■Selects Audio Mode for watching TV Listen with SAP (Secondary Audio Program) •Digital mode...
... Picture mode Sleep timer remaining time Aspect ratio 20 Audio track 1 of 2 (English) •Analog mode Press SAP to select the desired audio mode. • Each press of SAP will change the audio mode. (Stereo/SAP/Mono) Display the SUB MENU ■Press SUB MENU to show sub menu screen. (p. 28) This menu consists of shortcuts to enter the minor number in a compound channel number. example: CH15-1: - ■Other Useful Functions (Operate after ) ■Selects Audio Mode for watching TV Listen with SAP (Secondary Audio Program) •Digital mode...

Operating Instructions
Page 28
... and size when aspect setting is accessible directly by pressing the EZ Sync button on the remote control. (p. 25) Resets all channels and external inputs. (On/Off) AI sound On Enhances audio response when listening to stereo. (On/Off) Switches to "Off" when using external speakers (On/Off) "AI sound", "Surround", and "Audio leveler" do not work if "Off" is selected Selects according to the signal when HDMI is generated on the edges of warm colors (red...
... and size when aspect setting is accessible directly by pressing the EZ Sync button on the remote control. (p. 25) Resets all channels and external inputs. (On/Off) AI sound On Enhances audio response when listening to stereo. (On/Off) Switches to "Off" when using external speakers (On/Off) "AI sound", "Surround", and "Audio leveler" do not work if "Off" is selected Selects according to the signal when HDMI is generated on the edges of warm colors (red...
Operating Instructions
Page 29
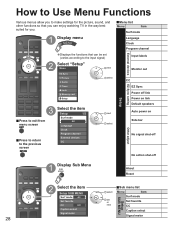
... settings for the picture, sound, and other functions so that you can enjoy watching TV in the way best suited for you. ■Menu list Menu Item Surf mode 1 Display menu Language Clock External devices •Displays the functions that can be set (varies according to the input signal) Program channel Input labels 2 Select "Setup" Menu EZ Sync Picture Audio Timer Lock Memory card Setup next select Monitor out CC EZ Sync Power off link Power on link EZ Sync setting Setup 3 Select...
... settings for the picture, sound, and other functions so that you can enjoy watching TV in the way best suited for you. ■Menu list Menu Item Surf mode 1 Display menu Language Clock External devices •Displays the functions that can be set (varies according to the input signal) Program channel Input labels 2 Select "Setup" Menu EZ Sync Picture Audio Timer Lock Memory card Setup next select Monitor out CC EZ Sync Power off link Power on link EZ Sync setting Setup 3 Select...

Operating Instructions
Page 30
... of the external equipment (p. 36) Surf mode All Language Clock Program channel [Comp. 1/Comp. 2/HDMI 1/HDMI 2/Video 1/Video 2/Video 3] To prevent howling and image oscillation, stops output of the pictures and audio specified in this menu. (p. 36) (On/Off) Displays subtitles (Closed Caption) (p. 36) Controls equipment connected to select the channel with Setup, such as channel settings. (p. 34) Reset Advanced Adjustments/Configurations (alternatives) Sets the mode to HDMI terminals (p. 30) (On/Off) "Power off link", "Power on link", and "Default speakers" cannot be selected if...
... of the external equipment (p. 36) Surf mode All Language Clock Program channel [Comp. 1/Comp. 2/HDMI 1/HDMI 2/Video 1/Video 2/Video 3] To prevent howling and image oscillation, stops output of the pictures and audio specified in this menu. (p. 36) (On/Off) Displays subtitles (Closed Caption) (p. 36) Controls equipment connected to select the channel with Setup, such as channel settings. (p. 34) Reset Advanced Adjustments/Configurations (alternatives) Sets the mode to HDMI terminals (p. 30) (On/Off) "Power off link", "Power on link", and "Default speakers" cannot be selected if...
Operating Instructions
Page 31
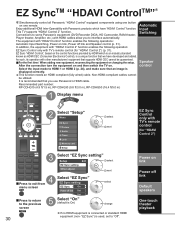
...-Operability with other manufacturers' equipment that we have "HDAVI Control" function. Switching Connections to the previous screen 5 Select "On" (default is On) change •If no HDMI equipment is •displayed correctly. After the connection turn the equipment on and then switch the TV on one remote. Recommended part number: RP-CDHG15 (4.9 ft/1.5 m), RP-CDHG30 (9.8 ft/3.0 m), RP-CDHG50 (16.4 ft/5.0 m) 1 Display menu 2 Select "Setup" Menu select EZ Sync SUB Picture next MENU Audio Timer Lock Memory card Setup 3 Select...
...-Operability with other manufacturers' equipment that we have "HDAVI Control" function. Switching Connections to the previous screen 5 Select "On" (default is On) change •If no HDMI equipment is •displayed correctly. After the connection turn the equipment on and then switch the TV on one remote. Recommended part number: RP-CDHG15 (4.9 ft/1.5 m), RP-CDHG30 (9.8 ft/3.0 m), RP-CDHG50 (16.4 ft/5.0 m) 1 Display menu 2 Select "Setup" Menu select EZ Sync SUB Picture next MENU Audio Timer Lock Memory card Setup 3 Select...
Operating Instructions
Page 32
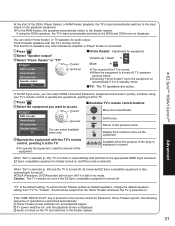
...'s input automatically switches to the DIGA and DIGA menu is displayed. select ■Available TV's remote control buttons Move the cursor/Select DVD recorder Home theater HD camcorder Speaker output TV access You can select Home theater, or TV speakers for equipment Select "Speaker output" Select "Home theater" or "TV" select Volume up / down Mute DVD recorder Home theater HD camcorder Speaker output TV change the default speakers setting from the Home Theater whenever the TV is powered on •automatically if it quickly. To set...
...'s input automatically switches to the DIGA and DIGA menu is displayed. select ■Available TV's remote control buttons Move the cursor/Select DVD recorder Home theater HD camcorder Speaker output TV access You can select Home theater, or TV speakers for equipment Select "Speaker output" Select "Home theater" or "TV" select Volume up / down Mute DVD recorder Home theater HD camcorder Speaker output TV change the default speakers setting from the Home Theater whenever the TV is powered on •automatically if it quickly. To set...
Operating Instructions
Page 33
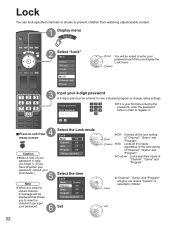
...;Press to exit from watching objectionable content. 1 Display menu 2 Select "Lock" Menu EZ Sync Picture Audio Timer Lock Memory card Setup next You will be entered to enter your password. 6 Select the Lock mode Lock Mode Off Channel Off Game Off Program Off Change password Select the item Lock Mode Custom Channel Off Game Off Program Off Change password Set •Off: Unlocks all the inputs regardless of the lock setting of "Channel", "Game" and • "Program". select •"Channel", "Game" and "Program" will grey out unless "Custom" is your first...
...;Press to exit from watching objectionable content. 1 Display menu 2 Select "Lock" Menu EZ Sync Picture Audio Timer Lock Memory card Setup next You will be entered to enter your password. 6 Select the Lock mode Lock Mode Off Channel Off Game Off Program Off Change password Select the item Lock Mode Custom Channel Off Game Off Program Off Change password Set •Off: Unlocks all the inputs regardless of the lock setting of "Channel", "Game" and • "Program". select •"Channel", "Game" and "Program" will grey out unless "Custom" is your first...
Operating Instructions
Page 35
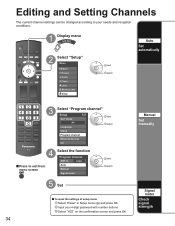
...can be changed according to your needs and reception conditions. 1 Display menu 2 Select "Setup" Menu EZ Sync Picture Audio Timer Lock Memory card Setup next select Auto Set automatically 3 Select "Program channel" Setup 1/2 next Surf mode All Language select Clock Program channel External devices CC 4 Select the function Program channel ANT in Cable ■Press to exit from menu screen Auto Manual Signal meter next select 5 Set ■ To reset the settings of setup menu Select "Reset" in Setup menu ( ) and press OK Input your 4-digit password with number buttons Select...
...can be changed according to your needs and reception conditions. 1 Display menu 2 Select "Setup" Menu EZ Sync Picture Audio Timer Lock Memory card Setup next select Auto Set automatically 3 Select "Program channel" Setup 1/2 next Surf mode All Language select Clock Program channel External devices CC 4 Select the function Program channel ANT in Cable ■Press to exit from menu screen Auto Manual Signal meter next select 5 Set ■ To reset the settings of setup menu Select "Reset" in Setup menu ( ) and press OK Input your 4-digit password with number buttons Select...

Operating Instructions
Page 37
Input Labels/Monitor Out/ 1 Display menu 2 Select "Setup" Menu EZ Sync Picture Audio Timer Lock Memory card Setup next select 3 Select "External devices" or "CC" Setup 1/2 next Surf mode All Language select Clock Program channel External devices CC 4 (External devices) Select "Input labels" or "Monitor out" ■Press to exit from menu screen External devices Input labels Monitor out next select 5 Set Input labels Display labels of external devices Monitor out Stop output of the picture and audio CC Display Closed Caption 36
Input Labels/Monitor Out/ 1 Display menu 2 Select "Setup" Menu EZ Sync Picture Audio Timer Lock Memory card Setup next select 3 Select "External devices" or "CC" Setup 1/2 next Surf mode All Language select Clock Program channel External devices CC 4 (External devices) Select "Input labels" or "Monitor out" ■Press to exit from menu screen External devices Input labels Monitor out next select 5 Set Input labels Display labels of external devices Monitor out Stop output of the picture and audio CC Display Closed Caption 36

Operating Instructions
Page 38
..., DVD, etc.) is connected to stop output of picture and audio. •(Video 1/Video 2/Video 3) Comp. 1/Comp. 2/HDMI 1/HDMI 2 cannot output video •signals regardless of the pictures and audio specified in "Analog" or "Digital" depend on the screen.) ■To reset the settings Select "CC reset" and press OK 37 Advanced Mode Analog CC1-4: T1-4: Digital Select "On" (when not using, select "Off"). (Choose the Closed Caption service of Analog broadcasting.) Information related to pictures (Appears at bottom of the external equipment Input labels select...
..., DVD, etc.) is connected to stop output of picture and audio. •(Video 1/Video 2/Video 3) Comp. 1/Comp. 2/HDMI 1/HDMI 2 cannot output video •signals regardless of the pictures and audio specified in "Analog" or "Digital" depend on the screen.) ■To reset the settings Select "CC reset" and press OK 37 Advanced Mode Analog CC1-4: T1-4: Digital Select "On" (when not using, select "Off"). (Choose the Closed Caption service of Analog broadcasting.) Information related to pictures (Appears at bottom of the external equipment Input labels select...
Operating Instructions
Page 41
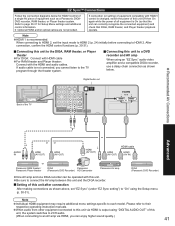
...Hz AC Cord (Connect after all digital formats are complete.) Cable TV or Cable Box ■ To watch digital video image DVD Player or Set Top Box (HDMI compatible machines only) • Note The picture and audio input signals connected to be output through speakers ■ To watch camcorder images Camcorder VCR DVD Player AUDIO VIDEO R L HDMI 1 or AUDIO IN Y Y VIDEO S VIDEO PB PB or DIGITAL AUDIO OUT PR PR L LL L L AUDIO R RR R R COMPONENT VIDEO TO AUDIO AMP INPUT INPUT INPUT PROG OUT 1 2 1 2 HDMI 2 AUDIO IN Optical digital audio cable Audio cable...
...Hz AC Cord (Connect after all digital formats are complete.) Cable TV or Cable Box ■ To watch digital video image DVD Player or Set Top Box (HDMI compatible machines only) • Note The picture and audio input signals connected to be output through speakers ■ To watch camcorder images Camcorder VCR DVD Player AUDIO VIDEO R L HDMI 1 or AUDIO IN Y Y VIDEO S VIDEO PB PB or DIGITAL AUDIO OUT PR PR L LL L L AUDIO R RR R R COMPONENT VIDEO TO AUDIO AMP INPUT INPUT INPUT PROG OUT 1 2 1 2 HDMI 2 AUDIO IN Optical digital audio cable Audio cable...
Operating Instructions
Page 42
... recommended. Note Individual HDMI equipment may require additional menu settings specific to their •respective operating instruction manuals. EZ SyncTM Connections Follow the connection diagrams below . Please refer to each model. If audio cable is output using an "EZ Sync" audio-video amplifier and a compatible DIGA recorder, use a daisy chain connection as shown below for Setup Menu settings and additional control information. When audio from other equipment connected to a DVD recorder and AV amp When using "DIGITAL AUDIO OUT" of...
... recommended. Note Individual HDMI equipment may require additional menu settings specific to their •respective operating instruction manuals. EZ SyncTM Connections Follow the connection diagrams below . Please refer to each model. If audio cable is output using an "EZ Sync" audio-video amplifier and a compatible DIGA recorder, use a daisy chain connection as shown below for Setup Menu settings and additional control information. When audio from other equipment connected to a DVD recorder and AV amp When using "DIGITAL AUDIO OUT" of...

Operating Instructions
Page 48
... 4:3 image horizontally to the screen's side edges. (Recommended for Letter Box) after changing input mode, or after changed signal resolution other than 720p/1080i/1080p. •Zoom adjust Vertical image position and size can be set the aspect ratio to FULL. ••(If viewing with H-FILL, JUST, ZOOM or 4:3, characters will be cut off .) The Closed Caption is 720p/1080i/1080p, the aspect mode automatically defaults to Full after turning off...
... 4:3 image horizontally to the screen's side edges. (Recommended for Letter Box) after changing input mode, or after changed signal resolution other than 720p/1080i/1080p. •Zoom adjust Vertical image position and size can be set the aspect ratio to FULL. ••(If viewing with H-FILL, JUST, ZOOM or 4:3, characters will be cut off .) The Closed Caption is 720p/1080i/1080p, the aspect mode automatically defaults to Full after turning off...
Operating Instructions
Page 49
.... If this can enjoy your home theater by connecting a Dolby Digital (5.1 channel) decoder and "Multi Channel" amplifier to PROG OUT terminals. number of files: Image resolution: Still images recorded with digital still cameras compatible with JPEG files of data is not supported. •• The file is a problem with your DVD player and DVD-Audio software the copyright protection function may damage the data or card. External speakers cannot be damaged). Caution 48...
.... If this can enjoy your home theater by connecting a Dolby Digital (5.1 channel) decoder and "Multi Channel" amplifier to PROG OUT terminals. number of files: Image resolution: Still images recorded with digital still cameras compatible with JPEG files of data is not supported. •• The file is a problem with your DVD player and DVD-Audio software the copyright protection function may damage the data or card. External speakers cannot be damaged). Caution 48...

Operating Instructions
Page 50
... an aspect adjustment function, set -top box or a DVD player, can cause "Image retention" to remain on either or both sides of the display field. •To reduce the risk of such "Image retention", change the brightness of either "COMPONENT", "S VIDEO", or • "VIDEO" to HDMI 2), EZ SyncTM is • available for Panasonic's HDAVI Control compatible equipment. • This standard is used with subdued room lighting. Picture mode Vivid (default): Provides enhanced picture...
... an aspect adjustment function, set -top box or a DVD player, can cause "Image retention" to remain on either or both sides of the display field. •To reduce the risk of such "Image retention", change the brightness of either "COMPONENT", "S VIDEO", or • "VIDEO" to HDMI 2), EZ SyncTM is • available for Panasonic's HDAVI Control compatible equipment. • This standard is used with subdued room lighting. Picture mode Vivid (default): Provides enhanced picture...
Operating Instructions
Page 54
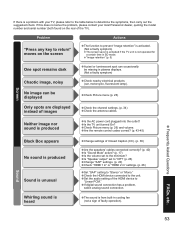
...;Set the audio setting of Closed Caption (CC). (p. 36 Are the speakers' cables connected correctly? (p. 40) Is "Sound Mute" active? (p. 17) Is the volume set to the minimum? Is "Speaker output" set to "Off"? (p. 26) Change "SAP" settings. (p. 20) Check "HDMI 1 in" or "HDMI 2 in plasma displays. (Not a faulty symptom) •Check nearby electrical products (car, motorcycle, fluorescent lamp). Is the TV unit turned On? If digital sound connection has a problem, •select analog sound connection. •The sound is not operated...
...;Set the audio setting of Closed Caption (CC). (p. 36 Are the speakers' cables connected correctly? (p. 40) Is "Sound Mute" active? (p. 17) Is the volume set to the minimum? Is "Speaker output" set to "Off"? (p. 26) Change "SAP" settings. (p. 20) Check "HDMI 1 in" or "HDMI 2 in plasma displays. (Not a faulty symptom) •Check nearby electrical products (car, motorcycle, fluorescent lamp). Is the TV unit turned On? If digital sound connection has a problem, •select analog sound connection. •The sound is not operated...


