
Operating Instructions
Page 2
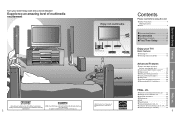
... 40 Specifications 42 Limited Warranty (for U.S.A 43 Customer Services Directory (for Canada 45 3 FAQs, etc. Advanced Quick Start Guide Viewing Basic Features ••Watching TV 13 Watching Videos and DVDs 15 Advanced Features •How to Use Menu Functions picture, sound quality, etc 16 Control with HDMI "HDAVI ControlTM 18 Channel Lock 22 Editing and Setting Channels 24 Input Labels/Closed Caption 26 Using Timer 28 Operating Peripheral Equipment 29 Recommended AV Connections 30...
... 40 Specifications 42 Limited Warranty (for U.S.A 43 Customer Services Directory (for Canada 45 3 FAQs, etc. Advanced Quick Start Guide Viewing Basic Features ••Watching TV 13 Watching Videos and DVDs 15 Advanced Features •How to Use Menu Functions picture, sound quality, etc 16 Control with HDMI "HDAVI ControlTM 18 Channel Lock 22 Editing and Setting Channels 24 Input Labels/Closed Caption 26 Using Timer 28 Operating Peripheral Equipment 29 Recommended AV Connections 30...
Operating Instructions
Page 3
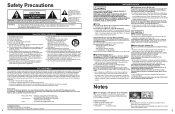
...;When using the pedestal, leave a space of North America One Panasonic Way, Secaucus, NJ 07094 Panasonic Consumer Electronics Company 1-888-VIEW-PTV (843-9788) consumerproducts@panasonic.com CANADIAN NOTICE: For Models TH-42PD60U, TH-42PD60X This Class B digital apparatus complies with the appliance. If the plug is damaged or the wall socket plate is not fully inserted, heat may reduce the remote control's transmission...
...;When using the pedestal, leave a space of North America One Panasonic Way, Secaucus, NJ 07094 Panasonic Consumer Electronics Company 1-888-VIEW-PTV (843-9788) consumerproducts@panasonic.com CANADIAN NOTICE: For Models TH-42PD60U, TH-42PD60X This Class B digital apparatus complies with the appliance. If the plug is damaged or the wall socket plate is not fully inserted, heat may reduce the remote control's transmission...
Operating Instructions
Page 4
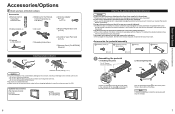
... as shown in damage to install and remove the television. Use the assembly screws A to secure the poles firmly to the bottom of the base D so that all the items shown. Accessories □Remote Control •Transmitter EUR7737Z30 □Batteries for the Remote •Control Transmitter (2) AA Battery □Antenna Adapter F-Type •for pedestal assembly A Assembly screw (4) B Assembly screw (4) (Black screw) C Pole (2) D Base (1) M5 x 20 M5 x 30...
... as shown in damage to install and remove the television. Use the assembly screws A to secure the poles firmly to the bottom of the base D so that all the items shown. Accessories □Remote Control •Transmitter EUR7737Z30 □Batteries for the Remote •Control Transmitter (2) AA Battery □Antenna Adapter F-Type •for pedestal assembly A Assembly screw (4) B Assembly screw (4) (Black screw) C Pole (2) D Base (1) M5 x 20 M5 x 30...
Operating Instructions
Page 5
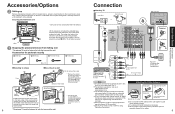
...;assembly manual to fix cables. 9 Quick Start Guide Connection Accessories/Options When receiving digital channel signals, all the other covering on a level floor or stand, place the television on the floor or stand with wood screws in the holes in the middle of the thickness of the unit SERVICE O N LY ANT D I G I TA L AUDIO OUT VIDEO Y Y PB PB PR PR S VIDEO L AUDIO IN R 1 2 COMPONENT VIDEO INPUT INPUT 1 INPUT 2 OUTPUT Label Pedestal Rear Lift the television unit above the pedestal base...
...;assembly manual to fix cables. 9 Quick Start Guide Connection Accessories/Options When receiving digital channel signals, all the other covering on a level floor or stand, place the television on the floor or stand with wood screws in the holes in the middle of the thickness of the unit SERVICE O N LY ANT D I G I TA L AUDIO OUT VIDEO Y Y PB PB PR PR S VIDEO L AUDIO IN R 1 2 COMPONENT VIDEO INPUT INPUT 1 INPUT 2 OUTPUT Label Pedestal Rear Lift the television unit above the pedestal base...

Operating Instructions
Page 6
...) Volume External equipment operations (p. 32) (VCRs, DVDs, etc.) 10 First Time Setup "First time setup" is displayed only when the TV is inserted into a wall outlet. Switches TV to On or Standby Sets the remote to communicate with the POWER button POWER - ■Press to exit ■Press to return to previous screen Note •To change increases.) (Continue to previously viewed channel and input modes. Identifying Controls Power indicator Power on : Red Power off . Channel selectors Volume adjusters TV/VIDEO Change the input mode...
...) Volume External equipment operations (p. 32) (VCRs, DVDs, etc.) 10 First Time Setup "First time setup" is displayed only when the TV is inserted into a wall outlet. Switches TV to On or Standby Sets the remote to communicate with the POWER button POWER - ■Press to exit ■Press to return to previous screen Note •To change increases.) (Continue to previously viewed channel and input modes. Identifying Controls Power indicator Power on : Red Power off . Channel selectors Volume adjusters TV/VIDEO Change the input mode...

Operating Instructions
Page 7
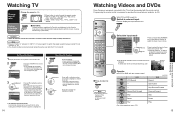
... Turn power on 2 POWER button on •unit should be On. - 3 Select a channel number up or down ■To directly input the digital channel • number - Channel Ending time Show title Clock 15-2 ABC - Progress •Available channels (analog/digital) are automatically set select ANT In Cable: Cable TV Antenna: Antenna Mode All: digital and analog - Audio Track 1 of SAP will not be memorized. 12 Watching TV Connect cable Box when watching cable TV. (p. 9) 1 Switch to view more channels featuring highquality video and sound Now scanning analog channel ... Analog...
... Turn power on 2 POWER button on •unit should be On. - 3 Select a channel number up or down ■To directly input the digital channel • number - Channel Ending time Show title Clock 15-2 ABC - Progress •Available channels (analog/digital) are automatically set select ANT In Cable: Cable TV Antenna: Antenna Mode All: digital and analog - Audio Track 1 of SAP will not be memorized. 12 Watching TV Connect cable Box when watching cable TV. (p. 9) 1 Switch to view more channels featuring highquality video and sound Now scanning analog channel ... Analog...
Operating Instructions
Page 8
... numbers will display the channel directly. 3 ok Press OK to switch the signal reception between cable TV and •antenna. (p. 12) •The channel number and volume level remain the same even after the TV is turned off. Programming the remote control is taken for several seconds, (Initial screen) the Input selection menu is exited. •The terminal and label of the equipment or ask your choice. [3] Component 2 or [4] HDMI [5] Video 1 - [6] Video 2 select enter...
... numbers will display the channel directly. 3 ok Press OK to switch the signal reception between cable TV and •antenna. (p. 12) •The channel number and volume level remain the same even after the TV is turned off. Programming the remote control is taken for several seconds, (Initial screen) the Input selection menu is exited. •The terminal and label of the equipment or ask your choice. [3] Component 2 or [4] HDMI [5] Video 1 - [6] Video 2 select enter...

Operating Instructions
Page 9
... vision Only 480p signal accepted; mode Picture Brightness Color Tint Sharpness No Standard +30 0 0 0 +10 (example: Picture menu) select Other adjust Audio Treble Balance AI sound Surround Speakers HDMI in Audio leveler Timer Sleep, Timer1-5 ■Press to return to TV 4 Adjust or select Picture 1/2 Normal Pic. Normal Pic. Increase or decrease the treble response. for external input signals. (Dark/Light) Reset Bass, Treble and Balance adjustments to factory default settings. Reduces noise of specific digital signals of DVD, STB, etc...
... vision Only 480p signal accepted; mode Picture Brightness Color Tint Sharpness No Standard +30 0 0 0 +10 (example: Picture menu) select Other adjust Audio Treble Balance AI sound Surround Speakers HDMI in Audio leveler Timer Sleep, Timer1-5 ■Press to return to TV 4 Adjust or select Picture 1/2 Normal Pic. Normal Pic. Increase or decrease the treble response. for external input signals. (Dark/Light) Reset Bass, Treble and Balance adjustments to factory default settings. Reduces noise of specific digital signals of DVD, STB, etc...
Operating Instructions
Page 10
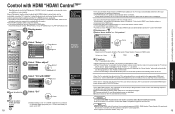
..."Control with HDMI") is recommended that you use Panasonic's HDMI cable. •Recommended part number: RP-CDHG15 (1.5 m), RP-CDHG30 (3.0 m), RP-CDHG50 (5.0 m) 1 Display menu Automatic input switching 2 Select "Setup" Menu Home theater Picture Audio Timer Lock Setup select next Theater speaker - 3 Select "Other adjust" Setup select Other adjust About Reset next 4 Select "Ctrl with HDMI" Other adjust Auto power on Off Side bar Off Prog-out stop Off Ctrl with HDMI On Power off link Set Power on the TV and switches to the TV. When selecting "Home theater", the sound...
..."Control with HDMI") is recommended that you use Panasonic's HDMI cable. •Recommended part number: RP-CDHG15 (1.5 m), RP-CDHG30 (3.0 m), RP-CDHG50 (5.0 m) 1 Display menu Automatic input switching 2 Select "Setup" Menu Home theater Picture Audio Timer Lock Setup select next Theater speaker - 3 Select "Other adjust" Setup select Other adjust About Reset next 4 Select "Ctrl with HDMI" Other adjust Auto power on Off Side bar Off Prog-out stop Off Ctrl with HDMI On Power off link Set Power on the TV and switches to the TV. When selecting "Home theater", the sound...
Operating Instructions
Page 11
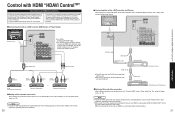
... (Panasonic DVD Recorder) or Panasonic RAM theater Panasonic Player theater ■Setting of this unit to a DVD recorder, RAM theater or Player theater SERVICE O N LY ANT D I G I TA L AUDIO OUT VIDEO Y Y PB PB PR PR S VIDEO L AUDIO IN R 1 2 COMPONENT VIDEO INPUT INPUT 1 INPUT 2 OUTPUT Optic fiber HDMI cable Digital audio input (Optic) HDMI (AV OUT) HDMI (AV IN) One AV amp and one DIGA can enjoy higher sound quality.) 21 Advanced Control with HDMI "HDAVI ControlTM" Recommended HDMI Connections Follow the connection diagrams below . When audio from...
... (Panasonic DVD Recorder) or Panasonic RAM theater Panasonic Player theater ■Setting of this unit to a DVD recorder, RAM theater or Player theater SERVICE O N LY ANT D I G I TA L AUDIO OUT VIDEO Y Y PB PB PR PR S VIDEO L AUDIO IN R 1 2 COMPONENT VIDEO INPUT INPUT 1 INPUT 2 OUTPUT Optic fiber HDMI cable Digital audio input (Optic) HDMI (AV OUT) HDMI (AV IN) One AV amp and one DIGA can enjoy higher sound quality.) 21 Advanced Control with HDMI "HDAVI ControlTM" Recommended HDMI Connections Follow the connection diagrams below . When audio from...
Operating Instructions
Page 12
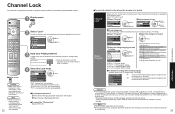
... : Turns off the monitor terminal output for programs that is used in this set to enter the password, enter the number twice in case you select a locked channel, a message will be blocked. 23 Advanced Channel Lock Menu Picture Audio Timer Lock Setup next select - 3 Input your password in ---- These channels will be entered to enter your local dealer.) ••••Off: "Channel lock" not activated All: Locks all channels and external inputs Game: Locks CH3, CH4, and external inputs CH: Locks specified channels (analog/digital...
... : Turns off the monitor terminal output for programs that is used in this set to enter the password, enter the number twice in case you select a locked channel, a message will be blocked. 23 Advanced Channel Lock Menu Picture Audio Timer Lock Setup next select - 3 Input your password in ---- These channels will be entered to enter your local dealer.) ••••Off: "Channel lock" not activated All: Locks all channels and external inputs Game: Locks CH3, CH4, and external inputs CH: Locks specified channels (analog/digital...
Operating Instructions
Page 13
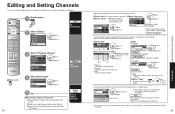
...and Setting Channels No Favorite Caption Add Caption: •Changes the station identifier Favorite: •Registers channel to Favorites List Add: •Adds or deletes channels select item to add or delete channels from channel list manually. If no problem is selected in Setup menu ( ) and press "OK" button Input your 4-digit password with number buttons Select "Yes" on a digital image. Select "ANT In" Select "Mode" (Select Cable or Antenna) Select All or Analog All: Analog and digital Analog: Analog only Auto program ANT In Cable Mode All Start scan set /next Select the...
...and Setting Channels No Favorite Caption Add Caption: •Changes the station identifier Favorite: •Registers channel to Favorites List Add: •Adds or deletes channels select item to add or delete channels from channel list manually. If no problem is selected in Setup menu ( ) and press "OK" button Input your 4-digit password with number buttons Select "Yes" on a digital image. Select "ANT In" Select "Mode" (Select Cable or Antenna) Select All or Analog All: Analog and digital Analog: Analog only Auto program ANT In Cable Mode All Start scan set /next Select the...
Operating Instructions
Page 14
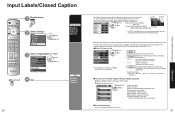
...skipped when switched with TV/VIDEO button. Analog Digital CC1 Primary Analog (Choose the closed caption service of Analog broadcasting.) Digital setting CC1-4: Information related to pictures (Appears at bottom of the external equipment VCR Input labels select •Terminals: Comp.1-2/HDMI/ Comp. 1 Comp. 2 SKIP SKIP set • Video1-2 Label: SKIP*/VCR/DVD/CABLE/ [example] DBS/PVR/GAME/AUX/[BLANK] HDMI DVD Terminal Video 1 Video 2 VCR SKIP * If "SKIP" is selected for the television to view the digital captioning.) •Select the setting. The program viewed must...
...skipped when switched with TV/VIDEO button. Analog Digital CC1 Primary Analog (Choose the closed caption service of Analog broadcasting.) Digital setting CC1-4: Information related to pictures (Appears at bottom of the external equipment VCR Input labels select •Terminals: Comp.1-2/HDMI/ Comp. 1 Comp. 2 SKIP SKIP set • Video1-2 Label: SKIP*/VCR/DVD/CABLE/ [example] DBS/PVR/GAME/AUX/[BLANK] HDMI DVD Terminal Video 1 Video 2 VCR SKIP * If "SKIP" is selected for the television to view the digital captioning.) •Select the setting. The program viewed must...

Operating Instructions
Page 15
Using Timer •The TV can operate other manufacturers' components using this TV's remote control. 1 Connect the external equipment to the TV and turn On/Off at the designated date and time. To find a code not listed in the code list This procedure searches all codes and is input or it takes more than 30 seconds to the previous screen Note •The TV automatically turns Off after a preselected amount...
Using Timer •The TV can operate other manufacturers' components using this TV's remote control. 1 Connect the external equipment to the TV and turn On/Off at the designated date and time. To find a code not listed in the code list This procedure searches all codes and is input or it takes more than 30 seconds to the previous screen Note •The TV automatically turns Off after a preselected amount...

Operating Instructions
Page 16
...;For Antenna connection via VCR, please refer to the HDMI or COMPONENT terminals, only audio signals will be obtained from "OUTPUT" terminals. However, audio output can be output. ■To listen to your various equipment. For other connections are complete.) Cable TV or Cable Box ■To watch digital video image DVD Player or Set Top Box (HDMI compatible machines only) SERVICE ONLY •For receiving digital broadcasting of cable TV, connect Cable TV directly to "ANT" terminal. • Digital audio amplifier...
...;For Antenna connection via VCR, please refer to the HDMI or COMPONENT terminals, only audio signals will be obtained from "OUTPUT" terminals. However, audio output can be output. ■To listen to your various equipment. For other connections are complete.) Cable TV or Cable Box ■To watch digital video image DVD Player or Set Top Box (HDMI compatible machines only) SERVICE ONLY •For receiving digital broadcasting of cable TV, connect Cable TV directly to "ANT" terminal. • Digital audio amplifier...
Operating Instructions
Page 17
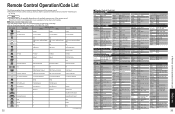
... Control Operation List This chart defines which keys are operational after programming (if needed), while in the selected remote control mode, VCR, DBS/CBL, DVD. DBS Menu CBL Menu DVD Setup Menu - - - Title Onscreen Display Onscreen Display Onscreen Display Onscreen Display 0-9 0-9 0-9 0-9 - DBS Previous Channel CBL Previous Channel Drive Select Channel Up/Down DBS Channel Up/Down CBL Channel Up/Down Channel Up/Down TV Volume Up/Down TV Volume Up/Down TV Volume Up/Down TV Volume Up/Down - Play *1: Combination type ■Remote Control Code List Cable...
... Control Operation List This chart defines which keys are operational after programming (if needed), while in the selected remote control mode, VCR, DBS/CBL, DVD. DBS Menu CBL Menu DVD Setup Menu - - - Title Onscreen Display Onscreen Display Onscreen Display Onscreen Display 0-9 0-9 0-9 0-9 - DBS Previous Channel CBL Previous Channel Drive Select Channel Up/Down DBS Channel Up/Down CBL Channel Up/Down Channel Up/Down TV Volume Up/Down TV Volume Up/Down TV Volume Up/Down TV Volume Up/Down - Play *1: Combination type ■Remote Control Code List Cable...
Operating Instructions
Page 19
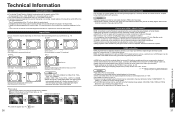
.../1080i/1080p, the aspect mode automatically defaults to On on the screen. When the signal is not assumed. Easy playback is "type A". Read the manuals of the equipment. A device having no digital output terminal may not be connected to the input terminal of either the connected equipment or the TV. Technical Information Closed Caption (CC) For viewing Closed Caption of digital broadcasting, set the aspect ratio to receive analog signals. For details of...
.../1080i/1080p, the aspect mode automatically defaults to On on the screen. When the signal is not assumed. Easy playback is "type A". Read the manuals of the equipment. A device having no digital output terminal may not be connected to the input terminal of either the connected equipment or the TV. Technical Information Closed Caption (CC) For viewing Closed Caption of digital broadcasting, set the aspect ratio to receive analog signals. For details of...

Operating Instructions
Page 20
... the cloth dry. •Use this can cause an after -images 4:3 Screen Display •••Vivid (default) Standard Cinema Pic. Do not scratch or hit the surface of the pedestal dirty. Do not allow long-term contact with fingernails or other than those shown above signals are reformatted for optimal viewing on your display. Pedestal • Cleaning Wipe the...
... the cloth dry. •Use this can cause an after -images 4:3 Screen Display •••Vivid (default) Standard Cinema Pic. Do not scratch or hit the surface of the pedestal dirty. Do not allow long-term contact with fingernails or other than those shown above signals are reformatted for optimal viewing on your display. Pedestal • Cleaning Wipe the...
Operating Instructions
Page 21
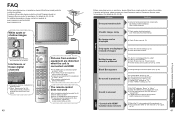
... frozen digital channels (intermittent sound) •Change the direction of Closed Caption (CC). (p. 26) Is "Sound Mute" active? (p. 10) Is the volume set to "On" again. (p. 18) 41 Sound HDMI Frequently Asked Questions FAQs, etc. The remote control does not work ••Switch the TV unit on . If problem still persists, please contact your local Panasonic dealer or Panasonic Service center for •digital channels . Is the TV unit turned On? Check Picture menu...
... frozen digital channels (intermittent sound) •Change the direction of Closed Caption (CC). (p. 26) Is "Sound Mute" active? (p. 10) Is the volume set to "On" again. (p. 18) 41 Sound HDMI Frequently Asked Questions FAQs, etc. The remote control does not work ••Switch the TV unit on . If problem still persists, please contact your local Panasonic dealer or Panasonic Service center for •digital channels . Is the TV unit turned On? Check Picture menu...
Operating Instructions
Page 22
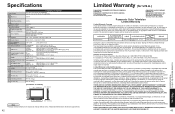
..., 8 Ω Sound Connection Terminals Audio Output Channel Capability (Digital/Analog) Operating Conditions INPUT 1-2 COMPONENT VIDEO INPUT 1-2 HDMI Card slot (Service only) (p. 30) AV PROG. The decision to your product or arrange for shop diagnosis and/or repair and then returned. CATEGORIES PLASMA DISPLAY ALL PARTS EXCEPT GLASS PANEL OR CRT 1 (ONE) YEAR LABOR 1 (ONE) YEAR GLASS PANEL OR CRT GLASS PANEL - 2 (TWO) YEARS GLASS PANEL OR CRT LABOR SERVICE 1 (ONE) YEAR IN-HOME OR...
..., 8 Ω Sound Connection Terminals Audio Output Channel Capability (Digital/Analog) Operating Conditions INPUT 1-2 COMPONENT VIDEO INPUT 1-2 HDMI Card slot (Service only) (p. 30) AV PROG. The decision to your product or arrange for shop diagnosis and/or repair and then returned. CATEGORIES PLASMA DISPLAY ALL PARTS EXCEPT GLASS PANEL OR CRT 1 (ONE) YEAR LABOR 1 (ONE) YEAR GLASS PANEL OR CRT GLASS PANEL - 2 (TWO) YEARS GLASS PANEL OR CRT LABOR SERVICE 1 (ONE) YEAR IN-HOME OR...


