

Operating Instructions
Page 2
...093; 6,381,747; and 6,516,132. The exclamation point within a triangle is intended to tell the user that parts inside the product are a risk of HDMI Licensing LLC. R Manufactured under license from Dolby Laboratories. CAUTION RISK OF ELECTRIC SHOCK DO NOT OPEN WARNING: To reduce the risk of the grounding plug... inside . Do not defeat the purpose of electric shock, do not remove cover or back. Reverse engineering or disassembly is a trademark of Dolby Laboratories. HDMI, the HDMI logo and High-Definition Multimedia Interface are trademarks of Cable Television Laboratories, Inc. 2
...093; 6,381,747; and 6,516,132. The exclamation point within a triangle is intended to tell the user that parts inside the product are a risk of HDMI Licensing LLC. R Manufactured under license from Dolby Laboratories. CAUTION RISK OF ELECTRIC SHOCK DO NOT OPEN WARNING: To reduce the risk of the grounding plug... inside . Do not defeat the purpose of electric shock, do not remove cover or back. Reverse engineering or disassembly is a trademark of Dolby Laboratories. HDMI, the HDMI logo and High-Definition Multimedia Interface are trademarks of Cable Television Laboratories, Inc. 2
Operating Instructions
Page 4
...on the back cover of these Instructions before making any adjustments, and retain them for U.S.A.) ... 47 Dear Panasonic Customer Welcome to the Panasonic family of Controls 16 The Illuminated Remote Control 16 4 First time setup 18 Watching TV programs 20 Aspect ... Receiver Location 8 Optional External Equipment 8 Remote Control Battery Installation 8 Accessories 9 Cable Connection 10 Antenna Connection 11 Cable CARDTM Connection 11 HDMI Connection 12 Digital TV - Set-Top Box (DTV-STB) or DVD Connection 13 Video Input Connection 13 Amplifier Connection (TO AUDIO AMP...
...on the back cover of these Instructions before making any adjustments, and retain them for U.S.A.) ... 47 Dear Panasonic Customer Welcome to the Panasonic family of Controls 16 The Illuminated Remote Control 16 4 First time setup 18 Watching TV programs 20 Aspect ... Receiver Location 8 Optional External Equipment 8 Remote Control Battery Installation 8 Accessories 9 Cable Connection 10 Antenna Connection 11 Cable CARDTM Connection 11 HDMI Connection 12 Digital TV - Set-Top Box (DTV-STB) or DVD Connection 13 Video Input Connection 13 Amplifier Connection (TO AUDIO AMP...

Operating Instructions
Page 10
... cord together. How to fix: How to the socket of the main body. 2 Fix the clamper. Cable Connection DIGITAL AUDIO OUT terminal (see page 14) HDMI terminal (see page 12) D I G I TA L SERVICE A U D I O O U T ONLY C a b l e C A R D TM ANTENNA Cable In Antenna terminals (see page 11) AV IN Y Y R L AUDIO IN VIDEO PB PB S VIDEO PR...
... cord together. How to fix: How to the socket of the main body. 2 Fix the clamper. Cable Connection DIGITAL AUDIO OUT terminal (see page 14) HDMI terminal (see page 12) D I G I TA L SERVICE A U D I O O U T ONLY C a b l e C A R D TM ANTENNA Cable In Antenna terminals (see page 11) AV IN Y Y R L AUDIO IN VIDEO PB PB S VIDEO PR...
Operating Instructions
Page 12
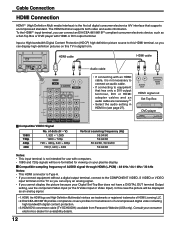
...in digital form. Compatible sampling freguency of uncompressed digital video including high bandwidth digital content protection. ∗3.HDMI-DVI conversion cable (TY-SCH03DH): available from Panasonic Website (USA only). Input a High-bandwidth Digital Content Protection (HDCP) high-definition picture source to...not have a DIGITAL OUT terminal Output setting, use with computers. • 1080i and 720p signals will be re-formatted for availability details. 12 HDMI cable HDMI cable D I G I TA L AUDIO OUT SERVICE ONLY SERVICE ONLY ANT VIDEO AV IN Y Y PB PB PR PR R L AUDIO...
...in digital form. Compatible sampling freguency of uncompressed digital video including high bandwidth digital content protection. ∗3.HDMI-DVI conversion cable (TY-SCH03DH): available from Panasonic Website (USA only). Input a High-bandwidth Digital Content Protection (HDCP) high-definition picture source to...not have a DIGITAL OUT terminal Output setting, use with computers. • 1080i and 720p signals will be re-formatted for availability details. 12 HDMI cable HDMI cable D I G I TA L AUDIO OUT SERVICE ONLY SERVICE ONLY ANT VIDEO AV IN Y Y PB PB PR PR R L AUDIO...

Operating Instructions
Page 14
... S VIDEO PR PR VIDEO L L AUDIO R 1 2 COMPONENT VIDEO INPUT INPUT 1 R TO AUDIO AMP INPUT 2 PROGOUT Notes: • When a device (STB, DVD, etc.) is connected to the HDMI, COMPONENT, or S-VIDEO terminals (see page 27). 2. Select Speakers "Off" in Audio menu (see page 12), only audio signals will be Dolby Digital. Program Out...
... S VIDEO PR PR VIDEO L L AUDIO R 1 2 COMPONENT VIDEO INPUT INPUT 1 R TO AUDIO AMP INPUT 2 PROGOUT Notes: • When a device (STB, DVD, etc.) is connected to the HDMI, COMPONENT, or S-VIDEO terminals (see page 27). 2. Select Speakers "Off" in Audio menu (see page 12), only audio signals will be Dolby Digital. Program Out...

Operating Instructions
Page 16
... choice. Note: Video input can also be selected by pressing TV/VIDEO , then the CH buttons, then pressing "OK" key. Input select [1] TV [2] Component 1 [3] Component 2 [4] HDMI [5] Video 1 [6] Video 2 • Press corresponding number key on the remote control to previously viewed channel and input modes. Operation of Controls The Illuminated Remote Control...
... choice. Note: Video input can also be selected by pressing TV/VIDEO , then the CH buttons, then pressing "OK" key. Input select [1] TV [2] Component 1 [3] Component 2 [4] HDMI [5] Video 1 [6] Video 2 • Press corresponding number key on the remote control to previously viewed channel and input modes. Operation of Controls The Illuminated Remote Control...

Operating Instructions
Page 22
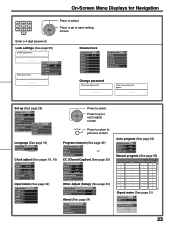
... MPEG NR Black level Off Off SD Off Dark Audio adjust (See page 26) Press to select "Other Adjust". Other Adjust AI Sound Surround Speakers HDMI In Audio Leveler On Off On Auto 0 Timer adjust (See page 28) CH -VOL OK VOL+ CH Press to select. Press to display desired Timer...
... MPEG NR Black level Off Off SD Off Dark Audio adjust (See page 26) Press to select "Other Adjust". Other Adjust AI Sound Surround Speakers HDMI In Audio Leveler On Off On Auto 0 Timer adjust (See page 28) CH -VOL OK VOL+ CH Press to select. Press to display desired Timer...
Operating Instructions
Page 23
... pages 18, 19) Clock Mode Manual Date 4 / 1 / 2005 Time 9 : 43 AM Time zone EST DST On Input labels (See page 32) Input labels Comp. 1 Comp. 2 HDMI Video 1 Video 2 CH -VOL OK VOL+ CH Press to select. No 4 - - - - - - No 6 - - - - - - Channel lock Channel lock CH 1 3 - 0 CH 2 CH 3 CH 4 CH 5 CH 6 CH 7 Program lock...
... pages 18, 19) Clock Mode Manual Date 4 / 1 / 2005 Time 9 : 43 AM Time zone EST DST On Input labels (See page 32) Input labels Comp. 1 Comp. 2 HDMI Video 1 Video 2 CH -VOL OK VOL+ CH Press to select. No 4 - - - - - - No 6 - - - - - - Channel lock Channel lock CH 1 3 - 0 CH 2 CH 3 CH 4 CH 5 CH 6 CH 7 Program lock...

Operating Instructions
Page 26
...Reset Bass, Treble and Balance adjustments to select or adjust the sub-menu. -VOL OK VOL+ CH Other Adjust AI Sound Surround Speakers HDMI In Audio Leveler On Off On Auto 0 AI Sound Equalize overall volume levels across all channels. CH Press to factory default settings. Note... "Treble" or "Balance". Other Adjust 1 Press to select "On" or "Off". Press to select "Other Adjust". Other Adjust AI Sound Surround Speakers HDMI In Audio Leveler On Off On Auto 0 26 Increase or decrease the bass response. Audio CH -VOL OK VOL+ Press to display the Main menu...
...Reset Bass, Treble and Balance adjustments to select or adjust the sub-menu. -VOL OK VOL+ CH Other Adjust AI Sound Surround Speakers HDMI In Audio Leveler On Off On Auto 0 AI Sound Equalize overall volume levels across all channels. CH Press to factory default settings. Note... "Treble" or "Balance". Other Adjust 1 Press to select "On" or "Off". Press to select "Other Adjust". Other Adjust AI Sound Surround Speakers HDMI In Audio Leveler On Off On Auto 0 26 Increase or decrease the bass response. Audio CH -VOL OK VOL+ Press to display the Main menu...

Operating Instructions
Page 27
...Leveler On Off On Auto 0 27 Sub-Menu Navigation Other Adjust AI Sound Surround Speakers HDMI In Audio Leveler On Off On Auto 0 Speakers This feature is set to select the mode. HDMI In When using HDMI (see page 14, Amplifier Connection). Press to stereo. Surround Enhances audio response when ... CH Press to select "On" or "Off". • On : For stereo audio. • Off : For monaural audio. Other Adjust AI Sound Surround Speakers HDMI In Audio Leveler On Off On Auto 0 Note: "AI Sound", "Surround" and "Audio Leveler" are not available when selecting "Off...
...Leveler On Off On Auto 0 27 Sub-Menu Navigation Other Adjust AI Sound Surround Speakers HDMI In Audio Leveler On Off On Auto 0 Speakers This feature is set to select the mode. HDMI In When using HDMI (see page 14, Amplifier Connection). Press to stereo. Surround Enhances audio response when ... CH Press to select "On" or "Off". • On : For stereo audio. • Off : For monaural audio. Other Adjust AI Sound Surround Speakers HDMI In Audio Leveler On Off On Auto 0 Note: "AI Sound", "Surround" and "Audio Leveler" are not available when selecting "Off...
Operating Instructions
Page 32
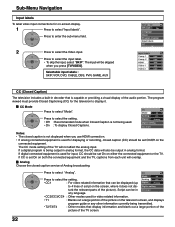
...is being used for video related information. • T1 : Blanks out a large portion of the TV will be skipped when you use HDMI connection. • If analog connected equipment is set On/Off on the connected equipment. Language Clock Program channel Input labels CC Input labels... Comp. 1 Comp. 2 HDMI Video 1 Video 2 SKIP SKIP DVD AUX SKIP CC (Closed Caption) The television includes a built-in analog format. If digital connected equipment...
...is being used for video related information. • T1 : Blanks out a large portion of the TV will be skipped when you use HDMI connection. • If analog connected equipment is set On/Off on the connected equipment. Language Clock Program channel Input labels CC Input labels... Comp. 1 Comp. 2 HDMI Video 1 Video 2 SKIP SKIP DVD AUX SKIP CC (Closed Caption) The television includes a built-in analog format. If digital connected equipment...
Operating Instructions
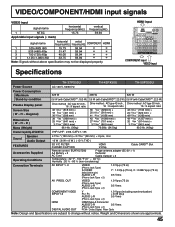
Page 45
...PB PB S VIDEO PR PR VIDEO L L AUDIO R 1 2 COMPONENT VIDEO INPUT INPUT 1 R TO AUDIO AMP INPUT 2 PROGOUT COMPONENT input VIDEO input TH-37PX50U TH-42PX50U TH-50PX50U Power Source AC 120 V, 50/60 Hz Power Consumption Maximum 325 W 399 W 525 W Stand-by condition 0.6 W (with CableCARDTM: 18.0 W) 0.6...23/64 " (60 mm) × 2 pcs, 6 Ω 16 W [ 8 W + 8 W ] ( 10 % THD ) 3D Y/C FILTER CLOSED CAPTION HDMI V-Chip Cable CARDTM Slot Remote control: EUR7627Z60 AA Battery × 2 AC Cord F-type antenna adapter (5C-2V × 1) Pedestal Cable clamper × 2 Temperature :...
...PB PB S VIDEO PR PR VIDEO L L AUDIO R 1 2 COMPONENT VIDEO INPUT INPUT 1 R TO AUDIO AMP INPUT 2 PROGOUT COMPONENT input VIDEO input TH-37PX50U TH-42PX50U TH-50PX50U Power Source AC 120 V, 50/60 Hz Power Consumption Maximum 325 W 399 W 525 W Stand-by condition 0.6 W (with CableCARDTM: 18.0 W) 0.6...23/64 " (60 mm) × 2 pcs, 6 Ω 16 W [ 8 W + 8 W ] ( 10 % THD ) 3D Y/C FILTER CLOSED CAPTION HDMI V-Chip Cable CARDTM Slot Remote control: EUR7627Z60 AA Battery × 2 AC Cord F-type antenna adapter (5C-2V × 1) Pedestal Cable clamper × 2 Temperature :...
Operating Instructions
Page 46
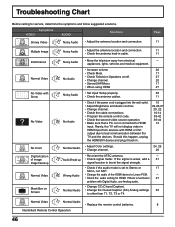
... batteries. 8 Intermittent Remote Control Operation 46 Page 11 Multiple Image Interference Normal Video No Video with Snow No Video No Color Digitalization of the HDMI device to HDMI input. If the signal is weak, add a 31 signal booster to boost the signal strength. • Check if the audio mode is ...Normal Audio Audio Break up Normal Video Black Box on /off. 27 • Change channel. 20 • Stereo/SAP/Mono 17 • When using HDMI 27 • Set Input Setup properly. 30 • Check the antenna cables. 11 • Check if the power cord is plugged into the wall ...
... batteries. 8 Intermittent Remote Control Operation 46 Page 11 Multiple Image Interference Normal Video No Video with Snow No Video No Color Digitalization of the HDMI device to HDMI input. If the signal is weak, add a 31 signal booster to boost the signal strength. • Check if the audio mode is ...Normal Audio Audio Break up Normal Video Black Box on /off. 27 • Change channel. 20 • Stereo/SAP/Mono 17 • When using HDMI 27 • Set Input Setup properly. 30 • Check the antenna cables. 11 • Check if the power cord is plugged into the wall ...


