

Operating Instructions
Page 2
.... Patents Nos. 4,631,603; 4,577,216; 4,819,098; 4,907,093; 6,381,747; patents and other limited viewing uses only unless otherwise authorized by U.S. No user-serviceable parts inside . R Manufactured under license from Dolby Laboratories. CAUTION RISK OF ELECTRIC SHOCK DO NOT OPEN WARNING: To reduce the risk of still pictures include logos, video games, computer images, teletext and images displayed in 4:3 mode.
.... Patents Nos. 4,631,603; 4,577,216; 4,819,098; 4,907,093; 6,381,747; patents and other limited viewing uses only unless otherwise authorized by U.S. No user-serviceable parts inside . R Manufactured under license from Dolby Laboratories. CAUTION RISK OF ELECTRIC SHOCK DO NOT OPEN WARNING: To reduce the risk of still pictures include logos, video games, computer images, teletext and images displayed in 4:3 mode.
Operating Instructions
Page 4
... 14 Program Out Connection (PROG OUT 14 Power ON / OFF 15 The Main Unit 15 Location of Controls 16 The Illuminated Remote Control 16 4 First time setup 18 Watching TV programs 20 Aspect Controls 21 On-Screen Menu Displays for Navigation 22 Sub-Menu Navigation 24 Picture 24 Audio 26 Timer 28 Set up 29 Lock 35 Operating peripheral equipment 39 Programming the remote control code 39 Infrared Code Index 40 Mode Operational Key Chart 43 VIDEO/COMPONENT/HDMI input signals 45 Specifications 45 Troubleshooting...
... 14 Program Out Connection (PROG OUT 14 Power ON / OFF 15 The Main Unit 15 Location of Controls 16 The Illuminated Remote Control 16 4 First time setup 18 Watching TV programs 20 Aspect Controls 21 On-Screen Menu Displays for Navigation 22 Sub-Menu Navigation 24 Picture 24 Audio 26 Timer 28 Set up 29 Lock 35 Operating peripheral equipment 39 Programming the remote control code 39 Infrared Code Index 40 Mode Operational Key Chart 43 VIDEO/COMPONENT/HDMI input signals 45 Specifications 45 Troubleshooting...

Operating Instructions
Page 7
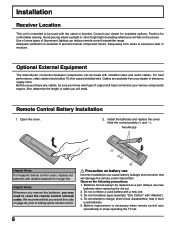
... technician to the TV if its cables attached might damage the cables which might damage the insulation and cause fire. Disconnect the power plug from becoming dusty. • Built-up . This Plasma TV radiates infrared rays; Install your infrared sensor in a place away from direct or reflected light from your hands, face or objects close . Use this is not done.
... technician to the TV if its cables attached might damage the cables which might damage the insulation and cause fire. Disconnect the power plug from becoming dusty. • Built-up . This Plasma TV radiates infrared rays; Install your infrared sensor in a place away from direct or reflected light from your hands, face or objects close . Use this is not done.
Operating Instructions
Page 8
... essential to reset the remote control infrared codes. Keep away from your various components require. Open the cover. 2. Do not mix battery types (example: "Zinc Carbon" with shielded video and audio cables. Before you may need . Helpful Hints: Whenever you remove the batteries, you purchase any cables, be replaced as a pair. Do not combine a used with the stand or bracket. Two AA size Helpful Hints: For frequent remote control users, replace old batteries...
... essential to reset the remote control infrared codes. Keep away from your various components require. Open the cover. 2. Do not mix battery types (example: "Zinc Carbon" with shielded video and audio cables. Before you may need . Helpful Hints: Whenever you remove the batteries, you purchase any cables, be replaced as a pair. Do not combine a used with the stand or bracket. Two AA size Helpful Hints: For frequent remote control users, replace old batteries...
Operating Instructions
Page 11
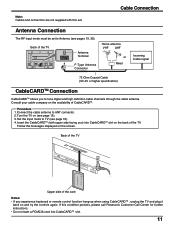
... PR PR R L AUDIO IN S VIDEO L AUDIO IN R 1 2 COMPONENT VIDEO INPUT 1 INPUT INPUT 2 OUTPUT ANTENNA Cable In Antenna Terminal F-Type Antenna Connector Home antenna VHF UHF or Mixer Incoming Cable signal 75 Ohm Coaxial Cable (5C-2V or higher specification) CableCARDTM Connection CableCARDTM allows you to Antenna (see pages 19, 30). Turn the TV on and try the controls again. Set the input mode to ANT connector. 2. If this set to tune digital and high definition cable channels through the cable antenna. Procedure 1. Back...
... PR PR R L AUDIO IN S VIDEO L AUDIO IN R 1 2 COMPONENT VIDEO INPUT 1 INPUT INPUT 2 OUTPUT ANTENNA Cable In Antenna Terminal F-Type Antenna Connector Home antenna VHF UHF or Mixer Incoming Cable signal 75 Ohm Coaxial Cable (5C-2V or higher specification) CableCARDTM Connection CableCARDTM allows you to Antenna (see pages 19, 30). Turn the TV on and try the controls again. Set the input mode to ANT connector. 2. If this set to tune digital and high definition cable channels through the cable antenna. Procedure 1. Back...
Operating Instructions
Page 12
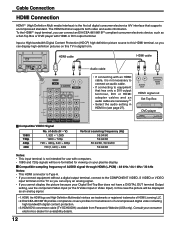
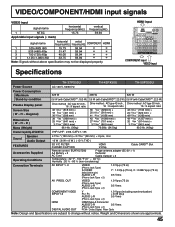
... a Set-Top Box or DVD player with computers. • 1080i and 720p signals will be displayed as an analog signal. ∗1.HDMI, the HDMI logo and High-Definition Multimedia Interface are necessary.∗3 • Select the audio setting in digital form. Compatible sampling freguency of uncompressed digital video including high bandwidth digital content protection. ∗3.HDMI-DVI conversion cable (TY-SCH03DH): available from Panasonic Website (USA only). The HDMI terminal supports both video and audio information. Compatible VIDEO Signal...
... a Set-Top Box or DVD player with computers. • 1080i and 720p signals will be displayed as an analog signal. ∗1.HDMI, the HDMI logo and High-Definition Multimedia Interface are necessary.∗3 • Select the audio setting in digital form. Compatible sampling freguency of uncompressed digital video including high bandwidth digital content protection. ∗3.HDMI-DVI conversion cable (TY-SCH03DH): available from Panasonic Website (USA only). The HDMI terminal supports both video and audio information. Compatible VIDEO Signal...

Operating Instructions
Page 13
... NTSC signal and progressively scans the image. • To view DTV programs, connect the STB to the component video input terminals (Y, PB, PR) of the STB to either S Video cable or Video cable. 13 Component Video cable Back of the TV INPUT 1 / 2 AV IN Y Y R L AUDIO IN VIDEO PB PB S VIDEO PR PR VIDEO L L AUDIO R 1 2 COMPONENT VIDEO INPUT 1 INPUT R TO AUDIO AMP INPUT 2 PROGOUT Note: The S Video input will be available in your area. • Use a Panasonic DTV-STB (Digital TV-Set-Top Box) or DVD Player. Connect either...
... NTSC signal and progressively scans the image. • To view DTV programs, connect the STB to the component video input terminals (Y, PB, PR) of the STB to either S Video cable or Video cable. 13 Component Video cable Back of the TV INPUT 1 / 2 AV IN Y Y R L AUDIO IN VIDEO PB PB S VIDEO PR PR VIDEO L L AUDIO R 1 2 COMPONENT VIDEO INPUT 1 INPUT R TO AUDIO AMP INPUT 2 PROGOUT Note: The S Video input will be available in your area. • Use a Panasonic DTV-STB (Digital TV-Set-Top Box) or DVD Player. Connect either...

Operating Instructions
Page 14
... DVD player and DVD-Audio software the copyright protection function may operate and disable optical output. • External speakers cannot be connected directly to OUTPUT terminals. • When ATSC channel is selected, the output from the DIGITAL AUDIO OUT jack will be output. No video signals will be output through Program Out terminals. • Some programs contain Macrovision signal to be PCM. OPTICAL IN Optical digital audio cable Amplifier or AUDIO INPUT L R D I G I TA L SERVICE A U D I O O U T ONLY Audio cable D I G I TA L AUDIO OUT C a b l e C A R D TM ANTENNA Cable...
... DVD player and DVD-Audio software the copyright protection function may operate and disable optical output. • External speakers cannot be connected directly to OUTPUT terminals. • When ATSC channel is selected, the output from the DIGITAL AUDIO OUT jack will be output. No video signals will be output through Program Out terminals. • Some programs contain Macrovision signal to be PCM. OPTICAL IN Optical digital audio cable Amplifier or AUDIO INPUT L R D I G I TA L SERVICE A U D I O O U T ONLY Audio cable D I G I TA L AUDIO OUT C a b l e C A R D TM ANTENNA Cable...
Operating Instructions
Page 15
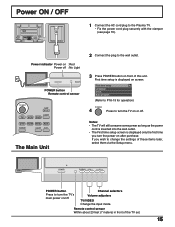
... time setup screen is displayed on or off . If you turn the power on front of the TV set. 15 Channel selectors Volume adjusters TV/VIDEO Change the input mode. Power indicator Power on : Red Power off : No Light POWER button Remote control sensor POWER SAP LIGHT TV VCR DVD DTV RCVR DBS/CBL AUX TV/VIDEO SLEEP EXIT ASPECT FAVORITE E RE MUT CALL CH The Main Unit -VOL OK VOL+ 2 Connect the plug to the wall outlet. 3 Press POWER button on after purchase. First time setup is displayed...
... time setup screen is displayed on or off . If you turn the power on front of the TV set. 15 Channel selectors Volume adjusters TV/VIDEO Change the input mode. Power indicator Power on : Red Power off : No Light POWER button Remote control sensor POWER SAP LIGHT TV VCR DVD DTV RCVR DBS/CBL AUX TV/VIDEO SLEEP EXIT ASPECT FAVORITE E RE MUT CALL CH The Main Unit -VOL OK VOL+ 2 Connect the plug to the wall outlet. 3 Press POWER button on after purchase. First time setup is displayed...

Operating Instructions
Page 17
...Sleep Timer CH: Change to cancel the mute. CH: Change to the right during menu mode. - RECALL Display or remove the channel banner. Channel, Program and Station identifier Program end time Program title Clock 15-2 ABC - Stereo SAP Mono LIGHT Illuminate the remote control buttons. FAVORITE Channel numbers registered in a compound channel number. • To enter the channel number ex. VOL +: Increase volume. +: Move cursor to the next channel down. : Move cursor downward during menu mode. Direct program number selection buttons PROG -: When tuning digital...
...Sleep Timer CH: Change to cancel the mute. CH: Change to the right during menu mode. - RECALL Display or remove the channel banner. Channel, Program and Station identifier Program end time Program title Clock 15-2 ABC - Stereo SAP Mono LIGHT Illuminate the remote control buttons. FAVORITE Channel numbers registered in a compound channel number. • To enter the channel number ex. VOL +: Increase volume. +: Move cursor to the next channel down. : Move cursor downward during menu mode. Direct program number selection buttons PROG -: When tuning digital...
Operating Instructions
Page 18
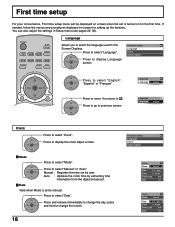
...+ CH Press to display the clock adjust screen. Press to display Language screen. Auto : Updates the clock time by user. Language Language English Press to select "English", "Español" or "Français". Manual : Registers the time set to select the language used for setting up the features. POWER SAP LIGHT TV VCR DVD DTV RCVR DBS/CBL AUX TV/VIDEO SLEEP EXIT Language Allows you to manual. First time setup Language Clock Auto program MUT ASPECT FAVORITE E RE CH...
...+ CH Press to display the clock adjust screen. Press to display Language screen. Auto : Updates the clock time by user. Language Language English Press to select "English", "Español" or "Français". Manual : Registers the time set to select the language used for setting up the features. POWER SAP LIGHT TV VCR DVD DTV RCVR DBS/CBL AUX TV/VIDEO SLEEP EXIT Language Allows you to manual. First time setup Language Clock Auto program MUT ASPECT FAVORITE E RE CH...
Operating Instructions
Page 23
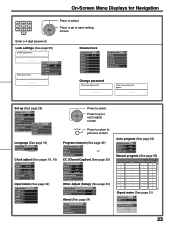
.... 2 HDMI Video 1 Video 2 CH -VOL OK VOL+ CH Press to previous screen. No 4 - - - - - - No 8 - - - - - - No 9 - - - - - - Lock Mode Off Channel Program Change password ---- Program channel (See page 30) Program channel Auto Manual Signal meter CC (Closed Caption) (See page 32) CC Mode Analog Digital Off CC1 Primary Digital setting CC reset Other Adjust (Setup) (See page 34) Other Adjust Auto Power On Off Side Bar Off About (See page 34) About Version License CableCARD Auto program (See page 30) Auto program ANT In Cable Mode All Start scan Manual...
.... 2 HDMI Video 1 Video 2 CH -VOL OK VOL+ CH Press to previous screen. No 4 - - - - - - No 8 - - - - - - No 9 - - - - - - Lock Mode Off Channel Program Change password ---- Program channel (See page 30) Program channel Auto Manual Signal meter CC (Closed Caption) (See page 32) CC Mode Analog Digital Off CC1 Primary Digital setting CC reset Other Adjust (Setup) (See page 34) Other Adjust Auto Power On Off Side Bar Off About (See page 34) About Version License CableCARD Auto program (See page 30) Auto program ANT In Cable Mode All Start scan Manual...

Operating Instructions
Page 27
... Connection). Sub-Menu Navigation Other Adjust AI Sound Surround Speakers HDMI In Audio Leveler On Off On Auto 0 Speakers This feature is set to "Off". Audio Leveler 0 Audio Leveler The audio leveler monitors the difference in audio levels between Analog or Digital Input. Press to turn TV speakers "On" or "Off" (see page 12), this feature will let you switch between input signals from external equipment and minimizes the change in output volume that could occur when switching input signals. Speakers...
... Connection). Sub-Menu Navigation Other Adjust AI Sound Surround Speakers HDMI In Audio Leveler On Off On Auto 0 Speakers This feature is set to "Off". Audio Leveler 0 Audio Leveler The audio leveler monitors the difference in audio levels between Analog or Digital Input. Press to turn TV speakers "On" or "Off" (see page 12), this feature will let you switch between input signals from external equipment and minimizes the change in output volume that could occur when switching input signals. Speakers...

Operating Instructions
Page 29
... in First time setup on page 18. Setup 1/2 CH scan Fav. Sub-Menu Navigation Setup 1/2 CH scan Fav. Language Clock Program channel Input labels CC 29 Press to select "Language". Please read about Clock in First time setup on pages 18-19. Press to display the Main menu. Language Clock Program channel Input labels CC Setup 1/2 CH scan Fav. Set up Press the MENU button to display the Clock screen. or "All". Picture Audio Timer Lock Setup CH scan CH -VOL...
... in First time setup on page 18. Setup 1/2 CH scan Fav. Sub-Menu Navigation Setup 1/2 CH scan Fav. Language Clock Program channel Input labels CC 29 Press to select "Language". Please read about Clock in First time setup on pages 18-19. Press to display the Main menu. Language Clock Program channel Input labels CC Setup 1/2 CH scan Fav. Set up Press the MENU button to display the Clock screen. or "All". Picture Audio Timer Lock Setup CH scan CH -VOL...
Operating Instructions
Page 32
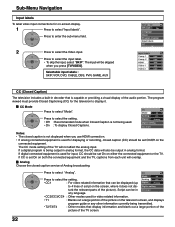
... Program channel Input labels CC Input labels Comp. 1 Comp. 2 HDMI Video 1 Video 2 SKIP SKIP DVD AUX SKIP CC (Closed Caption) The television includes a built-in decoder that is being output in analog format, the CC data will be skipped when you use HDMI connection. • If analog connected equipment is not being transmitted. • T2/T3/T4 : Other modes that can be displayed (up Digital Primary to select the setting. • Off : Recommended mode when Closed Caption...
... Program channel Input labels CC Input labels Comp. 1 Comp. 2 HDMI Video 1 Video 2 SKIP SKIP DVD AUX SKIP CC (Closed Caption) The television includes a built-in decoder that is being output in analog format, the CC data will be skipped when you use HDMI connection. • If analog connected equipment is not being transmitted. • T2/T3/T4 : Other modes that can be displayed (up Digital Primary to select the setting. • Off : Recommended mode when Closed Caption...

Operating Instructions
Page 34
... the Cable input. the password ---- Language Clock Program channel Input labels CC Setup 2/2 Other adjust About Reset Other Adjust Auto Power On Off Side Bar Off Auto Power On Press to select "Side bar". Press to select "Auto Power On". Other Adjust • The side bar may flash (alternate black/white) Auto Power On Off depending on the back of the display field. Press to display Enter password. Side Bar Adjustment Side Bar Do not display a picture in 4:3 mode for...
... the Cable input. the password ---- Language Clock Program channel Input labels CC Setup 2/2 Other adjust About Reset Other Adjust Auto Power On Off Side Bar Off Auto Power On Press to select "Side bar". Press to select "Auto Power On". Other Adjust • The side bar may flash (alternate black/white) Auto Power On Off depending on the back of the display field. Press to display Enter password. Side Bar Adjustment Side Bar Do not display a picture in 4:3 mode for...

Operating Instructions
Page 35
... Video inputs. • CH : Locks out specific analog and digital channels. CH -VOL OK VOL+ CH Press to view any of the program rating. These channels will change to " Enter password.". 0 Notes: • Use a code that is required to select the setting. • Off : Turns off Lock set functions. • All : All channels are locked regardless of video games, VCR tapes, channels and Video modes. Password is easy to clear the Lock setup. Sub-Menu Navigation Lock Press the MENU button to select "CH 1" - Lock Mode Off Channel Program Change password...
... Video inputs. • CH : Locks out specific analog and digital channels. CH -VOL OK VOL+ CH Press to view any of the program rating. These channels will change to " Enter password.". 0 Notes: • Use a code that is required to select the setting. • Off : Turns off Lock set functions. • All : All channels are locked regardless of video games, VCR tapes, channels and Video modes. Password is easy to clear the Lock setup. Sub-Menu Navigation Lock Press the MENU button to select "CH 1" - Lock Mode Off Channel Program Change password...
Operating Instructions
Page 40
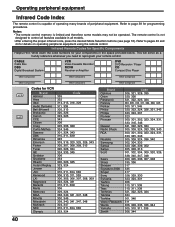
... control all models. • After entering the proper infrared code, press the desired Mode Selection buttons (see page 16). The remote control is limited and therefore some models may not be operated. CABLE Cable Box DBS Digital Broadcast System VCR Video Cassette Recorder RCVR Receiver or Amplifier DVD DVD Recorder / Player CD Compact Disc Player Other Component Other Component Other Component Other Component Other Component Codes for your remote control. Operating peripheral equipment Infrared Code Index The remote control is capable of operating...
... control all models. • After entering the proper infrared code, press the desired Mode Selection buttons (see page 16). The remote control is limited and therefore some models may not be operated. CABLE Cable Box DBS Digital Broadcast System VCR Video Cassette Recorder RCVR Receiver or Amplifier DVD DVD Recorder / Player CD Compact Disc Player Other Component Other Component Other Component Other Component Other Component Codes for your remote control. Operating peripheral equipment Infrared Code Index The remote control is capable of operating...
Operating Instructions
Page 45
...:1-135 Speaker Sound Audio Output FEATURES Accessories Supplied Operating Conditions 4 23/32 " (120 mm) × 2 23/64 " (60 mm) × 2 pcs, 6 Ω 16 W [ 8 W + 8 W ] ( 10 % THD ) 3D Y/C FILTER CLOSED CAPTION HDMI V-Chip Cable CARDTM Slot Remote control: EUR7627Z60 AA Battery × 2 AC Cord F-type antenna adapter (5C-2V × 1) Pedestal Cable clamper × 2 Temperature : 32 °F - 104 °F (0 ° - 40 °C) Humidity : 20 % - 80 % (non-condensing) Connection Terminals AV INPUT...
...:1-135 Speaker Sound Audio Output FEATURES Accessories Supplied Operating Conditions 4 23/32 " (120 mm) × 2 23/64 " (60 mm) × 2 pcs, 6 Ω 16 W [ 8 W + 8 W ] ( 10 % THD ) 3D Y/C FILTER CLOSED CAPTION HDMI V-Chip Cable CARDTM Slot Remote control: EUR7627Z60 AA Battery × 2 AC Cord F-type antenna adapter (5C-2V × 1) Pedestal Cable clamper × 2 Temperature : 32 °F - 104 °F (0 ° - 40 °C) Humidity : 20 % - 80 % (non-condensing) Connection Terminals AV INPUT...
Operating Instructions
Page 46
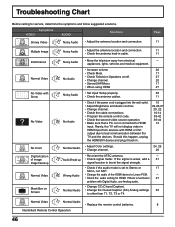
... HDMI or DVI output due to Stereo or 17 Mono, not SAP. • Change the audio of image Image freeze up Normal Video Black Box on /off. 27 • Change channel. 20 • Stereo/SAP/Mono 17 • When using HDMI 27 • Set Input Setup properly. 30 • Check the antenna cables. 11 • Check if the power cord is plugged into the wall outlet. • Adjust Brightness and Audio controls. • Change channel. • Check the cable connections. • Program the remote control code...
... HDMI or DVI output due to Stereo or 17 Mono, not SAP. • Change the audio of image Image freeze up Normal Video Black Box on /off. 27 • Change channel. 20 • Stereo/SAP/Mono 17 • When using HDMI 27 • Set Input Setup properly. 30 • Check the antenna cables. 11 • Check if the power cord is plugged into the wall outlet. • Adjust Brightness and Audio controls. • Change channel. • Check the cable connections. • Program the remote control code...


