
Operating Instructions
Page 2
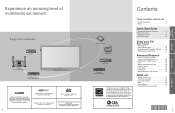
...; Watching Videos and DVDs 24 Advanced Features ● How to the "Home Use" setting or other factory default settings could result in the United States and other countries. Any modifications to Use Menu Functions (picture, sound quality, etc 25 ● VIERA LinkTM "HDAVI ControlTM 28 ● Lock 34 ● Editing and Setting Channels 36 ● Closed Caption 38 ● Input Labels 39 ● Using Timer 40 ● Recommended AV Connections 41...
...; Watching Videos and DVDs 24 Advanced Features ● How to the "Home Use" setting or other factory default settings could result in the United States and other countries. Any modifications to Use Menu Functions (picture, sound quality, etc 25 ● VIERA LinkTM "HDAVI ControlTM 28 ● Lock 34 ● Editing and Setting Channels 36 ● Closed Caption 38 ● Input Labels 39 ● Using Timer 40 ● Recommended AV Connections 41...

Operating Instructions
Page 3
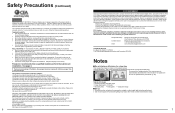
...-type plug. The power cord was not designed for an evaluation. CAUTION outlet is easily accessible. Insert the power cord plug as far as shown to supply cord and plug regularly. Do not use any dust from your TV's plug to the wall outlet. Do not handle the power cord plug with the cord plugged in a place away from direct or reflected light from the power Do not use a 3-prong to 2-prong AC plug...
...-type plug. The power cord was not designed for an evaluation. CAUTION outlet is easily accessible. Insert the power cord plug as far as shown to supply cord and plug regularly. Do not use any dust from your TV's plug to the wall outlet. Do not handle the power cord plug with the cord plugged in a place away from direct or reflected light from the power Do not use a 3-prong to 2-prong AC plug...
Operating Instructions
Page 4
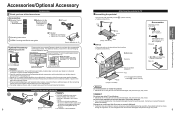
... play with furniture and television sets. • Don't place flat panel displays on furniture that children can be mounted to walls with the instructions, may reduce the remote control's transmission range. 7 Use of some types of drawers. • Remember that can easily be pulled or grabbed by several individuals and/or entities. Flat panel displays that they cannot be used in 4:3 mode •• • SD Card photo Video game...
... play with furniture and television sets. • Don't place flat panel displays on furniture that children can be mounted to walls with the instructions, may reduce the remote control's transmission range. 7 Use of some types of drawers. • Remember that can easily be pulled or grabbed by several individuals and/or entities. Flat panel displays that they cannot be used in 4:3 mode •• • SD Card photo Video game...
Operating Instructions
Page 5
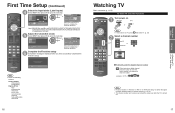
... the Remote Control Transmitter (2) AA Battery AC cord Operating Instructions VIERA Concierge and Quick start guide Pedestal TBLX0134 (TC-P42X2) TBLX0135 (TC-P50X2) How to assemble (p. 9) Optional Accessory Wall-hanging bracket (angle) TY-WK4P1RW Please contact your nearest Panasonic dealer to the wall-hanging bracket installation manual. Bottom view B Arrow mark Rear side Accessories Assembly screws (4 of each) A XYN5+F18FN M5 × 18 (Silver) B THEL078N (for 42") THEL080N (for the connecting cables not...
... the Remote Control Transmitter (2) AA Battery AC cord Operating Instructions VIERA Concierge and Quick start guide Pedestal TBLX0134 (TC-P42X2) TBLX0135 (TC-P50X2) How to assemble (p. 9) Optional Accessory Wall-hanging bracket (angle) TY-WK4P1RW Please contact your nearest Panasonic dealer to the wall-hanging bracket installation manual. Bottom view B Arrow mark Rear side Accessories Assembly screws (4 of each) A XYN5+F18FN M5 × 18 (Silver) B THEL078N (for 42") THEL080N (for the connecting cables not...

Operating Instructions
Page 7
... digital images and high-quality sound. Blu-ray Disc player Connecting to HDMI terminals will enable you to p. 29. To use COMPONENT terminals red blue green white Y green green PB COMPONENT VIDEO OUT blue blue PR red red L white white AUDIO R OUT AV Equipment e.g. Remote control Closed caption On/Off (p. 18) Switches TV On or Off (Standby) Changes the input mode (p. 24) Selects Audio Mode for TV viewing (p. 18) Exits from Menu screen VIERA Link menu (p. 32-33) Displays Main Menu...
... digital images and high-quality sound. Blu-ray Disc player Connecting to HDMI terminals will enable you to p. 29. To use COMPONENT terminals red blue green white Y green green PB COMPONENT VIDEO OUT blue blue PR red red L white white AUDIO R OUT AV Equipment e.g. Remote control Closed caption On/Off (p. 18) Switches TV On or Off (Standby) Changes the input mode (p. 24) Selects Audio Mode for TV viewing (p. 18) Exits from Menu screen VIERA Link menu (p. 32-33) Displays Main Menu...

Operating Instructions
Page 8
...) is set .) Auto program Progress Number of analog channels Number of 6 Select OK RETURN Start scanning for 30 seconds and plug it again. OK Select "Not used " will be selected. Note: Select "Cable" when viewing via Satellite receiver or Cable box. Skip: Go to select (Label inputs) OK Start scanning the channels (Available channels are automatically set to that point are selecting the store demonstration mode. select OK Select "No" and return to the original screen 15 First Time Setup Quick Start Guide Select...
...) is set .) Auto program Progress Number of analog channels Number of 6 Select OK RETURN Start scanning for 30 seconds and plug it again. OK Select "Not used " will be selected. Note: Select "Cable" when viewing via Satellite receiver or Cable box. Skip: Go to select (Label inputs) OK Start scanning the channels (Available channels are automatically set to that point are selecting the store demonstration mode. select OK Select "No" and return to the original screen 15 First Time Setup Quick Start Guide Select...
Operating Instructions
Page 9
... First time setup Completion message is displayed when you to view more channels featuring high-quality video and sound 16 Watching TV Basic connection (p. 11-12) To watch TV and other functions Turn power on (Remote) (TV) or Note If the mode is not TV, press and select TV. (p. 24) Select a channel number (Remote) up or down (TV) Viewing To directly enter the digital channel number When tuning to a digital channel, press the button to...
... First time setup Completion message is displayed when you to view more channels featuring high-quality video and sound 16 Watching TV Basic connection (p. 11-12) To watch TV and other functions Turn power on (Remote) (TV) or Note If the mode is not TV, press and select TV. (p. 24) Select a channel number (Remote) up or down (TV) Viewing To directly enter the digital channel number When tuning to a digital channel, press the button to...

Operating Instructions
Page 12
... view still images on a VIERA television by simply inserting an SD card into the VIERA SD card slot. (Media other than SD Cards will not work.) Photo viewer Insert the SD card * This setting will be displayed automatically next time. Image viewer settings Image viewer auto play " is "Off") Display "Photo viewer" Start the Slideshow Press to defaults Picture mode Vivid Contrast +30 Contrast 0 example: Picture menu Picture menu/Audio menu (p. 26) select adjust Select...
... view still images on a VIERA television by simply inserting an SD card into the VIERA SD card slot. (Media other than SD Cards will not work.) Photo viewer Insert the SD card * This setting will be displayed automatically next time. Image viewer settings Image viewer auto play " is "Off") Display "Photo viewer" Start the Slideshow Press to defaults Picture mode Vivid Contrast +30 Contrast 0 example: Picture menu Picture menu/Audio menu (p. 26) select adjust Select...

Operating Instructions
Page 13
... select Menu Picture 1/2 Reset to defaults Picture mode Vivid Contrast 0 Brightness 0 Color 0 Tint 0 Sharpness 0 adjust or select Selects from a menu screen Press to return to the previous screen Menu structure Menu Input labels HDMI 1 HDMI 2 Component 1 Component 2 Video 1 Video 2 Menu bar Press OK to move to the Menu items. Menu items Press OK to proceed to the next screen if available. Note The Input label will be adjusted. Operate the connected equipment using the remote control supplied with the equipment Note For details, see the manual...
... select Menu Picture 1/2 Reset to defaults Picture mode Vivid Contrast 0 Brightness 0 Color 0 Tint 0 Sharpness 0 adjust or select Selects from a menu screen Press to return to the previous screen Menu structure Menu Input labels HDMI 1 HDMI 2 Component 1 Component 2 Video 1 Video 2 Menu bar Press OK to move to the Menu items. Menu items Press OK to proceed to the next screen if available. Note The Input label will be adjusted. Operate the connected equipment using the remote control supplied with the equipment Note For details, see the manual...
Operating Instructions
Page 14
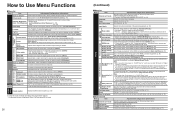
... on -screen display will not function if "Auto power on a digital image. (p. 37) 27 Setup SUB MENU How to Use Menu Functions (picture, sound quality, etc.) for the HDMI connection. (Digital input signal) Select audio input terminal when DVI cable is connected. (Analog audio input signal) (Digital/Component 1/Component 2/Video 1/Video 2) The TV can automatically turn On/Off at the designated date and time. (p. 40) Lock Locks the channels and programs. (p. 34) Closed caption Displays subtitles (Closed caption). (p. 38) Closed caption In the AV mode, the Audio and Setup menus give...
... on -screen display will not function if "Auto power on a digital image. (p. 37) 27 Setup SUB MENU How to Use Menu Functions (picture, sound quality, etc.) for the HDMI connection. (Digital input signal) Select audio input terminal when DVI cable is connected. (Analog audio input signal) (Digital/Component 1/Component 2/Video 1/Video 2) The TV can automatically turn On/Off at the designated date and time. (p. 40) Lock Locks the channels and programs. (p. 34) Closed caption Displays subtitles (Closed caption). (p. 38) Closed caption In the AV mode, the Audio and Setup menus give...
Operating Instructions
Page 15
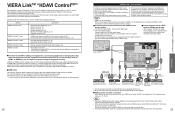
.... After connection, confirm the HDMI control functions (p. 30-33). recorder (DIGA) use Panasonic's HDMI cable. Be sure to connect the AV amp between this unit Off and On again while the power of all Panasonic "HDAVI Control" equipped components using one DVD recorder (DIGA) can correctly recognize the connected equipment) and check that enables digital sound signals to HDMI 2. Setting of AV equipment such as shown above, set the input mode to HDMI 2 (p. 24...
.... After connection, confirm the HDMI control functions (p. 30-33). recorder (DIGA) use Panasonic's HDMI cable. Be sure to connect the AV amp between this unit Off and On again while the power of all Panasonic "HDAVI Control" equipped components using one DVD recorder (DIGA) can correctly recognize the connected equipment) and check that enables digital sound signals to HDMI 2. Setting of AV equipment such as shown above, set the input mode to HDMI 2 (p. 24...
Operating Instructions
Page 16
... "HDAVI Control 3 or later") (Continued) When using a Blu-ray Disc player, DVD player/recorder or Home theater system, the TV will automatically change Automatic Input Switching Power on ) Default speakers TV Enables or disables interoperability of equipment the setting may or may not be set the Home theater system as default audio output. Channel information (Input signal/Channel list/Caption information) ○ --- --- Depending on ) Default speakers TV Selects either the TV's speakers or external home theater as Default speakers, change Select settings Menu VIERA...
... "HDAVI Control 3 or later") (Continued) When using a Blu-ray Disc player, DVD player/recorder or Home theater system, the TV will automatically change Automatic Input Switching Power on ) Default speakers TV Enables or disables interoperability of equipment the setting may or may not be set the Home theater system as default audio output. Channel information (Input signal/Channel list/Caption information) ○ --- --- Depending on ) Default speakers TV Selects either the TV's speakers or external home theater as Default speakers, change Select settings Menu VIERA...

Operating Instructions
Page 18
...Mode Off Channel Off Game Off Program Off Change password Menu Change password Enter new password. - - - - movie ratings) NR No rating G General Audience: All ages admitted PG Parental Guidance Suggested PG- Input your password. 34 Select "Lock" Menu Password Enter password. - - - - select set To lock/unlock all the inputs regardless of the lock settings of "Channel", "Game" and "Program". Locks Channel 3, Channel 4, and external inputs. Advanced Note This television is designed to "All" or "Off". Off next select Customizes programs lock based on a specific...
...Mode Off Channel Off Game Off Program Off Change password Menu Change password Enter new password. - - - - movie ratings) NR No rating G General Audience: All ages admitted PG Parental Guidance Suggested PG- Input your password. 34 Select "Lock" Menu Password Enter password. - - - - select set To lock/unlock all the inputs regardless of the lock settings of "Channel", "Game" and "Program". Locks Channel 3, Channel 4, and external inputs. Advanced Note This television is designed to "All" or "Off". Off next select Customizes programs lock based on a specific...
Operating Instructions
Page 19
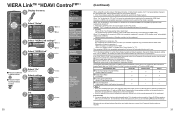
... the channel list manually. Display the menu Auto program Set automatically Select "Setup" Menu Setup 1/2 Channel surf mode All Language Clock ANT/Cable setup Input labels Anti image retention Adjusts Surf mode, Language, Clock, Channels, Inputs, and other settings. Select "ANT/Cable setup" Menu Setup 1/2 Channel surf mode All Language Clock ANT/Cable setup Input labels Anti image retention Scans for digital antenna channels. Set To reset the settings of the Setup menu Select "Reset to defaults" in " Select a scanning mode (p. 15) Select "Cable" or "Antenna...
... the channel list manually. Display the menu Auto program Set automatically Select "Setup" Menu Setup 1/2 Channel surf mode All Language Clock ANT/Cable setup Input labels Anti image retention Adjusts Surf mode, Language, Clock, Channels, Inputs, and other settings. Select "ANT/Cable setup" Menu Setup 1/2 Channel surf mode All Language Clock ANT/Cable setup Input labels Anti image retention Scans for digital antenna channels. Set To reset the settings of the Setup menu Select "Reset to defaults" in " Select a scanning mode (p. 15) Select "Cable" or "Antenna...
Operating Instructions
Page 20
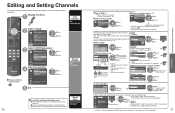
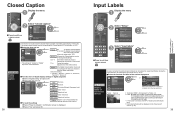
..., Channels, Inputs, and other settings. opacity Opacity of text Background Color of your connected devices. opacity Opacity of text box To reset the settings Outline Outline color of text Fore. next select The television includes a built-in "Analog" or "Digital" depend on the screen.) Select "Reset to external input terminals can be transmitting the Closed caption (CC) information. (p. 43) Select the item and set or Video 2 G A A Select or enter the name of the audio. select set Menu Closed caption Reset to defaults Mode...
..., Channels, Inputs, and other settings. opacity Opacity of text Background Color of your connected devices. opacity Opacity of text box To reset the settings Outline Outline color of text Fore. next select The television includes a built-in "Analog" or "Digital" depend on the screen.) Select "Reset to external input terminals can be transmitting the Closed caption (CC) information. (p. 43) Select the item and set or Video 2 G A A Select or enter the name of the audio. select set Menu Closed caption Reset to defaults Mode...

Operating Instructions
Page 21
... is set. The TV will not work if the "Auto power on or off after all the other connections, consult the instructions for the setup when using an external analog audio cable with an HDMI to turn on " (p. 27) is pressed. 40 Select "Timer" Menu Timer Sleep Timer 1 Timer 2 Timer 3 Timer 4 Timer 5 next select Set the TV to turn Off Recommended AV Connections These diagrams show our recommendations of the TV AC 120 V 60 Hz Cable TV or AC Cord Cable Box (Connect after...
... is set. The TV will not work if the "Auto power on or off after all the other connections, consult the instructions for the setup when using an external analog audio cable with an HDMI to turn on " (p. 27) is pressed. 40 Select "Timer" Menu Timer Sleep Timer 1 Timer 2 Timer 3 Timer 4 Timer 5 next select Set the TV to turn Off Recommended AV Connections These diagrams show our recommendations of the TV AC 120 V 60 Hz Cable TV or AC Cord Cable Box (Connect after...

Operating Instructions
Page 22
...; News • Political • Public Service Announcements • Religious • Sports • Weather Technical Information Closed Caption (CC) For viewing the CC of blocking "NR" programs (non rated, not applicable and none) as a set-top box or satellite receiver) has the CC set On using the Component or HDMI connection to standard ratings set to adults. This program may contain sophisticated themes, sexual content...
...; News • Political • Public Service Announcements • Religious • Sports • Weather Technical Information Closed Caption (CC) For viewing the CC of blocking "NR" programs (non rated, not applicable and none) as a set-top box or satellite receiver) has the CC set On using the Component or HDMI connection to standard ratings set to adults. This program may contain sophisticated themes, sexual content...

Operating Instructions
Page 23
... + 4-digit file number Usable characters: 1-byte "a to z", "A to Z", "0 to the HDMI connector using an HDMI compliant (fully wired) cable. If the connected device has an aspect adjustment function, set -top box or a DVD player, can be available for the first few seconds when Input mode is not liable for any deterioration or damage of December, 2009) for the HDAVI Control compatible equipment. The HDMI input terminal can be output as multi channel...
... + 4-digit file number Usable characters: 1-byte "a to z", "A to Z", "0 to the HDMI connector using an HDMI compliant (fully wired) cable. If the connected device has an aspect adjustment function, set -top box or a DVD player, can be available for the first few seconds when Input mode is not liable for any deterioration or damage of December, 2009) for the HDAVI Control compatible equipment. The HDMI input terminal can be output as multi channel...
Operating Instructions
Page 25
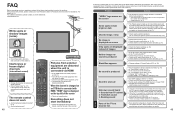
... mode. • "Image retention" (p. 7) The Plasma panel is on the rear of the antenna. Check Picture menu (p. 26) and volume. Interference or frozen digital channels (intermittent sound) Change the direction of the recorder. For details, read the manual of antenna for assistance. Is "TV speakers" set to resolve the problem. When the channel is changed on an STB that the correct input has been selected. (p. 24) Black Box appears Change settings of the screen This is produced with HDMI, "HDMI...
... mode. • "Image retention" (p. 7) The Plasma panel is on the rear of the antenna. Check Picture menu (p. 26) and volume. Interference or frozen digital channels (intermittent sound) Change the direction of the recorder. For details, read the manual of antenna for assistance. Is "TV speakers" set to resolve the problem. When the channel is changed on an STB that the correct input has been selected. (p. 24) Black Box appears Change settings of the screen This is produced with HDMI, "HDMI...
Operating Instructions
Page 26
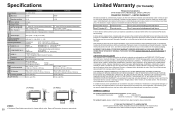
... are approximate. Specifications Consumption panel Power Source Maximum TC-P42X2 AC 120 V, 60 Hz 235 W 299 W TC-P50X2 Power Plasma Display Standby condition Drive method Aspect Ratio Visible screen size (W × H × Diagonal) (No. warrants this warranty. If removal is attributable to service the product, it was purchased as a gift, of a Panasonic brand product mentioned above contact info. or the Servicer be at its option either (a) repair your product with...
... are approximate. Specifications Consumption panel Power Source Maximum TC-P42X2 AC 120 V, 60 Hz 235 W 299 W TC-P50X2 Power Plasma Display Standby condition Drive method Aspect Ratio Visible screen size (W × H × Diagonal) (No. warrants this warranty. If removal is attributable to service the product, it was purchased as a gift, of a Panasonic brand product mentioned above contact info. or the Servicer be at its option either (a) repair your product with...


