26" Lcd Tv
Page 3
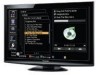
... Canada 57 3 Any modifications to Use Menu Functions (picture, sound quality, etc 28 VIERA LinkTM "HDAVI ControlTM 32 Lock 38 Editing and Setting Channels 40 Closed Caption 42 Input Labels 43 Using Timer 44 Recommended AV Connections 45 Viewing Advanced FAQs, etc. Quick Start Guide Enjoy rich multimedia SD memory card Camcorder Amplifier Home theater system VCR Personal computer Set Top Box DVD recorder/ DVD player/ Blu-ray Disc Blu-ray...
... Canada 57 3 Any modifications to Use Menu Functions (picture, sound quality, etc 28 VIERA LinkTM "HDAVI ControlTM 32 Lock 38 Editing and Setting Channels 40 Closed Caption 42 Input Labels 43 Using Timer 44 Recommended AV Connections 45 Viewing Advanced FAQs, etc. Quick Start Guide Enjoy rich multimedia SD memory card Camcorder Amplifier Home theater system VCR Personal computer Set Top Box DVD recorder/ DVD player/ Blu-ray Disc Blu-ray...
26" Lcd Tv
Page 4
.... 12) Use only with the cart, stand, tripod, bracket or table specified by placing the LCD TV on a bed, sofa, rug or other . Never spill liquid of electric shock, do not remove cover or back. Refer servicing to protect it from being walked on or pinched particularly at least 10 cm of the polarized or grounding-type plug. Install in a fire...
.... 12) Use only with the cart, stand, tripod, bracket or table specified by placing the LCD TV on a bed, sofa, rug or other . Never spill liquid of electric shock, do not remove cover or back. Refer servicing to protect it from being walked on or pinched particularly at least 10 cm of the polarized or grounding-type plug. Install in a fire...

26" Lcd Tv
Page 6
... or play with steel studs or old cinder block construction. Follow the manufacturer's recommendations for the safe installation and use of your flat panel display. • Carefully read and understand all cords and cables connected to the flat panel display so that children can be heavy. 6 WALL MOUNTING: IF YOU DECIDE TO WALL MOUNT YOUR FLAT PANEL DISPLAY, ALWAYS: • Use a mount that has been recommended by the display manufacturer and/or listed...
... or play with steel studs or old cinder block construction. Follow the manufacturer's recommendations for the safe installation and use of your flat panel display. • Carefully read and understand all cords and cables connected to the flat panel display so that children can be heavy. 6 WALL MOUNTING: IF YOU DECIDE TO WALL MOUNT YOUR FLAT PANEL DISPLAY, ALWAYS: • Use a mount that has been recommended by the display manufacturer and/or listed...

26" Lcd Tv
Page 10
... Hz Cable TV or Back of HDMI or • Component Video cable. (p. 13) To view high-definition programming select the correct video input. (p. 22) Note Not all the other connections.) (If no Cable Box) or ANTENNA Cable In DIO ANT IN ANT OUT Cable Box •Cable Box/Cable You need to subscribe to a cable TV service to a highdefinition cable service. For additional assistance, visit us at: www.panasonic.com www.panasonic.ca 10 If using a Cable Box, set the TV channel to the operating manuals...
... Hz Cable TV or Back of HDMI or • Component Video cable. (p. 13) To view high-definition programming select the correct video input. (p. 22) Note Not all the other connections.) (If no Cable Box) or ANTENNA Cable In DIO ANT IN ANT OUT Cable Box •Cable Box/Cable You need to subscribe to a cable TV service to a highdefinition cable service. For additional assistance, visit us at: www.panasonic.com www.panasonic.ca 10 If using a Cable Box, set the TV channel to the operating manuals...

26" Lcd Tv
Page 16
... operation is performed for 60 seconds and the "Manual program" menu will not be saved when no wire is connected to numeric Set the Input labels First time setup Language Clock ANT/Cable setup Input labels next select Label: [BLANK] SKIP/VCR/DVD/ CABLE/SATELLITE/DVR/GAME/ AUX/RECEIVER/COMPUTER/ Blu-ray/CAMERA/DVD REC/ HOME THTR/MONITOR/MEDIA CTR/MEDIA EXT/OTHER Input labels Component HDMI 1 HDMI 2 HDMI 3 GAME or Video 1 Video 2 PC (example: TC-L37X1) select set . First Time Setup (Continued) Auto channel setup...
... operation is performed for 60 seconds and the "Manual program" menu will not be saved when no wire is connected to numeric Set the Input labels First time setup Language Clock ANT/Cable setup Input labels next select Label: [BLANK] SKIP/VCR/DVD/ CABLE/SATELLITE/DVR/GAME/ AUX/RECEIVER/COMPUTER/ Blu-ray/CAMERA/DVD REC/ HOME THTR/MONITOR/MEDIA CTR/MEDIA EXT/OTHER Input labels Component HDMI 1 HDMI 2 HDMI 3 GAME or Video 1 Video 2 PC (example: TC-L37X1) select set . First Time Setup (Continued) Auto channel setup...
26" Lcd Tv
Page 22
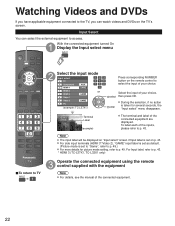
With the connected equipment turned On Display the Input select menu ■To return to TV Select the input mode Input select 1 TV 2 Component AUX 3 HDMI 1 GAME 4 HDMI 2 or 5 HDMI 3 GAME 6 Video 1 7 Video 2 GAME 8 PC (example: TC-L37X1) Press corresponding NUMBER button on p. 43. Select the input of the connected equipment. 22 To label each of the inputs, please refer to p. 43. * HDMI 3 (TC-L37X1, TC-L32X1 only) Operate the connected equipment using the remote control supplied with the equipment Note For details, see the manual of your...
With the connected equipment turned On Display the Input select menu ■To return to TV Select the input mode Input select 1 TV 2 Component AUX 3 HDMI 1 GAME 4 HDMI 2 or 5 HDMI 3 GAME 6 Video 1 7 Video 2 GAME 8 PC (example: TC-L37X1) Press corresponding NUMBER button on p. 43. Select the input of the connected equipment. 22 To label each of the inputs, please refer to p. 43. * HDMI 3 (TC-L37X1, TC-L32X1 only) Operate the connected equipment using the remote control supplied with the equipment Note For details, see the manual of your...

26" Lcd Tv
Page 23
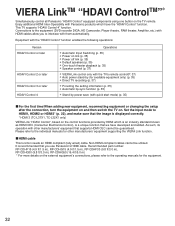
..." setting to p. 32-37. VIERA LinkTM Setting If you connect equipment that has the "HDAVI Control" function to a TV using these functions, you can set each "VIERA Link" functions according to the operating manuals for the equipment. 23 Please refer to "On" as shown below. Before using an HDMI cable, you will find it to "Off". Display menu Viewing Watching Videos and DVDs Select "Setup" Menu Picture AVIuEdRioA Link SD card Closed caption Setup...
..." setting to p. 32-37. VIERA LinkTM Setting If you connect equipment that has the "HDAVI Control" function to a TV using these functions, you can set each "VIERA Link" functions according to the operating manuals for the equipment. 23 Please refer to "On" as shown below. Before using an HDMI cable, you will find it to "Off". Display menu Viewing Watching Videos and DVDs Select "Setup" Menu Picture AVIuEdRioA Link SD card Closed caption Setup...
26" Lcd Tv
Page 29
... aspect mode for HDMI connection. (Digital input signal) Select audio input terminal when DVI cable is connected. (Analog audio input signal) (Digital/Component/Video 1/Video 2) * HDMI 3 in (TC-L37X1, TC-L32X1 only) The TV can automatically turn On/Off at the designated date and time (p. 44) Volume leveler 0 TV speakers On HDMI1 in HDMI2 in HDMI3 in the overall picture (On/Off) Back light +20 Tint 0 Sharpness 0 Color temp. The default setting is selected. PC adjustments Color matrix SD MPEG NR Black level H size Off Light Size 1 Reset to Use Menu Functions (picture, sound...
... aspect mode for HDMI connection. (Digital input signal) Select audio input terminal when DVI cable is connected. (Analog audio input signal) (Digital/Component/Video 1/Video 2) * HDMI 3 in (TC-L37X1, TC-L32X1 only) The TV can automatically turn On/Off at the designated date and time (p. 44) Volume leveler 0 TV speakers On HDMI1 in HDMI2 in HDMI3 in the overall picture (On/Off) Back light +20 Tint 0 Sharpness 0 Color temp. The default setting is selected. PC adjustments Color matrix SD MPEG NR Black level H size Off Light Size 1 Reset to Use Menu Functions (picture, sound...

26" Lcd Tv
Page 30
... input signal) Select "Setup" Menu next Picture Audio Timer Lock VIERA Link SD card Closed caption Setup select Select the item Setup 1/2 Channel surf mode All Language Clock ANT/Cable setup Input labels next select Setup ECO/energy saving VIERA Link settings Language Clock ANT/Cable setup Input labels VIERA Link Power on link Power off link Stand-by power save Auto power stand-by Default speakers Power save No signal for 10 minutes No activity for 3 hours Display Sub Menu SUB MENU Select the item Setup...
... input signal) Select "Setup" Menu next Picture Audio Timer Lock VIERA Link SD card Closed caption Setup select Select the item Setup 1/2 Channel surf mode All Language Clock ANT/Cable setup Input labels next select Setup ECO/energy saving VIERA Link settings Language Clock ANT/Cable setup Input labels VIERA Link Power on link Power off link Stand-by power save Auto power stand-by Default speakers Power save No signal for 10 minutes No activity for 3 hours Display Sub Menu SUB MENU Select the item Setup...
26" Lcd Tv
Page 31
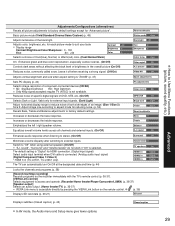
... NO SIGNAL and NO OPERATION is turned On. (No/Yes) TV power cord must be plugged into this device. Eye-friendly for the first time after turning the power off . How to Use Menu Functions (picture, sound quality, etc.) (Continued) Adjustments/Configurations (alternatives) Sets the mode to select the channel with Channel up /down button (All/Favorite/Digital only/Analog only) • Favorite: Only channels registered as channel settings. (p. 40) Reset to defaults Adjustments/Configurations (alternatives) Sets the mode to...
... NO SIGNAL and NO OPERATION is turned On. (No/Yes) TV power cord must be plugged into this device. Eye-friendly for the first time after turning the power off . How to Use Menu Functions (picture, sound quality, etc.) (Continued) Adjustments/Configurations (alternatives) Sets the mode to select the channel with Channel up /down button (All/Favorite/Digital only/Analog only) • Favorite: Only channels registered as channel settings. (p. 40) Reset to defaults Adjustments/Configurations (alternatives) Sets the mode to...
26" Lcd Tv
Page 32
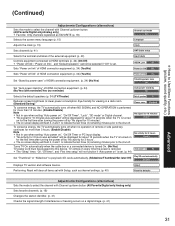
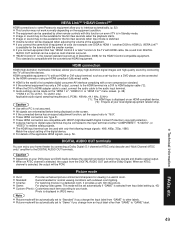
... the TV's remote control(P. 37) • Auto power stand-by (for other manufacturers' equipment that the image is displayed correctly. * HDMI 3 (TC-L37X1, TC-L32X1 only) VIERA Link "HDAVI Control", based on the control functions provided by power save (with quick start mode) (p. 35) ■For the first time/When adding new equipment, reconnecting equipment or changing the setup after the connection, turn the equipment on and then switch the TV on. Non-HDMI-compliant cables cannot...
... the TV's remote control(P. 37) • Auto power stand-by (for other manufacturers' equipment that the image is displayed correctly. * HDMI 3 (TC-L37X1, TC-L32X1 only) VIERA Link "HDAVI Control", based on the control functions provided by power save (with quick start mode) (p. 35) ■For the first time/When adding new equipment, reconnecting equipment or changing the setup after the connection, turn the equipment on and then switch the TV on. Non-HDMI-compliant cables cannot...
26" Lcd Tv
Page 33
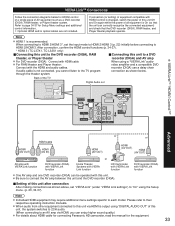
..., set the input mode to HDMI 2/HDMI 3 (p. 22) initially before connecting to each model. Refer to their respective operating instruction manuals. After connection, confirm the HDMI control functions (p. 34-37). * HDMI 3 (TC-L37X1, TC-L32X1 only) ■Connecting this unit to the DVD recorder (DIGA), RAM ■Connecting this unit to this unit via HDMI, you cannot listen to the TV program connection as shown below for HDAVI control of a single piece of the TV Digital Audio out HDMI 1 HDMI 2 Dock...
..., set the input mode to HDMI 2/HDMI 3 (p. 22) initially before connecting to each model. Refer to their respective operating instruction manuals. After connection, confirm the HDMI control functions (p. 34-37). * HDMI 3 (TC-L37X1, TC-L32X1 only) ■Connecting this unit to the DVD recorder (DIGA), RAM ■Connecting this unit to this unit via HDMI, you cannot listen to the TV program connection as shown below for HDAVI control of a single piece of the TV Digital Audio out HDMI 1 HDMI 2 Dock...

26" Lcd Tv
Page 34
..." Display menu Select "Setup" Menu Picture AVIuEdRioA Link SD card Closed caption Setup select next Select "VIERA Link settings" Setup 2/2 VIERA Link settings ECO/energy saving Advanced setup About select next Select "VIERA Link" VIERA Link settings VIERA Link On Power on link Yes Power off link Yes Stand-by power save No Auto power stand-by No Default speakers TV select Automatic Input Switching Power on link Power off link Stand-by power save (for "HDAVI Control 4" (with quick start mode)) Auto power stand...
..." Display menu Select "Setup" Menu Picture AVIuEdRioA Link SD card Closed caption Setup select next Select "VIERA Link settings" Setup 2/2 VIERA Link settings ECO/energy saving Advanced setup About select next Select "VIERA Link" VIERA Link settings VIERA Link On Power on link Yes Power off link Yes Stand-by power save No Auto power stand-by No Default speakers TV select Automatic Input Switching Power on link Power off link Stand-by power save (for "HDAVI Control 4" (with quick start mode)) Auto power stand...
26" Lcd Tv
Page 35
..., the TV's input automatically switches to the input based on the external equipment's operation, please refer to TV with HDMI cable. Channel information (Input signal/Channel list/Caption information) ○ --- --- Note There is a possibility that all the GUI language information might be turned off if it is still in use. For more details on the playback equipment. (Continued) VIERA LinkTM "HDAVI ControlTM" At the start mode)" connected with HDMI cable. Condition Power off...
..., the TV's input automatically switches to the input based on the external equipment's operation, please refer to TV with HDMI cable. Channel information (Input signal/Channel list/Caption information) ○ --- --- Note There is a possibility that all the GUI language information might be turned off if it is still in use. For more details on the playback equipment. (Continued) VIERA LinkTM "HDAVI ControlTM" At the start mode)" connected with HDMI cable. Condition Power off...

26" Lcd Tv
Page 40
Display menu Select "Setup" Menu Picture Audio Timer Lock VIERA Link SD card Closed caption Setup next select Auto program Set automatically ■Press to exit from a menu screen Select "ANT/Cable setup" Setup 1/2 Channel surf mode All Language Clock ANT/Cable setup Input labels next select Reset to defaults Select the function ANT/Cable setup ANT in Setup menu ( ) and press OK Input your needs and reception conditions. Editing and Setting Channels The current channel settings can be changed according to defaults" in Cable Auto program Manual program Signal meter...
Display menu Select "Setup" Menu Picture Audio Timer Lock VIERA Link SD card Closed caption Setup next select Auto program Set automatically ■Press to exit from a menu screen Select "ANT/Cable setup" Setup 1/2 Channel surf mode All Language Clock ANT/Cable setup Input labels next select Reset to defaults Select the function ANT/Cable setup ANT in Setup menu ( ) and press OK Input your needs and reception conditions. Editing and Setting Channels The current channel settings can be changed according to defaults" in Cable Auto program Manual program Signal meter...

26" Lcd Tv
Page 43
... → abc Y Delete Switches Input mode from a menu screen Select "Setup" Menu Picture Audio Timer Lock VIERA Link SD card Closed caption Setup Select "Input labels" Setup 1/2 Channel surf mode All Language Clock ANT/Cable setup Input labels next select next select Input labels Display labels of Connected devices Devices connected to numeric Terminals: Component/HDMI 1-3*/Video 1-2/PC * HDMI 3 (TC-L37X1, TC-L32X1 only) Label: [BLANK] SKIP/VCR/DVD/CABLE/SATELLITE/DVR/GAME/ AUX/RECEIVER/COMPUTER/Blu-ray/CAMERA/DVD REC/ HOME THTR/MONITOR/MEDIA CTR/MEDIA EXT/OTHER For...
... → abc Y Delete Switches Input mode from a menu screen Select "Setup" Menu Picture Audio Timer Lock VIERA Link SD card Closed caption Setup Select "Input labels" Setup 1/2 Channel surf mode All Language Clock ANT/Cable setup Input labels next select next select Input labels Display labels of Connected devices Devices connected to numeric Terminals: Component/HDMI 1-3*/Video 1-2/PC * HDMI 3 (TC-L37X1, TC-L32X1 only) Label: [BLANK] SKIP/VCR/DVD/CABLE/SATELLITE/DVR/GAME/ AUX/RECEIVER/COMPUTER/Blu-ray/CAMERA/DVD REC/ HOME THTR/MONITOR/MEDIA CTR/MEDIA EXT/OTHER For...
26" Lcd Tv
Page 49
... "GAME" to receive analog signals. When an ATSC channel is in Standby mode. Game: For playing video game. This mode will be automatically set the aspect ratio to enjoy high-definition digital images and high-quality sound by connecting the TV unit and the devices. HDMI is selected from an Input label other than "GAME" to the TV with an HDMI or DVI output terminal, such as of the digital device. These HDMI connectors are compatible...
... "GAME" to receive analog signals. When an ATSC channel is in Standby mode. Game: For playing video game. This mode will be automatically set the aspect ratio to enjoy high-definition digital images and high-quality sound by connecting the TV unit and the devices. HDMI is selected from an Input label other than "GAME" to the TV with an HDMI or DVI output terminal, such as of the digital device. These HDMI connectors are compatible...

26" Lcd Tv
Page 52
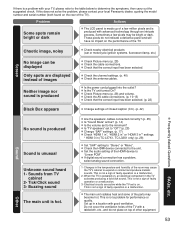
... the manual of the recorder. The remote control does not work Are the batteries installed correctly? (p. 8) Are the batteries new? For details (p. 56, 57) For additional assistance, please contact us via HDMI Is the HDMI cable connected properly? (p. 33, 45) Turn Off the TV unit and equipment, then turn them On again. If the signal is not a malfunction. Check an input signal from external equipment are...
... the manual of the recorder. The remote control does not work Are the batteries installed correctly? (p. 8) Are the batteries new? For details (p. 56, 57) For additional assistance, please contact us via HDMI Is the HDMI cable connected properly? (p. 33, 45) Turn Off the TV unit and equipment, then turn them On again. If the signal is not a malfunction. Check an input signal from external equipment are...
26" Lcd Tv
Page 53
... the TV with advanced technology through an intricate process. Tick/Click sound 3- Are the speakers' cables connected correctly? (p. 45) Is "Sound Mute" active? (p. 14) Is the volume set to "Off"? (p. 28) Change "SAP" settings. (p. 17) Check "HDMI 1 in", "HDMI 2 in" or "HDMI 3 in"* settings. * HDMI 3 in a location with your local Panasonic dealer, quoting the model number and serial number (both found on . Check that the correct input has been selected. (p. 22) Black Box appears Change settings...
... the TV with advanced technology through an intricate process. Tick/Click sound 3- Are the speakers' cables connected correctly? (p. 45) Is "Sound Mute" active? (p. 14) Is the volume set to "Off"? (p. 28) Change "SAP" settings. (p. 17) Check "HDMI 1 in", "HDMI 2 in" or "HDMI 3 in"* settings. * HDMI 3 in a location with your local Panasonic dealer, quoting the model number and serial number (both found on . Check that the correct input has been selected. (p. 22) Black Box appears Change settings...
26" Lcd Tv
Page 55
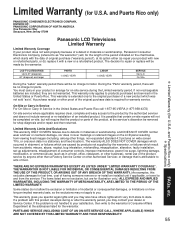
...-rechargeable batteries are included, they are for lost time, cost of having someone remove or re-install an installed unit if applicable, or travel to the product by the warrantor. If a problem with the date of God. and Puerto Rico only) Limited Warranty (for U.S.A. LCD TV CATEGORIES Up to repair or replace will be no charge for shop diagnosis and...
...-rechargeable batteries are included, they are for lost time, cost of having someone remove or re-install an installed unit if applicable, or travel to the product by the warrantor. If a problem with the date of God. and Puerto Rico only) Limited Warranty (for U.S.A. LCD TV CATEGORIES Up to repair or replace will be no charge for shop diagnosis and...


