Sd Movie
Page 3
... Charging the Battery 11 Inserting a Memory Card 12 Using the LCD Monitor 13 Turning the Power On 15 Selecting Operation Modes 16 Using the Menu Screen 17 List of Menus 18 Setting Date and Time 20 Adjusting Brightness and Color Level on the LCD Monitor 21 Digital Zoom Function 31 Night View Function 31 Backlight Compensation Function........... 32 Adjusting White Balance 33 Erasing the Files Recorded on a Memory Card 34 Protecting Files (File Protection 35 Writing Printing Data on an external device ........ 39 Recording Pictures supplied from an external device 40 Using Auto...
... Charging the Battery 11 Inserting a Memory Card 12 Using the LCD Monitor 13 Turning the Power On 15 Selecting Operation Modes 16 Using the Menu Screen 17 List of Menus 18 Setting Date and Time 20 Adjusting Brightness and Color Level on the LCD Monitor 21 Digital Zoom Function 31 Night View Function 31 Backlight Compensation Function........... 32 Adjusting White Balance 33 Erasing the Files Recorded on a Memory Card 34 Protecting Files (File Protection 35 Writing Printing Data on an external device ........ 39 Recording Pictures supplied from an external device 40 Using Auto...
Sd Movie
Page 4
... recorded and created can be used without obtaining permission from the holders of mercury. Only 70 Customer Services Directory (For U.S.A Only 72 Index 73 Spanish Quick Use Guide/ Guía española para el uso rápido Dear Customer, We would like to take this Panasonic SD Video Camera. THERE ARE NOT USER SERVICEABLE PARTS INSIDE. Disposal of these Operating Instructions carefully and keep them handy...
... recorded and created can be used without obtaining permission from the holders of mercury. Only 70 Customer Services Directory (For U.S.A Only 72 Index 73 Spanish Quick Use Guide/ Guía española para el uso rápido Dear Customer, We would like to take this Panasonic SD Video Camera. THERE ARE NOT USER SERVICEABLE PARTS INSIDE. Disposal of these Operating Instructions carefully and keep them handy...
Sd Movie
Page 5
... BE INSTALLED NEAR THE EQUIPMENT AND SHALL BE EASILY ACCESSIBLE. Replace only with the same or equivalent type recommended by U.S. A lithium ion/polymer battery that is not in accordance with a mere 0.01% of this is not a malfunction and does not affect the recorded picture. ≥If the SD Video Camera is protected by the manufacturer. However, this SD Video Camera, its accessories or Memory Card...
... BE INSTALLED NEAR THE EQUIPMENT AND SHALL BE EASILY ACCESSIBLE. Replace only with the same or equivalent type recommended by U.S. A lithium ion/polymer battery that is not in accordance with a mere 0.01% of this is not a malfunction and does not affect the recorded picture. ≥If the SD Video Camera is protected by the manufacturer. However, this SD Video Camera, its accessories or Memory Card...
Sd Movie
Page 7
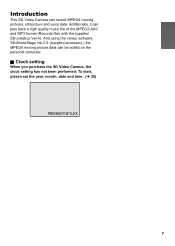
To start, please set the year, month, date and time. (l 20) PRESS MENU TO SET CLOCK 7 Introduction This SD Video Camera can play back a high quality music file of the MPEG2-AAC and MP3 format (Records files with the supplied SD-Jukebox Ver.4). Additionally, it can record MPEG4 moving picture data can be edited on the personal computer. ª Clock setting When you purchase the SD Video Camera, the clock setting has not been performed. And using the viewer software, SD-MovieStage Ver.2.5 (supplied accessory), the MPEG4 moving pictures, still picture and voice data.
To start, please set the year, month, date and time. (l 20) PRESS MENU TO SET CLOCK 7 Introduction This SD Video Camera can play back a high quality music file of the MPEG2-AAC and MP3 format (Records files with the supplied SD-Jukebox Ver.4). Additionally, it can record MPEG4 moving picture data can be edited on the personal computer. ª Clock setting When you purchase the SD Video Camera, the clock setting has not been performed. And using the viewer software, SD-MovieStage Ver.2.5 (supplied accessory), the MPEG4 moving pictures, still picture and voice data.

Sd Movie
Page 10
... the pictures on an external device to be recorded on a Card using the timer function. (l 39, 40) 1 Place the SD Video Camera on the USB Cradle. ≥The grooves A of the SD Video Camera fit in the leading protrusions B. ≥Place the SD Video Camera on the USB Cradle so that the mating connectors 1 are in alignment. ≥Before fitting the SD Video Camera on the USB Cradle, turn the SD Video Camera off. 1 A B Power Supply ª Using...
... the pictures on an external device to be recorded on a Card using the timer function. (l 39, 40) 1 Place the SD Video Camera on the USB Cradle. ≥The grooves A of the SD Video Camera fit in the leading protrusions B. ≥Place the SD Video Camera on the USB Cradle so that the mating connectors 1 are in alignment. ≥Before fitting the SD Video Camera on the USB Cradle, turn the SD Video Camera off. 1 A B Power Supply ª Using...
Sd Movie
Page 11
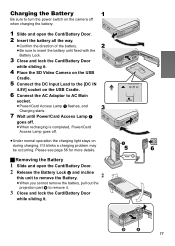
... Card/Battery Door while sliding it. 4 Place the SD Video Camera on the USB Cradle. 5 Connect the DC Input Lead to the [DC IN 4.8V] socket on the USB Cradle. 6 Connect the AC Adaptor to remove it. 3 Close and lock the Card/Battery Door while sliding it blinks a charging problem may be occurring. Charging the Battery 1 Be sure to turn the power switch on the camera off when charging the battery. 1 Slide and open the Card/Battery...
... Card/Battery Door while sliding it. 4 Place the SD Video Camera on the USB Cradle. 5 Connect the DC Input Lead to the [DC IN 4.8V] socket on the USB Cradle. 6 Connect the AC Adaptor to remove it. 3 Close and lock the Card/Battery Door while sliding it blinks a charging problem may be occurring. Charging the Battery 1 Be sure to turn the power switch on the camera off when charging the battery. 1 Slide and open the Card/Battery...
Sd Movie
Page 13
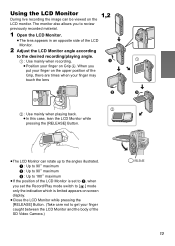
... allows you set the Record/Play mode switch to [ ] mode only the indication which is limited appears on screen display. ≥Close the LCD Monitor while pressing the [RELEASE] Button. (Take care not to get your finger caught between the LCD Monitor and the body of the LCD Monitor. 2 Adjust the LCD Monitor angle according to review previously recorded material. 1,2 1 Open the LCD Monitor. ≥The lens appears in...
... allows you set the Record/Play mode switch to [ ] mode only the indication which is limited appears on screen display. ≥Close the LCD Monitor while pressing the [RELEASE] Button. (Take care not to get your finger caught between the LCD Monitor and the body of the LCD Monitor. 2 Adjust the LCD Monitor angle according to review previously recorded material. 1,2 1 Open the LCD Monitor. ≥The lens appears in...
Sd Movie
Page 14
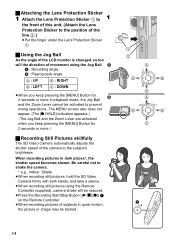
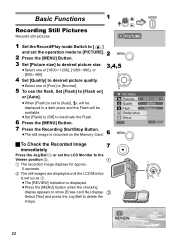
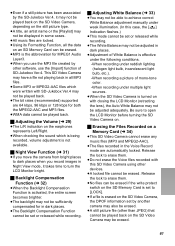
... [MENU] Button for B 2 seconds or more .) ª Recording Still Pictures skillfully The SD Video Camera automatically adjusts the shutter speed of the camera to the position of the line 2.) ≥Put the finger under the Lens Protection Sticker 1. ª Using the Jog Ball As the angle of the LCD monitor is changed, so too will be reduced. ≥Press the Recording Start/Stop Button ([1/_]/[¥]) 1 on the Remote Controller...
... [MENU] Button for B 2 seconds or more .) ª Recording Still Pictures skillfully The SD Video Camera automatically adjusts the shutter speed of the camera to the position of the line 2.) ≥Put the finger under the Lens Protection Sticker 1. ª Using the Jog Ball As the angle of the LCD monitor is changed, so too will be reduced. ≥Press the Recording Start/Stop Button ([1/_]/[¥]) 1 on the Remote Controller...
Sd Movie
Page 15
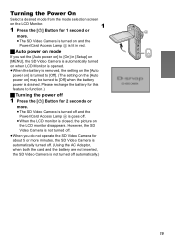
... the battery is removed, the setting on the [Auto power on] is turned to [Off]. (The setting on the [Auto power on the LCD monitor disappears. Turning the Power On Select a desired mode from the mode selection screen on the LCD Monitor. 1 1 Press the [Í] Button for 1 second or A more. ≥The SD Video Camera is turned on and the Power/Card Access Lamp A is lit in red. ª Auto power on mode If you do not operate the SD Video Camera...
... the battery is removed, the setting on the [Auto power on] is turned to [Off]. (The setting on the [Auto power on the LCD monitor disappears. Turning the Power On Select a desired mode from the mode selection screen on the LCD Monitor. 1 1 Press the [Í] Button for 1 second or A more. ≥The SD Video Camera is turned on and the Power/Card Access Lamp A is lit in red. ª Auto power on mode If you do not operate the SD Video Camera...
Sd Movie
Page 22
... Recorded Image 7 immediately Press the Jog Ball 1 or set the LCD Monitor to the Viewer position 2. 1 1 The recorded image displays for approx. Ô 5 seconds. 2 The still images are displayed until the LCD Monitor is set up as 1. × ≥The [REVIEW] Indication is displayed. ≥Press the [MENU] Button when the checking display appears to show [Erase card file] display. 2 Select [Yes] and press the Jog Ball to delete the image. Basic Functions 1 MODE Recording Still Pictures Records...
... Recorded Image 7 immediately Press the Jog Ball 1 or set the LCD Monitor to the Viewer position 2. 1 1 The recorded image displays for approx. Ô 5 seconds. 2 The still images are displayed until the LCD Monitor is set up as 1. × ≥The [REVIEW] Indication is displayed. ≥Press the [MENU] Button when the checking display appears to show [Erase card file] display. 2 Select [Yes] and press the Jog Ball to delete the image. Basic Functions 1 MODE Recording Still Pictures Records...

Sd Movie
Page 40
... SD Video Camera off and put in the USB Cradle. (l 10) 2 Connect the [AV IN/OUT] terminal of the USB Cradle to the AV Output Sockets of the DC IN 4.8V external device 2 using supplied AV Cable 1. 3 Turn on the SD Video Camera and set the Record/Play mode Switch to [ ] and AV IN/OUT 2 then, set the operation mode to [PICTURE] or [MPEG4]. 4 Press the [MENU] Button and then, select 1 [Setup] and press the Jog Ball. 5 Set [Input...
... SD Video Camera off and put in the USB Cradle. (l 10) 2 Connect the [AV IN/OUT] terminal of the USB Cradle to the AV Output Sockets of the DC IN 4.8V external device 2 using supplied AV Cable 1. 3 Turn on the SD Video Camera and set the Record/Play mode Switch to [ ] and AV IN/OUT 2 then, set the operation mode to [PICTURE] or [MPEG4]. 4 Press the [MENU] Button and then, select 1 [Setup] and press the Jog Ball. 5 Set [Input...

Sd Movie
Page 42
... the processor or hard disk drive is not guaranteed. ≥Operation on a Memory Card, and cut and edit moving pictures (SD-MovieStage Ver.2.5). By using encryption technology in the PC may occasionally cause an operating problem. ≥USB Driver, SD-MovieStage Ver.2.5 and SD-Jukebox Ver.4 cannot be moved/copied to the PDF manual of valid purchasers. Install the USB driver before connecting the SD Video Camera to be available for use the software. On a Personal Computer...
... the processor or hard disk drive is not guaranteed. ≥Operation on a Memory Card, and cut and edit moving pictures (SD-MovieStage Ver.2.5). By using encryption technology in the PC may occasionally cause an operating problem. ≥USB Driver, SD-MovieStage Ver.2.5 and SD-Jukebox Ver.4 cannot be moved/copied to the PDF manual of valid purchasers. Install the USB driver before connecting the SD Video Camera to be available for use the software. On a Personal Computer...
Sd Movie
Page 53
... White Balance setting (l 33) 7 Date/Time Indication (l 20) 8 Elapsed time indication 0h00m00s [ ] Record mode: Elapsed recording time [ ] Play mode: Elapsed playback time 9 Indication of recordable time and recordable number of images R 0: Number of the SD Memory Card is set . If [Check card] is still displayed, the Memory Card is fully utilized. Format it. (l 38) [File locked]: You attempted to execute the erase operation on a locked file. [Please re-operate]: Turn off and on the remote controller indicates the sound quality to be exhausted. Replace it with the USB cable, slide...
... White Balance setting (l 33) 7 Date/Time Indication (l 20) 8 Elapsed time indication 0h00m00s [ ] Record mode: Elapsed recording time [ ] Play mode: Elapsed playback time 9 Indication of recordable time and recordable number of images R 0: Number of the SD Memory Card is set . If [Check card] is still displayed, the Memory Card is fully utilized. Format it. (l 38) [File locked]: You attempted to execute the erase operation on a locked file. [Please re-operate]: Turn off and on the remote controller indicates the sound quality to be exhausted. Replace it with the USB cable, slide...
Sd Movie
Page 58
... MENU TO SET CLOCK] indicator is displayed, set the date and time after the Flash is used to indicate that pictures cannot be recorded. ≥When removing the battery, take care not to drop it. ≥When the SD Video Camera is turned on, do not attach or remove the battery, or plug the power cord in or out. ª Inserting a Memory Card (l 12) ≥While the Power/Card Access Lamp is on, the following operations should...
... MENU TO SET CLOCK] indicator is displayed, set the date and time after the Flash is used to indicate that pictures cannot be recorded. ≥When removing the battery, take care not to drop it. ≥When the SD Video Camera is turned on, do not attach or remove the battery, or plug the power cord in or out. ª Inserting a Memory Card (l 12) ≥While the Power/Card Access Lamp is on, the following operations should...
Sd Movie
Page 60
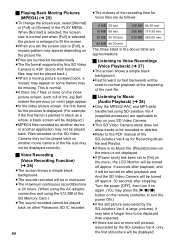
... files recorded by another device or another movie camera or the file size may not be displayed correctly. ª Voice Recording (Voice Recording Function) (l 26) ≥The screen shows a simple black background. ≥The sounds recorded will be in the PLAY MENU. This is not displayed. ≥If [Power save] has been set the screen size to the PDF manual of the next file. ª Listening to Music (Audio Playback) (l 28) ≥Only the MPEG2-AAC and MP3 data transferred using SD...
... files recorded by another device or another movie camera or the file size may not be displayed correctly. ª Voice Recording (Voice Recording Function) (l 26) ≥The screen shows a simple black background. ≥The sounds recorded will be in the PLAY MENU. This is not displayed. ≥If [Power save] has been set the screen size to the PDF manual of the next file. ª Listening to Music (Audio Playback) (l 28) ≥Only the MPEG2-AAC and MP3 data transferred using SD...
Sd Movie
Page 61
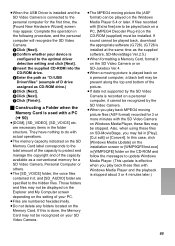
... erase the Voice files recorded with this case, the [1] Indication flashes.) ≥This mode cannot be set by other software, use the [Import] function of mono-tone color. -When recording under multiple light sources. ≥When the SD Video Camera is turned on with closing the LCD Monitor (retracting the lens), the Auto White Balance may not be adjusted adequately. ≥Even if a still picture has been associated by the SD-Jukebox Ver.4, it takes time...
... erase the Voice files recorded with this case, the [1] Indication flashes.) ≥This mode cannot be set by other software, use the [Import] function of mono-tone color. -When recording under multiple light sources. ≥When the SD Video Camera is turned on with closing the LCD Monitor (retracting the lens), the Auto White Balance may not be adjusted adequately. ≥Even if a still picture has been associated by the SD-Jukebox Ver.4, it takes time...
Sd Movie
Page 64
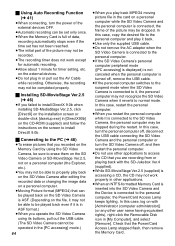
... on the Memory Card by using its buttons, pull out the USB cable. (The SD Video Camera cannot be operated in [My Computer], and select [Remove]. ª Using Auto Recording Function (l 41) ≥When connecting, turn the SD Video Camera off , remove the USB cable. ≥If the personal computer switches to the suspend mode when the SD Video Camera is connected to it, the personal computer may not work except for automatic recording. ≥Allow about 1 minute for timer setting, etc...
... on the Memory Card by using its buttons, pull out the USB cable. (The SD Video Camera cannot be operated in [My Computer], and select [Remove]. ª Using Auto Recording Function (l 41) ≥When connecting, turn the SD Video Camera off , remove the USB cable. ≥If the personal computer switches to the suspend mode when the SD Video Camera is connected to it, the personal computer may not work except for automatic recording. ≥Allow about 1 minute for timer setting, etc...
Sd Movie
Page 65
... sound cannot be played back, download the appropriate software (G.726). (G.726 is installed at the same time as the supplied software, SD-MovieStage Ver.2.5.) ≥When formatting a Memory Card, format it on the SD Video Camera or on SD-Jukebox Ver.4. ≥When a moving picture is played back on a personal computer, a black belt may be present along the top and bottom of the picture. ≥If data not supported by the SD Video Camera is recorded...
... sound cannot be played back, download the appropriate software (G.726). (G.726 is installed at the same time as the supplied software, SD-MovieStage Ver.2.5.) ≥When formatting a Memory Card, format it on the SD Video Camera or on SD-Jukebox Ver.4. ≥When a moving picture is played back on a personal computer, a black belt may be present along the top and bottom of the picture. ≥If data not supported by the SD Video Camera is recorded...
Sd Movie
Page 67
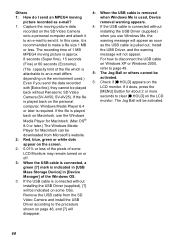
... while stopping playback (or pausing).) 4-2: When the [Power save] mode is set to [Normal]? The LCD Monitor stays dark in which is not compatible with it cannot be used. 6: Either the SD Video Camera or the Memory Card may be damaged. If the SD Video Camera is not turned off after pressing the [Í] Button, pull it out from the USB Cradle and remove the battery. 8: Sound is not heard while a still picture is played back. 8: Sound...
... while stopping playback (or pausing).) 4-2: When the [Power save] mode is set to [Normal]? The LCD Monitor stays dark in which is not compatible with it cannot be used. 6: Either the SD Video Camera or the Memory Card may be damaged. If the SD Video Camera is not turned off after pressing the [Í] Button, pull it out from the USB Cradle and remove the battery. 8: Sound is not heard while a still picture is played back. 8: Sound...
Sd Movie
Page 68
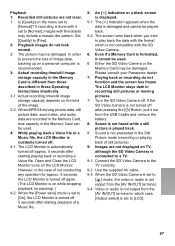
... a file size 1 MB or less. Install the USB Driver, and the warning message will be indicated on some LCD Monitors may remain turned on or off. 3: When the USB cable is connected, a green [?] mark is indicated in [USB Mass Storage Device] in [Device Manager] of the file which is required. In this case, it does, press the [MENU] Button for Macintosh can be downloaded from the SD Video Camera and install the USB Driver...
... a file size 1 MB or less. Install the USB Driver, and the warning message will be indicated on some LCD Monitors may remain turned on or off. 3: When the USB cable is connected, a green [?] mark is indicated in [USB Mass Storage Device] in [Device Manager] of the file which is required. In this case, it does, press the [MENU] Button for Macintosh can be downloaded from the SD Video Camera and install the USB Driver...


