

Owners Manual
Page 2
... 4 Transporting the unit 4 Making the connections 5 Overview of controls 6 Preparing the remote control 6 Preparing the media 7 Media playback 8 DAB 9 Radio 10 Clock and timers 11 Sound effects 12 Illumination 12 Jukebox 12 Karaoke 13 Using a microphone 13 External equipment 13 Others 14 Maintenance 14 Troubleshooting 15 Specifications 17 CAUTION! Do not repair this unit by mobile telephones during use in hazardous radiation exposure. • Set the unit up on this unit to SC-UA3. Keep...
... 4 Transporting the unit 4 Making the connections 5 Overview of controls 6 Preparing the remote control 6 Preparing the media 7 Media playback 8 DAB 9 Radio 10 Clock and timers 11 Sound effects 12 Illumination 12 Jukebox 12 Karaoke 13 Using a microphone 13 External equipment 13 Others 14 Maintenance 14 Troubleshooting 15 Specifications 17 CAUTION! Do not repair this unit by mobile telephones during use in hazardous radiation exposure. • Set the unit up on this unit to SC-UA3. Keep...

Owners Manual
Page 3
... differ according to BS1362. Before use Remove the connector cover. A replacement fuse cover can be subject to change.) 2 AC mains lead For the United Kingdom and Ireland (K2CT2YY00089) 1 Remote control (N2QAYB001149) 1 Remote control battery SC-UA4 1 DAB antenna (RFA3664) Fuse (5 ampere) Fuse (5 ampere) SC-UA3 1 FM indoor antenna (RSAX0002) SC-UA3 For the United Kingdom and Ireland 1 Antenna plug adaptor (K1YZ02000013) TQBJ2015 Note...
... differ according to BS1362. Before use Remove the connector cover. A replacement fuse cover can be subject to change.) 2 AC mains lead For the United Kingdom and Ireland (K2CT2YY00089) 1 Remote control (N2QAYB001149) 1 Remote control battery SC-UA4 1 DAB antenna (RFA3664) Fuse (5 ampere) Fuse (5 ampere) SC-UA3 1 FM indoor antenna (RSAX0002) SC-UA3 For the United Kingdom and Ireland 1 Antenna plug adaptor (K1YZ02000013) TQBJ2015 Note...
Owners Manual
Page 4
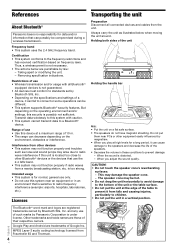
... or in a vertical position. The speaker cone may damage the speaker cone. - MPEG Layer-3 audio coding technology licensed from Fraunhofer IIS and Thomson. 4 4 Transporting the unit Preparation Disconnect all Bluetooth® equipped devices is sensitive to connect or some operations can be different. • This system supports Bluetooth® security features. When the sound is located too close to a Bluetooth...
... or in a vertical position. The speaker cone may damage the speaker cone. - MPEG Layer-3 audio coding technology licensed from Fraunhofer IIS and Thomson. 4 4 Transporting the unit Preparation Disconnect all Bluetooth® equipped devices is sensitive to connect or some operations can be different. • This system supports Bluetooth® security features. When the sound is located too close to a Bluetooth...
Owners Manual
Page 5
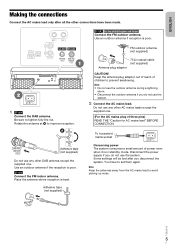
.... Disconnect the power supply if you do not use any other connections have to set them again. Use an outdoor antenna if the reception is in standby mode. ENGLISH Making the connections Connect the AC mains lead only after you disconnect the system. Rotate the antenna at to prevent swallowing. FM outdoor antenna (not supplied) 75 Ω coaxial cable (not supplied) Antenna plug adaptor CAUTION! Adhesive tape (not...
.... Disconnect the power supply if you do not use any other connections have to set them again. Use an outdoor antenna if the reception is in standby mode. ENGLISH Making the connections Connect the AC mains lead only after you disconnect the system. Rotate the antenna at to prevent swallowing. FM outdoor antenna (not supplied) 75 Ω coaxial cable (not supplied) Antenna plug adaptor CAUTION! Adhesive tape (not...

Owners Manual
Page 6
... button again. K View the play menu L Select the sound effects M Select the jukebox N USB port ( ) O Disc tray P Display panel Q Remote control sensor Distance: Within approximately 7 m Angle: Approximately 20° up and down, 30° left and right Preparing the remote control Use alkaline or manganese battery. Overview of power. TQBJ2015 6 6 B Select the audio source On the unit: To start Bluetooth® pairing, press and hold [ ]. I Adjust the volume level J Mute the sound...
... button again. K View the play menu L Select the sound effects M Select the jukebox N USB port ( ) O Disc tray P Display panel Q Remote control sensor Distance: Within approximately 7 m Angle: Approximately 20° up and down, 30° left and right Preparing the remote control Use alkaline or manganese battery. Overview of power. TQBJ2015 6 6 B Select the audio source On the unit: To start Bluetooth® pairing, press and hold [ ]. I Adjust the volume level J Mute the sound...

Owners Manual
Page 7
... "PAIRING" is complete. ENGLISH Preparing the media Disc 1 Press [CD x] (unit: [x]) to select "USB". Note: • Do not use a USB extension cable. The system cannot recognise USB device connected through Bluetooth®. Press again to close the disc tray. 2 Press [USB/CD] repeatedly to select "PAIRING" and then press [OK]. 3 Select "SC-UA4" or "SC-UA3" from the Bluetooth® menu of the data. 1 Decrease the volume and connect the USB device to...
... "PAIRING" is complete. ENGLISH Preparing the media Disc 1 Press [CD x] (unit: [x]) to select "USB". Note: • Do not use a USB extension cable. The system cannot recognise USB device connected through Bluetooth®. Press again to close the disc tray. 2 Press [USB/CD] repeatedly to select "PAIRING" and then press [OK]. 3 Select "SC-UA4" or "SC-UA3" from the Bluetooth® menu of the data. 1 Decrease the volume and connect the USB device to...
Owners Manual
Page 8
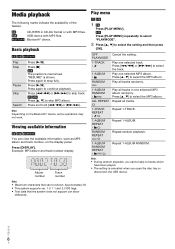
...; Text data that the system does not support can view the available information, such as MP3 album and track number, on the Bluetooth® device, some operations may not work. USB Press [PLAY MENU] repeatedly to select "PLAYMODE". 2 Press [R, T] to continue playback. Play one selected MP3 album randomly. Play all tracks in CD-DA format or with MP3 files. Repeat 1-ALBUM RANDOM. Press again to...
...; Text data that the system does not support can view the available information, such as MP3 album and track number, on the Bluetooth® device, some operations may not work. USB Press [PLAY MENU] repeatedly to select "PLAYMODE". 2 Press [R, T] to continue playback. Play one selected MP3 album randomly. Play all tracks in CD-DA format or with MP3 files. Repeat 1-ALBUM RANDOM. Press again to...

Owners Manual
Page 9
... can play CD-R/RW with all USB devices. • This system supports USB 2.0 full speed. • This system can change the link mode to select "PRESET" and then press [OK]. In this function, the video and audio output may not be played in to the station. 4 Press [OK]. 5 Press [R, T] to start tuning. Note: If you have the extension ".mp3" or ".MP3". • Tracks will tune automatically. Adjust the antenna and...
... can play CD-R/RW with all USB devices. • This system supports USB 2.0 full speed. • This system can change the link mode to select "PRESET" and then press [OK]. In this function, the video and audio output may not be played in to the station. 4 Press [OK]. 5 Press [R, T] to start tuning. Note: If you have the extension ".mp3" or ".MP3". • Tracks will tune automatically. Adjust the antenna and...

Owners Manual
Page 10
... starts changing quickly. "STEREO" is shown when a stereo broadcast is shown. Checking the signal quality You can listen to secondary services when " " is cancelled when you select other frequency blocks, press [R, T]. Memory presetting You can receive into the channels in to the station. 4 Press [OK]. 5 Press [R, T] to preset more stations. The tuner presets all the stations it can preset up to 30 FM stations. █ Automatic presetting 1 Press [PLAY MENU] to select "A.PRESET...
... starts changing quickly. "STEREO" is shown when a stereo broadcast is shown. Checking the signal quality You can listen to secondary services when " " is cancelled when you select other frequency blocks, press [R, T]. Memory presetting You can receive into the channels in to the station. 4 Press [OK]. 5 Press [R, T] to preset more stations. The tuner presets all the stations it can preset up to 30 FM stations. █ Automatic presetting 1 Press [PLAY MENU] to select "A.PRESET...
Owners Manual
Page 11
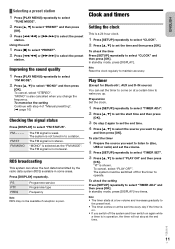
... (disc, USB or radio) and set the volume. 2 Press [SETUP] repeatedly to select "TIMER SET". 3 Press [R, T] to set the end time. 4 Press [R, T] to select "CLOCK" and then press [OK]. Using the unit 1 Press [8] to select "PRESET". 2 Press [2/3] or [5/6] to select "TIMER ADJ" and then press [OK]. To cancel, select "STEREO". "MONO" is in operation, the timer will not stop at a certain time to wake you want to a station...
... (disc, USB or radio) and set the volume. 2 Press [SETUP] repeatedly to select "TIMER SET". 3 Press [R, T] to set the end time. 4 Press [R, T] to select "CLOCK" and then press [OK]. Using the unit 1 Press [8] to select "PRESET". 2 Press [2/3] or [5/6] to select "TIMER ADJ" and then press [OK]. To cancel, select "STEREO". "MONO" is in operation, the timer will not stop at a certain time to wake you want to a station...
Owners Manual
Page 12
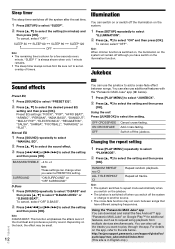
... "MANUAL EQ". 2 Press [R, T] to select the sound effect. 3 Press [2/3] or [5/6] to select "D.BASS LEVEL" or "D.BASS BEAT". BASS/MID/TREBLE -4 to +4 SURROUND Note: These settings can also use the jukebox to play through the app. Changing the repeat setting 1 Press [PLAY MENU] repeatedly to select "PLAYMODE". 2 Press [R, T] to select the setting (in English only.) Repeat all tracks. http://av.jpn.support.panasonic.com/support/global/cs/ audio/app...
... "MANUAL EQ". 2 Press [R, T] to select the sound effect. 3 Press [2/3] or [5/6] to select "D.BASS LEVEL" or "D.BASS BEAT". BASS/MID/TREBLE -4 to +4 SURROUND Note: These settings can also use the jukebox to play through the app. Changing the repeat setting 1 Press [PLAY MENU] repeatedly to select "PLAYMODE". 2 Press [R, T] to select the setting (in English only.) Repeat all tracks. http://av.jpn.support.panasonic.com/support/global/cs/ audio/app...

Owners Manual
Page 13
... appropriate operating instructions. Changing the Karaoke effect You can occur when you do not use the Karaoke effect in D-IN or AUX source, set "D-IN MODE" or "AUX MODE" to "MODE 1". (Zpage 14) 1 Connect a microphone (not supplied) to sing with the background music. 4 Play the music source and adjust the volume of this system. Cancel the effect. Plug type: Ø 6.3 mm monaural 2 Press [SOUND] repeatedly to select "MIC VOL...
... appropriate operating instructions. Changing the Karaoke effect You can occur when you do not use the Karaoke effect in D-IN or AUX source, set "D-IN MODE" or "AUX MODE" to "MODE 1". (Zpage 14) 1 Connect a microphone (not supplied) to sing with the background music. 4 Play the music source and adjust the volume of this system. Cancel the effect. Plug type: Ø 6.3 mm monaural 2 Press [SOUND] repeatedly to select "MIC VOL...
Owners Manual
Page 14
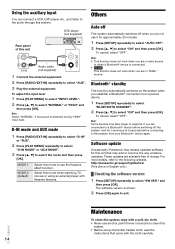
...; device before connecting to this unit Audio cable (not supplied) 1 Connect the external equipment. 2 Press [RADIO/EXT-IN] repeatedly to select "ON" and then press [OK]. DVD player (not supplied) Rear panel of charge. Bluetooth® standby This function automatically switches on the system when you are available free of this system from a paired device. 1 Press [SETUP] repeatedly to select "BLUETOOTH STANDBY". 2 Press [R, T] to select "AUX". 3 Play the external equipment...
...; device before connecting to this unit Audio cable (not supplied) 1 Connect the external equipment. 2 Press [RADIO/EXT-IN] repeatedly to select "ON" and then press [OK]. DVD player (not supplied) Rear panel of charge. Bluetooth® standby This function automatically switches on the system when you are available free of this system from a paired device. 1 Press [SETUP] repeatedly to select "BLUETOOTH STANDBY". 2 Press [R, T] to select "AUX". 3 Play the external equipment...

Owners Manual
Page 15
.... The total number of tracks displayed is out of the check points, or if the solutions indicated do not solve the problem, consult your dealer. Change to "SC-UA4" or "SC-UA3" manually. Sound from the device is interrupted. • The device is incorrect. The antenna should be read. • The format of the 10 m communication range. If you have to set the audio output to a playable disc. •...
.... The total number of tracks displayed is out of the check points, or if the solutions indicated do not solve the problem, consult your dealer. Change to "SC-UA4" or "SC-UA3" manually. Sound from the device is interrupted. • The device is incorrect. The antenna should be read. • The format of the 10 m communication range. If you have to set the audio output to a playable disc. •...

Owners Manual
Page 16
... connecting the external equipment by using different codes. "AUDIO UNSUPPORTED" • The signal format or frequency is using too much power. Select only the supported sampling frequencies on the remote control for a minimum of the remote control. - You can only play supported format. • The system may have not put in the USB device. • Examine the content. "SCAN FAILED" • Stations cannot be received. "ERROR" • An incorrect operation was done. "USB NO DEVICE...
... connecting the external equipment by using different codes. "AUDIO UNSUPPORTED" • The signal format or frequency is using too much power. Select only the supported sampling frequencies on the remote control for a minimum of the remote control. - You can only play supported format. • The system may have not put in the USB device. • Examine the content. "SCAN FAILED" • Stations cannot be received. "ERROR" • An incorrect operation was done. "USB NO DEVICE...
Owners Manual
Page 17
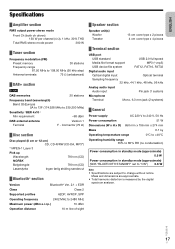
... Operation distance 10 m line of sight █ Speaker section Speaker unit(s) Woofer Tweeter 13 cm cone type x 2 pieces 4 cm cone type x 4 pieces █ Terminal section USB port USB standard Media file format support USB device file system USB 2.0 full speed MP3 (*.mp3) FAT12, FAT16, FAT32 Digital audio input Optical digital input Optical terminal Sampling frequency 32 kHz, 44.1 kHz, 48 kHz, 96 kHz Analog audio input Audio input Pin jack (1 system) Microphone Terminal Mono, 6.3 mm jack (2 systems) █ General Power...
... Operation distance 10 m line of sight █ Speaker section Speaker unit(s) Woofer Tweeter 13 cm cone type x 2 pieces 4 cm cone type x 4 pieces █ Terminal section USB port USB standard Media file format support USB device file system USB 2.0 full speed MP3 (*.mp3) FAT12, FAT16, FAT32 Digital audio input Optical digital input Optical terminal Sampling frequency 32 kHz, 44.1 kHz, 48 kHz, 96 kHz Analog audio input Audio input Pin jack (1 system) Microphone Terminal Mono, 6.3 mm jack (2 systems) █ General Power...

Owners Manual
Page 19
...help to save valuable resources and prevent any potential negative effects on the products, packaging, and/or accompanying documents mean that used electrical and electronic products and batteries must not be used batteries, please take them to applicable collection points in combination with the requirement set by the Directive...pot descărca o copie a DoC-ului original al produselor noastre RE de la adressa noastră DoC din Internet: http://www.doc.panasonic.de Contact la Reprezentanţa autorizată: Panasonic Marketing Europe GmbH, Panasonic Testing Centre, Winsbergring 15...
...help to save valuable resources and prevent any potential negative effects on the products, packaging, and/or accompanying documents mean that used electrical and electronic products and batteries must not be used batteries, please take them to applicable collection points in combination with the requirement set by the Directive...pot descărca o copie a DoC-ului original al produselor noastre RE de la adressa noastră DoC din Internet: http://www.doc.panasonic.de Contact la Reprezentanţa autorizată: Panasonic Marketing Europe GmbH, Panasonic Testing Centre, Winsbergring 15...


