SCBTT190 User Guide
Page 8
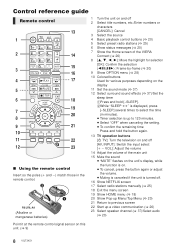
...; To confirm the remaining time Press and hold the button again. 13 TV operation buttons [Í TV]: Turn the television on and off [AV, INPUT]: Switch the input select [i j VOL]: Adjust the volume 14 Adjust the volume of the main unit 15 Mute the sound ≥ "MUTE" flashes on the unit's display...
...; To confirm the remaining time Press and hold the button again. 13 TV operation buttons [Í TV]: Turn the television on and off [AV, INPUT]: Switch the input select [i j VOL]: Adjust the volume 14 Adjust the volume of the main unit 15 Mute the sound ≥ "MUTE" flashes on the unit's display...
SCBTT190 User Guide
Page 15
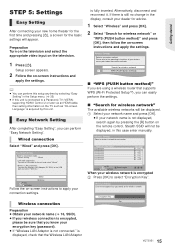
... the settings. ≥ You can perform this setup anytime by selecting "Easy Setting" in the Setup menu. (> 35) ≥ If this unit is connected to a Panasonic TV (VIERA) supporting HDAVI Control 2 or later via an HDMI cable, then setting information on -screen instructions to apply your connection settings. Wired Wireless OK... a connection mode. Current setting : Wired LAN cable connection: Connect a LAN cable to select "Encryption Key". Preparation Turn on the television and select the appropriate video input on the television. 1 Press [Í].
... the settings. ≥ You can perform this setup anytime by selecting "Easy Setting" in the Setup menu. (> 35) ≥ If this unit is connected to a Panasonic TV (VIERA) supporting HDAVI Control 2 or later via an HDMI cable, then setting information on -screen instructions to apply your connection settings. Wired Wireless OK... a connection mode. Current setting : Wired LAN cable connection: Connect a LAN cable to select "Encryption Key". Preparation Turn on the television and select the appropriate video input on the television. 1 Press [Í].
SCBTT190 User Guide
Page 16
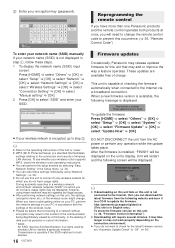
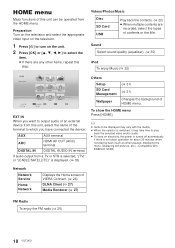
...control If you do not have usage rights may not work properly depending on this unit to connect to connect. http://panasonic.jp/support/global/cs/ (This site is capable of the wireless router. ≥ Please be displayed; Wireless Settings Enter... show the firmware version on the connection environment. ≥ If you can redo these settings individually using these steps. 1 To display the network name (SSID) input screen: Press [HOME] > select "Others" > [OK] > select "Setup" > [OK] > select "Network" > [OK] > select "Network Settings" > [OK] > select "Wireless Settings" > ...
...control If you do not have usage rights may not work properly depending on this unit to connect to connect. http://panasonic.jp/support/global/cs/ (This site is capable of the wireless router. ≥ Please be displayed; Wireless Settings Enter... show the firmware version on the connection environment. ≥ If you can redo these settings individually using these steps. 1 To display the network name (SSID) input screen: Press [HOME] > select "Others" > [OK] > select "Setup" > [OK] > select "Network" > [OK] > select "Network Settings" > [OK] > select "Wireless Settings" > ...
SCBTT190 User Guide
Page 17
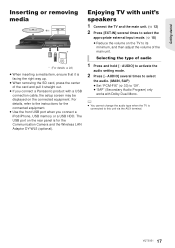
... Mono. ≥ You cannot change the audio type when the TV is for the connected equipment. ≥ Use the front USB port when you connect a Panasonic product with a USB connection cable, the setup screen may be displayed on the TV to the instructions for the Communication Camera and the Wireless LAN...] several times to this unit via the AUX terminal. 17 VQT3X51 The USB port on the rear panel is connected to select the appropriate external input mode. (> 18) ≥ Reduce the volume on the connected equipment.
... Mono. ≥ You cannot change the audio type when the TV is for the connected equipment. ≥ Use the front USB port when you connect a Panasonic product with a USB connection cable, the setup screen may be displayed on the TV to the instructions for the Communication Camera and the Wireless LAN...] several times to this unit via the AUX terminal. 17 VQT3X51 The USB port on the rear panel is connected to select the appropriate external input mode. (> 18) ≥ Reduce the volume on the connected equipment.
SCBTT190 User Guide
Page 18
Preparation Turn on the television and select the appropriate video input on the television. 1 Press [Í] to turn on electricity, the power is turned off automatically if there is no button operation for about 30 minutes ...
Preparation Turn on the television and select the appropriate video input on the television. 1 Press [Í] to turn on electricity, the power is turned off automatically if there is no button operation for about 30 minutes ...
SCBTT190 User Guide
Page 19
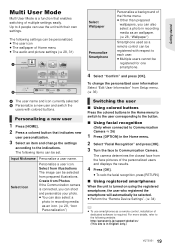
Input Nickname Personalize a user name. The camera determines the closest face from the face pictures of the personalized users and displays the results. 4 Press [OK]. ≥ ... menu. (> 36) A The user name and icon currently selected B Personalize a new user and switch the users with their own settings. Create from prepared illustrations. http://panasonic.jp/support/global/cs/ (This site is a function that indicates new user personalization. 3 Select an item and change the personalized user information Select "Edit User...
Input Nickname Personalize a user name. The camera determines the closest face from the face pictures of the personalized users and displays the results. 4 Press [OK]. ≥ ... menu. (> 36) A The user name and icon currently selected B Personalize a new user and switch the users with their own settings. Create from prepared illustrations. http://panasonic.jp/support/global/cs/ (This site is a function that indicates new user personalization. 3 Select an item and change the personalized user information Select "Edit User...
SCBTT190 User Guide
Page 23
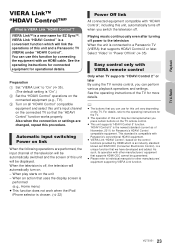
...the TV. "HDAVI Control 5" is chosen. (> 22) Power Off link All connected equipment compatible with "HDAVI Control", including this unit and a Panasonic TV (VIERA) under "HDAVI Control". When an action that uses the display screen is performed (e.g., Home menu) ≥ This function does not ... the screen of the TV for more details. ≥ The buttons that you can use this unit's input channel on the control functions provided by connecting the equipment with Panasonic's conventional HDAVI equipment. ≥ VIERA Link "HDAVI Control", based on the connected TV so that the ...
...the TV. "HDAVI Control 5" is chosen. (> 22) Power Off link All connected equipment compatible with "HDAVI Control", including this unit and a Panasonic TV (VIERA) under "HDAVI Control". When an action that uses the display screen is performed (e.g., Home menu) ≥ This function does not ... the screen of the TV for more details. ≥ The buttons that you can use this unit's input channel on the control functions provided by connecting the equipment with Panasonic's conventional HDAVI equipment. ≥ VIERA Link "HDAVI Control", based on the connected TV so that the ...

SCBTT190 User Guide
Page 24
... "Setup" and press [OK]. 4 Press [3, 4] to select "Audio" and press [OK]. 5 Press [3, 4] to select "TV Audio Input" and press [OK]. 6 Press [3, 4] to switch "AUX", "ARC" or "DIGITAL IN" and press [OK]. ≥ Select an audio input terminal connected to the unit. 1 Press [EXT-IN] to select "D-IN". 2 Press [STATUS] to enable output...
... "Setup" and press [OK]. 4 Press [3, 4] to select "Audio" and press [OK]. 5 Press [3, 4] to select "TV Audio Input" and press [OK]. 6 Press [3, 4] to switch "AUX", "ARC" or "DIGITAL IN" and press [OK]. ≥ Select an audio input terminal connected to the unit. 1 Press [EXT-IN] to select "D-IN". 2 Press [STATUS] to enable output...
SCBTT190 User Guide
Page 33
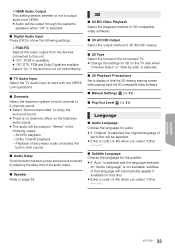
... you select "Other ¢¢¢¢". Advanced operations 33 VQT3X51 Select "On" if the sound is cut off intermittently. ∫ TV Audio Input Select the TV audio input to this unit. ≥ "On": PCM is available. ≥ "Off": DTS, PCM and Dolby Digital are available. ¾HDMI Audio Output...or not to output audio from HDMI. ≥ Audio will be output through the system's speakers when "Off" is selected. ∫ Digital Audio Input Press [OK] to show the following settings: ¾ PCM-FIX Selects the audio output from the devices connected to work with the VIERA Link operations...
... you select "Other ¢¢¢¢". Advanced operations 33 VQT3X51 Select "On" if the sound is cut off intermittently. ∫ TV Audio Input Select the TV audio input to this unit. ≥ "On": PCM is available. ≥ "Off": DTS, PCM and Dolby Digital are available. ¾HDMI Audio Output...or not to output audio from HDMI. ≥ Audio will be output through the system's speakers when "Off" is selected. ∫ Digital Audio Input Press [OK] to show the following settings: ¾ PCM-FIX Selects the audio output from the devices connected to work with the VIERA Link operations...
SCBTT190 User Guide
Page 40
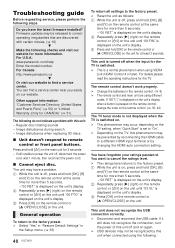
...panasonic.ca 4 Or visit our website to the factory preset. ¾ Select "Yes" in "Restore Default Settings" in the remote control. (> 8) ¾ The remote control and main unit are discovered with this phenomenon may not be prevented by reconnecting the HDMI cable to power the unit off when the input...not recognize the connection, turn the power of this unit when connected using VIERA Link (HDAVI Control 4 or later). If still unable to a different HDMI input terminal or by this unit off , press and hold [Í/I ] on the unit until "06 FTO" is set to "On". ¾ Depending ...
...panasonic.ca 4 Or visit our website to the factory preset. ¾ Select "Yes" in "Restore Default Settings" in the remote control. (> 8) ¾ The remote control and main unit are discovered with this phenomenon may not be prevented by reconnecting the HDMI cable to power the unit off when the input...not recognize the connection, turn the power of this unit when connected using VIERA Link (HDAVI Control 4 or later). If still unable to a different HDMI input terminal or by this unit off , press and hold [Í/I ] on the unit until "06 FTO" is set to "On". ¾ Depending ...
SCBTT190 User Guide
Page 41
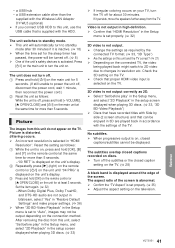
... or [< OPEN/CLOSE] on the TV. (> 28) A black band is selected on . Check the 3D setting on the TV. ¾ Check that proper HDMI video input is displayed around the edge of the unit's safety devices is on, closed captions recorded on the TV. The unit switches to standby mode. ¾...
... or [< OPEN/CLOSE] on the TV. (> 28) A black band is selected on . Check the 3D setting on the TV. ¾ Check that proper HDMI video input is displayed around the edge of the unit's safety devices is on, closed captions recorded on the TV. The unit switches to standby mode. ¾...

SCBTT190 User Guide
Page 45
... nm (CDs)/660 nm (DVDs)/405 nm (BDs) Laser power: No hazardous radiation is 3 ≠. Reference SPEAKER SECTION* FRONT SPEAKERS [BTT196] [BTT195] Full range: Dimensions (WkHkD): Mass (Weight): 6.5 cm (21/2q) CONE TYPE 292 mmk1185 mmk292 mm (111/2qk4621/32qk111/2q) Approx. 2.42... ≠) SURROUND: 60 W per ch (3 ≠) 45 Hz to 120 Hz, 1.0 % total harmonic distortion SUBWOOFER: 100 W (3 ≠) Audio Input AUX: k1 Digital Audio Input Optical k1 Sampling frequency: Audio Format: 32 kHz, 44.1 kHz, 48 kHz PCM, Dolby Digital, DTS FM TUNER SECTION Frequency range: 87.9 MHz...
... nm (CDs)/660 nm (DVDs)/405 nm (BDs) Laser power: No hazardous radiation is 3 ≠. Reference SPEAKER SECTION* FRONT SPEAKERS [BTT196] [BTT195] Full range: Dimensions (WkHkD): Mass (Weight): 6.5 cm (21/2q) CONE TYPE 292 mmk1185 mmk292 mm (111/2qk4621/32qk111/2q) Approx. 2.42... ≠) SURROUND: 60 W per ch (3 ≠) 45 Hz to 120 Hz, 1.0 % total harmonic distortion SUBWOOFER: 100 W (3 ≠) Audio Input AUX: k1 Digital Audio Input Optical k1 Sampling frequency: Audio Format: 32 kHz, 44.1 kHz, 48 kHz PCM, Dolby Digital, DTS FM TUNER SECTION Frequency range: 87.9 MHz...


