
Dvd Theater Receiver
Page 3
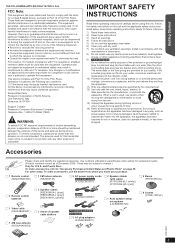
... during device operation. Getting Started Playing Discs Other Operations THE FOLLOWING APPLIES ONLY IN THE U.S.A. These limits are provided for your outlet, consult an electrician for a Class B digital device, pursuant to avoid injury from whom you made your purchase. ∏ 1 Remote control ∏ 1 FM indoor antenna (N2QAYB000359) (RSA0007-M) ∏ 2 AC power supply cords [U.S.A.]and]]Canada] (K2CB2CB00021) ∏ 2 Speaker stands (with the instructions, may cause undesired operation. To...
... during device operation. Getting Started Playing Discs Other Operations THE FOLLOWING APPLIES ONLY IN THE U.S.A. These limits are provided for your outlet, consult an electrician for a Class B digital device, pursuant to avoid injury from whom you made your purchase. ∏ 1 Remote control ∏ 1 FM indoor antenna (N2QAYB000359) (RSA0007-M) ∏ 2 AC power supply cords [U.S.A.]and]]Canada] (K2CB2CB00021) ∏ 2 Speaker stands (with the instructions, may cause undesired operation. To...
Dvd Theater Receiver
Page 4
... number of a frame still so picture quality is required. Now it transmits uncompressed digital video and audio signals on a single cable. One that can also be 5.1-channel sound. Over time your musical enjoyment. Dolby Digital This is a next-generation digital interface for use when adjusting the picture. Dynamic range Dynamic range is calculated based on past and future I : Intra coded picture This picture has the best...
... number of a frame still so picture quality is required. Now it transmits uncompressed digital video and audio signals on a single cable. One that can also be 5.1-channel sound. Over time your musical enjoyment. Dolby Digital This is a next-generation digital interface for use when adjusting the picture. Dynamic range Dynamic range is calculated based on past and future I : Intra coded picture This picture has the best...
Dvd Theater Receiver
Page 5
...IMPORTANT SAFETY INSTRUCTIONS 3 Accessories 3 Glossary 4 Quick Start Guide step 1 Assembling the front speakers 6 step 2 Positioning 7 step 3 Connections 8 Digital transmitter connection 8 Speaker connections 8 Audio and video connections 9 Radio antenna connections 10 step 4 AC power supply cord connections 11 step 5 Preparing the wireless system 11 step 6 Preparing the remote control 11 Setting up the radio 13 Presetting stations automatically 13 Confirming the preset channels 13 Manual tuning 13 Selecting the playback source 15 Selecting the source from the START menu 15...
...IMPORTANT SAFETY INSTRUCTIONS 3 Accessories 3 Glossary 4 Quick Start Guide step 1 Assembling the front speakers 6 step 2 Positioning 7 step 3 Connections 8 Digital transmitter connection 8 Speaker connections 8 Audio and video connections 9 Radio antenna connections 10 step 4 AC power supply cord connections 11 step 5 Preparing the wireless system 11 step 6 Preparing the remote control 11 Setting up the radio 13 Presetting stations automatically 13 Confirming the preset channels 13 Manual tuning 13 Selecting the playback source 15 Selecting the source from the START menu 15...
Dvd Theater Receiver
Page 7
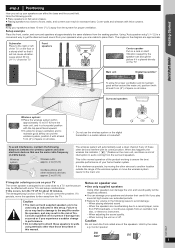
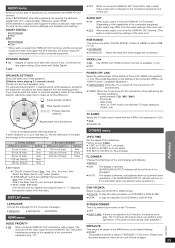
... speakers and shorten their useful life if you play sound at least 5 cm (2q) of these other electronic devices that it persists, move the wireless system nearer to the main unit. Hold by the speaker can damage your home theater system. Leave about 30 minutes. Center speaker Put on or off for proper ventilation. Vibration caused by the sides. Surround speakers Quick Start Guide Wireless system§ ≥ Place the wireless system...
... speakers and shorten their useful life if you play sound at least 5 cm (2q) of these other electronic devices that it persists, move the wireless system nearer to the main unit. Hold by the speaker can damage your home theater system. Leave about 30 minutes. Center speaker Put on or off for proper ventilation. Vibration caused by the sides. Surround speakers Quick Start Guide Wireless system§ ≥ Place the wireless system...
Dvd Theater Receiver
Page 9
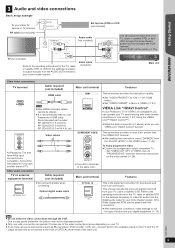
... this connection. ≥ After making this connection, make settings to your home theater system. This connection provides a much purer picture than the VIDEO OUT terminal. ≥ After making this connection, select "DARKER" from the "BLACK LEVEL" in Menu 4 (HDMI) (B 23). Refer to the operating instructions for the TV, cable or satellite STB for best sound and true surround sound. Getting Started Quick Start Guide 3 Audio and video connections Basic setup example To your cable TV service or TV antenna RF cable (not included) Set...
... this connection. ≥ After making this connection, make settings to your home theater system. This connection provides a much purer picture than the VIDEO OUT terminal. ≥ After making this connection, select "DARKER" from the "BLACK LEVEL" in Menu 4 (HDMI) (B 23). Refer to the operating instructions for the TV, cable or satellite STB for best sound and true surround sound. Getting Started Quick Start Guide 3 Audio and video connections Basic setup example To your cable TV service or TV antenna RF cable (not included) Set...

Dvd Theater Receiver
Page 12
... 3. 2 DVD Select "DVD/CD". 3 SMART SETUP Show the Smart setup. RQTX0221 12 Preparation Turn on menu screen. ≥TV aspect Select the aspect to suit your TV and select the appropriate video input mode (e.g. The speakers output loud test signals during the Auto speaker setup. Yes No SET RETURN 4 Select "Yes". VIDEO 1, AV 1, HDMI, etc.) to suit the connections to this unit is output from your TV's video input mode, refer to a "HDAVI Control 3 or...
... 3. 2 DVD Select "DVD/CD". 3 SMART SETUP Show the Smart setup. RQTX0221 12 Preparation Turn on menu screen. ≥TV aspect Select the aspect to suit your TV and select the appropriate video input mode (e.g. The speakers output loud test signals during the Auto speaker setup. Yes No SET RETURN 4 Select "Yes". VIDEO 1, AV 1, HDMI, etc.) to suit the connections to this unit is output from your TV's video input mode, refer to a "HDAVI Control 3 or...
Dvd Theater Receiver
Page 15
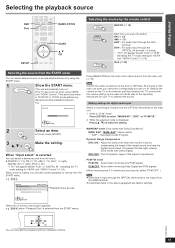
... when receiving Dolby Digital and PCM signals. (When receiving true 5.1-channel surround sound, select "PCM OFF".) [Note] ≥ Audio that is input through the OPTICAL IN terminal is selected You can select a desired source from the START menu) Reference RQTX0221 You can select desired source or access playback/menus by the remote control DVD/CD (B 12) DVD RADIO EXT-IN iPod Each time you press the button: FM (B 13) AM (B 13) AUX§: For audio input...
... when receiving Dolby Digital and PCM signals. (When receiving true 5.1-channel surround sound, select "PCM OFF".) [Note] ≥ Audio that is input through the OPTICAL IN terminal is selected You can select a desired source from the START menu) Reference RQTX0221 You can select desired source or access playback/menus by the remote control DVD/CD (B 12) DVD RADIO EXT-IN iPod Each time you press the button: FM (B 13) AM (B 13) AUX§: For audio input...

Dvd Theater Receiver
Page 16
... various sound effects Getting Started Playing Discs Other Operations +, VOL VOL SURROUND SURROUND SOUND SOUND Recommended modes to enjoy TV audio or stereo sources from the front speakers, as well as it is displayed Select a sound mode. If this occurs, turn the sound effects off. While "MANUAL" is displayed Each time you press [2, 1]: PLII MOVIE § Suitable for late night viewing.) W.SRD ≥ "(( ))" lights when there is output as the surround speakers even when playing a 2-channel sound or non-surround sound.
... various sound effects Getting Started Playing Discs Other Operations +, VOL VOL SURROUND SURROUND SOUND SOUND Recommended modes to enjoy TV audio or stereo sources from the front speakers, as well as it is displayed Select a sound mode. If this occurs, turn the sound effects off. While "MANUAL" is displayed Each time you press [2, 1]: PLII MOVIE § Suitable for late night viewing.) W.SRD ≥ "(( ))" lights when there is output as the surround speakers even when playing a 2-channel sound or non-surround sound.

Dvd Theater Receiver
Page 17
... adjust both surround speaker levels at the same time using [3, 4]. Getting Started Playing Discs Adjusting the speaker output level manually Preparation ≥ To display the picture, turn on the main unit's display when you can adjust SW (Subwoofer) only if the disc includes a subwoofer channel and "ÎPLII" is displayed, press [-CH SELECT]. S: `6 dB to i6 dB 2 Press [3] (increase) or [4] (decrease) to select the speaker. C, RS, LS, SW: `6 dB to i6 dB (Factory preset...
... adjust both surround speaker levels at the same time using [3, 4]. Getting Started Playing Discs Adjusting the speaker output level manually Preparation ≥ To display the picture, turn on the main unit's display when you can adjust SW (Subwoofer) only if the disc includes a subwoofer channel and "ÎPLII" is displayed, press [-CH SELECT]. S: `6 dB to i6 dB 2 Press [3] (increase) or [4] (decrease) to select the speaker. C, RS, LS, SW: `6 dB to i6 dB (Factory preset...
Dvd Theater Receiver
Page 22
Menu 1 (Disc/Play) [DVD-V] Current setting T 1 C1 1:ENG 3/2.1ch OFF 1 :ENG CHAPTER SEARCH 3 Make the settings. Read the disc's instructions for picture's date display Reference Dolby Pro Logic II has no signal) .0: No surround .1: Mono surround .2: Stereo surround (left/right) .1: Center .2: Front leftiFront right .3: Front leftiFront rightiCenter PLAY SPEED REPEAT MODE SUBTITLE ANGLE JPG D AT E DATE DISPLAY [DVD-VR] [DVD-V] To change the speed - e.g. Menu 1 (Disc/Play) TRACK SEARCH To start from "k0.6" to "k1.4" (in 0.1-unit...
Menu 1 (Disc/Play) [DVD-V] Current setting T 1 C1 1:ENG 3/2.1ch OFF 1 :ENG CHAPTER SEARCH 3 Make the settings. Read the disc's instructions for picture's date display Reference Dolby Pro Logic II has no signal) .0: No surround .1: Mono surround .2: Stereo surround (left/right) .1: Center .2: Front leftiFront right .3: Front leftiFront rightiCenter PLAY SPEED REPEAT MODE SUBTITLE ANGLE JPG D AT E DATE DISPLAY [DVD-VR] [DVD-V] To change the speed - e.g. Menu 1 (Disc/Play) TRACK SEARCH To start from "k0.6" to "k1.4" (in 0.1-unit...
Dvd Theater Receiver
Page 24
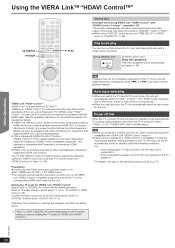
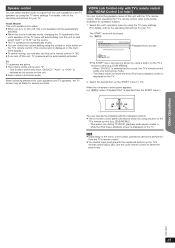
... audio and video output. (This works only when the source is "DVD/CD", "AUX" or "D-IN".) ≥ When using VIERA Link "HDAVI Control" with VIERA Link "HDAVI Control" stays on this unit's speaker to the TV speakers For details, refer also to the operating instructions for your TV. when changing the TV input from this unit and the TV, and start disc play You can use from the one the main unit is connected...
... audio and video output. (This works only when the source is "DVD/CD", "AUX" or "D-IN".) ≥ When using VIERA Link "HDAVI Control" with VIERA Link "HDAVI Control" stays on this unit's speaker to the TV speakers For details, refer also to the operating instructions for your TV. when changing the TV input from this unit and the TV, and start disc play You can use from the one the main unit is connected...
Dvd Theater Receiver
Page 25
... TV menu settings. (For details, refer to the operating instructions for several seconds. This function works only when "DVD/CD", "AUX"§ or "D-IN"§ is selected as the source, the TV's remote control works only during "DVD/CD" playback and resume modes or, while the iPod music playback screen is output from this unit's remote control to select the play list etc. This works only during stop mode. - Getting Started Playing Discs Speaker control You can select whether audio is displayed...
... TV menu settings. (For details, refer to the operating instructions for several seconds. This function works only when "DVD/CD", "AUX"§ or "D-IN"§ is selected as the source, the TV's remote control works only during "DVD/CD" playback and resume modes or, while the iPod music playback screen is output from this unit's remote control to select the play list etc. This works only during stop mode. - Getting Started Playing Discs Speaker control You can select whether audio is displayed...
Dvd Theater Receiver
Page 26
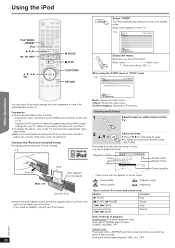
... menu. iPod Music Videos All (iPod display) Input select Home theater Playing Discs Other Operations Reference You can enjoy iPod music through this unit's display mode. Videos: Shows the video menu. Enjoying music/videos 1F Select music or video menu on the TV. music playback screen Playback condition Song Artist Album iPod 3 of playback Shuffle mode (For music playback only) Press [PLAY MODE] several times within a few seconds. During the music/video playback: ONE, ALL, OFF Music menu appears on the TV. iPod menu (iPod LCD) (} When using the START menu in "IPOD" mode...
... menu. iPod Music Videos All (iPod display) Input select Home theater Playing Discs Other Operations Reference You can enjoy iPod music through this unit's display mode. Videos: Shows the video menu. Enjoying music/videos 1F Select music or video menu on the TV. music playback screen Playback condition Song Artist Album iPod 3 of playback Shuffle mode (For music playback only) Press [PLAY MODE] several times within a few seconds. During the music/video playback: ONE, ALL, OFF Music menu appears on the TV. iPod menu (iPod LCD) (} When using the START menu in "IPOD" mode...
Dvd Theater Receiver
Page 28
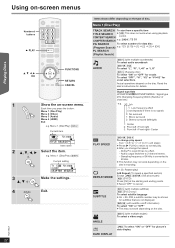
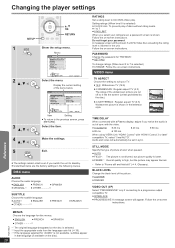
...;2 RQTX0221 §1 The original language designated on -screen instructions. Changing the player settings Getting Started Playing Discs Other Operations SETUP OK RETURN SETUP OK RETURN 1 SETUP -CH SELECT Show the setup menu. OK Display the current setting of the widescreen picture are the factory settings in sync. Audio and video will appear. Follow the on the disc is selected. §2 Input the appropriate code from the language code list (B 39). §3 If the language selected...
...;2 RQTX0221 §1 The original language designated on -screen instructions. Changing the player settings Getting Started Playing Discs Other Operations SETUP OK RETURN SETUP OK RETURN 1 SETUP -CH SELECT Show the setup menu. OK Display the current setting of the widescreen picture are the factory settings in sync. Audio and video will appear. Follow the on the disc is selected. §2 Input the appropriate code from the language code list (B 39). §3 If the language selected...
Dvd Theater Receiver
Page 29
... Menu 4 (HDMI) is activated, when you perform some operations. (This does not work with 5.1-channel sound, all values in the table and change to prevent burn marks on DVD-RAM or DVD-R/-RW. Convenient for late night viewing. (Only works with Dolby Digital) ≥ OFF SPEAKER SETTINGS Select the delay time of the speakers. (Effective when playing 5.1-channel sound) (Center and surround speakers only) For optimum listening with the VIERA Link operations (B 24). ≥ AUX ≥ DIGITAL...
... Menu 4 (HDMI) is activated, when you perform some operations. (This does not work with 5.1-channel sound, all values in the table and change to prevent burn marks on DVD-RAM or DVD-R/-RW. Convenient for late night viewing. (Only works with Dolby Digital) ≥ OFF SPEAKER SETTINGS Select the delay time of the speakers. (Effective when playing 5.1-channel sound) (Center and surround speakers only) For optimum listening with the VIERA Link operations (B 24). ≥ AUX ≥ DIGITAL...
Dvd Theater Receiver
Page 32
..." will switch off , disconnect the AC power supply cord, and then reconnect it. ≥ If the service numbers fail to "Product information" on again. The HDMI cable is a power supply problem. Check whether the Auto speaker setup microphone is displayed.) Some characters are not displayed correctly. Perform the setup again and keep quiet during program and random modes, or when setup menu or START menu is plugged in Canada. General operation No response when any buttons are...
..." will switch off , disconnect the AC power supply cord, and then reconnect it. ≥ If the service numbers fail to "Product information" on again. The HDMI cable is a power supply problem. Check whether the Auto speaker setup microphone is displayed.) Some characters are not displayed correctly. Perform the setup again and keep quiet during program and random modes, or when setup menu or START menu is plugged in Canada. General operation No response when any buttons are...
Dvd Theater Receiver
Page 33
... 4 devices are connected with HDMI cables. Play does not start. ≥ This unit may take time to the TV, and is heard. An AC power supply cord or fluorescent light is heard during play time will return to "480p".) (B 23) ≥ Video images converted to "480i". Confirm the audio connection. Effects do not work . Charge the iPod, and then operate again. Press [SURROUND] to change the aspect. ≥ Change the zoom setting. ("ZOOM...
... 4 devices are connected with HDMI cables. Play does not start. ≥ This unit may take time to the TV, and is heard. An AC power supply cord or fluorescent light is heard during play time will return to "480p".) (B 23) ≥ Video images converted to "480i". Confirm the audio connection. Effects do not work . Charge the iPod, and then operate again. Press [SURROUND] to change the aspect. ≥ Change the zoom setting. ("ZOOM...
Dvd Theater Receiver
Page 36
... at: http:/ / www.panasonic.com/ help or, contact us directly at the addresses listed for lost time, travel to and from state to repair or replace will be made by the warrantor, or failures which starts with a new or a refurbished product. Getting Started Playing Discs Other Operations Limited Warranty (ONLY FOR U.S.A. The decision to state. Product or Part Name Audio Products (except items listed below , which result from...
... at: http:/ / www.panasonic.com/ help or, contact us directly at the addresses listed for lost time, travel to and from state to repair or replace will be made by the warrantor, or failures which starts with a new or a refurbished product. Getting Started Playing Discs Other Operations Limited Warranty (ONLY FOR U.S.A. The decision to state. Product or Part Name Audio Products (except items listed below , which result from...
Dvd Theater Receiver
Page 38
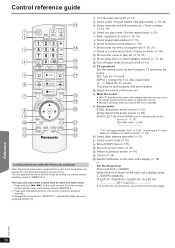
...) < Turn Whisper-mode Surround on /off (B 12) 2 Select a disc / Play all loaded CDs sequentially (B 19, 20) 3 Select channels and title numbers etc. / Enter numbers (B 13, 19) 4 Select the play mode / Set the repeat mode (B 20) 5 Basic operations for at the Panasonic TV and press the button. [Í]: Turn the TV on /off (B 16) = TV operations Aim the remote control at least 2 seconds. A Select radio stations manually (B 13) B Select sound mode (B 16) C Show START menu (B 15) D Show on-screen menu...
...) < Turn Whisper-mode Surround on /off (B 12) 2 Select a disc / Play all loaded CDs sequentially (B 19, 20) 3 Select channels and title numbers etc. / Enter numbers (B 13, 19) 4 Select the play mode / Set the repeat mode (B 20) 5 Basic operations for at the Panasonic TV and press the button. [Í]: Turn the TV on /off (B 16) = TV operations Aim the remote control at least 2 seconds. A Select radio stations manually (B 13) B Select sound mode (B 16) C Show START menu (B 15) D Show on-screen menu...
Dvd Theater Receiver
Page 39
...) 6 Connect iPod (B 26) 7 Select a disc directly (B 18) 8 Open the disc tray to exchange the disc. (B 18) 9 Connect Auto speaker setup microphone (B 12) : The indicator lights when there is automatically switched to standby mode or vice versa. Adjust the volume of time. Excessive sound pressure from on to 2-channel stereo. ≥ To prevent hearing damage, avoid listening for VIERA Link "HDAVI Control" (B 24). > Skip or slow-search play / Select the radio stations (B 13, 18) ? Remote control signal sensor < Display = Select the source DVD/CD...
...) 6 Connect iPod (B 26) 7 Select a disc directly (B 18) 8 Open the disc tray to exchange the disc. (B 18) 9 Connect Auto speaker setup microphone (B 12) : The indicator lights when there is automatically switched to standby mode or vice versa. Adjust the volume of time. Excessive sound pressure from on to 2-channel stereo. ≥ To prevent hearing damage, avoid listening for VIERA Link "HDAVI Control" (B 24). > Skip or slow-search play / Select the radio stations (B 13, 18) ? Remote control signal sensor < Display = Select the source DVD/CD...


