
Operating Instructions
Page 2
...• Start your volume control at a safe level BEFORE your sensitive hearing. CAUTION! Once you have established a comfortable sound level: • Set the dial and leave it 's time to your software. NO USER-SERVICEABLE PARTS INSIDE. VIERA Link™ is a registered trademark and the DTS...Ltd. DTS is a trademark of this unit as the unit you listening for the correct method of your equipment at a low setting. • Slowly increase the sound until you avoid prolonged exposure to the manufacturer's instructions. All Rights Reserved. This device complies with...
...• Start your volume control at a safe level BEFORE your sensitive hearing. CAUTION! Once you have established a comfortable sound level: • Set the dial and leave it 's time to your software. NO USER-SERVICEABLE PARTS INSIDE. VIERA Link™ is a registered trademark and the DTS...Ltd. DTS is a trademark of this unit as the unit you listening for the correct method of your equipment at a low setting. • Slowly increase the sound until you avoid prolonged exposure to the manufacturer's instructions. All Rights Reserved. This device complies with...
Operating Instructions
Page 4
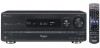
...; Other connections are all speakers connected!! Settings Until now...We must adjust the speaker settings... The Home Theater begins. A B VIERA Link Previous Home Theater systems required multiple operations. One-touch playback. We can we enjoy TV with surround sound. (➔ pages 28, 29). 4 RQT9223 With SA-BX500! With SA-BX500! How can enjoy TV with surround...
...; Other connections are all speakers connected!! Settings Until now...We must adjust the speaker settings... The Home Theater begins. A B VIERA Link Previous Home Theater systems required multiple operations. One-touch playback. We can we enjoy TV with surround sound. (➔ pages 28, 29). 4 RQT9223 With SA-BX500! With SA-BX500! How can enjoy TV with surround...
Operating Instructions
Page 5
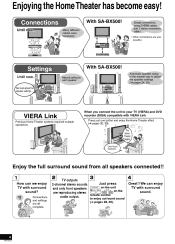
...attenuator ...40 Adjusting the time lag by delaying audio output when pictures on TV arrives after sounds ...40 Changing the volume display ...40 Reset (factory settings) ...40 Step 2 Connecting speakers ...10 Step 3 Connecting a TV and a Blu-ray Disc/DVD player ...12 Step 4 Watching TV or ... Recording ...41 Remote controlling a TV or DVD recorder etc...42 Remote controlling a TV, cable box and satellite receiver ...42 Using two or more Panasonic equipment (a mini component system, an AV amp etc.) ...42 Remote controlling a DVD recorder ...43 Remote controlling a Blu-ray Disc/DVD player ......
...attenuator ...40 Adjusting the time lag by delaying audio output when pictures on TV arrives after sounds ...40 Changing the volume display ...40 Reset (factory settings) ...40 Step 2 Connecting speakers ...10 Step 3 Connecting a TV and a Blu-ray Disc/DVD player ...12 Step 4 Watching TV or ... Recording ...41 Remote controlling a TV or DVD recorder etc...42 Remote controlling a TV, cable box and satellite receiver ...42 Using two or more Panasonic equipment (a mini component system, an AV amp etc.) ...42 Remote controlling a DVD recorder ...43 Remote controlling a Blu-ray Disc/DVD player ......

Operating Instructions
Page 6
R Display Lights on when 2-channel mix is functioning (➔ pages 27, 41 and 51) Lights on when Radio display sleep timer is set (➔ page 37) 2CH MIX SPEAKERS BI-WIRE A B Unit display Lights on when PCM FIX is selected (➔ page 39) Lights on . For ... using surround effects for twochannel sources, etc. Only for replacement parts. (Product numbers correct as Blu-ray Disc Lights on when the following multichannel playback settings are used • When playing multi-channel sources • When using the digital transmitter (SH-FX67) is on.) (➔ page 29) Lights up...
R Display Lights on when 2-channel mix is functioning (➔ pages 27, 41 and 51) Lights on when Radio display sleep timer is set (➔ page 37) 2CH MIX SPEAKERS BI-WIRE A B Unit display Lights on when PCM FIX is selected (➔ page 39) Lights on . For ... using surround effects for twochannel sources, etc. Only for replacement parts. (Product numbers correct as Blu-ray Disc Lights on when the following multichannel playback settings are used • When playing multi-channel sources • When using the digital transmitter (SH-FX67) is on.) (➔ page 29) Lights up...
Operating Instructions
Page 7
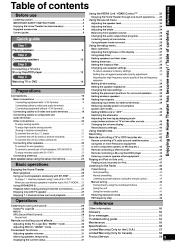
... TEST NEO : 6 SFC MUSIC MOVIE SOUND MENU DISPLAY RETURN TV VOL OPTION TV/VIDEO PORT SETUP Caution About 7 meters (23 feet) or less when you set the unit in before the other equipment (➔ pages 33 and 42 to 44) For operating SOUND MENU (➔ pages 34 and 35)/SETUP (➔...
... TEST NEO : 6 SFC MUSIC MOVIE SOUND MENU DISPLAY RETURN TV VOL OPTION TV/VIDEO PORT SETUP Caution About 7 meters (23 feet) or less when you set the unit in before the other equipment (➔ pages 33 and 42 to 44) For operating SOUND MENU (➔ pages 34 and 35)/SETUP (➔...

Operating Instructions
Page 8
The steps 1 to 4 indicate the method one by setting speakers properly. Step 1 Placing speakers (➔ page 9) You can easily enjoy high-quality pictures and sounds. Quick guide This section guides you can enjoy the ... simplest way to the appropriate operating instructions. Step 4 Watching TV or DVD (➔ pages 14 and 15) You can install and connect speakers in 7.1ch setting. Step 2 Connecting speakers (➔ pages 10 and 11) You can enjoy TV and DVD with surround sound. 8 RQT9223 Refer to the steps indicated below...
The steps 1 to 4 indicate the method one by setting speakers properly. Step 1 Placing speakers (➔ page 9) You can easily enjoy high-quality pictures and sounds. Quick guide This section guides you can enjoy the ... simplest way to the appropriate operating instructions. Step 4 Watching TV or DVD (➔ pages 14 and 15) You can install and connect speakers in 7.1ch setting. Step 2 Connecting speakers (➔ pages 10 and 11) You can enjoy TV and DVD with surround sound. 8 RQT9223 Refer to the steps indicated below...

Operating Instructions
Page 9
... of the connected speakers to the listening-viewing position and perform steps instructed in "Setting distances" (➔ page 37) or perform steps instructed in any surround back speaker, sound assigned to them . Surround speakers ( D right, E ...viewing position, about 1 meter (3 feet) higher than ear level. H in "Connecting speakers" (➔ pages 10 and 11). This page introduces speaker settings for setting. 9 RQT9223 Placing speakers Quick guide H Active Subwoofer The subwoofer can be placed in "Auto speaker setup using the setup microphone" (➔ pages 24...
... of the connected speakers to the listening-viewing position and perform steps instructed in "Setting distances" (➔ page 37) or perform steps instructed in any surround back speaker, sound assigned to them . Surround speakers ( D right, E ...viewing position, about 1 meter (3 feet) higher than ear level. H in "Connecting speakers" (➔ pages 10 and 11). This page introduces speaker settings for setting. 9 RQT9223 Placing speakers Quick guide H Active Subwoofer The subwoofer can be placed in "Auto speaker setup using the setup microphone" (➔ pages 24...

Operating Instructions
Page 10
Remove the vinyl covering the tips of 4 Ω, make sure to set "4 OHMS " in "Auto speaker setup using the setup microphone" (➔ pages 24 and 25) after making sure left and right, and ( and ). Speaker terminals ( ) ( ) A Front ...; IN OUT (BD/ TV MONITOR (DVD RECORDER) DVD 1 CE L AC IN~ R IN CD SUB 10 RQT9223 • Do not forget to take steps instructed in "Setting the speaker impedance" on page 38. Improper connections may damage circuits. The action may cause the unit to develop problems. • Do not short-circuit...
Remove the vinyl covering the tips of 4 Ω, make sure to set "4 OHMS " in "Auto speaker setup using the setup microphone" (➔ pages 24 and 25) after making sure left and right, and ( and ). Speaker terminals ( ) ( ) A Front ...; IN OUT (BD/ TV MONITOR (DVD RECORDER) DVD 1 CE L AC IN~ R IN CD SUB 10 RQT9223 • Do not forget to take steps instructed in "Setting the speaker impedance" on page 38. Improper connections may damage circuits. The action may cause the unit to develop problems. • Do not short-circuit...
Operating Instructions
Page 12
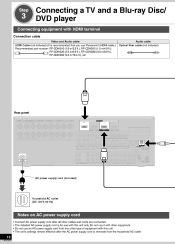
...AC power supply cord • Connect AC power supply cord after all other type of equipment with this unit. • The unit's settings remain effective after the AC power supply cord is removed from the household AC outlet. 12 RQT9223 Do not use it with other equipment.... not use an AC power supply cord from any other cables and cords are connected. • The included AC power supply cord is for use Panasonic's HDMI cable.) Recommended part number: RP-CDHG10 (1.0 m/3.3 ft.), RP-CDHG15 (1.5 m/4.9 ft.), RP-CDHG20 (2.0 m/6.6 ft.), RP-CDHG30 (3.0 m/9.8 ft.), RP-CDHG50 (5.0 m/16.4 ft.), etc....
...AC power supply cord • Connect AC power supply cord after all other type of equipment with this unit. • The unit's settings remain effective after the AC power supply cord is removed from the household AC outlet. 12 RQT9223 Do not use it with other equipment.... not use an AC power supply cord from any other cables and cords are connected. • The included AC power supply cord is for use Panasonic's HDMI cable.) Recommended part number: RP-CDHG10 (1.0 m/3.3 ft.), RP-CDHG15 (1.5 m/4.9 ft.), RP-CDHG20 (2.0 m/6.6 ft.), RP-CDHG30 (3.0 m/9.8 ft.), RP-CDHG50 (5.0 m/16.4 ft.), etc....
Operating Instructions
Page 13
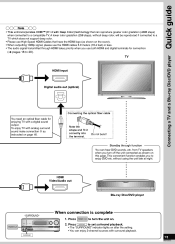
... cables 5.0 meters (16.4 feet) or less. • The audio signal transmitted through function You can enjoy 2-channel sources with surround playback. Press + POWER SURROUND to set surround playback. _ POWER 2. R • The "SURROUND" indicator lights on this page. Do not bend! Standby through HDMI takes priority when you to 20). to turn... Color) technology that have the HDMI logo (as shown on . To enjoy TV with analog surround sound make connection as shown on after the setting. • You can hear DVD sounds, etc.
... cables 5.0 meters (16.4 feet) or less. • The audio signal transmitted through function You can enjoy 2-channel sources with surround playback. Press + POWER SURROUND to set surround playback. _ POWER 2. R • The "SURROUND" indicator lights on this page. Do not bend! Standby through HDMI takes priority when you to 20). to turn... Color) technology that have the HDMI logo (as shown on . To enjoy TV with analog surround sound make connection as shown on after the setting. • You can hear DVD sounds, etc.

Operating Instructions
Page 15
...; Check the "SURROUND" indicator is lighting up. Press or Watch TV or DVD • You can enjoy a variety of surround effects (➔ pages 28 to set surround playback (➔ pages 13 and 29). If not, press [SURROUND] on the unit to 30). R 3 4 Watch TV or DVD To adjust the volume VOLUME...
...; Check the "SURROUND" indicator is lighting up. Press or Watch TV or DVD • You can enjoy a variety of surround effects (➔ pages 28 to set surround playback (➔ pages 13 and 29). If not, press [SURROUND] on the unit to 30). R 3 4 Watch TV or DVD To adjust the volume VOLUME...
Operating Instructions
Page 16
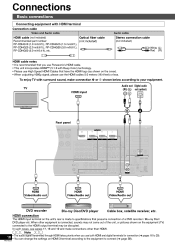
... recorder / Blu-ray Disc/ DVD player etc. When other than HDMI. 16 RQT9223 • The audio signal transmitted through HDMI takes priority when you use Panasonic's HDMI cable. • This unit incorporates HDMI™ (V.1.3 with HDMI terminal Connection cable Video and Audio cable Audio cable HDMI cable (not included) Recommended ...equipment with Deep Color) technology. • Please use both HDMI and digital terminals for connection (➔ pages 16 to 20). • You can change the settings on the equipment (TV) connected to the HDMI output terminal may be disrupted.
... recorder / Blu-ray Disc/ DVD player etc. When other than HDMI. 16 RQT9223 • The audio signal transmitted through HDMI takes priority when you use Panasonic's HDMI cable. • This unit incorporates HDMI™ (V.1.3 with HDMI terminal Connection cable Video and Audio cable Audio cable HDMI cable (not included) Recommended ...equipment with Deep Color) technology. • Please use both HDMI and digital terminals for connection (➔ pages 16 to 20). • You can change the settings on the equipment (TV) connected to the HDMI output terminal may be disrupted.

Operating Instructions
Page 17
...; The input video signal can be sent out through an output terminal of the same type only. • You can change the digital input terminal setting according to the equipment to your equipment. Note • When you make connection or instructed on page 16 according to connect (➔ page...
...; The input video signal can be sent out through an output terminal of the same type only. • You can change the digital input terminal setting according to the equipment to your equipment. Note • When you make connection or instructed on page 16 according to connect (➔ page...

Operating Instructions
Page 18
... Disc/ DVD player Note DVD recorder VCR Cable box or satellite receiver Game 18 • The input video signal can change the digital input terminal setting according to the equipment to your equipment.
... Disc/ DVD player Note DVD recorder VCR Cable box or satellite receiver Game 18 • The input video signal can change the digital input terminal setting according to the equipment to your equipment.

Operating Instructions
Page 19
.... • Peripheral equipment sold separately unless otherwise indicated. • To connect equipment, refer to component and audio terminals The component video terminals can change the settings for this reason. Do not bend! Note • The input video signal can be sent out through an output terminal of the same type only...
.... • Peripheral equipment sold separately unless otherwise indicated. • To connect equipment, refer to component and audio terminals The component video terminals can change the settings for this reason. Do not bend! Note • The input video signal can be sent out through an output terminal of the same type only...

Operating Instructions
Page 20
... CABLE/SAT IN GAME IN TV OUT SUBWOOFER LOOP ANT EXT GND AM ANT 20 RQT9223 Note • You can change the digital input terminal setting according to the equipment to connect (➔ page 39). See pages 17, 18 and 19 for video connections.
... CABLE/SAT IN GAME IN TV OUT SUBWOOFER LOOP ANT EXT GND AM ANT 20 RQT9223 Note • You can change the digital input terminal setting according to the equipment to connect (➔ page 39). See pages 17, 18 and 19 for video connections.

Operating Instructions
Page 22
...(not included) OUT TV MONITOR (DVD RECORDER) L R IN CD Note • When connecting speakers with the impedance of 4 Ω, make this setting. To connect a second pair of front speakers (SPEAKERS B) Make the following connections when you wish to install a second pair of speakers in "Making bi... analog audio and 2-channel PCM signals (➔ page 51). • When connecting speakers with the impedance of 4 Ω, make sure to set "4 OHMS " in "Setting the speaker impedance" on page 38. • See "Notes on "To connect bi-wire speakers"" on page 51 for more details. 22 ...
...(not included) OUT TV MONITOR (DVD RECORDER) L R IN CD Note • When connecting speakers with the impedance of 4 Ω, make this setting. To connect a second pair of front speakers (SPEAKERS B) Make the following connections when you wish to install a second pair of speakers in "Making bi... analog audio and 2-channel PCM signals (➔ page 51). • When connecting speakers with the impedance of 4 Ω, make sure to set "4 OHMS " in "Setting the speaker impedance" on page 38. • See "Notes on "To connect bi-wire speakers"" on page 51 for more details. 22 ...

Operating Instructions
Page 23
... the FM indoor antenna. • The antenna should be used wirelessly, you cannot set "MULTI ROOM ". • By using Panasonic SH-FX67 (a set , the surround speakers cannot be installed by using 2 sets of the antenna where reception is best. To use multi room function, make ID... number setting (➔ page 27). • Setting of a digital transmitter and a wireless system sold separately...
... the FM indoor antenna. • The antenna should be used wirelessly, you cannot set "MULTI ROOM ". • By using Panasonic SH-FX67 (a set , the surround speakers cannot be installed by using 2 sets of the antenna where reception is best. To use multi room function, make ID... number setting (➔ page 27). • Setting of a digital transmitter and a wireless system sold separately...
Operating Instructions
Page 24
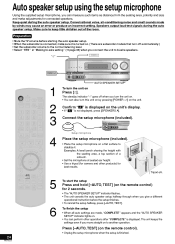
...SPEAKERS B AUTO SPEAKER SETUP RETURN -SETUP OK TUNE SETUP MIC AUX S VIDEO VIDEO L - AUDIO - To finish the setup • When all auto settings are subwoofer models that turn off when you turn the unit on. • You can also turn the unit on . (There are made by pressing... and small sounds made , "COMPLETE " appears and the "AUTO SPEAKER SETUP" indicator lights on by winds may cause an error or produce an incorrect setting. Examples: A level bench sharing the height with the seating area, a top section of the room. • Mute the TV volume before the setup...
...SPEAKERS B AUTO SPEAKER SETUP RETURN -SETUP OK TUNE SETUP MIC AUX S VIDEO VIDEO L - AUDIO - To finish the setup • When all auto settings are subwoofer models that turn off when you turn the unit on. • You can also turn the unit on . (There are made by pressing... and small sounds made , "COMPLETE " appears and the "AUTO SPEAKER SETUP" indicator lights on by winds may cause an error or produce an incorrect setting. Examples: A level bench sharing the height with the seating area, a top section of the room. • Mute the TV volume before the setup...
Operating Instructions
Page 25
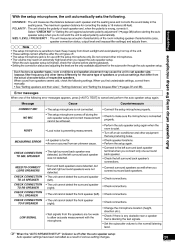
.... • Turn off during the • Check to the normal listening level. With the setup microphone, the unit automatically sets the following settings. Error messages When one surround back speaker. • Check the left ). • The unit cannot detect the front speaker...room including speaker characteristics (size, speaker connection status, output level and lowpass filter settings) and adjusts them manually. • See "Setting speakers and their sizes", "Setting distances" and "Setting the lowpass filter" (➔ pages 37 and 38). When sound from an ...
.... • Turn off during the • Check to the normal listening level. With the setup microphone, the unit automatically sets the following settings. Error messages When one surround back speaker. • Check the left ). • The unit cannot detect the front speaker...room including speaker characteristics (size, speaker connection status, output level and lowpass filter settings) and adjusts them manually. • See "Setting speakers and their sizes", "Setting distances" and "Setting the lowpass filter" (➔ pages 37 and 38). When sound from an ...