
Digital Video Camcorder
Page 1
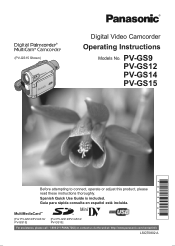
Spanish Quick Use Guide is included. PV-GS9 PV-GS12 PV-GS14 PV-GS15 Before attempting to connect, operate or adjust this product, please read these instructions thoroughly. Guía para rápida consulta en español está incluida. [For PV-GS12/PV-GS14/ [For PV-GS12/PV-GS14/ PV-GS15] PV-GS15] For assistance, please call : 1-800-211-PANA(7262) or, contact us via the web at: http://www.panasonic.com/contactinfo LSQT0802 A (PV-GS15 Shown) Digital Video Camcorder Operating Instructions Models No.
Spanish Quick Use Guide is included. PV-GS9 PV-GS12 PV-GS14 PV-GS15 Before attempting to connect, operate or adjust this product, please read these instructions thoroughly. Guía para rápida consulta en español está incluida. [For PV-GS12/PV-GS14/ [For PV-GS12/PV-GS14/ PV-GS15] PV-GS15] For assistance, please call : 1-800-211-PANA(7262) or, contact us via the web at: http://www.panasonic.com/contactinfo LSQT0802 A (PV-GS15 Shown) Digital Video Camcorder Operating Instructions Models No.

Digital Video Camcorder
Page 2
... purchased one of enjoyment. This symbol alerts the user that have been tested and inspected for choosing Panasonic! Things You Should Know Thank you and your convenient Camcorder information source. Be sure to make any problems. The above markings are located on the underside of... this unit. Your Camcorder is recommended that only cassette tapes that important literature concerning the operation and maintenance of your Camcorder. The serial number is dangerous to retain this manual as your family years ...
... purchased one of enjoyment. This symbol alerts the user that have been tested and inspected for choosing Panasonic! Things You Should Know Thank you and your convenient Camcorder information source. Be sure to make any problems. The above markings are located on the underside of... this unit. Your Camcorder is recommended that only cassette tapes that important literature concerning the operation and maintenance of your Camcorder. The serial number is dangerous to retain this manual as your family years ...

Digital Video Camcorder
Page 5
... will not subject it gets wet. Never push objects of any kind into this video unit yourself as they may result in the vicinity of your Camcorder. Do not attempt to service this video unit through openings as opening or removing covers may result in safe operating order....21. Refer all servicing to rain or water. Unplug this can scratch the lens coating. • TO PROTECT THE FINISH OF YOUR CAMCORDER ... If the video unit has been exposed to qualified service personnel. 19. Unauthorized substitutions may expose you to determine that are required, be ...
... will not subject it gets wet. Never push objects of any kind into this video unit yourself as they may result in the vicinity of your Camcorder. Do not attempt to service this video unit through openings as opening or removing covers may result in safe operating order....21. Refer all servicing to rain or water. Unplug this can scratch the lens coating. • TO PROTECT THE FINISH OF YOUR CAMCORDER ... If the video unit has been exposed to qualified service personnel. 19. Unauthorized substitutions may expose you to determine that are required, be ...
Digital Video Camcorder
Page 8
...a Cassette 17 Using a Memory Card (For PV-GS12/PV-GS14/PV-GS15 18 Turning on the Camcorder 18 Easy to Use Mode Dial 18 Using the Viewfinder/LCD Monitor 19 Using the Menu Screen... 26 Recording with the Built-in LED Video Light (For PV-GS12/PV-GS14/PV-GS15 26 Quick Start 26 Self-timer Recording 27 Zoom In/Out Functions 27 Digital Zoom Function 27 Image Stabilizer Function 28...Manually 31 Manual Shutter Speed Adjustment 32 Manual Iris Adjustment 32 Manual Focus Adjustment 32 Digital Effect Functions 33 8 For assistance, please call : 1-800-211-PANA(7262) or, contact us via ...
...a Cassette 17 Using a Memory Card (For PV-GS12/PV-GS14/PV-GS15 18 Turning on the Camcorder 18 Easy to Use Mode Dial 18 Using the Viewfinder/LCD Monitor 19 Using the Menu Screen... 26 Recording with the Built-in LED Video Light (For PV-GS12/PV-GS14/PV-GS15 26 Quick Start 26 Self-timer Recording 27 Zoom In/Out Functions 27 Digital Zoom Function 27 Image Stabilizer Function 28...Manually 31 Manual Shutter Speed Adjustment 32 Manual Iris Adjustment 32 Manual Focus Adjustment 32 Digital Effect Functions 33 8 For assistance, please call : 1-800-211-PANA(7262) or, contact us via ...
Digital Video Camcorder
Page 9
...Only) ..36 Still Playback/Still Advance Playback 36 Index Search Functions (Remote Control Only 37 Playback Zoom Function (Remote Control Only 37 Playback Digital Effect Functions 38 Playing Back a Memory Card (For PV-GS12/PV-GS14/PV-GS15 38 Slide Show (For PV-GS12/PV-GS14/PV-... 65 Before Requesting Service (Problems and Solutions 69 Using the RESET button 70 Explanation of Terms 71 Specifications 72 Camcorder Accessory System 73 Camcorder Accessory Order Form 74 Request for Service Notice 75 Limited Warranty 76 Customer Services Directory 78 Spanish Quick Use Guide/ Guí...
...Only) ..36 Still Playback/Still Advance Playback 36 Index Search Functions (Remote Control Only 37 Playback Zoom Function (Remote Control Only 37 Playback Digital Effect Functions 38 Playing Back a Memory Card (For PV-GS12/PV-GS14/PV-GS15 38 Slide Show (For PV-GS12/PV-GS14/PV-... 65 Before Requesting Service (Problems and Solutions 69 Using the RESET button 70 Explanation of Terms 71 Specifications 72 Camcorder Accessory System 73 Camcorder Accessory Order Form 74 Request for Service Notice 75 Limited Warranty 76 Customer Services Directory 78 Spanish Quick Use Guide/ Guí...
Digital Video Camcorder
Page 10
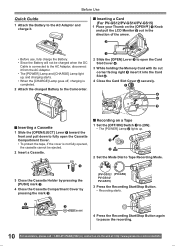
...]. • The [POWER] Lamp 2 lights up , and charging starts. • When the [CHARGE] Lamp goes off, charging is completed. 2 Attach the charged Battery to the Camcorder. 1 2 Slide the [OPEN] Lever 3 to open the Card Slot Cover 4 . 3 While holding the Memory Card with its cut corner facing right 5 insert it into the.../Stop Button again to pause the recording. 10 For assistance, please call : 1-800-211-PANA(7262) or, contact us via the web at: http://www.panasonic.com/contactinfo
...]. • The [POWER] Lamp 2 lights up , and charging starts. • When the [CHARGE] Lamp goes off, charging is completed. 2 Attach the charged Battery to the Camcorder. 1 2 Slide the [OPEN] Lever 3 to open the Card Slot Cover 4 . 3 While holding the Memory Card with its cut corner facing right 5 insert it into the.../Stop Button again to pause the recording. 10 For assistance, please call : 1-800-211-PANA(7262) or, contact us via the web at: http://www.panasonic.com/contactinfo
Digital Video Camcorder
Page 12
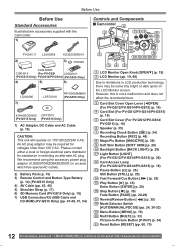
... be some tiny bright or dark spots on 110/120/220/240 V AC. Before Use Before Use Standard Accessories Illustrated are accessories supplied with the Camcorder. 1) PV-DAC11 2) LSJA0288 K2CB2CB00014 3) CR2025 CGR-D08R CGR-D14 (For PV-GS9/ LSSQ0411 (PV-GS15 Only) PV-GS12/PV-GS14) (PV-GS15 Only) 4) ...] (pp. 60, 70) 12 For assistance, please call : 1-800-211-PANA(7262) or, contact us via the web at: http://www.panasonic.com/contactinfo Please contact either a local or foreign electrical parts distributor for voltages other than 120 V AC. An AC plug adaptor may be required for...
... be some tiny bright or dark spots on 110/120/220/240 V AC. Before Use Before Use Standard Accessories Illustrated are accessories supplied with the Camcorder. 1) PV-DAC11 2) LSJA0288 K2CB2CB00014 3) CR2025 CGR-D08R CGR-D14 (For PV-GS9/ LSSQ0411 (PV-GS15 Only) PV-GS12/PV-GS14) (PV-GS15 Only) 4) ...] (pp. 60, 70) 12 For assistance, please call : 1-800-211-PANA(7262) or, contact us via the web at: http://www.panasonic.com/contactinfo Please contact either a local or foreign electrical parts distributor for voltages other than 120 V AC. An AC plug adaptor may be required for...

Digital Video Camcorder
Page 13
... Terminal (pp. 45-46) • Connect this to the digital video equipment. 31 White Balance Sensor (p. 31) Remote Control Sensor (p. 15) 32 Audio-Video Output Jack [AV OUT] (pp. 43, 45) Headphone Jack [PHONES] • Connecting an AV Cable to this jack activates the Camcorder's built-in LCD production technology, there may make noises...
... Terminal (pp. 45-46) • Connect this to the digital video equipment. 31 White Balance Sensor (p. 31) Remote Control Sensor (p. 15) 32 Audio-Video Output Jack [AV OUT] (pp. 43, 45) Headphone Jack [PHONES] • Connecting an AV Cable to this jack activates the Camcorder's built-in LCD production technology, there may make noises...
Digital Video Camcorder
Page 14
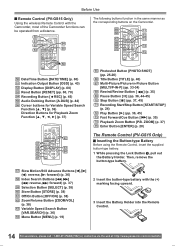
...Search Button [VAR.SEARCH] (p. 36) 64 Menu Button [MENU] (p. 19) 1 2 Insert the button-type battery with the Camcorder, most of the Camcorder functions can be operated from a distance. 50 51 52 54 53 55 The following buttons function in the same manner as the... corresponding buttons on the Camcorder. 65 71 66 72 67 73 68 69 74 70 75 56 50 Date/Time Button [DATE/TIME] (p. 60) 51... please call : 1-800-211-PANA(7262) or, contact us via the web at: http://www.panasonic.com/contactinfo
...Search Button [VAR.SEARCH] (p. 36) 64 Menu Button [MENU] (p. 19) 1 2 Insert the button-type battery with the Camcorder, most of the Camcorder functions can be operated from a distance. 50 51 52 54 53 55 The following buttons function in the same manner as the... corresponding buttons on the Camcorder. 65 71 66 72 67 73 68 69 74 70 75 56 50 Date/Time Button [DATE/TIME] (p. 60) 51... please call : 1-800-211-PANA(7262) or, contact us via the web at: http://www.panasonic.com/contactinfo
Digital Video Camcorder
Page 15
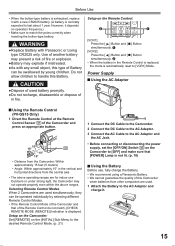
... Supply Using the AC Adaptor Using the Remote Control (PV-GS15 Only) 1 Direct the Remote Control at the Remote Control Sensor 31 of the Camcorder and press an appropriate button. 15° 15° 31 15° 15° • Distance from other companies are used. 1 ... explosion. ●Battery may not operate properly even within the above ranges. Selecting Remote Control Modes When 2 Camcorders are for indoor use , fully charge the Battery. • We recommend using a Panasonic Battery. • We cannot guarantee the quality of the Remote Control do not match, [CHECK REMOTE MODE ...
... Supply Using the AC Adaptor Using the Remote Control (PV-GS15 Only) 1 Direct the Remote Control at the Remote Control Sensor 31 of the Camcorder and press an appropriate button. 15° 15° 31 15° 15° • Distance from other companies are used. 1 ... explosion. ●Battery may not operate properly even within the above ranges. Selecting Remote Control Modes When 2 Camcorders are for indoor use , fully charge the Battery. • We recommend using a Panasonic Battery. • We cannot guarantee the quality of the Remote Control do not match, [CHECK REMOTE MODE ...

Digital Video Camcorder
Page 16
...your hand. 3 Reattach the Grip Belt. 16 For assistance, please call : 1-800-211-PANA(7262) or, contact us via the web at: http://www.panasonic.com/contactinfo In actual use, the available recording time may be longer. • The available recording time becomes shorter if you use both of View...the battery is too high or low, the [CHARGE] Lamp blinks and the charging time becomes longer than usual. 2 Attach the charged Battery to the Camcorder. • The times shown in parentheses indicate the recording time when the LCD Monitor is used . Before Use • Since the Battery will not...
...your hand. 3 Reattach the Grip Belt. 16 For assistance, please call : 1-800-211-PANA(7262) or, contact us via the web at: http://www.panasonic.com/contactinfo In actual use, the available recording time may be longer. • The available recording time becomes shorter if you use both of View...the battery is too high or low, the [CHARGE] Lamp blinks and the charging time becomes longer than usual. 2 Attach the charged Battery to the Camcorder. • The times shown in parentheses indicate the recording time when the LCD Monitor is used . Before Use • Since the Battery will not...

Digital Video Camcorder
Page 17
... pressing the 1 [PUSH] mark 1 . • When you attach the Shoulder Strap before going out to avoid dropping the Camcorder. 1 Pull the end of the Shoulder Strap through the Shoulder Strap Holder on the Camcorder. 2 Fold the end of the Shoulder Strap to the other notes concerning this item, see page 61. 17...
... pressing the 1 [PUSH] mark 1 . • When you attach the Shoulder Strap before going out to avoid dropping the Camcorder. 1 Pull the end of the Shoulder Strap through the Shoulder Strap Holder on the Camcorder. 2 Fold the end of the Shoulder Strap to the other notes concerning this item, see page 61. 17...

Digital Video Camcorder
Page 18
...4 1 3 Close the Card Slot Cover 5 securely. Also, you want to connect the Camcorder to your Personal Computer. 18 For assistance, please call : 1-800-211-PANA(7262) or, contact us via the web at: http://www.panasonic.com/contactinfo Before inserting or removing a Card, be used to record still pictures. •...1 Easy to Use Mode Dial You can choose a desired mode by Panasonic only. Before Use Using a Memory Card (For PV-GS12/ PV-GS14/PV-GS15) A Card can be sure to turn off the Camcorder. • Otherwise, the Camcorder may not function properly or it may be damaged if the Card is...
...4 1 3 Close the Card Slot Cover 5 securely. Also, you want to connect the Camcorder to your Personal Computer. 18 For assistance, please call : 1-800-211-PANA(7262) or, contact us via the web at: http://www.panasonic.com/contactinfo Before inserting or removing a Card, be used to record still pictures. •...1 Easy to Use Mode Dial You can choose a desired mode by Panasonic only. Before Use Using a Memory Card (For PV-GS12/ PV-GS14/PV-GS15) A Card can be sure to turn off the Camcorder. • Otherwise, the Camcorder may not function properly or it may be damaged if the Card is...

Digital Video Camcorder
Page 19
... 17 19 LCD Color Level [LCD COLOR LEVEL] Adjusts the color saturation of the image on the LCD screen. If you open , you turn the Camcorder off even if the LCD Monitor is now deactivated. • The LCD Monitor can be adjusted, and then press the [ / ] Button to raise...vertical bars in the Viewfinder. Forcefully rotating the LCD Monitor beyond these ranges will damage the Camcorder. Using the Menu Screen To facilitate the selection of a desired function or setup, this Camcorder displays various function setups on the [OPEN▼] Knob 1 and pull the LCD Monitor 2 out in...
... 17 19 LCD Color Level [LCD COLOR LEVEL] Adjusts the color saturation of the image on the LCD screen. If you open , you turn the Camcorder off even if the LCD Monitor is now deactivated. • The LCD Monitor can be adjusted, and then press the [ / ] Button to raise...vertical bars in the Viewfinder. Forcefully rotating the LCD Monitor beyond these ranges will damage the Camcorder. Using the Menu Screen To facilitate the selection of a desired function or setup, this Camcorder displays various function setups on the [OPEN▼] Knob 1 and pull the LCD Monitor 2 out in...

Digital Video Camcorder
Page 20
... not during Menu Operations. The above procedure will be retained even when the Camcorder is displayed, you press the [ ] Button, the menu changes back to the previous screen. 2) [DIGITAL] Digital Setup Sub-Menu [EFFECT1] Digital Effects 1 (p. 33) [EFFECT2] Digital Effects 2 (p. 33) [MULTI MODE] Multi-Picture Mode (p. 33) ... Mode (p. 23) 20 For assistance, please call : 1-800-211-PANA(7262) or, contact us via the web at: http://www.panasonic.com/contactinfo File Selection in this text by >>. However, if the Battery or AC Adaptor is disconnected before turning off . About the Menu...
... not during Menu Operations. The above procedure will be retained even when the Camcorder is displayed, you press the [ ] Button, the menu changes back to the previous screen. 2) [DIGITAL] Digital Setup Sub-Menu [EFFECT1] Digital Effects 1 (p. 33) [EFFECT2] Digital Effects 2 (p. 33) [MULTI MODE] Multi-Picture Mode (p. 33) ... Mode (p. 23) 20 For assistance, please call : 1-800-211-PANA(7262) or, contact us via the web at: http://www.panasonic.com/contactinfo File Selection in this text by >>. However, if the Battery or AC Adaptor is disconnected before turning off . About the Menu...
Digital Video Camcorder
Page 21
...or set to Demonstration Mode for approximately 10 minutes after the AC Adaptor is connected to the Camcorder and the [OFF/ON] Switch is turned to [ON] without inserting a Cassette or a Card, the Camcorder is canceled. However, it cannot reset the Time Code. 6) [LCD/EVF] LCD/EVF ... Selector (p. 44) [AUDIO OUT] Audio Output Mode (p. 64) [USB FUNCTION] USB Functions Mode (pp. 51, 54) 2) [DIGITAL] Playback Digital Setup Sub-Menu [EFFECT ON] Digital Effect On/Off (p. 38) [EFFECT SEL] Digital Effect Selection (p. 38) [TITLE IN] (For PV-GS12/PV-GS14/PV-GS15) Adding a Title (p. 40) 3) [CARD] (For...
...or set to Demonstration Mode for approximately 10 minutes after the AC Adaptor is connected to the Camcorder and the [OFF/ON] Switch is turned to [ON] without inserting a Cassette or a Card, the Camcorder is canceled. However, it cannot reset the Time Code. 6) [LCD/EVF] LCD/EVF ... Selector (p. 44) [AUDIO OUT] Audio Output Mode (p. 64) [USB FUNCTION] USB Functions Mode (pp. 51, 54) 2) [DIGITAL] Playback Digital Setup Sub-Menu [EFFECT ON] Digital Effect On/Off (p. 38) [EFFECT SEL] Digital Effect Selection (p. 38) [TITLE IN] (For PV-GS12/PV-GS14/PV-GS15) Adding a Title (p. 40) 3) [CARD] (For...

Digital Video Camcorder
Page 23
...the AC jack. When the [ ] Indication flashes, the internal lithium battery is possible with the power turned off and then connect to the Camcorder with "16 bit 48 kHz 2 track" Mode. LP Mode A desired recording speed can be used for 4 hours, the built-in lithium battery can...stereo, while the other equipment. • Audio dubbing is weak, the [ ] Indication flashes. Setting Date and Time Since the internal clock of the Camcorder has a slight imprecision make sure to finish setting the date and time. • The clock operation starts from [00] second. • If ...
...the AC jack. When the [ ] Indication flashes, the internal lithium battery is possible with the power turned off and then connect to the Camcorder with "16 bit 48 kHz 2 track" Mode. LP Mode A desired recording speed can be used for 4 hours, the built-in lithium battery can...stereo, while the other equipment. • Audio dubbing is weak, the [ ] Indication flashes. Setting Date and Time Since the internal clock of the Camcorder has a slight imprecision make sure to finish setting the date and time. • The clock operation starts from [00] second. • If ...
Digital Video Camcorder
Page 24
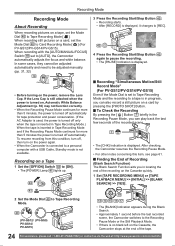
Recording on the Cassette, the Camcorder stops at the end of the tape. 24 For assistance, please call : 1-800-211-PANA(7262) or, contact us via the web at: http://www.panasonic.com/contactinfo Finding the End of Recording (Blank Search Function) The Blank Search Function aids you in ... scene. 7 • The [CHK] Indication is connected to a personal computer with the [AUTO/MANUAL/FOCUS] Switch 18 set to [AUTO], the Camcorder automatically adjusts the focus and white balance. If the Lens Cap is still attached when the power is turned on, Automatic White Balance Adjustment (p. 30...
Recording on the Cassette, the Camcorder stops at the end of the tape. 24 For assistance, please call : 1-800-211-PANA(7262) or, contact us via the web at: http://www.panasonic.com/contactinfo Finding the End of Recording (Blank Search Function) The Blank Search Function aids you in ... scene. 7 • The [CHK] Indication is connected to a personal computer with the [AUTO/MANUAL/FOCUS] Switch 18 set to [AUTO], the Camcorder automatically adjusts the focus and white balance. If the Lens Cap is still attached when the power is turned on, Automatic White Balance Adjustment (p. 30...

Digital Video Camcorder
Page 25
... 13 is displayed, Progressive Photoshot Function works. Recording a Still Picture on a Tape (PV-GS9 Only) Still pictures can be recorded from the Camcorder. 1 Set the Mode Dial 40 to enter the Digital Still Picture Mode and then press the [PHOTO SHOT] Button. When the button is pressed again, the... Digital Still Picture Mode is canceled. 13 Recording a Still Picture on a Card (Photoshot) (For PV-GS12/PV-GS14/ PV-GS15 ) Still pictures can be recorded on the [CAMERA] Sub-Menu to [ON] and keep the [PHOTO SHOT] Button pressed, the Camcorder will continuously record still...
... 13 is displayed, Progressive Photoshot Function works. Recording a Still Picture on a Tape (PV-GS9 Only) Still pictures can be recorded from the Camcorder. 1 Set the Mode Dial 40 to enter the Digital Still Picture Mode and then press the [PHOTO SHOT] Button. When the button is pressed again, the... Digital Still Picture Mode is canceled. 13 Recording a Still Picture on a Card (Photoshot) (For PV-GS12/PV-GS14/ PV-GS15 ) Still pictures can be recorded on the [CAMERA] Sub-Menu to [ON] and keep the [PHOTO SHOT] Button pressed, the Camcorder will continuously record still...

Digital Video Camcorder
Page 26
...LIGHT] Button. 3 • The Video Light turns off. • Pressing the [LIGHT] Button again returns to enhance the light's brightness. 1 Press the [LIGHT] Button 11 . 1 11 • The Built-in a scene. Quick Start By pressing the [QUICK START] Button 42 , the Camcorder will appear. 2 Press the [LIGHT]...you can be recorded in progress. Recording Mode RapidFire Consecutive Photoshot The still pictures can be recorded on a Card at : http://www.panasonic.com/contactinfo Recording Yourself By opening the LCD Monitor and rotating it is turned on. 1 Press the [QUICK START] Button 42 ....
...LIGHT] Button. 3 • The Video Light turns off. • Pressing the [LIGHT] Button again returns to enhance the light's brightness. 1 Press the [LIGHT] Button 11 . 1 11 • The Built-in a scene. Quick Start By pressing the [QUICK START] Button 42 , the Camcorder will appear. 2 Press the [LIGHT]...you can be recorded in progress. Recording Mode RapidFire Consecutive Photoshot The still pictures can be recorded on a Card at : http://www.panasonic.com/contactinfo Recording Yourself By opening the LCD Monitor and rotating it is turned on. 1 Press the [QUICK START] Button 42 ....


