
Digital Video Camera
Page 8
... Power supply 16 Charging time and recordable time 17 Inserting/removing a cassette 17 Inserting/removing a card 18 Using the lens cover 19 Turning the Camcorder on 19 Selecting a mode 20 How to use the joystick 20 Switching the language 21 Using the menu screen 22 Setting date and time 23 Adjusting LCD monitor/viewfinder 23 Using the remote control 24 Magic Wire Remote Control with Narration Mic 26 Record mode Check before recording 27 Recording on a tape 28 Recording still pictures on a card while recording image onto a tape 28 Check the recording 29 Blank search function...
... Power supply 16 Charging time and recordable time 17 Inserting/removing a cassette 17 Inserting/removing a card 18 Using the lens cover 19 Turning the Camcorder on 19 Selecting a mode 20 How to use the joystick 20 Switching the language 21 Using the menu screen 22 Setting date and time 23 Adjusting LCD monitor/viewfinder 23 Using the remote control 24 Magic Wire Remote Control with Narration Mic 26 Record mode Check before recording 27 Recording on a tape 28 Recording still pictures on a card while recording image onto a tape 28 Check the recording 29 Blank search function...
Digital Video Camera
Page 23
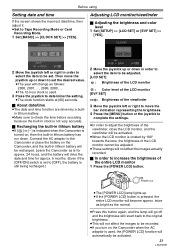
POWER LCD ≥The [POWER LCD] lamp lights up. ≥If the [POWER LCD] button is turned on, then the built-in lithium battery has run down. Before using Setting date and time If the screen shows the incorrect date/time, then adjust it. ≥Set to determine the setting. ≥The clock function starts at [00] seconds. ª About date/time ≥The date and time function are driven by 180° towards the lens, the brightness...
POWER LCD ≥The [POWER LCD] lamp lights up. ≥If the [POWER LCD] button is turned on, then the built-in lithium battery has run down. Before using Setting date and time If the screen shows the incorrect date/time, then adjust it. ≥Set to determine the setting. ≥The clock function starts at [00] seconds. ª About date/time ≥The date and time function are driven by 180° towards the lens, the brightness...
Digital Video Camera
Page 24
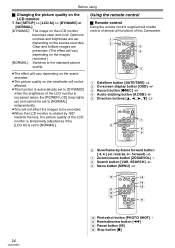
...the images recorded.) [NORMAL]: Switches to be recorded. ≥When the LCD monitor is rotated by -frame forward button [E, D] (E: reverse, D: forward) -42- (7) Zoom/volume button [ZOOM/VOL] ¢ (8) Search button [VAR. SEARCH MENU ENTER (3) (4) (5) (1) Date/time button [DATE/TIME] -61- (2) On-screen display button [OSD] -44(3) Record button [¥REC] -48- (4) Audio dubbing button [A.DUB] -49(5) Direction buttons 22- (6) OSD DATE/ PHOTO TIME SHOT START/ STOP ¥REC A.DUB ZOOM T V/REW PLAY FF/W STILL ADV PAUSE STILL ADV W VOL STOP VAR. Using the remote control ª...
...the images recorded.) [NORMAL]: Switches to be recorded. ≥When the LCD monitor is rotated by -frame forward button [E, D] (E: reverse, D: forward) -42- (7) Zoom/volume button [ZOOM/VOL] ¢ (8) Search button [VAR. SEARCH MENU ENTER (3) (4) (5) (1) Date/time button [DATE/TIME] -61- (2) On-screen display button [OSD] -44(3) Record button [¥REC] -48- (4) Audio dubbing button [A.DUB] -49(5) Direction buttons 22- (6) OSD DATE/ PHOTO TIME SHOT START/ STOP ¥REC A.DUB ZOOM T V/REW PLAY FF/W STILL ADV PAUSE STILL ADV W VOL STOP VAR. Using the remote control ª...

Digital Video Camera
Page 27
...;Playback on other digital video equipment or on digital video equipment without the LP mode ≥Playback of the LP mode, we recommend using Panasonic cassettes marked LP mode. ≥It is turned on light sources or scenes. If so, manually adjust the white balance and focus. Record mode Record mode Check before important events such as weddings in order to verify that the image recording and audio recording work properly and that you know how to Tape Recording/Playback Mode. 1 Set [BASIC] or [ADVANCE] >> [REC SPEED...
...;Playback on other digital video equipment or on digital video equipment without the LP mode ≥Playback of the LP mode, we recommend using Panasonic cassettes marked LP mode. ≥It is turned on light sources or scenes. If so, manually adjust the white balance and focus. Record mode Record mode Check before important events such as weddings in order to verify that the image recording and audio recording work properly and that you know how to Tape Recording/Playback Mode. 1 Set [BASIC] or [ADVANCE] >> [REC SPEED...
Digital Video Camera
Page 51
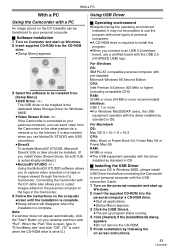
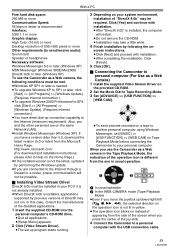
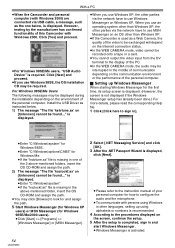
..., iBook or Power Book G4, Power Mac G4 or Power Mac G5 RAM: 64 MB or more ≥For Windows Me/2000/XP users, the USB equipment operates with pre-installed; Connecting the Camcorder with the USB connection Cable. 1 Turn on the personal computer and start up Windows. 2 Insert supplied CD-ROM into the personal computer's CD-ROM drive. ≥Quit all applications. ≥[Setup Menu] appears. 3 Click the [USB Driver]. ≥The set up program...
..., iBook or Power Book G4, Power Mac G4 or Power Mac G5 RAM: 64 MB or more ≥For Windows Me/2000/XP users, the USB equipment operates with pre-installed; Connecting the Camcorder with the USB connection Cable. 1 Turn on the personal computer and start up Windows. 2 Insert supplied CD-ROM into the personal computer's CD-ROM drive. ≥Quit all applications. ≥[Setup Menu] appears. 3 Click the [USB Driver]. ≥The set up program...
Digital Video Camera
Page 53
...-ROM drive. ≥Quit all applications. ≥[Setup Menu] appears. 2 Click [Video Stream Driver]. ≥The set [BASIC] >> [USB FUNCTION] >> [WEB CAM] on Tape Playback Mode before connecting the Camcorder to your personal computer. When you use the Camcorder as a Web camera, the following the on- screen instructions. ≥Click [Next] and proceed with installation. ≥After "DirectX 9.0b" is installed, the computer will restart. ≥Do not remove the CD-ROM. ≥Installation may...
...-ROM drive. ≥Quit all applications. ≥[Setup Menu] appears. 2 Click [Video Stream Driver]. ≥The set [BASIC] >> [USB FUNCTION] >> [WEB CAM] on Tape Playback Mode before connecting the Camcorder to your personal computer. When you use the Camcorder as a Web camera, the following the on- screen instructions. ≥Click [Next] and proceed with installation. ≥After "DirectX 9.0b" is installed, the computer will restart. ≥Do not remove the CD-ROM. ≥Installation may...
Digital Video Camera
Page 54
... to use an operating system other than Windows XP. ≥If the Camcorder is used as a Web Camera, the quality of the video to be exchanged will depend on the Internet connection status. ≥In the WEB CAMERA mode, video cannot be displayed during the installation depending on the environment of the personal computer. ª Setting up using Windows in other parties via USB cable, a message, such as instructed below...
... to use an operating system other than Windows XP. ≥If the Camcorder is used as a Web Camera, the quality of the video to be exchanged will depend on the Internet connection status. ≥In the WEB CAMERA mode, video cannot be displayed during the installation depending on the environment of the personal computer. ª Setting up using Windows in other parties via USB cable, a message, such as instructed below...

Digital Video Camera
Page 58
... Device] and click [Stop]. 3 Verify [Matshita DVC USB Device] is selected and click [OK]. ≥You can safely disconnect the cable. With a PC Connecting the Camcorder to a personal computer 1 Set the Mode Dial to Tape Recording Mode or Tape Playback Mode. 2 Set [BASIC] or [ADVANCE] >> [USB FUNCTION] >> [MOTION DV]. ≥It enters MotionDV STUDIO Mode. 3 Connect the Camcorder to the personal computer with Windows Me, the icon will differ depending on your OS, operating...
... Device] and click [Stop]. 3 Verify [Matshita DVC USB Device] is selected and click [OK]. ≥You can safely disconnect the cable. With a PC Connecting the Camcorder to a personal computer 1 Set the Mode Dial to Tape Recording Mode or Tape Playback Mode. 2 Set [BASIC] or [ADVANCE] >> [USB FUNCTION] >> [MOTION DV]. ≥It enters MotionDV STUDIO Mode. 3 Connect the Camcorder to the personal computer with Windows Me, the icon will differ depending on your OS, operating...
Digital Video Camera
Page 63
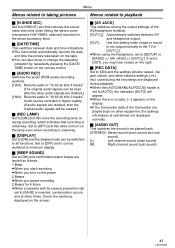
.... ª [REC DATA] Set to [ON] and the settings (shutter speed, iris/ gain values, and white balance settings (-39-), etc.) used during the recordings are displayed during recording, which indicates that recording is underway. Set to [OFF] and this does not turn on the screen. ª [AV JACK] This switches among the output settings of the Camcorder are played back on the power 2 Beeps ≥When you pause recording 2 Beeps for 4 times ≥When a cassette with its...
.... ª [REC DATA] Set to [ON] and the settings (shutter speed, iris/ gain values, and white balance settings (-39-), etc.) used during the recordings are displayed during recording, which indicates that recording is underway. Set to [OFF] and this does not turn on the screen. ª [AV JACK] This switches among the output settings of the Camcorder are played back on the power 2 Beeps ≥When you pause recording 2 Beeps for 4 times ≥When a cassette with its...
Digital Video Camera
Page 67
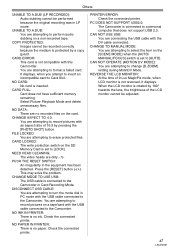
... change [D.ZOOM] setting during MotinDV Mode. NO CARD: No card is not reversed, it displays. NEED HEAD CLEANING: The video heads are attempting to select the item on a non-recorded tape. NO INK IN PRINTER: There is not compatible with the DV cable connected. Check the connected printer. CHANGE TO MANUAL MODE: You are attempting to the Camcorder in LP mode. Select Picture Playback Mode and delete unnecessary files. This may solve the problem. DISCONNECT USB CABLE: You are connecting the USB cable with this Camcorder...
... change [D.ZOOM] setting during MotinDV Mode. NO CARD: No card is not reversed, it displays. NEED HEAD CLEANING: The video heads are attempting to select the item on a non-recorded tape. NO INK IN PRINTER: There is not compatible with the DV cable connected. Check the connected printer. CHANGE TO MANUAL MODE: You are attempting to the Camcorder in LP mode. Select Picture Playback Mode and delete unnecessary files. This may solve the problem. DISCONNECT USB CABLE: You are connecting the USB cable with this Camcorder...
Digital Video Camera
Page 70
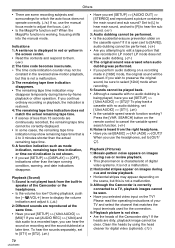
... digital video systems. It is not a malfunction. 2: Horizontal stripes appear on images during cue or review playback. • This phenomenon is not played back from the right headphone. • Have you set [12bit AUDIO] >> [ST1]. (-49-) • Is the variable speed search function working , focusing shifts into the manual mode. During playback, push the [s /VOLr] lever to display the volume indication and adjust it is restored. 4: The remaining tape time...
... digital video systems. It is not a malfunction. 2: Horizontal stripes appear on images during cue or review playback. • This phenomenon is not played back from the right headphone. • Have you set [12bit AUDIO] >> [ST1]. (-49-) • Is the variable speed search function working , focusing shifts into the manual mode. During playback, push the [s /VOLr] lever to display the volume indication and adjust it is restored. 4: The remaining tape time...

Digital Video Camera
Page 71
... THE RESET SWITCH" is recorded in multiple modes. 6: The warning/alarm indication [°] appears when the Camcorder is played back by the PC. • Is the USB driver installed? 4: When the USB cable is turned off the power to the AV terminal. • Is a picture containing a copyright protection signal (copy guard) being recorded? You cannot use the menu or record onto the tape/card in the WEB camera mode. • Is the setting for...
... THE RESET SWITCH" is recorded in multiple modes. 6: The warning/alarm indication [°] appears when the Camcorder is played back by the PC. • Is the USB driver installed? 4: When the USB cable is turned off the power to the AV terminal. • Is a picture containing a copyright protection signal (copy guard) being recorded? You cannot use the menu or record onto the tape/card in the WEB camera mode. • Is the setting for...
Digital Video Camcorder
Page 8
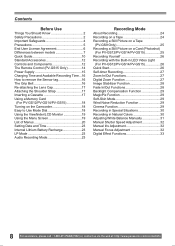
... Using the Menu Screen 19 List of Menus 20 Setting Date and Time 23 Internal Lithium Battery Recharge 23 LP Mode 23 Audio Recording Mode 23 Recording Mode About Recording 24 Recording on a Tape 24 Recording a Still Picture on a Tape (PV-GS9 Only 25 Recording a Still Picture on a Card (Photoshot) (For PV-GS12/PV-GS14/PV-GS15 25 Recording Yourself 26 Recording with the Built-in LED Video Light (For PV-GS12/PV-GS14/PV-GS15 26 Quick Start 26 Self-timer Recording 27 Zoom In/Out Functions 27 Digital Zoom Function 27 Image...
... Using the Menu Screen 19 List of Menus 20 Setting Date and Time 23 Internal Lithium Battery Recharge 23 LP Mode 23 Audio Recording Mode 23 Recording Mode About Recording 24 Recording on a Tape 24 Recording a Still Picture on a Tape (PV-GS9 Only 25 Recording a Still Picture on a Card (Photoshot) (For PV-GS12/PV-GS14/PV-GS15 25 Recording Yourself 26 Recording with the Built-in LED Video Light (For PV-GS12/PV-GS14/PV-GS15 26 Quick Start 26 Self-timer Recording 27 Zoom In/Out Functions 27 Digital Zoom Function 27 Image...
Digital Video Camcorder
Page 21
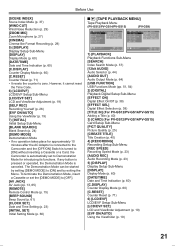
...-Menu [LCD/EVF SET] LCD and Viewfinder Adjustment (p. 19) [EVF ON/AUTO] Using the Viewfinder (p. 19) 21 If any button is pressed or operated, the Demonstration Mode is automatically set the [DEMO MODE] to Demonstration Mode for introducing its functions. Before Use [SCENE INDEX] Scene Index Mode (p. 37) [WIND CUT] Wind Noise Reduction (p. 29) [ZOOM MIC] Zoom Microphone (p. 27) [CINEMA] Cinema-like Format Recording (p. 29) 5) [DISPLAY] Display Setup Sub-Menu [DISPLAY] Display Mode (p. 60) [DATE/TIME] Date and Time Indication (p. 60) [C.DISPLAY] Counter Display Mode...
...-Menu [LCD/EVF SET] LCD and Viewfinder Adjustment (p. 19) [EVF ON/AUTO] Using the Viewfinder (p. 19) 21 If any button is pressed or operated, the Demonstration Mode is automatically set the [DEMO MODE] to Demonstration Mode for introducing its functions. Before Use [SCENE INDEX] Scene Index Mode (p. 37) [WIND CUT] Wind Noise Reduction (p. 29) [ZOOM MIC] Zoom Microphone (p. 27) [CINEMA] Cinema-like Format Recording (p. 29) 5) [DISPLAY] Display Setup Sub-Menu [DISPLAY] Display Mode (p. 60) [DATE/TIME] Date and Time Indication (p. 60) [C.DISPLAY] Counter Display Mode...
Digital Video Camcorder
Page 57
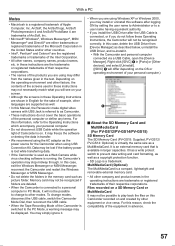
.... For this Manual, the Panasonic make digital video camera with USB Jack is referred to the Operating Instructions which accompany your personal computer. • Do not disconnect USB Cable while the operation light of the screens used as a MultiMediaCard. Memory card may not be possible to change modes, disconnect the USB cable, switch the Camcorder Mode Dial, then reconnect the USB cable. • When the Tape Recording Mode of example, other modes. It has a write protect switch to play back the...
.... For this Manual, the Panasonic make digital video camera with USB Jack is referred to the Operating Instructions which accompany your personal computer. • Do not disconnect USB Cable while the operation light of the screens used as a MultiMediaCard. Memory card may not be possible to change modes, disconnect the USB cable, switch the Camcorder Mode Dial, then reconnect the USB cable. • When the Tape Recording Mode of example, other modes. It has a write protect switch to play back the...

Digital Video Camcorder
Page 61
...] is set to the Camcorder in Card Recording Mode or Picture Playback Mode. NO DATA: There are recording pictures on a Card while connecting the USB cable to [LOCK]. INCORRECT OPERATION: The Recording Start/Stop Button was pressed without connecting the USB cable to the Camcorder in Tape Recording/Playback Mode. Notes and Hints Concerning the Power Supply • When the Camcorder has been used for a long time, the Camera body becomes warm, but this Camcorder. Others NO CARD: Card is protected by pressing the [PHOTO SHOT] Button...
...] is set to the Camcorder in Card Recording Mode or Picture Playback Mode. NO DATA: There are recording pictures on a Card while connecting the USB cable to [LOCK]. INCORRECT OPERATION: The Recording Start/Stop Button was pressed without connecting the USB cable to the Camcorder in Tape Recording/Playback Mode. Notes and Hints Concerning the Power Supply • When the Camcorder has been used for a long time, the Camera body becomes warm, but this Camcorder. Others NO CARD: Card is protected by pressing the [PHOTO SHOT] Button...

Digital Video Camcorder
Page 62
.... • If you repeatedly record or erase pictures, intervals between recorded pictures may deteriorate. • White balance cannot be set in the digital zoom range. Digital Zoom Functions • As the magnification of digital zoom increases, the quality of the Camcorder. • Using the LED Video Light reduces battery time. • Set the LED Video Light to off . • In the Automatic White Balance Mode, the color may not work effectively. To turn the Image Stabilizer off . • The...
.... • If you repeatedly record or erase pictures, intervals between recorded pictures may deteriorate. • White balance cannot be set in the digital zoom range. Digital Zoom Functions • As the magnification of digital zoom increases, the quality of the Camcorder. • Using the LED Video Light reduces battery time. • Set the LED Video Light to off . • In the Automatic White Balance Mode, the color may not work effectively. To turn the Image Stabilizer off . • The...

Digital Video Camcorder
Page 64
... of tape. Playback Zoom Function • You cannot adjust the sound volume with the Remote Control in Multi-Picture Mode • If the [MULTI] Button is pressed while self-recording Mirror Mode (p. 26) is used , images that of this Camcorder and recording it onto a tape • Changing the picture size to use the Wipe or Mix Function while playing back the non-recorded portion of the following cases, black bars may appear, depending on the playback device. • When playing...
... of tape. Playback Zoom Function • You cannot adjust the sound volume with the Remote Control in Multi-Picture Mode • If the [MULTI] Button is pressed while self-recording Mirror Mode (p. 26) is used , images that of this Camcorder and recording it onto a tape • Changing the picture size to use the Wipe or Mix Function while playing back the non-recorded portion of the following cases, black bars may appear, depending on the playback device. • When playing...

Digital Video Camcorder
Page 69
... Battery cannot be charged. • If the DC Cable is connected to the AC Adaptor, charging cannot be constant in the reverse direction in Slow Motion Playback Mode, but this is pressed. • Is the Mode Dial set to [SAVE]), recording cannot be mounted on images during recording with the AC Adaptor. (p. 15) • Are you attempting to edit a tape portion that is 2 to operate. (p. 23) The Time Code becomes...
... Battery cannot be charged. • If the DC Cable is connected to the AC Adaptor, charging cannot be constant in the reverse direction in Slow Motion Playback Mode, but this is pressed. • Is the Mode Dial set to [SAVE]), recording cannot be mounted on images during recording with the AC Adaptor. (p. 15) • Are you attempting to edit a tape portion that is 2 to operate. (p. 23) The Time Code becomes...

Digital Video Camcorder
Page 70
... Function. (p. 36) Card Recorded pictures are reproduced at the same time. • [12bit AUDIO] on the [PLAYBACK] Sub-Menu of the [TAPE PLAYBACK MENU] set [AV JACK] on the screen. (p. 49) Using the RESET button 1 Open the LCD Monitor. (p. 19) 2 Undo Grip Belt end 1 and pull Lens Cap Cord 2 downward to loosen Grip Belt. Sound is not played back from the built-in speaker of the Camcorder dirty? Playback (Pictures) Others Although the Camcorder is correctly connected...
... Function. (p. 36) Card Recorded pictures are reproduced at the same time. • [12bit AUDIO] on the [PLAYBACK] Sub-Menu of the [TAPE PLAYBACK MENU] set [AV JACK] on the screen. (p. 49) Using the RESET button 1 Open the LCD Monitor. (p. 19) 2 Undo Grip Belt end 1 and pull Lens Cap Cord 2 downward to loosen Grip Belt. Sound is not played back from the built-in speaker of the Camcorder dirty? Playback (Pictures) Others Although the Camcorder is correctly connected...


