
Dlp Projector - English/ French
Page 1
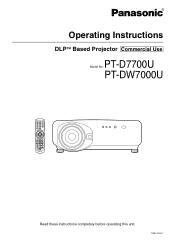
PT-DW7000U ON POWER OFF AUTO SETUP RGB 1 VIDEO RGB 2 S-VIDEO AUX SHUTTER SHUT MENU FREEZE PAGE UP ENTER PAGE DOWN ON SCREEN 1 2 3 STD OSD SYSTEM SEL D.ZOOM 4 FUNC 1 5 6 BRIGHT CONTRAST 7 LENS 8 9 NEXT ASPECT 0 USER LIGHT ID ALL ID SET Computer Numetric LASER ON/OFF Projector Read these instructions completely before operating this unit. TQBJ 0146-1 Operating Instructions DLPTM Based Projector Commercial Use PT-D7700U Model No.
PT-DW7000U ON POWER OFF AUTO SETUP RGB 1 VIDEO RGB 2 S-VIDEO AUX SHUTTER SHUT MENU FREEZE PAGE UP ENTER PAGE DOWN ON SCREEN 1 2 3 STD OSD SYSTEM SEL D.ZOOM 4 FUNC 1 5 6 BRIGHT CONTRAST 7 LENS 8 9 NEXT ASPECT 0 USER LIGHT ID ALL ID SET Computer Numetric LASER ON/OFF Projector Read these instructions completely before operating this unit. TQBJ 0146-1 Operating Instructions DLPTM Based Projector Commercial Use PT-D7700U Model No.
Dlp Projector - English/ French
Page 4
... parts 10 Remote control 10 Front and side of the projector 12 Rear view of the main unit 13 Controls on -screen indication function 88 Setting the system format 89 How to use network module (optional 90 Initial setting of network module 91 Accessing from the Web browser 92 Returning the network module setting back to adjust the lens for addressing unevenness of focusing ..42 Automatic adjustment (AUTO SETUP 43 Registration of input signal data...
... parts 10 Remote control 10 Front and side of the projector 12 Rear view of the main unit 13 Controls on -screen indication function 88 Setting the system format 89 How to use network module (optional 90 Initial setting of network module 91 Accessing from the Web browser 92 Returning the network module setting back to adjust the lens for addressing unevenness of focusing ..42 Automatic adjustment (AUTO SETUP 43 Registration of input signal data...
Dlp Projector - English/ French
Page 7
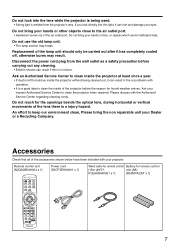
... season for remote control [15m (49'3"), unit (AA) K1EA03NA0001 x 1] [R03NPA/2ST x 1] ON POWER OFF AUTO SETUP RGB 1 VIDEO RGB 2 S-VIDEO AUX SHUTTER SHUT MENU FREEZE PAGE UP ENTER PAGE DOWN ON SCREEN 1 2 3 STD OSD SYSTEM SEL D.ZOOM 4 FUNC 1 5 6 BRIGHT CONTRAST 7 LENS 8 9 NEXT ASPECT 0 USER LIGHT ID ALL ID SET Computer Numetric LASER ON/OFF Projector 7 Do not look directly into the lens while the projector is being cleaned out...
... season for remote control [15m (49'3"), unit (AA) K1EA03NA0001 x 1] [R03NPA/2ST x 1] ON POWER OFF AUTO SETUP RGB 1 VIDEO RGB 2 S-VIDEO AUX SHUTTER SHUT MENU FREEZE PAGE UP ENTER PAGE DOWN ON SCREEN 1 2 3 STD OSD SYSTEM SEL D.ZOOM 4 FUNC 1 5 6 BRIGHT CONTRAST 7 LENS 8 9 NEXT ASPECT 0 USER LIGHT ID ALL ID SET Computer Numetric LASER ON/OFF Projector 7 Do not look directly into the lens while the projector is being cleaned out...
Dlp Projector - English/ French
Page 8
... handling the screen, be viewed. In particular, turning the power on and off the lightings near highvoltage power lines or power sources. Use soft and dry cloth to clean the cabinet If stains are hard to the lens, it over 2 700 m (8881.5') above sea level, set the "Fan Control", described on the screen. If dust adheres to remove, use . Avoid installing the product in a place free from vibrations and...
... handling the screen, be viewed. In particular, turning the power on and off the lightings near highvoltage power lines or power sources. Use soft and dry cloth to clean the cabinet If stains are hard to the lens, it over 2 700 m (8881.5') above sea level, set the "Fan Control", described on the screen. If dust adheres to remove, use . Avoid installing the product in a place free from vibrations and...

Dlp Projector - English/ French
Page 10
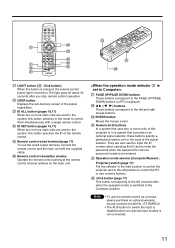
... function of parts Remote control ON POWER OFF AUTO SETUP RGB 1 VIDEO RGB 2 S-VIDEO AUX SHUTTER SHUT MENU FREEZE PAGE UP ENTER PAGE DOWN ON SCREEN 1 STD 2 OSD 3 SYSTEM SEL D.ZOOM 4 FUNC 1 5 6 BRIGHT CONTRAST 7 LENS 8 9 NEXT ASPECT 0 USER LIGHT ID ALL ID SET Computer Numetric LASER ON/OFF Projector < When the operation mode selector is set button pressed, every press on the screen. POWER OFF button (page 40) Turns off the on the menu screen, change the value...
... function of parts Remote control ON POWER OFF AUTO SETUP RGB 1 VIDEO RGB 2 S-VIDEO AUX SHUTTER SHUT MENU FREEZE PAGE UP ENTER PAGE DOWN ON SCREEN 1 STD 2 OSD 3 SYSTEM SEL D.ZOOM 4 FUNC 1 5 6 BRIGHT CONTRAST 7 LENS 8 9 NEXT ASPECT 0 USER LIGHT ID ALL ID SET Computer Numetric LASER ON/OFF Projector < When the operation mode selector is set button pressed, every press on the screen. POWER OFF button (page 40) Turns off the on the menu screen, change the value...
Dlp Projector - English/ French
Page 11
... ON POWER OFF AUTO SETUP RGB 1 VIDEO RGB 2 S-VIDEO AUX SHUTTER SHUT MENU FREEZE PAGE UP ENTER PAGE DOWN ON SCREEN 1 STD 2 OSD 3 SYSTEM SEL D.ZOOM 4 FUNC 1 5 6 BRIGHT CONTRAST 7 LENS 8 9 NEXT ASPECT 0 USER LIGHT ID ALL ID SET Computer Numetric LASER ON/OFF Projector 1RGB POWEROFF ON LIGHT button ( Click button) When this button specifies the ID of the remote control. USER button Displays the sub-memory screen of the signal registration. Operation mode selector (Computer/Numeric, Projector) switch...
... ON POWER OFF AUTO SETUP RGB 1 VIDEO RGB 2 S-VIDEO AUX SHUTTER SHUT MENU FREEZE PAGE UP ENTER PAGE DOWN ON SCREEN 1 STD 2 OSD 3 SYSTEM SEL D.ZOOM 4 FUNC 1 5 6 BRIGHT CONTRAST 7 LENS 8 9 NEXT ASPECT 0 USER LIGHT ID ALL ID SET Computer Numetric LASER ON/OFF Projector 1RGB POWEROFF ON LIGHT button ( Click button) When this button specifies the ID of the remote control. USER button Displays the sub-memory screen of the signal registration. Operation mode selector (Computer/Numeric, Projector) switch...
Dlp Projector - English/ French
Page 12
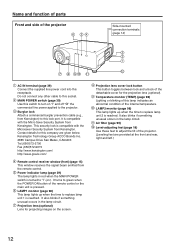
.... Temperature monitor (TEMP) (page 98) Lighting or blinking of this lamp indicates an abnormal condition of the projector Side-mounted connection terminals (page 14) AC IN terminal (page 39) Connect the supplied line power cord into this socket. Air filter (page 99) Level-adjusting feet (page 18) Use these feet to turn on "I " (on the screen. Do not connect any other cable to replace lamp unit 2 is pressed. Power indicator lamp (page 39) The lamp lights in the lamp...
.... Temperature monitor (TEMP) (page 98) Lighting or blinking of this lamp indicates an abnormal condition of the projector Side-mounted connection terminals (page 14) AC IN terminal (page 39) Connect the supplied line power cord into this socket. Air filter (page 99) Level-adjusting feet (page 18) Use these feet to turn on "I " (on the screen. Do not connect any other cable to replace lamp unit 2 is pressed. Power indicator lamp (page 39) The lamp lights in the lamp...
Dlp Projector - English/ French
Page 17
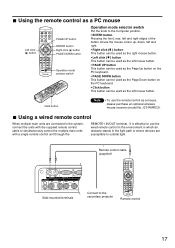
... connected in the system, connect the units with the supplied remote control cable to the secondary projector ON POWER OFF AUTO SETUP RGB 1 VIDEO RGB 2 S-VIDEO AUX SHUTTER SHUT MENU FREEZE PAGE UP ENTER PAGE DOWN ON SCREEN 1 STD 2 OSD 3 SYSTEM SEL D.ZOOM 4 FUNC 1 5 6 BRIGHT CONTRAST 7 LENS 8 9 NEXT ASPECT 0 USER LIGHT ID ALL ID SET Computer Numetric LASER ON/OFF Projector Remote control 17 It is effective to use the remote control as the left mouse button...
... connected in the system, connect the units with the supplied remote control cable to the secondary projector ON POWER OFF AUTO SETUP RGB 1 VIDEO RGB 2 S-VIDEO AUX SHUTTER SHUT MENU FREEZE PAGE UP ENTER PAGE DOWN ON SCREEN 1 STD 2 OSD 3 SYSTEM SEL D.ZOOM 4 FUNC 1 5 6 BRIGHT CONTRAST 7 LENS 8 9 NEXT ASPECT 0 USER LIGHT ID ALL ID SET Computer Numetric LASER ON/OFF Projector Remote control 17 It is effective to use the remote control as the left mouse button...
Dlp Projector - English/ French
Page 39
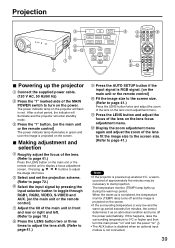
... abnormal condition and turns off the power automatically. Press the "l" button. [on the projector will enter standby mode. Select and set the projection scheme. (Refer to page 72.) Select the input signal by pressing the input selector button to toggle through RGB1, RGB2, VIDEO, S-VIDEO and AUX. [on the main unit or the remote control] Fit the image size to the screen size. (Refer to display a focus adjustment screen. The temperature monitor (TEMP) lamp lights up during the...
... abnormal condition and turns off the power automatically. Press the "l" button. [on the projector will enter standby mode. Select and set the projection scheme. (Refer to page 72.) Select the input signal by pressing the input selector button to toggle through RGB1, RGB2, VIDEO, S-VIDEO and AUX. [on the main unit or the remote control] Fit the image size to the screen size. (Refer to display a focus adjustment screen. The temperature monitor (TEMP) lamp lights up during the...

Dlp Projector - English/ French
Page 40
... POWER OFF AUTO SETUP RGB 1 VIDEO RGB 2 S-VIDEO AUX SHUTTER SHUT MENU FREEZE PAGE UP ENTER PAGE DOWN ON SCREEN 1 2 3 STD OSD SYSTEM SEL D.ZOOM 4 FUNC 1 5 6 BRIGHT CONTRAST 7 LENS 8 9 NEXT ASPECT 0 USER LIGHT ID ALL ID SET Computer Numetric LASER ON/OFF Projector Powering off the main power inadvertently, the projection lamp may remain unlit. To light up the lamp, turn the power on again after a while. 40 Note • Turning on the power supply...
... POWER OFF AUTO SETUP RGB 1 VIDEO RGB 2 S-VIDEO AUX SHUTTER SHUT MENU FREEZE PAGE UP ENTER PAGE DOWN ON SCREEN 1 2 3 STD OSD SYSTEM SEL D.ZOOM 4 FUNC 1 5 6 BRIGHT CONTRAST 7 LENS 8 9 NEXT ASPECT 0 USER LIGHT ID ALL ID SET Computer Numetric LASER ON/OFF Projector Powering off the main power inadvertently, the projection lamp may remain unlit. To light up the lamp, turn the power on again after a while. 40 Note • Turning on the power supply...
Dlp Projector - English/ French
Page 43
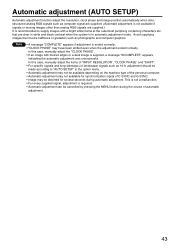
..., manually adjust the "CLOCK PHASE". • If an image with a bright white frame at the outermost periphery containing characters etc. This is not a malfunction. • For every supplied signal, adjustment is required. • Automatic adjustment can be distorted for synchronization signal of C-SYNC and G-SYNC. • Image may be cancelled by pressing the MENU button during automatic adjustment. Automatic adjustment (AUTO SETUP) Automatic adjustment function adjust the resolution, clock phase and image...
..., manually adjust the "CLOCK PHASE". • If an image with a bright white frame at the outermost periphery containing characters etc. This is not a malfunction. • For every supplied signal, adjustment is required. • Automatic adjustment can be distorted for synchronization signal of C-SYNC and G-SYNC. • Image may be cancelled by pressing the MENU button during automatic adjustment. Automatic adjustment (AUTO SETUP) Automatic adjustment function adjust the resolution, clock phase and image...

Dlp Projector - English/ French
Page 46
... 45. Use this function when the user needs adjustment of picture quality such as screen aspect ratio and image adjustment data (BRIGHT, CONTRAST etc.). Select the SUB MEMORY number stored with a sub memory function to register plural pieces of image adjustment data even they are determined to sub memory Press the "USER" button on normal screen (menu is not displayed). Registration of input signal data Sub memory The projector is provided...
... 45. Use this function when the user needs adjustment of picture quality such as screen aspect ratio and image adjustment data (BRIGHT, CONTRAST etc.). Select the SUB MEMORY number stored with a sub memory function to register plural pieces of image adjustment data even they are determined to sub memory Press the "USER" button on normal screen (menu is not displayed). Registration of input signal data Sub memory The projector is provided...
Dlp Projector - English/ French
Page 49
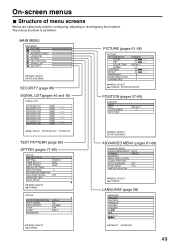
... SETTING LAMP SELECT LAMP POWER RS232C SETTING OSD POSITION SYSTEM INFORMATION COLOR MATCHING VIDEO SETTING AUTO SETUP 2 FRONT-F DUAL HIGH 2 OFF :MENU SELECT :CHANGE OPTION OUTPUT RESOLUTION AUTO SIGNAL FAN CONTROL P IN P FUNC1 PASSWORD SXGA+ ON NORMAL OFF P IN P PICTURE (pages 51-56) PICTURE PICTURE MODE COLOR TINT COLOR TEMP. On-screen menus Structure of menu screens Menus are extensively used for configuring, adjusting or reconfiguring the projector. GAMMA CONTRAST BRIGHT SHARPNESS NOISE REDUCTION DYNAMIC IRIS DYNAMIC 50 30 DEFAULT 2.2 32 32 6 2 1 :MENU SELECT :CHANGE...
... SETTING LAMP SELECT LAMP POWER RS232C SETTING OSD POSITION SYSTEM INFORMATION COLOR MATCHING VIDEO SETTING AUTO SETUP 2 FRONT-F DUAL HIGH 2 OFF :MENU SELECT :CHANGE OPTION OUTPUT RESOLUTION AUTO SIGNAL FAN CONTROL P IN P FUNC1 PASSWORD SXGA+ ON NORMAL OFF P IN P PICTURE (pages 51-56) PICTURE PICTURE MODE COLOR TINT COLOR TEMP. On-screen menus Structure of menu screens Menus are extensively used for configuring, adjusting or reconfiguring the projector. GAMMA CONTRAST BRIGHT SHARPNESS NOISE REDUCTION DYNAMIC IRIS DYNAMIC 50 30 DEFAULT 2.2 32 32 6 2 1 :MENU SELECT :CHANGE...
Dlp Projector - English/ French
Page 71
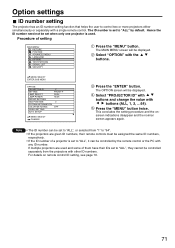
... "MENU" button. If multiple projectors are given ID numbers, their IDs set when only one projector is set to "ALL" by the remote control or the PC with the buttons. :MENU SELECT ENTER:SUB MENU OPTION PROJECTOR ID SETTING LAMP SELECT LAMP POWER RS232C SETTING OSD POSITION SYSTEM INFORMATION COLOR MATCHING VIDEO SETTING AUTO SETUP 2 FRONT-F DUAL HIGH 2 OFF :MENU SELECT :CHANGE Press the "ENTER" button. Procedure of a projector is used. Option settings ID number setting The projector has an ID number setting function that helps...
... "MENU" button. If multiple projectors are given ID numbers, their IDs set when only one projector is set to "ALL" by the remote control or the PC with the buttons. :MENU SELECT ENTER:SUB MENU OPTION PROJECTOR ID SETTING LAMP SELECT LAMP POWER RS232C SETTING OSD POSITION SYSTEM INFORMATION COLOR MATCHING VIDEO SETTING AUTO SETUP 2 FRONT-F DUAL HIGH 2 OFF :MENU SELECT :CHANGE Press the "ENTER" button. Procedure of a projector is used. Option settings ID number setting The projector has an ID number setting function that helps...
Dlp Projector - English/ French
Page 75
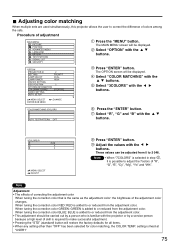
... sets. OPTION PROJECTOR ID SETTING LAMP SELECT LAMP POWER RS232C SETTING OSD POSITION SYSTEM INFORMATION COLOR MATCHING VIDEO SETTING AUTO SETUP 2 FRONT-F DUAL HIGH 2 3COLORS Press "ENTER" button. Select "COLOR MATCHING" with the buttons. When tuning the correction color BLUE: BLUE is added to make successful adjustment. • Pressing the "STD" (standard) button will restore the factory defaults for all items. • When any setting other than "OFF" has been selected for color matching, the COLOR TEMP...
... sets. OPTION PROJECTOR ID SETTING LAMP SELECT LAMP POWER RS232C SETTING OSD POSITION SYSTEM INFORMATION COLOR MATCHING VIDEO SETTING AUTO SETUP 2 FRONT-F DUAL HIGH 2 3COLORS Press "ENTER" button. Select "COLOR MATCHING" with the buttons. When tuning the correction color BLUE: BLUE is added to make successful adjustment. • Pressing the "STD" (standard) button will restore the factory defaults for all items. • When any setting other than "OFF" has been selected for color matching, the COLOR TEMP...

Dlp Projector - English/ French
Page 98
... a "REPLACE THE LAMP" message on the screen when turning on the projector power supply. • This lamp monitor lights up status High temperature inside. (WARNING) High temperature inside (Standby condition) • Did you turn the power back on page 40 and clean the air filter (refer to 40 °C. • Remove the object that is • Check if the ventilation port is detected in the lamp circuit. • Turn off the power and take a measure to the indication of...
... a "REPLACE THE LAMP" message on the screen when turning on the projector power supply. • This lamp monitor lights up status High temperature inside. (WARNING) High temperature inside (Standby condition) • Did you turn the power back on page 40 and clean the air filter (refer to 40 °C. • Remove the object that is • Check if the ventilation port is detected in the lamp circuit. • Turn off the power and take a measure to the indication of...

Dlp Projector - English/ French
Page 99
... it is replaced, also replace the air filter. 99 Clean the air filter. Set the air filter and then mount the filter in the bottom of the air filter, take out the filter from the receptacle. Attention • Be careful not to step . Dismantle the air filter. In addition, when the lamp unit is a sign to turn "OFF" the power supply) on the location of projector operation. Clean the air filter section once every 100 hours or so...
... it is replaced, also replace the air filter. 99 Clean the air filter. Set the air filter and then mount the filter in the bottom of the air filter, take out the filter from the receptacle. Attention • Be careful not to step . Dismantle the air filter. In addition, when the lamp unit is a sign to turn "OFF" the power supply) on the location of projector operation. Clean the air filter section once every 100 hours or so...

Dlp Projector - English/ French
Page 100
... replaced after 1 300 hours 2 (with the lamp output set at "HIGH"), power supply will not disappear unless the menu (MENU) button is operated. Therefore, it is DUAL). Further, an on-screen indication will appear for about 30 seconds or when either control button on the rear of main unit or remote control button is operated.) After the time of 1 500 hours 1, the on lamp unit replacement Be careful when handling a light source lamp. Indication after 1 300 hours 2 (with a new...
... replaced after 1 300 hours 2 (with the lamp output set at "HIGH"), power supply will not disappear unless the menu (MENU) button is operated. Therefore, it is DUAL). Further, an on-screen indication will appear for about 30 seconds or when either control button on the rear of main unit or remote control button is operated.) After the time of 1 500 hours 1, the on lamp unit replacement Be careful when handling a light source lamp. Indication after 1 300 hours 2 (with a new...

Dlp Projector - English/ French
Page 102
... used hours of lamp unit 8. The SYSTEM INFORMATION screen will be reset to zero. An item "LAMP RESET" will be added. 14. LAMP1: Replace the LAMP UNIT 1 LAMP2: Replace the LAMP UNIT 2 15. When "OK?" Insert the power cord plug into the wall outlet and then press the MAIN POWER switch. is projected onto the screen. 10. Press the "I ", turn the MAIN POWER "O", confirm that a picture is displayed, press the "ENTER" button. Replacement...
... used hours of lamp unit 8. The SYSTEM INFORMATION screen will be reset to zero. An item "LAMP RESET" will be added. 14. LAMP1: Replace the LAMP UNIT 1 LAMP2: Replace the LAMP UNIT 2 15. When "OK?" Insert the power cord plug into the wall outlet and then press the MAIN POWER switch. is projected onto the screen. 10. Press the "I ", turn the MAIN POWER "O", confirm that a picture is displayed, press the "ENTER" button. Replacement...
Dlp Projector - English/ French
Page 103
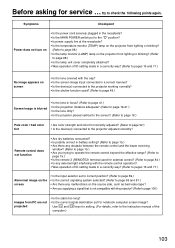
... the remote control and the beam receiving window? (Refer to page 15.) • Are you supplying a signal that is not compatible with the cap? • Is the screen image input connected in a correct manner? • Is the device(s) connected to the projector working normally? • Is the shutter function used for notebook computer screen image? Before asking for setting. (For details, refer to the instruction manual of ID setting...
... the remote control and the beam receiving window? (Refer to page 15.) • Are you supplying a signal that is not compatible with the cap? • Is the screen image input connected in a correct manner? • Is the device(s) connected to the projector working normally? • Is the shutter function used for notebook computer screen image? Before asking for setting. (For details, refer to the instruction manual of ID setting...


