

Lcd Projector
Page 1
Before using your projector, be sure to safety" (pages 6 - 10). PT-LB90NTU PT-LB90U PT-LB78VU PT-LB75VU Thank you for future use. JJ Before operating this product, please read "Precautions with regard to read the instructions carefully, and save this manual for purchasing a Panasonic Projector. TQBJ0302 ENGLISH Operating Instructions LCD Projector Commercial Use Model No.
Before using your projector, be sure to safety" (pages 6 - 10). PT-LB90NTU PT-LB90U PT-LB78VU PT-LB75VU Thank you for future use. JJ Before operating this product, please read "Precautions with regard to read the instructions carefully, and save this manual for purchasing a Panasonic Projector. TQBJ0302 ENGLISH Operating Instructions LCD Projector Commercial Use Model No.

Lcd Projector
Page 2
... the user to the presence of uninsulated "dangerous voltage" within an equilateral triangle is both safe to environmental considerations. Power Supply: This LCD Projector is a safety feature. Do not remove the grounding pin on 100 V - 240 V, 50 Hz/60 Hz AC, house current only... outlet. ENGLISH Dispose may result. Model number: PT-LB90NTU/PT-LB90U/PT-LB78VU/PT-LB75VU Serial number: WARNING: TO REDUCE THE RISK OF FIRE OR ELECTRIC SHOCK, DONOT EXPOSE THIS PRODUCT TO RAIN OR MOISTURE. Do not defeat the purpose of Panasonic Marketing Europe GmbH Winsbergring 15, 22525 Hamburg, F.R....
... the user to the presence of uninsulated "dangerous voltage" within an equilateral triangle is both safe to environmental considerations. Power Supply: This LCD Projector is a safety feature. Do not remove the grounding pin on 100 V - 240 V, 50 Hz/60 Hz AC, house current only... outlet. ENGLISH Dispose may result. Model number: PT-LB90NTU/PT-LB90U/PT-LB78VU/PT-LB75VU Serial number: WARNING: TO REDUCE THE RISK OF FIRE OR ELECTRIC SHOCK, DONOT EXPOSE THIS PRODUCT TO RAIN OR MOISTURE. Do not defeat the purpose of Panasonic Marketing Europe GmbH Winsbergring 15, 22525 Hamburg, F.R....
Lcd Projector
Page 4
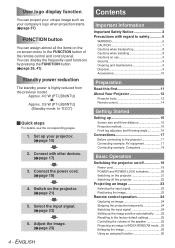
... 8 Cautions on use 9 Security 9 Cleaning and maintenance 9 Disposal 9 Accessories 10 Preparation Read this first 11 About Your Projector 12 Projector body 12 Remote control 14 Getting Started Setting up 15 Screen size and throw distance 15 Projection method 16 Front leg adjusters... reduction The standby power is highly reduced from the previous model. Connect the power cord. (Æpage 19) 4. Approx. 4.0 W (PT-LB80NTU) Approx. 0.9 W (PT-LB90NTU) (Standby mode: In "ECO") JJQuick steps For details, see the corresponding pages. 1. Adjust the image. (Æpage 23) 4 ...
... 8 Cautions on use 9 Security 9 Cleaning and maintenance 9 Disposal 9 Accessories 10 Preparation Read this first 11 About Your Projector 12 Projector body 12 Remote control 14 Getting Started Setting up 15 Screen size and throw distance 15 Projection method 16 Front leg adjusters... reduction The standby power is highly reduced from the previous model. Connect the power cord. (Æpage 19) 4. Approx. 4.0 W (PT-LB80NTU) Approx. 0.9 W (PT-LB90NTU) (Standby mode: In "ECO") JJQuick steps For details, see the corresponding pages. 1. Adjust the image. (Æpage 23) 4 ...

Lcd Projector
Page 5
...CAPTION SETTING 36 STARTUP LOGO 37 AUTO SETUP 37 SIGNAL SEARCH 37 BACK COLOR 37 WIDE MODE 38 SXGA MODE 38 OTHER FUNCTIONS 38 PROJECTOR SETUP menu 39 STATUS 39 NO SIGNAL SHUT-OFF 39 INITIAL START UP 39 INSTALLATION 39 HIGH ALTITUDE MODE 39 STANDBY MODE 40 ... 44 MENU LOCK PASSWORD 44 CONTROL DEVICE SETUP 44 NETWORK menu (PT-LB90NTU only 45 Maintenance LAMP and TEMP Indicators 46 Managing the indicated problems 46 Care and Replacement 47 Before Care and Replacement 47 Cleaning the projector 47 Replacing the Lamp unit 48 Troubleshooting 51 Appendix Technical Information 52...
...CAPTION SETTING 36 STARTUP LOGO 37 AUTO SETUP 37 SIGNAL SEARCH 37 BACK COLOR 37 WIDE MODE 38 SXGA MODE 38 OTHER FUNCTIONS 38 PROJECTOR SETUP menu 39 STATUS 39 NO SIGNAL SHUT-OFF 39 INITIAL START UP 39 INSTALLATION 39 HIGH ALTITUDE MODE 39 STANDBY MODE 40 ... 44 MENU LOCK PASSWORD 44 CONTROL DEVICE SETUP 44 NETWORK menu (PT-LB90NTU only 45 Maintenance LAMP and TEMP Indicators 46 Managing the indicated problems 46 Care and Replacement 47 Before Care and Replacement 47 Cleaning the projector 47 Replacing the Lamp unit 48 Troubleshooting 51 Appendix Technical Information 52...

Lcd Projector
Page 6
...safety Important Information WARNING „„POWER The wall outlet or the circuit breaker shall be installed near any water gets inside the projector, cut off the power supply immediately. Continued use anything other objects. If the plug is overloaded (ex., by a qualified technician.... Failure to observe this will cause the projector to become unbalanced and fall, which could result in damage or injury. zzIf not using too many adapters), overheating may occur and...
...safety Important Information WARNING „„POWER The wall outlet or the circuit breaker shall be installed near any water gets inside the projector, cut off the power supply immediately. Continued use anything other objects. If the plug is overloaded (ex., by a qualified technician.... Failure to observe this will cause the projector to become unbalanced and fall, which could result in damage or injury. zzIf not using too many adapters), overheating may occur and...
Lcd Projector
Page 7
...suffocation if swallowed. Electric shocks can cause death by a qualified technician. zzBe especially careful not to disconnect the power plug from the projector. In addition, turn off the power and disconnect the power plug when you are correct when inserting the batteries. zzUse manganese batteries... measures if necessary. When not using tape or something similar before disposal. Important Information Precautions with regard to remodel or disassemble the projector. Doing so can result if this case, do not touch it can cause burns. zzStrong light is being used. Do not...
...suffocation if swallowed. Electric shocks can cause death by a qualified technician. zzBe especially careful not to disconnect the power plug from the projector. In addition, turn off the power and disconnect the power plug when you are correct when inserting the batteries. zzUse manganese batteries... measures if necessary. When not using tape or something similar before disposal. Important Information Precautions with regard to remodel or disassemble the projector. Doing so can result if this case, do not touch it can cause burns. zzStrong light is being used. Do not...
Lcd Projector
Page 8
... care in locations exposed to direct sunlight or near motors. Always disconnect all cables before adjusting the lens focus. 8 - Moving the projector with cables still attached can damage the cables, which are near highvoltage power lines or near stoves. Do not touch or bring your ...a car or a vessel, vibrations or impacts will result in damage to the internal parts, causing failure. zzDo not install the projector at elevations higher than the projector and its other components will be shortened. „„Be sure to ask a specialised technician when installing the product to a...
... care in locations exposed to direct sunlight or near motors. Always disconnect all cables before adjusting the lens focus. 8 - Moving the projector with cables still attached can damage the cables, which are near highvoltage power lines or near stoves. Do not touch or bring your ...a car or a vessel, vibrations or impacts will result in damage to the internal parts, causing failure. zzDo not install the projector at elevations higher than the projector and its other components will be shortened. „„Be sure to ask a specialised technician when installing the product to a...
Lcd Projector
Page 9
...this reason, take care not to clean the inside the lamp is released in advance. „„Connection to external device When connecting the projector to a computer or external device, use the power cord supplied with the corresponding device and a commercially available shielded interface cable. „&#...environment. Display the white screen test pattern for 10 hours will be magnified and projected onto the screen. „„Do not move the projector while it . Ask your local authorities or dealer and ask for long periods of smoke. ENGLISH - 9 Security „„Take safety ...
...this reason, take care not to clean the inside the lamp is released in advance. „„Connection to external device When connecting the projector to a computer or external device, use the power cord supplied with the corresponding device and a commercially available shielded interface cable. „&#...environment. Display the white screen test pattern for 10 hours will be magnified and projected onto the screen. „„Do not move the projector while it . Ask your local authorities or dealer and ask for long periods of smoke. ENGLISH - 9 Security „„Take safety ...

Lcd Projector
Page 10
...Service Center for enclosed products, such as a plug cover or foam cartons, must be treated properly. Remote control for PT-LB90NTU (×1) (N2QAYB000436) Remote control for PT-LB90U/LB78VU/ LB75VU (×1) (N2QAYB000262) Power cord (×1) (K2CG3DR00008) RGB signal cable (×1) 1.8 m (5'10... (TTRA0185) AA batteries for Remote control (×2) Carrying bag (×1) (TPEP021) CD-ROM (×1) (TXFQB02VKJ2) (PT-LB90NTU only) Note zzThe protectors for lost accessories. 10 - zzContact to safety Accessories Make sure the following accessories are provided with your projector.
...Service Center for enclosed products, such as a plug cover or foam cartons, must be treated properly. Remote control for PT-LB90NTU (×1) (N2QAYB000436) Remote control for PT-LB90U/LB78VU/ LB75VU (×1) (N2QAYB000262) Power cord (×1) (K2CG3DR00008) RGB signal cable (×1) 1.8 m (5'10... (TTRA0185) AA batteries for Remote control (×2) Carrying bag (×1) (TPEP021) CD-ROM (×1) (TXFQB02VKJ2) (PT-LB90NTU only) Note zzThe protectors for lost accessories. 10 - zzContact to safety Accessories Make sure the following accessories are provided with your projector.
Lcd Projector
Page 11
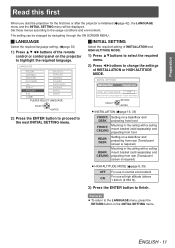
... FRONT/ CEILING Mounting in the ceiling with a ceiling mount bracket (sold separately) and projecting from front REAR/ DESK Setting on the projector to highlight the required language. Set those menus according to the usage conditions and environment. ENGLISH - 11 The setting can be displayed....navigating through the ON SCREEN MENU. Preparation Read this first Read this first When you start the projection for the first time or after the projector is required) zzHIGH ALTITUDE MODE (Æpage 8, 39) OFF For use in normal environment ON For use at high altitude (above 1...
... FRONT/ CEILING Mounting in the ceiling with a ceiling mount bracket (sold separately) and projecting from front REAR/ DESK Setting on the projector to highlight the required language. Set those menus according to the usage conditions and environment. ENGLISH - 11 The setting can be displayed....navigating through the ON SCREEN MENU. Preparation Read this first Read this first When you start the projection for the first time or after the projector is required) zzHIGH ALTITUDE MODE (Æpage 8, 39) OFF For use in normal environment ON For use at high altitude (above 1...
Lcd Projector
Page 12
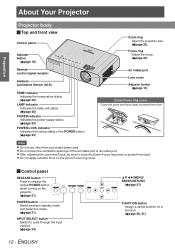
zzDo not apply extreme force on the RELEASE projector. (Æpage 21) POWER button Switch between standby mode and projection mode. (Æpage 21) INPUT SELECT button Switch to protect from dust. zzAfter adjusting ... sure to close the Zoom-Focus ring cover to cycle through the input method. (Æpage 24) INPUT SELECT FUNCTION MENU 12 - Preparation AAbbouotuYotuYr oPruojrecPtorrojector Projector body JJTop and front view Control panel Adjuster button (Æpage 16) Zoom ring Adjust the projection size. (Æpage 23) Focus ring Adjust the...
zzDo not apply extreme force on the RELEASE projector. (Æpage 21) POWER button Switch between standby mode and projection mode. (Æpage 21) INPUT SELECT button Switch to protect from dust. zzAfter adjusting ... sure to close the Zoom-Focus ring cover to cycle through the input method. (Æpage 24) INPUT SELECT FUNCTION MENU 12 - Preparation AAbbouotuYotuYr oPruojrecPtorrojector Projector body JJTop and front view Control panel Adjuster button (Æpage 16) Zoom ring Adjust the projection size. (Æpage 23) Focus ring Adjust the...
Lcd Projector
Page 13
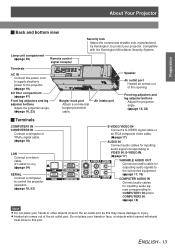
... IN COMPUTER2 IN Connect a computer or YPBPR signal cable. (Æpage 18) LAN Connect a network cable. (PT-LB90NTU only) (Æpage 54) SERIAL Connect a computer to control the projector operation. (Æpage 18, 53) S-VIDEO/VIDEO IN Connect a S-VIDEO signal cable or an RCA composite video...buttons Adjust the projection angle. (Æpage 16, 23) Burglar hook port Attach a commercial burglar prevention cable. Preparation About Your Projector JJBack and bottom view Security lock Attach the commercial shackle lock, manufactured by Kensington, to protect your hands or face, or ...
... IN COMPUTER2 IN Connect a computer or YPBPR signal cable. (Æpage 18) LAN Connect a network cable. (PT-LB90NTU only) (Æpage 54) SERIAL Connect a computer to control the projector operation. (Æpage 18, 53) S-VIDEO/VIDEO IN Connect a S-VIDEO signal cable or an RCA composite video...buttons Adjust the projection angle. (Æpage 16, 23) Burglar hook port Attach a commercial burglar prevention cable. Preparation About Your Projector JJBack and bottom view Security lock Attach the commercial shackle lock, manufactured by Kensington, to protect your hands or face, or ...

Lcd Projector
Page 14
... up the cover. Use only manganese batteries or alkaline batteries with liquids or moisture. Attaching a hand strap You can operate the projector with the remote control within the remote range of different types. zzDo not swing the strapped remote control. zzYou can attach a... old and new batteries or batteries of 15 m (49'2"), approximately ±30 ° vertically and horizontally. zzIf there are only for PT-LB90NTU. (See CD-ROM contents.) Turn off the projection temporarily. (Æpage 24) Display the frozen image while the display of subsequent images continues...
... up the cover. Use only manganese batteries or alkaline batteries with liquids or moisture. Attaching a hand strap You can operate the projector with the remote control within the remote range of different types. zzDo not swing the strapped remote control. zzYou can attach a... old and new batteries or batteries of 15 m (49'2"), approximately ±30 ° vertically and horizontally. zzIf there are only for PT-LB90NTU. (See CD-ROM contents.) Turn off the projection temporarily. (Æpage 24) Display the frozen image while the display of subsequent images continues...
Lcd Projector
Page 15
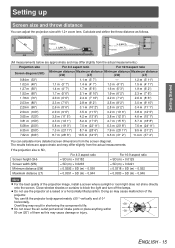
...0.046 Note zzFor the best quality of them as follows. Getting Started Setting up Setting up Screen size and throw distance You can tilt the projector body approximately ±30 ° vertically and ±10 ° horizontally. Projected image SH SH 88,6 mm SD Screen L (LW/LT...) SW SW L (LW/LT) Screen (All measurements below are approximate and may cause malfunction of the projector. zzDo not use the projector at a raised or a horizontally tilted position. Doing so may differ slightly from the actual measurements.) Projection size For 4:3 aspect ratio...
...0.046 Note zzFor the best quality of them as follows. Getting Started Setting up Setting up Screen size and throw distance You can tilt the projector body approximately ±30 ° vertically and ±10 ° horizontally. Projected image SH SH 88,6 mm SD Screen L (LW/LT...) SW SW L (LW/LT) Screen (All measurements below are approximate and may cause malfunction of the projector. zzDo not use the projector at a raised or a horizontally tilted position. Doing so may differ slightly from the actual measurements.) Projection size For 4:3 aspect ratio...
Lcd Projector
Page 16
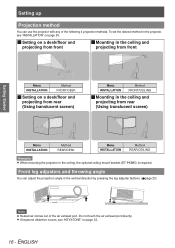
Do not touch the air exhaust port directly. Front leg adjusters and throwing angle You can use the projector with any of the air exhaust port. zzIf keystone distortion occurs, see "INSTALLATION" on page 32. 16 - ENGLISH JJSetting on a desk/floor and ... in the ceiling and projecting from rear (Using translucent screen) Menu INSTALLATION Method REAR/DESK Menu INSTALLATION Method REAR/CEILING Remarks zzWhen mounting the projector in the projector, see "KEYSTONE" on page 39. To set the desired method in the ceiling, the optional ceiling mount bracket (ET-PKB80) is required. ...
Do not touch the air exhaust port directly. Front leg adjusters and throwing angle You can use the projector with any of the air exhaust port. zzIf keystone distortion occurs, see "INSTALLATION" on page 32. 16 - ENGLISH JJSetting on a desk/floor and ... in the ceiling and projecting from rear (Using translucent screen) Menu INSTALLATION Method REAR/DESK Menu INSTALLATION Method REAR/CEILING Remarks zzWhen mounting the projector in the projector, see "KEYSTONE" on page 39. To set the desired method in the ceiling, the optional ceiling mount bracket (ET-PKB80) is required. ...

Lcd Projector
Page 17
... jitter, the projected image may have poor image quality and timebase correction is provided with the projector and each peripheral device terminal. zzVarious connecting cables are not provided with the projector and each peripheral device. Getting Started ENGLISH - 17 zzThe peripheral devices must be turned off.... the type of video signals, see "List of each peripheral device terminal. Connections Connections Before connecting to the projector zzRead and follow the operating instructions of compatible signals". (Æpage 52) Connecting example: AV equipment To S-VIDEO output...
... jitter, the projected image may have poor image quality and timebase correction is provided with the projector and each peripheral device terminal. zzVarious connecting cables are not provided with the projector and each peripheral device. Getting Started ENGLISH - 17 zzThe peripheral devices must be turned off.... the type of video signals, see "List of each peripheral device terminal. Connections Connections Before connecting to the projector zzRead and follow the operating instructions of compatible signals". (Æpage 52) Connecting example: AV equipment To S-VIDEO output...

Lcd Projector
Page 18
... Audio system Computer Computer (Controlling a projector) Computer Note zzWhen connecting the RGB signal cable, be sure to securely tighten the fixing screws on the D-Sub (15-pin) wall outlet. zzOne RGB cable is provided with the projector and each peripheral device terminals. 18 ...- Remarks zzFor the network connection between the projector and computers, see the CD-ROM contents provided . (PT-LB90NTU only) zzWhen you connect more than one computer, switch the ...
... Audio system Computer Computer (Controlling a projector) Computer Note zzWhen connecting the RGB signal cable, be sure to securely tighten the fixing screws on the D-Sub (15-pin) wall outlet. zzOne RGB cable is provided with the projector and each peripheral device terminals. 18 ...- Remarks zzFor the network connection between the projector and computers, see the CD-ROM contents provided . (PT-LB90NTU only) zzWhen you connect more than one computer, switch the ...
Lcd Projector
Page 19
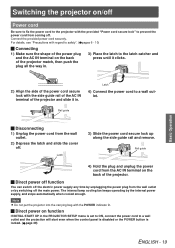
..., then push the plug all the way in. 3 ) Place the latch to the latch catcher and press until it in the PROJECTOR SETUP menu is set to ON, connect the power cord to a wall outlet and the projection will start even when the control panel is disabled ... regard to safety". (Æpages 6 - 10) JJConnecting 1 ) Make sure the shape of the power plug and the AC IN terminal on the back of the projector and slide it clicks. Rail guide JJDisconnecting 1 ) Unplug the power cord from coming off . The internal lamp cooling fan keeps operating by switching off the...
..., then push the plug all the way in. 3 ) Place the latch to the latch catcher and press until it in the PROJECTOR SETUP menu is set to ON, connect the power cord to a wall outlet and the projection will start even when the control panel is disabled ... regard to safety". (Æpages 6 - 10) JJConnecting 1 ) Make sure the shape of the power plug and the AC IN terminal on the back of the projector and slide it clicks. Rail guide JJDisconnecting 1 ) Unplug the power cord from coming off . The internal lamp cooling fan keeps operating by switching off the...
Lcd Projector
Page 20
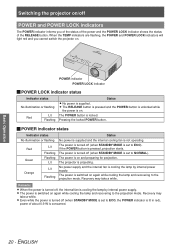
...supplied. zzThe RELEASE button is pressed and the POWER button is unlocked while the power is on and preparing for projection. The projector is not operating. Remarks zzWhen the power is turned off POWER and POWER LOCK indicators The POWER indicator informs you cannot switch the... projector on again while cooling the lamp and recovering to the projection mode. Switching the projector on/off , the internal fan is cooling the lamp by internal power supply. JJPOWER indicator ...
...supplied. zzThe RELEASE button is pressed and the POWER button is unlocked while the power is on and preparing for projection. The projector is not operating. Remarks zzWhen the power is turned off POWER and POWER LOCK indicators The POWER indicator informs you cannot switch the... projector on again while cooling the lamp and recovering to the projection mode. Switching the projector on/off , the internal fan is cooling the lamp by internal power supply. JJPOWER indicator ...
Lcd Projector
Page 21
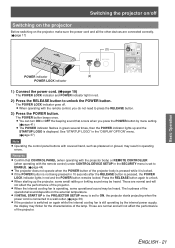
...button is pressed, the POWER LOCK indicator lights in red. 2222 Press the RELEASE button to unlock the POWER button. The loudness of the projector body is pressed while it is still operating by menu setting. (Æpage 41) zzThe POWER indicator flashes in operating errors. Basic Operation ...depends on again while the internal cooling fan is locked. Press the RELEASE button again to a wall outlet. (Æpage 39) zzIf the projector is switched on the external temperature. zzWhen starting up and the STARTUP LOGO is operating, some small rattling or tinkling sound may be heard....
...button is pressed, the POWER LOCK indicator lights in red. 2222 Press the RELEASE button to unlock the POWER button. The loudness of the projector body is pressed while it is still operating by menu setting. (Æpage 41) zzThe POWER indicator flashes in operating errors. Basic Operation ...depends on again while the internal cooling fan is locked. Press the RELEASE button again to a wall outlet. (Æpage 39) zzIf the projector is switched on the external temperature. zzWhen starting up and the STARTUP LOGO is operating, some small rattling or tinkling sound may be heard....


