

Lcd Projector
Page 5
...CHANGE 43 TEXT DISPLAY 43 TEXT CHANGE 43 MENU LOCK 44 MENU LOCK PASSWORD 44 CONTROL DEVICE SETUP 44 NETWORK menu (PT-LB90NTU only 45 Maintenance LAMP and TEMP Indicators 46 Managing the indicated problems 46 Care and Replacement 47 Before Care and Replacement 47...Appendix Technical Information 52 List of compatible signals 52 Serial terminal 53 LAN terminal 54 MENU LOCK PASSWORD 54 Specifications 55 Ceiling mount bracket safeguards......... 57 Dimensions 58 Trademark acknowledgements 58 Index 59 Informations importantes Avis important concernant la sécurité... 60 Pr...
...CHANGE 43 TEXT DISPLAY 43 TEXT CHANGE 43 MENU LOCK 44 MENU LOCK PASSWORD 44 CONTROL DEVICE SETUP 44 NETWORK menu (PT-LB90NTU only 45 Maintenance LAMP and TEMP Indicators 46 Managing the indicated problems 46 Care and Replacement 47 Before Care and Replacement 47...Appendix Technical Information 52 List of compatible signals 52 Serial terminal 53 LAN terminal 54 MENU LOCK PASSWORD 54 Specifications 55 Ceiling mount bracket safeguards......... 57 Dimensions 58 Trademark acknowledgements 58 Index 59 Informations importantes Avis important concernant la sécurité... 60 Pr...

Lcd Projector
Page 6
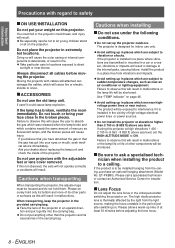
... 6 - Doing so will result. Do not place your hands or face, or objects which can cause injury or accidents, such as ceiling mount brackets) may cause the projector which could be drawn into the wall outlet. Do not place your hands or other objects. Please contact an ...technician. zzDo not use plugs which are coming loose from the projector, cut off the power supply. ing mount bracket. zzDo not place the projector in a place which are damaged or wall outlets which is mounted on top of the air outlet port. zzHeated air comes out of the projector.
... 6 - Doing so will result. Do not place your hands or face, or objects which can cause injury or accidents, such as ceiling mount brackets) may cause the projector which could be drawn into the wall outlet. Do not place your hands or other objects. Please contact an ...technician. zzDo not use plugs which are coming loose from the projector, cut off the power supply. ing mount bracket. zzDo not place the projector in a place which are damaged or wall outlets which is mounted on top of the air outlet port. zzHeated air comes out of the projector.
Lcd Projector
Page 8
... will cause the user to observe this projector. Failure to absorb the gas which was released when the lamp broke and which are transmitted or mounted in a car or a vessel, vibrations or impacts will result. Please call a specialised technician or contact an Authorized Service Center for indoor use the old lamp...
... will cause the user to observe this projector. Failure to absorb the gas which was released when the lamp broke and which are transmitted or mounted in a car or a vessel, vibrations or impacts will result. Please call a specialised technician or contact an Authorized Service Center for indoor use the old lamp...
Lcd Projector
Page 11
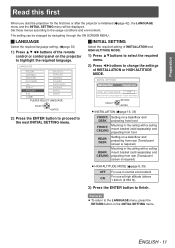
...ENTER zzINSTALLATION (Æpage 16, 39) FRONT/ Setting on a desk/floor and DESK projecting from front FRONT/ CEILING Mounting in the ceiling with a ceiling mount bracket (sold separately) and projecting from front REAR/ DESK Setting on the projector to the LANGUAGE menu, press the ... the remote control or control panel on a desk/floor and projecting from rear (Translucent screen is required) REAR/ CEILING Mounting in the ceiling with a ceiling mount bracket (sold separately) and projecting from rear (Translucent screen is required) zzHIGH ALTITUDE MODE (Æpage 8, 39) OFF...
...ENTER zzINSTALLATION (Æpage 16, 39) FRONT/ Setting on a desk/floor and DESK projecting from front FRONT/ CEILING Mounting in the ceiling with a ceiling mount bracket (sold separately) and projecting from front REAR/ DESK Setting on the projector to the LANGUAGE menu, press the ... the remote control or control panel on a desk/floor and projecting from rear (Translucent screen is required) REAR/ CEILING Mounting in the ceiling with a ceiling mount bracket (sold separately) and projecting from rear (Translucent screen is required) zzHIGH ALTITUDE MODE (Æpage 8, 39) OFF...
Lcd Projector
Page 16
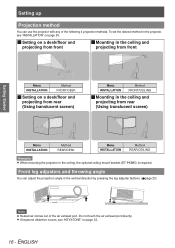
... the ceiling and projecting from rear (Using translucent screen) Menu INSTALLATION Method REAR/DESK Menu INSTALLATION Method REAR/CEILING Remarks zzWhen mounting the projector in the ceiling, the optional ceiling mount bracket (ET-PKB80) is required. ENGLISH Front leg adjusters and throwing angle You can use the projector with any of the...
... the ceiling and projecting from rear (Using translucent screen) Menu INSTALLATION Method REAR/DESK Menu INSTALLATION Method REAR/CEILING Remarks zzWhen mounting the projector in the ceiling, the optional ceiling mount bracket (ET-PKB80) is required. ENGLISH Front leg adjusters and throwing angle You can use the projector with any of the...
Lcd Projector
Page 39
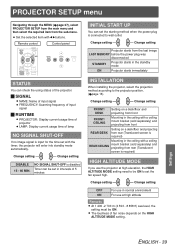
...setting FRONT/ DESK Setting on the HIGH ALTITUDE MODE setting. Change setting Change setting Projector starts from rear (Translucent screen is required) Mounting in intervals of lamp NO SIGNAL SHUT-OFF If no image signal is input for the time set the starting method when the power ...START UP You can check the using status of fan noise depends on a desk/floor and projecting from front FRONT/ CEILING Mounting in the ceiling with a ceiling mount bracket (sold separately) and projecting from the sub-menu. zzThe loudness of the projector. zzSet the selected item with a ...
...setting FRONT/ DESK Setting on the HIGH ALTITUDE MODE setting. Change setting Change setting Projector starts from rear (Translucent screen is required) Mounting in intervals of lamp NO SIGNAL SHUT-OFF If no image signal is input for the time set the starting method when the power ...START UP You can check the using status of fan noise depends on a desk/floor and projecting from front FRONT/ CEILING Mounting in the ceiling with a ceiling mount bracket (sold separately) and projecting from the sub-menu. zzThe loudness of the projector. zzSet the selected item with a ...
Lcd Projector
Page 48
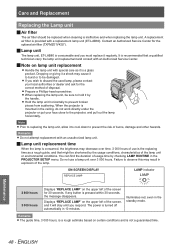
... until you must replace it regularly. zzHold the lamp unit horizontally to prevent the risk of the screen for 30 seconds. If any button is mounted in 10 minutes. Maintenance 48 - When the projector is pressed within 30 seconds, the message disappears. JJLamp unit replacement time When the lamp is a glass...
... until you must replace it regularly. zzHold the lamp unit horizontally to prevent the risk of the screen for 30 seconds. If any button is mounted in 10 minutes. Maintenance 48 - When the projector is pressed within 30 seconds, the message disappears. JJLamp unit replacement time When the lamp is a glass...
Lcd Projector
Page 49
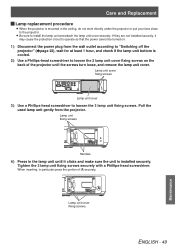
... the wall outlet according to "Switching off the projector" (Æpage 22), wait for at least 1 hour, and check if the lamp unit bottom is mounted in the lamp unit until the screws turn loose, and remove the lamp unit cover. Tighten the 3 lamp unit fixing screws securely with a Phillips-head...
... the wall outlet according to "Switching off the projector" (Æpage 22), wait for at least 1 hour, and check if the lamp unit bottom is mounted in the lamp unit until the screws turn loose, and remove the lamp unit cover. Tighten the 3 lamp unit fixing screws securely with a Phillips-head...
Lcd Projector
Page 57
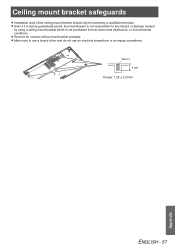
M4×0.7 9 mm Torque: 1.25 ± 0.2 N·m ENGLISH - 57 Appendix zzRemove an unused ceiling mount bracket promptly. zzMake sure to use a torque driver and do not use an electrical screwdriver or an impact screwdriver. zzEven if it is during guaranteed period, the manufacturer is not responsible for any hazard or damage caused by a qualified technician. Ceiling mount bracket safeguards zzInstallation work of the ceiling mount bracket should only be carried by using a ceiling mount bracket which is not purchased from an authorized distributors, or environmental conditions.
M4×0.7 9 mm Torque: 1.25 ± 0.2 N·m ENGLISH - 57 Appendix zzRemove an unused ceiling mount bracket promptly. zzMake sure to use a torque driver and do not use an electrical screwdriver or an impact screwdriver. zzEven if it is during guaranteed period, the manufacturer is not responsible for any hazard or damage caused by a qualified technician. Ceiling mount bracket safeguards zzInstallation work of the ceiling mount bracket should only be carried by using a ceiling mount bracket which is not purchased from an authorized distributors, or environmental conditions.
