
Lcd Projector
Page 5
... 43 TEXT DISPLAY 43 TEXT CHANGE 43 MENU LOCK 44 MENU LOCK PASSWORD 44 CONTROL DEVICE SETUP 44 NETWORK menu (PT-LB90NTU only 45 Maintenance LAMP and TEMP Indicators 46 Managing the indicated problems 46 Care and Replacement 47 Before Care and Replacement...51 Appendix Technical Information 52 List of compatible signals 52 Serial terminal 53 LAN terminal 54 MENU LOCK PASSWORD 54 Specifications 55 Ceiling mount bracket safeguards......... 57 Dimensions 58 Trademark acknowledgements 58 Index 59 Informations importantes Avis important concernant la sécurité... 60 Pr&#...
... 43 TEXT DISPLAY 43 TEXT CHANGE 43 MENU LOCK 44 MENU LOCK PASSWORD 44 CONTROL DEVICE SETUP 44 NETWORK menu (PT-LB90NTU only 45 Maintenance LAMP and TEMP Indicators 46 Managing the indicated problems 46 Care and Replacement 47 Before Care and Replacement...51 Appendix Technical Information 52 List of compatible signals 52 Serial terminal 53 LAN terminal 54 MENU LOCK PASSWORD 54 Specifications 55 Ceiling mount bracket safeguards......... 57 Dimensions 58 Trademark acknowledgements 58 Index 59 Informations importantes Avis important concernant la sécurité... 60 Pr&#...

Lcd Projector
Page 6
... securely into a bundle. zzIf dust builds up the projector in humid or dusty places or in narrow, badly venti- Components deterioration (such as ceiling mount brackets) may cause the projector which is used while damaged, electric shocks, short-circuits or fire will result. Failure to observe this will cause the ... it , place heavy objects on top of it or wrap it with wet hands. Installation work (such as carpets or sponge mats. ing mount bracket. zzHeated air comes out of time, pull the power plug out from the wall outlet and wipe it into the wall outlet. zzIf the ...
... securely into a bundle. zzIf dust builds up the projector in humid or dusty places or in narrow, badly venti- Components deterioration (such as ceiling mount brackets) may cause the projector which is used while damaged, electric shocks, short-circuits or fire will result. Failure to observe this will cause the ... it , place heavy objects on top of it or wrap it with wet hands. Installation work (such as carpets or sponge mats. ing mount bracket. zzHeated air comes out of time, pull the power plug out from the wall outlet and wipe it into the wall outlet. zzIf the ...
Lcd Projector
Page 11
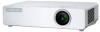
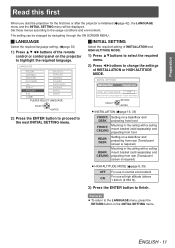
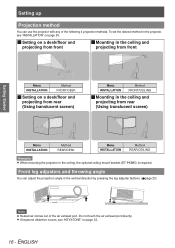
...of the remote control or control panel on a desk/floor and projecting from rear (Translucent screen is required) REAR/ CEILING Mounting in the ceiling with a ceiling mount bracket (sold separately) and projecting from rear (Translucent screen is initialised (Æpage 42), the LANGUAGE menu and the ... (Æpage 16, 39) FRONT/ Setting on a desk/floor and DESK projecting from front FRONT/ CEILING Mounting in the ceiling with a ceiling mount bracket (sold separately) and projecting from front REAR/ DESK Setting on the projector to finish. The setting can be displayed.
...of the remote control or control panel on a desk/floor and projecting from rear (Translucent screen is required) REAR/ CEILING Mounting in the ceiling with a ceiling mount bracket (sold separately) and projecting from rear (Translucent screen is initialised (Æpage 42), the LANGUAGE menu and the ... (Æpage 16, 39) FRONT/ Setting on a desk/floor and DESK projecting from front FRONT/ CEILING Mounting in the ceiling with a ceiling mount bracket (sold separately) and projecting from front REAR/ DESK Setting on the projector to finish. The setting can be displayed.
Lcd Projector
Page 16
...a desk/floor and projecting from rear (Using translucent screen) Menu INSTALLATION Method FRONT/CEILING JJMounting in the ceiling and projecting from rear (Using translucent screen) Menu INSTALLATION Method REAR/DESK Menu INSTALLATION Method REAR/CEILING Remarks zzWhen mounting the projector in the vertical direction by pressing the leg adjuster buttons. (Æpage... the desired method in the projector, see "KEYSTONE" on page 39. Setting up Projection method You can adjust the projection angle in the ceiling, the optional ceiling mount bracket (ET-PKB80) is required.
...a desk/floor and projecting from rear (Using translucent screen) Menu INSTALLATION Method FRONT/CEILING JJMounting in the ceiling and projecting from rear (Using translucent screen) Menu INSTALLATION Method REAR/DESK Menu INSTALLATION Method REAR/CEILING Remarks zzWhen mounting the projector in the vertical direction by pressing the leg adjuster buttons. (Æpage... the desired method in the projector, see "KEYSTONE" on page 39. Setting up Projection method You can adjust the projection angle in the ceiling, the optional ceiling mount bracket (ET-PKB80) is required.
Lcd Projector
Page 39
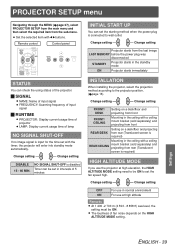
...(Æpage 16) Change setting Change setting FRONT/ DESK Setting on a desk/floor and projecting from front FRONT/ CEILING Mounting in the ceiling with a ceiling mount bracket (sold separately) and projecting from front Setting on the HIGH ALTITUDE MODE setting. zzSet the selected item with the ... of fan noise depends on a desk/floor and projecting REAR/DESK from rear (Translucent screen is required) Mounting in the ceiling with a ceiling REAR/CEILING mount bracket (sold separately) and projecting from rear (Translucent screen is required) HIGH ALTITUDE MODE If you use at high...
...(Æpage 16) Change setting Change setting FRONT/ DESK Setting on a desk/floor and projecting from front FRONT/ CEILING Mounting in the ceiling with a ceiling mount bracket (sold separately) and projecting from front Setting on the HIGH ALTITUDE MODE setting. zzSet the selected item with the ... of fan noise depends on a desk/floor and projecting REAR/DESK from rear (Translucent screen is required) Mounting in the ceiling with a ceiling REAR/CEILING mount bracket (sold separately) and projecting from rear (Translucent screen is required) HIGH ALTITUDE MODE If you use at high...
Lcd Projector
Page 57
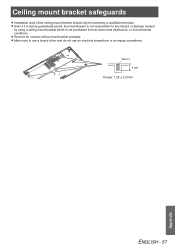
zzRemove an unused ceiling mount bracket promptly. zzEven if it is during guaranteed period, the manufacturer is not responsible for any hazard or damage caused by a qualified technician. Ceiling mount bracket safeguards zzInstallation work of the ceiling mount bracket should only be carried by using a ceiling mount bracket which is not purchased from an authorized distributors, or environmental conditions. M4×0.7 9 mm Torque: 1.25 ± 0.2 N·m ENGLISH - 57 Appendix zzMake sure to use a torque driver and do not use an electrical screwdriver or an impact screwdriver.
zzRemove an unused ceiling mount bracket promptly. zzEven if it is during guaranteed period, the manufacturer is not responsible for any hazard or damage caused by a qualified technician. Ceiling mount bracket safeguards zzInstallation work of the ceiling mount bracket should only be carried by using a ceiling mount bracket which is not purchased from an authorized distributors, or environmental conditions. M4×0.7 9 mm Torque: 1.25 ± 0.2 N·m ENGLISH - 57 Appendix zzMake sure to use a torque driver and do not use an electrical screwdriver or an impact screwdriver.
