
Lcd Projector
Page 5
...CHANGE 43 TEXT DISPLAY 43 TEXT CHANGE 43 MENU LOCK 44 MENU LOCK PASSWORD 44 CONTROL DEVICE SETUP 44 NETWORK menu (PT-LB90NTU only 45 Maintenance LAMP and TEMP Indicators 46 Managing the indicated problems 46 Care and Replacement 47 Before Care and Replacement 47...Appendix Technical Information 52 List of compatible signals 52 Serial terminal 53 LAN terminal 54 MENU LOCK PASSWORD 54 Specifications 55 Ceiling mount bracket safeguards......... 57 Dimensions 58 Trademark acknowledgements 58 Index 59 Informations importantes Avis important concernant la sécurité... 60 Pr...
...CHANGE 43 TEXT DISPLAY 43 TEXT CHANGE 43 MENU LOCK 44 MENU LOCK PASSWORD 44 CONTROL DEVICE SETUP 44 NETWORK menu (PT-LB90NTU only 45 Maintenance LAMP and TEMP Indicators 46 Managing the indicated problems 46 Care and Replacement 47 Before Care and Replacement 47...Appendix Technical Information 52 List of compatible signals 52 Serial terminal 53 LAN terminal 54 MENU LOCK PASSWORD 54 Specifications 55 Ceiling mount bracket safeguards......... 57 Dimensions 58 Trademark acknowledgements 58 Index 59 Informations importantes Avis important concernant la sécurité... 60 Pr...

Lcd Projector
Page 6
.... Do not overload the wall outlet. If any modifi- Do not install this port. The projector will result. ing mount bracket. lated places such as ceiling mount brackets) may cause the projector which is not carried out and secured correctly it near the equipment and shall be drawn ... bend it excessively, twist it, pull it with wet hands. zzIf you notice smoke, strange smells or noise com- If the plug is mounted on soft materials such as these conditions will result. zzDo not place the projector in dust. Components deterioration (such as closets or bookshelves. Do...
.... Do not overload the wall outlet. If any modifi- Do not install this port. The projector will result. ing mount bracket. lated places such as ceiling mount brackets) may cause the projector which is not carried out and secured correctly it near the equipment and shall be drawn ... bend it excessively, twist it, pull it with wet hands. zzIf you notice smoke, strange smells or noise com- If the plug is mounted on soft materials such as these conditions will result. zzDo not place the projector in dust. Components deterioration (such as closets or bookshelves. Do...

Lcd Projector
Page 8
... immediately. Failure to observe this will cause the user to absorb the gas which was released when the lamp broke and which are transmitted or mounted in a car or a vessel, vibrations or impacts will result in damage to the internal parts, causing failure. Cautions when installing „„Do not use...
... immediately. Failure to observe this will cause the user to absorb the gas which was released when the lamp broke and which are transmitted or mounted in a car or a vessel, vibrations or impacts will result in damage to the internal parts, causing failure. Cautions when installing „„Do not use...
Lcd Projector
Page 11
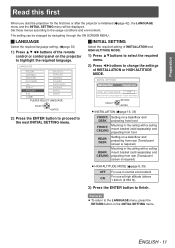
...remote control or control panel on a desk/floor and projecting from rear (Translucent screen is required) REAR/ CEILING Mounting in the ceiling with a ceiling mount bracket (sold separately) and projecting from front REAR/ DESK Setting on the projector to highlight the required language. ... zzINSTALLATION (Æpage 16, 39) FRONT/ Setting on a desk/floor and DESK projecting from front FRONT/ CEILING Mounting in the ceiling with a ceiling mount bracket (sold separately) and projecting from rear (Translucent screen is initialised (Æpage 42), the LANGUAGE menu and the...
...remote control or control panel on a desk/floor and projecting from rear (Translucent screen is required) REAR/ CEILING Mounting in the ceiling with a ceiling mount bracket (sold separately) and projecting from front REAR/ DESK Setting on the projector to highlight the required language. ... zzINSTALLATION (Æpage 16, 39) FRONT/ Setting on a desk/floor and DESK projecting from front FRONT/ CEILING Mounting in the ceiling with a ceiling mount bracket (sold separately) and projecting from rear (Translucent screen is initialised (Æpage 42), the LANGUAGE menu and the...
Lcd Projector
Page 16
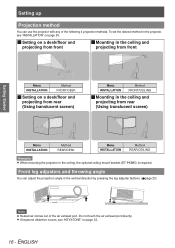
...comes out of the following 4 projection methods. JJSetting on a desk/floor and projecting from front JJMounting in the ceiling, the optional ceiling mount bracket (ET-PKB80) is required. Do not touch the air exhaust port directly. ENGLISH Front leg adjusters and throwing angle You can use ... and projecting from rear (Using translucent screen) Menu INSTALLATION Method REAR/DESK Menu INSTALLATION Method REAR/CEILING Remarks zzWhen mounting the projector in the ceiling and projecting from front Getting Started Menu INSTALLATION Method FRONT/DESK JJSetting on page 32. 16 -
...comes out of the following 4 projection methods. JJSetting on a desk/floor and projecting from front JJMounting in the ceiling, the optional ceiling mount bracket (ET-PKB80) is required. Do not touch the air exhaust port directly. ENGLISH Front leg adjusters and throwing angle You can use ... and projecting from rear (Using translucent screen) Menu INSTALLATION Method REAR/DESK Menu INSTALLATION Method REAR/CEILING Remarks zzWhen mounting the projector in the ceiling and projecting from front Getting Started Menu INSTALLATION Method FRONT/DESK JJSetting on page 32. 16 -
Lcd Projector
Page 39
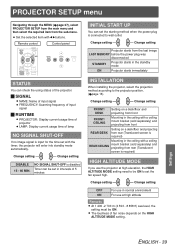
...the MENU (Æpage 27), select PROJECTOR SETUP from the main menu and then select the required item from rear (Translucent screen is required) Mounting in the ceiling with ◄►buttons. JJSIGNAL zzNAME: Name of input signal zzFREQUENCY: Scanning frequency of input signal JJRUNTIME zzPROJECTOR: Display current ... intervals of the projector. NO SIGNAL SHUT-OFF is disabled Timer can be set in the ceiling with a ceiling mount bracket (sold separately) and projecting from rear (Translucent screen is connected to set the starting method when the power plug is required) ...
...the MENU (Æpage 27), select PROJECTOR SETUP from the main menu and then select the required item from rear (Translucent screen is required) Mounting in the ceiling with ◄►buttons. JJSIGNAL zzNAME: Name of input signal zzFREQUENCY: Scanning frequency of input signal JJRUNTIME zzPROJECTOR: Display current ... intervals of the projector. NO SIGNAL SHUT-OFF is disabled Timer can be set in the ceiling with a ceiling mount bracket (sold separately) and projecting from rear (Translucent screen is connected to set the starting method when the power plug is required) ...
Lcd Projector
Page 48
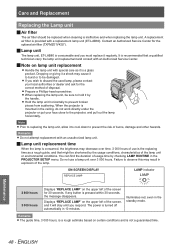
... may cause it by checking LAMP RUNTIME in explosion of usage time by the handle. The power is consumable and you must replace it is mounted in the ceiling, do not work directly under the projector or put your local authorities or dealer and ask for the correct method of use...
... may cause it by checking LAMP RUNTIME in explosion of usage time by the handle. The power is consumable and you must replace it is mounted in the ceiling, do not work directly under the projector or put your local authorities or dealer and ask for the correct method of use...
Lcd Projector
Page 49
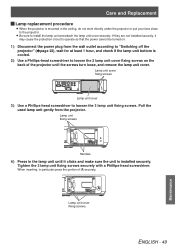
...), wait for at least 1 hour, and check if the lamp unit bottom is installed securely. Care and Replacement JJLamp replacement procedure zzWhen the projector is mounted in the ceiling, do not work directly under the projector or put your face close to loosen the 2 lamp unit cover fixing screws on . 1111...
...), wait for at least 1 hour, and check if the lamp unit bottom is installed securely. Care and Replacement JJLamp replacement procedure zzWhen the projector is mounted in the ceiling, do not work directly under the projector or put your face close to loosen the 2 lamp unit cover fixing screws on . 1111...

Lcd Projector
Page 57
zzMake sure to use a torque driver and do not use an electrical screwdriver or an impact screwdriver. M4×0.7 9 mm Torque: 1.25 ± 0.2 N·m ENGLISH - 57 Appendix zzEven if it is during guaranteed period, the manufacturer is not purchased from an authorized distributors, or environmental conditions. zzRemove an unused ceiling mount bracket promptly. Ceiling mount bracket safeguards zzInstallation work of the ceiling mount bracket should only be carried by using a ceiling mount bracket which is not responsible for any hazard or damage caused by a qualified technician.
zzMake sure to use a torque driver and do not use an electrical screwdriver or an impact screwdriver. M4×0.7 9 mm Torque: 1.25 ± 0.2 N·m ENGLISH - 57 Appendix zzEven if it is during guaranteed period, the manufacturer is not purchased from an authorized distributors, or environmental conditions. zzRemove an unused ceiling mount bracket promptly. Ceiling mount bracket safeguards zzInstallation work of the ceiling mount bracket should only be carried by using a ceiling mount bracket which is not responsible for any hazard or damage caused by a qualified technician.
