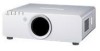
Operating Instructions
Page 5
...aspect ratio 22 Displaying the internal test pattern 22 Using an assigned function 23 Displaying the status of compatible signals 34 Specifications 36 Dimensions 38 Trademark acknowledgements 38 Index 39 Avis important concernant la sécurit 41 Précautions de sé...method 16 Removing and attaching the projection lens 17 Power cord 18 Basic Operation 2. Important Information Important Safety Notice 2 Precautions with the projector. 3. Connect with other devices See the functional instructions in the CD-ROM that is provided with regard to safety 6 WARNINGS 6 ...
...aspect ratio 22 Displaying the internal test pattern 22 Using an assigned function 23 Displaying the status of compatible signals 34 Specifications 36 Dimensions 38 Trademark acknowledgements 38 Index 39 Avis important concernant la sécurit 41 Précautions de sé...method 16 Removing and attaching the projection lens 17 Power cord 18 Basic Operation 2. Important Information Important Safety Notice 2 Precautions with the projector. 3. Connect with other devices See the functional instructions in the CD-ROM that is provided with regard to safety 6 WARNINGS 6 ...
Operating Instructions
Page 21
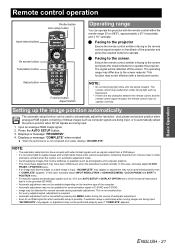
... "COMPLETE" when ended. In this case, manually adjust INPUT RESOLUTION in ADVANCED MENU, CLOCK PHASE and SHIFT in POSITION menu. • For specific signals and landscape signals such as 16:9, see AUTO SETUP in DISPLAY OPTION menu of bitmap images such as photographs and computer graphics. • ... available for synchronisation signal of C-SYNC and G-SYNC. • Image may be distorted for several seconds during the course of the projector and press the required buttons to automatically adjust the picture position when DVI-D signals are any obstacles between the remote control and the...
... "COMPLETE" when ended. In this case, manually adjust INPUT RESOLUTION in ADVANCED MENU, CLOCK PHASE and SHIFT in POSITION menu. • For specific signals and landscape signals such as 16:9, see AUTO SETUP in DISPLAY OPTION menu of bitmap images such as photographs and computer graphics. • ... available for synchronisation signal of C-SYNC and G-SYNC. • Image may be distorted for several seconds during the course of the projector and press the required buttons to automatically adjust the picture position when DVI-D signals are any obstacles between the remote control and the...
Operating Instructions
Page 36
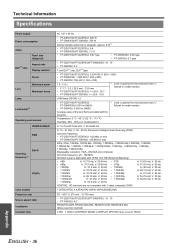
..." (1 270 mm - 12 700 mm) • PT-DZ6710U/PT-DZ6700U/PT-DW6300U: 16 : 10 • PT-D6000U: 4:3 FRONT/FLOOR, FRONT/CEILING, REAR/FLOOR, REAR/CEILING (Menu selection method) 2 000 : 1 (When CONTRAST MODE in DISPLAY OPTION menu is provided with the projector. Technical Information Specifications Power supply Power consumption Amps DLP™ chip Panel size (diagonal) Aspect ratio...
..." (1 270 mm - 12 700 mm) • PT-DZ6710U/PT-DZ6700U/PT-DW6300U: 16 : 10 • PT-D6000U: 4:3 FRONT/FLOOR, FRONT/CEILING, REAR/FLOOR, REAR/CEILING (Menu selection method) 2 000 : 1 (When CONTRAST MODE in DISPLAY OPTION menu is provided with the projector. Technical Information Specifications Power supply Power consumption Amps DLP™ chip Panel size (diagonal) Aspect ratio...