

User Manual
Page 1
TQBJ0219 PT-D5700UL PT-DW5100U PT-DW5100UL Read these instructions completely before operating this unit. Operating Instructions DLP® Based Projector Commercial Use PT-D5700U Model No.
TQBJ0219 PT-D5700UL PT-DW5100U PT-DW5100UL Read these instructions completely before operating this unit. Operating Instructions DLP® Based Projector Commercial Use PT-D5700U Model No.
User Manual
Page 2
The lightning flash with a three-pin grounding-type power plug. This plug will be pleased with your Panasonic DLP® based projector. Do not remove 2 WARNUNG- WARNING RISK OF ELECTRIC SHOCK. CAUTION: This equipment is equipped with arrowhead symbol, within an... out of the grounding plug. Model number: PT-D5700U/PT-D5700UL/PT-DW5100U/PT-DW5100UL Serial number: IMPORTANT SAFETY NOTICE WARNING: TO REDUCE THE RISK OF FIRE OR ELECTRIC SHOCK, DO NOT EXPOSE THIS PRODUCT TO RAIN OR MOISTURE. Dear Panasonic Customer: This instruction booklet provides all the necessary...
The lightning flash with a three-pin grounding-type power plug. This plug will be pleased with your Panasonic DLP® based projector. Do not remove 2 WARNUNG- WARNING RISK OF ELECTRIC SHOCK. CAUTION: This equipment is equipped with arrowhead symbol, within an... out of the grounding plug. Model number: PT-D5700U/PT-D5700UL/PT-DW5100U/PT-DW5100UL Serial number: IMPORTANT SAFETY NOTICE WARNING: TO REDUCE THE RISK OF FIRE OR ELECTRIC SHOCK, DO NOT EXPOSE THIS PRODUCT TO RAIN OR MOISTURE. Dear Panasonic Customer: This instruction booklet provides all the necessary...
User Manual
Page 4
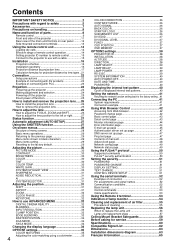
... lens......26 How to install the projection lens 26 How to remove the projection lens 26 How to adjust the lens 26 How to adjust the FOCUS, ZOOM and SHIFT 26 How to adjust the lens...CINEMA REALITY 32 BLANKING 32 INPUT RESOLUTION 33 CLAMP POSITION 33 EDGE BLENDING 33 RASTER POSITION 34 XGA MODE 34 SXGA MODE 34 Changing the display language 34 OPTION1 settings 35 COLOR MATCHING 35 ...37 OSD POSITION 37 OSD MEMORY 37 OPTION2 settings 38 PROJECTOR ID 38 INSTALLATION 38 ALTITUDE 38 DIRECTION 38 LAMP SELECT 39 LAMP RELAY 39 LAMP POWER 39 RS-232C 39 SYSTEM INFORMATION 40 AUTO ...
... lens......26 How to install the projection lens 26 How to remove the projection lens 26 How to adjust the lens 26 How to adjust the FOCUS, ZOOM and SHIFT 26 How to adjust the lens...CINEMA REALITY 32 BLANKING 32 INPUT RESOLUTION 33 CLAMP POSITION 33 EDGE BLENDING 33 RASTER POSITION 34 XGA MODE 34 SXGA MODE 34 Changing the display language 34 OPTION1 settings 35 COLOR MATCHING 35 ...37 OSD POSITION 37 OSD MEMORY 37 OPTION2 settings 38 PROJECTOR ID 38 INSTALLATION 38 ALTITUDE 38 DIRECTION 38 LAMP SELECT 39 LAMP RELAY 39 LAMP POWER 39 RS-232C 39 SYSTEM INFORMATION 40 AUTO ...

User Manual
Page 5
...Use the provided safety wire cable and take the full weight of the projector or on top of time, pull the power cord plug out from the projector's lens. Do not install this projector in a place which is unstable. • If the projector is overloaded (for example, by a qualified technician. • If...directly into this light, it can hurt and damage your eyes. • Be especially careful not to let young children look into the lens while the projector is being used while damaged, electric shocks, short-circuits or fire may result. • Ask an Authorized Service Center to carry out...
...Use the provided safety wire cable and take the full weight of the projector or on top of time, pull the power cord plug out from the projector's lens. Do not install this projector in a place which is unstable. • If the projector is overloaded (for example, by a qualified technician. • If...directly into this light, it can hurt and damage your eyes. • Be especially careful not to let young children look into the lens while the projector is being used while damaged, electric shocks, short-circuits or fire may result. • Ask an Authorized Service Center to carry out...
User Manual
Page 6
... sight. Do not connect the + and - If the battery fluid leaks, do not touch it can cause burns, fire or damage to the projector. When replacing the lamp, allow at least 50 cm (19.7") of batteries. - Precautions with regard to safety Do not set up the...medical advice immediately. Do not use rechargeable batteries in the ceiling. Before replacing the lamp, be sure to disconnect the power cord plug from the remote control at least one hour before moving the projector. • Moving the projector with bare hands, and take the following measures if necessary. • Battery ...
... sight. Do not connect the + and - If the battery fluid leaks, do not touch it can cause burns, fire or damage to the projector. When replacing the lamp, allow at least 50 cm (19.7") of batteries. - Precautions with regard to safety Do not set up the...medical advice immediately. Do not use rechargeable batteries in the ceiling. Before replacing the lamp, be sure to disconnect the power cord plug from the remote control at least one hour before moving the projector. • Moving the projector with bare hands, and take the following measures if necessary. • Battery ...
User Manual
Page 7
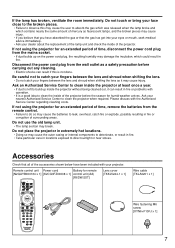
... Wire fastening M6 screw [XYN6+F10FJ x 1] 7 Be careful not to catch your fingers between the lens and shroud when shifting the lens as it can result if this may cause the user to clean the inside the projector without being cleaned out, it may cause the outer casing or internal components to deteriorate... or bring your face close to the broken pieces. • Failure to observe this is left to clean the projector when required. Do not use the old lamp unit. • The lamp section may cause injury. • If you believe that the gas has got into your eyes or mouth, seek...
... Wire fastening M6 screw [XYN6+F10FJ x 1] 7 Be careful not to catch your fingers between the lens and shroud when shifting the lens as it can result if this may cause the user to clean the inside the projector without being cleaned out, it may cause the outer casing or internal components to deteriorate... or bring your face close to the broken pieces. • Failure to observe this is left to clean the projector when required. Do not use the old lamp unit. • The lamp section may cause injury. • If you believe that the gas has got into your eyes or mouth, seek...
User Manual
Page 8
...of its life cycle by its instructions. Otherwise the life of the projection lens with bare hand. The high clarity projector lens is operating or subject it will be shortened. Lamp deterioration due to vibration and impacts. If stains are magnified and projected on .... Precautions on a vinyl sheet or carpet. Lamp A mercury lamp with the supplied lens cap when the projector is used beyond the replacement time. • Lamp deterioration accelerates when used continuously for installation. If dust adheres to the lens, it to damage the internal parts, causing ...
...of its life cycle by its instructions. Otherwise the life of the projection lens with bare hand. The high clarity projector lens is operating or subject it will be shortened. Lamp deterioration due to vibration and impacts. If stains are magnified and projected on .... Precautions on a vinyl sheet or carpet. Lamp A mercury lamp with the supplied lens cap when the projector is used beyond the replacement time. • Lamp deterioration accelerates when used continuously for installation. If dust adheres to the lens, it to damage the internal parts, causing ...
User Manual
Page 9
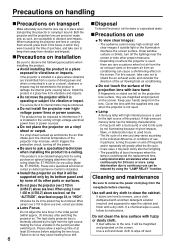
... ( ) button (page 25) Switched the power to the "standby" mode if the MAIN POWER has been put to send information about the projector's status via E-mail. It can also be used . ENTER button (page 29) Press this button while projecting an image automatically corrects the picture...(page 27) Pressing this button to enter your menu selection or to display projector information. While the auto setup feature is pressed. Name and function of parts Remote control Remote control operation indicator lamp The lamp flashes when any remote control button is active, a message "AUTO SETUP" ...
... ( ) button (page 25) Switched the power to the "standby" mode if the MAIN POWER has been put to send information about the projector's status via E-mail. It can also be used . ENTER button (page 29) Press this button while projecting an image automatically corrects the picture...(page 27) Pressing this button to enter your menu selection or to display projector information. While the auto setup feature is pressed. Name and function of parts Remote control Remote control operation indicator lamp The lamp flashes when any remote control button is active, a message "AUTO SETUP" ...
User Manual
Page 11
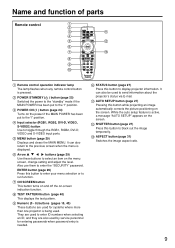
...blinks if something unusual occurs in the lamp circuit. LAMP2 monitor (page 54) This lamp lights up when the time to this lamp indicates an abnormal condition of the remote control or the main unit is turned to this socket. Projection lens Lens for attaching anti-theft chain Attach ... ring (page 26) For focus adjustment. Do not connect any other fastening device available from Kensington) to replace lamp unit 1 is reached. Power indicator (page 24) The lamp lights in red when the MAIN POWER switch is pressed. Lens cap Cap the lens whenever the projector is also available.
...blinks if something unusual occurs in the lamp circuit. LAMP2 monitor (page 54) This lamp lights up when the time to this lamp indicates an abnormal condition of the remote control or the main unit is turned to this socket. Projection lens Lens for attaching anti-theft chain Attach ... ring (page 26) For focus adjustment. Do not connect any other fastening device available from Kensington) to replace lamp unit 1 is reached. Power indicator (page 24) The lamp lights in red when the MAIN POWER switch is pressed. Lens cap Cap the lens whenever the projector is also available.
User Manual
Page 12
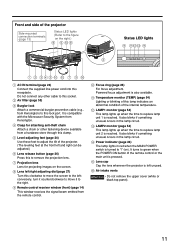
... outlet port. It can be displayed by holding down the menu key for lens focus, zoom and shift (position). LENS button (page 26) Switches to video input. RGB2 button (page 24) ... main power applied to select an item on the power. Arrow ( ) buttons (page 29) Use to the projector. DVI button (page 24) Switches to RGB2 input. POWER STANDBY ( ) button (page 25) Switches the power... • Heated air comes out of space], otherwise burns or damage could result. Lamp unit cover The lamp unit is displayed. S-VIDEO button (page 24) Switches to the "standby" mode. ...
... outlet port. It can be displayed by holding down the menu key for lens focus, zoom and shift (position). LENS button (page 26) Switches to video input. RGB2 button (page 24) ... main power applied to select an item on the power. Arrow ( ) buttons (page 29) Use to the projector. DVI button (page 24) Switches to RGB2 input. POWER STANDBY ( ) button (page 25) Switches the power... • Heated air comes out of space], otherwise burns or damage could result. Lamp unit cover The lamp unit is displayed. S-VIDEO button (page 24) Switches to the "standby" mode. ...
User Manual
Page 13
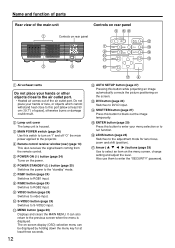
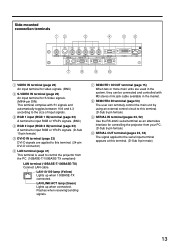
... S1 signals and automatically toggles between 16:9 and 4:3 according to the size of input signals. LAN 10/100 lamp (Yellow) Lights up when connected. LAN LINK/ACT lamp (Green) Lights up when 100BASE-TX connected. Flashes when receiving/sending signals. Side-mounted connection terminals R/PR ...LAN VIDEO IN terminal (page 23) An input terminal for video signals. (BNC) S-VIDEO IN terminal (page 23) An input terminal for controlling the projector from the PC. (10BASE-T/100BASE-TX compliant) LAN terminal (10BASE-T/100BASE-TX) Connect LAN cable. RGB 1 input (RGB 1 IN) terminal (page...
... S1 signals and automatically toggles between 16:9 and 4:3 according to the size of input signals. LAN 10/100 lamp (Yellow) Lights up when connected. LAN LINK/ACT lamp (Green) Lights up when 100BASE-TX connected. Flashes when receiving/sending signals. Side-mounted connection terminals R/PR ...LAN VIDEO IN terminal (page 23) An input terminal for video signals. (BNC) S-VIDEO IN terminal (page 23) An input terminal for controlling the projector from the PC. (10BASE-T/100BASE-TX compliant) LAN terminal (10BASE-T/100BASE-TX) Connect LAN cable. RGB 1 input (RGB 1 IN) terminal (page...
User Manual
Page 14
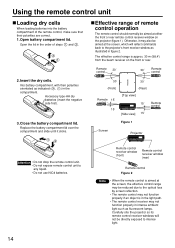
...screen reflection. • The remote control may not function properly if an object is approx. 30 m (98.4') from the beam receiver on the projector (figure 1). Remote control receiver window (front) Remote control receiver window (rear) Remote control Figure 2 Note • When the remote control is ...liquid. • Do not use NiCd batteries. Open battery compartment lid. Otherwise, it clicks. Open the lid in intense ambient light such as fluorescent lamps. Remote 30˚ control 30˚ Remote control 30˚ 30˚ (Front) (Rear) Remote 15˚ control 15˚ [Top ...
...screen reflection. • The remote control may not function properly if an object is approx. 30 m (98.4') from the beam receiver on the projector (figure 1). Remote control receiver window (front) Remote control receiver window (rear) Remote control Figure 2 Note • When the remote control is ...liquid. • Do not use NiCd batteries. Open battery compartment lid. Otherwise, it clicks. Open the lid in intense ambient light such as fluorescent lamps. Remote 30˚ control 30˚ Remote control 30˚ 30˚ (Front) (Rear) Remote 15˚ control 15˚ [Top ...
User Manual
Page 15
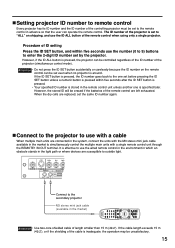
...where devices are susceptible to simultaneously control the multiple main units with a single remote control unit through the REMOTE1 IN/OUT terminal. Connect to the projector to use the wired remote control in the environment in which an obstacle stands in the market to outside light. It is pressed, the ID...digit ID number set before pressing the ID SET button unless a numeric button is pressed within five seconds use the ID ALL button of the projector is set the same ID number again. However, the stored ID will be controlled regardless of the ID number of the cable is stored in...
...where devices are susceptible to simultaneously control the multiple main units with a single remote control unit through the REMOTE1 IN/OUT terminal. Connect to the projector to use the wired remote control in the environment in which an obstacle stands in the market to outside light. It is pressed, the ID...digit ID number set before pressing the ID SET button unless a numeric button is pressed within five seconds use the ID ALL button of the projector is set the same ID number again. However, the stored ID will be controlled regardless of the ID number of the cable is stored in...

User Manual
Page 16
... on user's needs or viewing conditions. After the projector is roughly positioned, picture size and vertical picture positioning can be finely adjusted with the powered zoom lens and lens tilt mechanism. Attention • Do not place or use one projector on top of another projection unit. • Leave... a clearance of lens to the figure below and the information on the rear panel ...
... on user's needs or viewing conditions. After the projector is roughly positioned, picture size and vertical picture positioning can be finely adjusted with the powered zoom lens and lens tilt mechanism. Attention • Do not place or use one projector on top of another projection unit. • Leave... a clearance of lens to the figure below and the information on the rear panel ...
User Manual
Page 22
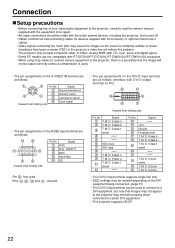
... mating side Color signal • The pin assignments on the DVI-D input terminal are as follows (interface with PT-D5700U/PT-D5700UL/PT-DW5100U/PT-DW5100UL projectors. • When using long cables to connect various equipment to the projector, there is used . Signal T. T. D. D. M. S data 1 shield T. S clock shield T. S data 2- Signal +5 V Ground Hot ...Pin No. M. Connection Setup precautions • Before connecting any of your video/audio equipment to the projector, carefully read the owners manual supplied with the equipment once again. • All cable connections should...
... mating side Color signal • The pin assignments on the DVI-D input terminal are as follows (interface with PT-D5700U/PT-D5700UL/PT-DW5100U/PT-DW5100UL projectors. • When using long cables to connect various equipment to the projector, there is used . Signal T. T. D. D. M. S data 1 shield T. S clock shield T. S data 2- Signal +5 V Ground Hot ...Pin No. M. Connection Setup precautions • Before connecting any of your video/audio equipment to the projector, carefully read the owners manual supplied with the equipment once again. • All cable connections should...

User Manual
Page 23
... 2 IN IN SERIAL OUT DVI-D IN LAN DVI-D Cable or HDMI-DVI conversion cable (available in time base corrector (TBC) or use a TBC between the projector and the video deck. • If nonstandard burst signals are input. (Refer to page 37.) Example of connecting with PCs PC with PC DVI-D terminal... computer may not function properly until the resume capability is disabled. • When the SYNC ON GREEN signal is the case, connect a TBC between the projector and the video deck. • The EDID settings may be sure to page 37.) 23
... 2 IN IN SERIAL OUT DVI-D IN LAN DVI-D Cable or HDMI-DVI conversion cable (available in time base corrector (TBC) or use a TBC between the projector and the video deck. • If nonstandard burst signals are input. (Refer to page 37.) Example of connecting with PCs PC with PC DVI-D terminal... computer may not function properly until the resume capability is disabled. • When the SYNC ON GREEN signal is the case, connect a TBC between the projector and the video deck. • The EDID settings may be sure to page 37.) 23
User Manual
Page 24
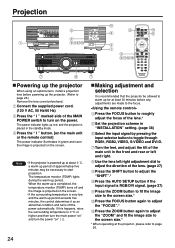
...adjust the "ZOOM" and fit the image size to the screen size.* * When operating at least 30 minutes before powering up the projector. (Refer to page 26.) Remove the lens cover beforehand. Press the " I " marked side of the main unit in "INSTALLATION" setting. (page 38) Select the input ... B/PB SYNC/HD VD VIDEO IN S-VIDEO IN REMOTE 1 IN OUT RGB 1 IN REMOTE 2 IN IN SE Powering up the projector When using an optional lens, install a projection lens before any adjustments are made to the focus. If this happens, raise the surrounding temperature to start projection. Note • If the...
...adjust the "ZOOM" and fit the image size to the screen size.* * When operating at least 30 minutes before powering up the projector. (Refer to page 26.) Remove the lens cover beforehand. Press the " I " marked side of the main unit in "INSTALLATION" setting. (page 38) Select the input ... B/PB SYNC/HD VD VIDEO IN S-VIDEO IN REMOTE 1 IN OUT RGB 1 IN REMOTE 2 IN IN SE Powering up the projector When using an optional lens, install a projection lens before any adjustments are made to the focus. If this happens, raise the surrounding temperature to start projection. Note • If the...
User Manual
Page 25
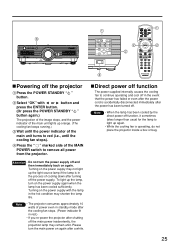
...even after turning off the main power inadvertently, the projection lamp may shorten the lamp life. Note • When the lamp has been cooled by the direct power off the projector Press the POWER STANDBY " " button. To light up the lamp, turn the main power on again. Turning on the power... supply again when the lamp has been cooled sufficiently. Note • The projector consumes approximately 10 watts of cooling down after the power cord is operating, do not place the projector inside a box or bag. 25 Direct power off function The...
...even after turning off the main power inadvertently, the projection lamp may shorten the lamp life. Note • When the lamp has been cooled by the direct power off the projector Press the POWER STANDBY " " button. To light up the lamp, turn the main power on again. Turning on the power... supply again when the lamp has been cooled sufficiently. Note • The projector consumes approximately 10 watts of cooling down after the power cord is operating, do not place the projector inside a box or bag. 25 Direct power off function The...
User Manual
Page 26
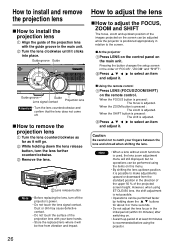
.... Press to select an item and adjust it . Caution Be careful not to catch your bare hands. • Store the replaced lens where it will be adjusted while the projector is not possible. • Operations can be free from the standard position in relation to the screen. However, when using ET-DLE050...
.... Press to select an item and adjust it . Caution Be careful not to catch your bare hands. • Store the replaced lens where it will be adjusted while the projector is not possible. • Operations can be free from the standard position in relation to the screen. However, when using ET-DLE050...
User Manual
Page 27
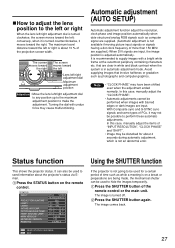
..., manually adjust the items of "INPUT RESOLUTION", "CLOCK PHASE" and "SHIFT". • Image may have been shifted even when the adjustment ended normally. AROUND LAMP MAIN VERSION NETWORK VERSION REMOTE2 NTSC VIDEO 15.73kHz/59.94Hz 33h 13h/ ON/ 13h/ ON/ 25 °C / 77 °F 37 °C / ... halftones or gradation such as photographs and computer graphics. Status function This shows the projector status. The image comes back. 27 How to adjust the lens position to the left or right When the lens left/right adjustment dial is turned clockwise, the screen moves toward the left /right...
..., manually adjust the items of "INPUT RESOLUTION", "CLOCK PHASE" and "SHIFT". • Image may have been shifted even when the adjustment ended normally. AROUND LAMP MAIN VERSION NETWORK VERSION REMOTE2 NTSC VIDEO 15.73kHz/59.94Hz 33h 13h/ ON/ 13h/ ON/ 25 °C / 77 °F 37 °C / ... halftones or gradation such as photographs and computer graphics. Status function This shows the projector status. The image comes back. 27 How to adjust the lens position to the left or right When the lens left/right adjustment dial is turned clockwise, the screen moves toward the left /right...


