Studio System 300 Installation Guide
Page 2
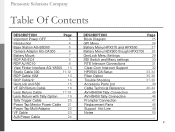
Panasonic Solutions Company Table Of Contents DESCRIPTION Page Important Power OFF 3 Introduction 4 Base Station AG-BS300 5 Camera Adaptor AG-CA300 6 Battery Mount 7 ROP AG-EC4 8 ROP AJ-RC10 9 View Finder Interface AG-YA500 10 Studio Cable 300 11-12 ROP Cable 10M 13 ROP Cable 9" 14 GenLock and SDI ...though HPX3700 28 GenLock Menu Settings 29 SDI Switch and Menu settings 30 RTS Intercom Connections 31 Clear-Com Intercom Support 32 HPX500 DA Setup 33-34 Fiber Option 35-36 Trouble Shooting 37-38 Accessory Parts List 39 Cable Technical Reference 40-44 AV...
Panasonic Solutions Company Table Of Contents DESCRIPTION Page Important Power OFF 3 Introduction 4 Base Station AG-BS300 5 Camera Adaptor AG-CA300 6 Battery Mount 7 ROP AG-EC4 8 ROP AJ-RC10 9 View Finder Interface AG-YA500 10 Studio Cable 300 11-12 ROP Cable 10M 13 ROP Cable 9" 14 GenLock and SDI ...though HPX3700 28 GenLock Menu Settings 29 SDI Switch and Menu settings 30 RTS Intercom Connections 31 Clear-Com Intercom Support 32 HPX500 DA Setup 33-34 Fiber Option 35-36 Trouble Shooting 37-38 Accessory Parts List 39 Cable Technical Reference 40-44 AV...
Studio System 300 Installation Guide
Page 8
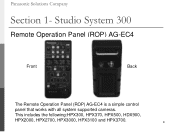
Panasonic Solutions Company Section 1- This includes the following:HPX300, HPX370, HPX500, HDX900, HPX2000, HPX2700, HPX3000, HPX3100 and HPX3700. 8 Studio System 300 Remote Operation Panel (ROP) AG-EC4 Front Back The Remote Operation Panel (ROP) AG-EC4 is a simple control panel that works with all system supported cameras.
Panasonic Solutions Company Section 1- This includes the following:HPX300, HPX370, HPX500, HDX900, HPX2000, HPX2700, HPX3000, HPX3100 and HPX3700. 8 Studio System 300 Remote Operation Panel (ROP) AG-EC4 Front Back The Remote Operation Panel (ROP) AG-EC4 is a simple control panel that works with all system supported cameras.
Studio System 300 Installation Guide
Page 9
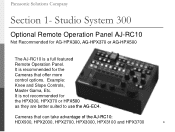
Cameras that offer more control options. Example: Knee and Slope Controls, Master Gama, Etc. Studio System 300 Optional Remote Operation Panel AJ-RC10 Not Recommended for AG-HPX300, AG-HPX370 or AG-HPX500 The AJ-RC10 is not recommended for the Cameras that can take advantage of the AJ-RC10: HDX900, HPX2000, HPX2700, HPX3000, HPX3100 and HPX3700 9 It is a full featured Remote Operation Panel. Panasonic Solutions Company Section 1- It is recommended for the HPX300, HPX370 or HPX500 as they are better suited to use the AG-EC4.
Cameras that offer more control options. Example: Knee and Slope Controls, Master Gama, Etc. Studio System 300 Optional Remote Operation Panel AJ-RC10 Not Recommended for AG-HPX300, AG-HPX370 or AG-HPX500 The AJ-RC10 is not recommended for the Cameras that can take advantage of the AJ-RC10: HDX900, HPX2000, HPX2700, HPX3000, HPX3100 and HPX3700 9 It is a full featured Remote Operation Panel. Panasonic Solutions Company Section 1- It is recommended for the HPX300, HPX370 or HPX500 as they are better suited to use the AG-EC4.
Studio System 300 Installation Guide
Page 15
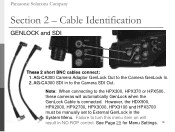
AG-CA300 Camera Adaptor GenLock Out to External GenLock in NO ROP control. Failure to turn this menu item on will automatically GenLock when the GenLock ..., HPX2700, HPX3000, HPX3100 and HPX3700 must be manually set to the Camera GenLock In. 2. See Page 29 for Menu Settings. 15 Panasonic Solutions Company Section 2 - AG-CA300 SDI in to the HPX300, HPX370 or HPX500, these cameras will result in the System Menu. Cable Identification GENLOCK and SDI These 2 short BNC cables connect: 1.
AG-CA300 Camera Adaptor GenLock Out to External GenLock in NO ROP control. Failure to turn this menu item on will automatically GenLock when the GenLock ..., HPX2700, HPX3000, HPX3100 and HPX3700 must be manually set to the Camera GenLock In. 2. See Page 29 for Menu Settings. 15 Panasonic Solutions Company Section 2 - AG-CA300 SDI in to the HPX300, HPX370 or HPX500, these cameras will result in the System Menu. Cable Identification GENLOCK and SDI These 2 short BNC cables connect: 1.
Studio System 300 Installation Guide
Page 23
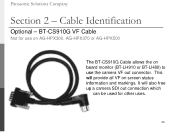
It will provide all VF on board monitor (BT-LH910 or BT-LH80) to use on AG-HPX300, AG-HPX370 or AG-HPX500 The BT-CS910G Cable allows the on screen status information and markings. BT-CS910G VF Cable Not for other uses. 23 Panasonic Solutions Company Section 2 - This will also free up a camera SDI out connection which can be used for use the camera VF out connector. Cable Identification Optional -
It will provide all VF on board monitor (BT-LH910 or BT-LH80) to use on AG-HPX300, AG-HPX370 or AG-HPX500 The BT-CS910G Cable allows the on screen status information and markings. BT-CS910G VF Cable Not for other uses. 23 Panasonic Solutions Company Section 2 - This will also free up a camera SDI out connection which can be used for use the camera VF out connector. Cable Identification Optional -
Studio System 300 Installation Guide
Page 24
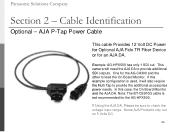
... Device or for the AG-CA300 and the other to provide the additional accessories power needs. If Using the AJA DA, Please be sure to provide additional SDI outputs. Some AJA Products only run on 5 Volts DC. 24 Example: AG-HPX500 has only 1 SDI out. Panasonic Solutions Company Section 2 ...- In this example configuration is not recommended for the AG-HPX500. One for an AJA DA. Note: The BT-CS910G cable is used, it will need...
... Device or for the AG-CA300 and the other to provide the additional accessories power needs. If Using the AJA DA, Please be sure to provide additional SDI outputs. Some AJA Products only run on 5 Volts DC. 24 Example: AG-HPX500 has only 1 SDI out. Panasonic Solutions Company Section 2 ...- In this example configuration is not recommended for the AG-HPX500. One for an AJA DA. Note: The BT-CS910G cable is used, it will need...
Studio System 300 Installation Guide
Page 27
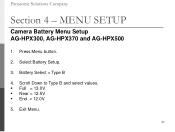
Scroll Down to Type B and select values. Full = 13.0V Near = 12.5V End = 12.0V 5. Press Menu button. 2. Battery Select = Type B 4. Exit Menu. 27 Panasonic Solutions Company Section 4 - Select Battery Setup. 3. MENU SETUP Camera Battery Menu Setup AG-HPX300, AG-HPX370 and AG-HPX500 1.
Scroll Down to Type B and select values. Full = 13.0V Near = 12.5V End = 12.0V 5. Press Menu button. 2. Battery Select = Type B 4. Exit Menu. 27 Panasonic Solutions Company Section 4 - Select Battery Setup. 3. MENU SETUP Camera Battery Menu Setup AG-HPX300, AG-HPX370 and AG-HPX500 1.

Studio System 300 Installation Guide
Page 29
Genlock = GL IN or EXT (depending on camera) 5. MENU SETUP Genlock Menu Setup AJ-HDX900, AJ-HPX2000, AJ-HPX2700, AJ-HPX3000, AJ-HPX3100, AJ-HPX3700 1. Select Genlock 4. Exit Menu NOTE: AG-HPX300, AG-HPX370 and AG-HPX500 will auto Genlock when a signal is connected and do not require setting Genlock to enter menu. 2. Press and hold the menu button for 2 seconds to EXT. 29 Panasonic Solutions Company Section 5 - Select System Settings. 3.
Genlock = GL IN or EXT (depending on camera) 5. MENU SETUP Genlock Menu Setup AJ-HDX900, AJ-HPX2000, AJ-HPX2700, AJ-HPX3000, AJ-HPX3100, AJ-HPX3700 1. Select Genlock 4. Exit Menu NOTE: AG-HPX300, AG-HPX370 and AG-HPX500 will auto Genlock when a signal is connected and do not require setting Genlock to enter menu. 2. Press and hold the menu button for 2 seconds to EXT. 29 Panasonic Solutions Company Section 5 - Select System Settings. 3.
Studio System 300 Installation Guide
Page 30
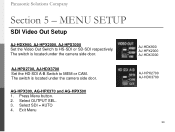
MENU SETUP SDI Video Out Setup AJ-HDX900, AJ-HPX2000, AJ-HPX3000 Set the Video Out Switch to MEM or CAM. Select SDI = AUTO 4. The switch is located under the camera side door. AG-HPX300, AG-HPX370 and AG-HPX500 1. Press Menu button. 2. Select OUTPUT SEL. 3. Exit Menu AJ-HDX900 AJ-HPX2000 AJ-HDX3000 AJ-HPX2700 AJ-HDX3700 30 The switch is located under the camera side door. Panasonic Solutions Company Section 5 - AJ-HPX2700, AJ-HDX3700 Set the HD-SDI A-B Switch to HS-SDI or SD-SDI respectively.
MENU SETUP SDI Video Out Setup AJ-HDX900, AJ-HPX2000, AJ-HPX3000 Set the Video Out Switch to MEM or CAM. Select SDI = AUTO 4. The switch is located under the camera side door. AG-HPX300, AG-HPX370 and AG-HPX500 1. Press Menu button. 2. Select OUTPUT SEL. 3. Exit Menu AJ-HDX900 AJ-HPX2000 AJ-HDX3000 AJ-HPX2700 AJ-HDX3700 30 The switch is located under the camera side door. Panasonic Solutions Company Section 5 - AJ-HPX2700, AJ-HDX3700 Set the HD-SDI A-B Switch to HS-SDI or SD-SDI respectively.
Studio System 300 Installation Guide
Page 33
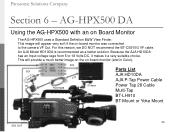
.... This will appear very soft if the on board monitor was connected to 18 Volts DC, it makes it a very suitable choice. Panasonic Solutions Company Section 6 - AG-HPX500 DA Using the AG-HPX500 with an on board monitor (and in Color). SDI MultiTap SDI PowerTap28 BT-Mount Parts List AJA HD10DA AJA P-Tap Power Cable...
.... This will appear very soft if the on board monitor was connected to 18 Volts DC, it makes it a very suitable choice. Panasonic Solutions Company Section 6 - AG-HPX500 DA Using the AG-HPX500 with an on board monitor (and in Color). SDI MultiTap SDI PowerTap28 BT-Mount Parts List AJA HD10DA AJA P-Tap Power Cable...
Studio System 300 Installation Guide
Page 36
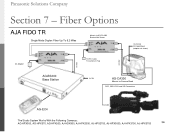
Panasonic Solutions Company Section 7 - Fiber Options AJA FIDO TR Single Mode Duplex Fiber Up To 6.2 Miles Mounts to AG-CA-300 Bracket Not Shown AC Adaptor 12VDC Cable To Camera D-Tap 12 VDC IN VIA Gold Mount (adaptor not shown) SDI I/O SDI I/O AG-BS300 Base Station AC IN AG-CA300 Mounts to Camera Back ROP, GEN LOCK and SDI Connections AG-EC4 The Studio System Works With the Following Cameras: AG-HPX300, AG-HPX370, AG-HPX500, AJ-HDX900, AJ-HPX2000, AJ-HPX2700, AJ-HPX3000, AJ-HPX3100, AJ-HPX3700 36
Panasonic Solutions Company Section 7 - Fiber Options AJA FIDO TR Single Mode Duplex Fiber Up To 6.2 Miles Mounts to AG-CA-300 Bracket Not Shown AC Adaptor 12VDC Cable To Camera D-Tap 12 VDC IN VIA Gold Mount (adaptor not shown) SDI I/O SDI I/O AG-BS300 Base Station AC IN AG-CA300 Mounts to Camera Back ROP, GEN LOCK and SDI Connections AG-EC4 The Studio System Works With the Following Cameras: AG-HPX300, AG-HPX370, AG-HPX500, AJ-HDX900, AJ-HPX2000, AJ-HPX2700, AJ-HPX3000, AJ-HPX3100, AJ-HPX3700 36
Studio System 300 Installation Guide
Page 37
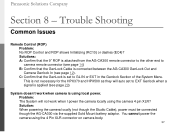
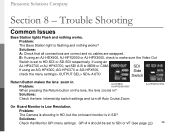
...for the HPX370 and HPX500 as they will not work when camera is applied (see page 12). Trouble Shooting Common Issues Remote Control (ROP) Problem: No ROP Control and ROP shows Initializing (RC10) or dashes (EC4)? Solutions: A: Confirm that the 9" ROP is attached from the AG-CA300 remote connector ...camera using local power. C: Confirm that the GenLock Cable is set to GL IN or EXT in the Genlock Section of the System Menu. Panasonic Solutions Company Section 8 - Problem: The System will auto set to EXT Genlock when a signal is using the 4 Pin XLR connector on camera body...
...for the HPX370 and HPX500 as they will not work when camera is applied (see page 12). Trouble Shooting Common Issues Remote Control (ROP) Problem: No ROP Control and ROP shows Initializing (RC10) or dashes (EC4)? Solutions: A: Confirm that the 9" ROP is attached from the AG-CA300 remote connector ...camera using local power. C: Confirm that the GenLock Cable is set to GL IN or EXT in the Genlock Section of the System Menu. Panasonic Solutions Company Section 8 - Problem: The System will auto set to EXT Genlock when a signal is using the 4 Pin XLR connector on camera body...
Studio System 300 Installation Guide
Page 38
...HPX2000/3000 When pressing the Return button on board monitor is flashing and nothing works. If using an AG-HPX300, AG-HPX370 or AG-HPX500, check the menu settings> OUTPUT SEL> SDI> AUTO SDI Side Switch Return Button makes the lens zoom...Station lights Flash and nothing works? Problem: The Base Station light is in HD, but the on the lens, the lens zooms in . B: If using an AJ-HPX2700 or AJ-HPX3700..., set to HD-SDI or SD-SDI respectively. Solutions: Check the lens internal dip switch settings and turn...
...HPX2000/3000 When pressing the Return button on board monitor is flashing and nothing works. If using an AG-HPX300, AG-HPX370 or AG-HPX500, check the menu settings> OUTPUT SEL> SDI> AUTO SDI Side Switch Return Button makes the lens zoom...Station lights Flash and nothing works? Problem: The Base Station light is in HD, but the on the lens, the lens zooms in . B: If using an AJ-HPX2700 or AJ-HPX3700..., set to HD-SDI or SD-SDI respectively. Solutions: Check the lens internal dip switch settings and turn...
Studio System 300 Installation Guide
Page 39
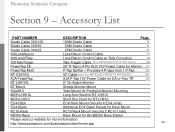
Panasonic Solutions Company Section 9 - Accessory List PART NUMBER DESCRIPTION Page Studio Cable 300/100 100M Studio Cable ...Tap to 4 Pin XLR 12V Power Cable for more information: http://www.panasonic.com/business/provideo/home.asp 39 Provides 4 P-taps from 1 P-Tap 22 BT-CS910G VF Cable (not for HPX300 HPX370 HPX500) 23 AJA PowerTap AJA P-Tap 12V Power Cable for DA or Fido...EC4 Blank Panels for Rack Mount RC10-Rack RC10 Rack Mount (mounts 2 RC10 Units) BS300-Rack Rack Mount for AG-BS300 Base Station Please visit our website for Monitor 21 PowerTap-Multi P-Tap Splitter -
Panasonic Solutions Company Section 9 - Accessory List PART NUMBER DESCRIPTION Page Studio Cable 300/100 100M Studio Cable ...Tap to 4 Pin XLR 12V Power Cable for more information: http://www.panasonic.com/business/provideo/home.asp 39 Provides 4 P-taps from 1 P-Tap 22 BT-CS910G VF Cable (not for HPX300 HPX370 HPX500) 23 AJA PowerTap AJA P-Tap 12V Power Cable for DA or Fido...EC4 Blank Panels for Rack Mount RC10-Rack RC10 Rack Mount (mounts 2 RC10 Units) BS300-Rack Rack Mount for AG-BS300 Base Station Please visit our website for Monitor 21 PowerTap-Multi P-Tap Splitter -


