
User Manual
Page 2
... 14 Inverter Turbo Defrost Feature 15 Defrosting Tips & Techniques 15-16 Sensor Reheat Feature 17 Sensor Cook Feature 17 Sensor Cook Chart 18 Microwave Recipes 19 Timer Feature (Kitchen Timer/Stand Time/Delay Start 20 Microwave Shortcuts 21-22 Food Characteristics 23 Cooking Techniques 23-24 Quick Guide to Operation 27 Maintenance Care and Cleaning of Your Microwave Oven 9 Before Requesting Service 25 Warranty & Service 26 General Information Cookware Guide ...8 Oven Components Diagram 10 Specifications ...28 User's Record ...28
... 14 Inverter Turbo Defrost Feature 15 Defrosting Tips & Techniques 15-16 Sensor Reheat Feature 17 Sensor Cook Feature 17 Sensor Cook Chart 18 Microwave Recipes 19 Timer Feature (Kitchen Timer/Stand Time/Delay Start 20 Microwave Shortcuts 21-22 Food Characteristics 23 Cooking Techniques 23-24 Quick Guide to Operation 27 Maintenance Care and Cleaning of Your Microwave Oven 9 Before Requesting Service 25 Warranty & Service 26 General Information Cookware Guide ...8 Oven Components Diagram 10 Specifications ...28 User's Record ...28
User Manual
Page 4
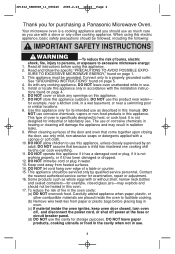
... of burns, electric shock, fire, injury to persons, or exposure to facilitate cooking. (b) Remove wire twist-ties from heated surfaces. 14. Carefully attend appliance when paper, plastic, or other cooking appliance. See "GROUNDING INSTRUCTIONS" found on this manual. As with any other combustible materials are placed inside the oven ignites, keep oven door closed glass jars-may result in use as much care as described in...
... of burns, electric shock, fire, injury to persons, or exposure to facilitate cooking. (b) Remove wire twist-ties from heated surfaces. 14. Carefully attend appliance when paper, plastic, or other cooking appliance. See "GROUNDING INSTRUCTIONS" found on this manual. As with any other combustible materials are placed inside the oven ignites, keep oven door closed glass jars-may result in use as much care as described in...
User Manual
Page 5
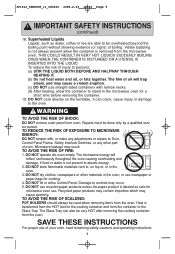
... not present to the Glass Tray. The film of oven. TO REDUCE THE RISK OF EXPOSURE TO MICROWAVE ENERGY: DO NOT tamper with, or make any adjustments or repairs to Door, Control Panel Frame, Safety Interlock Switches, or any other materials in the oven, or use newspaper or paper bags for microwave oven use straight-sided containers with narrow necks. (d) After heating, allow the container to...
... not present to the Glass Tray. The film of oven. TO REDUCE THE RISK OF EXPOSURE TO MICROWAVE ENERGY: DO NOT tamper with, or make any adjustments or repairs to Door, Control Panel Frame, Safety Interlock Switches, or any other materials in the oven, or use newspaper or paper bags for microwave oven use straight-sided containers with narrow necks. (d) After heating, allow the container to...
User Manual
Page 6
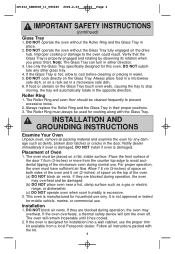
... the microwave oven during operation, the oven may overheat. Use only the Glass Tray specifically designed for installation into a wall cabinet, use the proper trim kit available from the counter top edge to prevent excessive noise. 2. Place the front surface of Oven 1. Placement of the door 7.6cm (3-inches) or more from a local Panasonic dealer. DO NOT block air vents. If the oven is excessive. 2. IP1812_38W80CP_11_080220 2008.2.20 16:03 Page 6 IMPORTANT SAFETY INSTRUCTIONS (continued) Glass Tray...
... the microwave oven during operation, the oven may overheat. Use only the Glass Tray specifically designed for installation into a wall cabinet, use the proper trim kit available from the counter top edge to prevent excessive noise. 2. Place the front surface of Oven 1. Placement of the door 7.6cm (3-inches) or more from a local Panasonic dealer. DO NOT block air vents. If the oven is excessive. 2. IP1812_38W80CP_11_080220 2008.2.20 16:03 Page 6 IMPORTANT SAFETY INSTRUCTIONS (continued) Glass Tray...
User Manual
Page 7
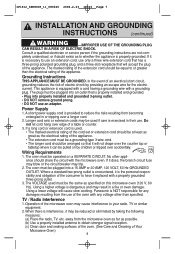
.... (c) Clean door and sealing surfaces of the oven. (See Care and Cleaning of Your Microwave Oven) 5 In the event of an electrical short circuit, grounding reduces the risk of the appliance. A short power-supply cord is properly installed and grounded. • Plug into properly installed and grounded 3-prong outlet. • DO NOT remove ground prong. • DO NOT use an adapter. Wiring Requirements 1. Panasonic is interference, it replaced with the microwave oven...
.... (c) Clean door and sealing surfaces of the oven. (See Care and Cleaning of Your Microwave Oven) 5 In the event of an electrical short circuit, grounding reduces the risk of the appliance. A short power-supply cord is properly installed and grounded. • Plug into properly installed and grounded 3-prong outlet. • DO NOT remove ground prong. • DO NOT use an adapter. Wiring Requirements 1. Panasonic is interference, it replaced with the microwave oven...
User Manual
Page 8
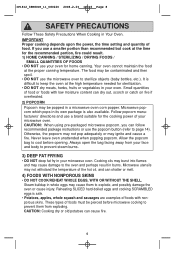
... are examples of your microwave oven. Reheating SLICED hard-boiled eggs and cooking SCRAMBLED eggs is difficult to keep the oven at the high temperature needed for sterilization. • DO NOT dry meats, herbs, fruits or vegetables in your oven for the cooking power of foods with low moisture content can follow recommended package instructions or use the microwave oven to sterilize objects (baby...
... are examples of your microwave oven. Reheating SLICED hard-boiled eggs and cooking SCRAMBLED eggs is difficult to keep the oven at the high temperature needed for sterilization. • DO NOT dry meats, herbs, fruits or vegetables in your oven for the cooking power of foods with low moisture content can follow recommended package instructions or use the microwave oven to sterilize objects (baby...

User Manual
Page 9
... heat faster and can be used for microwave cooking only. Always follow instructions provided by the manufacturer. Microwave safe thermometers are placed in the oven for both meat and candy. 9) BABY FORMULA / BABY FOOD • DO NOT heat baby formula or baby food in the oven, allow at least 2.5 cm (1-inch) of space between foil and interior oven walls or door. • Dishes with metallic trim...
... heat faster and can be used for microwave cooking only. Always follow instructions provided by the manufacturer. Microwave safe thermometers are placed in the oven for both meat and candy. 9) BABY FORMULA / BABY FOOD • DO NOT heat baby formula or baby food in the oven, allow at least 2.5 cm (1-inch) of space between foil and interior oven walls or door. • Dishes with metallic trim...
User Manual
Page 10
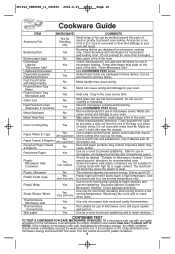
... may cause sparks. Heat only 1 tray in microwave heating. Metal can occur if foil is microwave oven safe (transparent to your oven. Safe for Microwave Heating." Metal can be tested; Use to warm cooked foods, and to cook foods that require short cooking time such as a cover to prevent spattering and to your oven will result. This material absorbs microwave energy. Use to cover food during cooking to a low serving temperature only. Wood...
... may cause sparks. Heat only 1 tray in microwave heating. Metal can occur if foil is microwave oven safe (transparent to your oven. Safe for Microwave Heating." Metal can be tested; Use to warm cooked foods, and to cook foods that require short cooking time such as a cover to prevent spattering and to your oven will result. This material absorbs microwave energy. Use to cover food during cooking to a low serving temperature only. Wood...
User Manual
Page 11
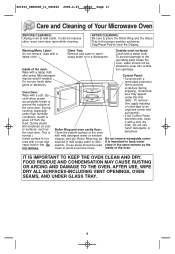
...: Glass Tray: Outside oven surfaces: Do not remove, wipe with a Remove and wash in warm Clean with a damp cloth after using. Inside of Your Microwave Oven BEFORE CLEANING: Unplug oven at wall outlet. Wipe with a damp cloth. To remove film, apply masking or clear tape to an exposed corner and pull gently.) • If the Control Panel becomes wet, clean it with a soft, dry cloth when steam accumulates inside or...
...: Glass Tray: Outside oven surfaces: Do not remove, wipe with a Remove and wash in warm Clean with a damp cloth after using. Inside of Your Microwave Oven BEFORE CLEANING: Unplug oven at wall outlet. Wipe with a damp cloth. To remove film, apply masking or clear tape to an exposed corner and pull gently.) • If the Control Panel becomes wet, clean it with a soft, dry cloth when steam accumulates inside or...
User Manual
Page 13
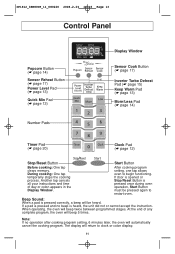
... door is opened or Stop/Reset Button is pressed once during oven operation, Start Button must be heard. Beep Sound: When a pad is heard, the unit did not or cannot accept the instruction. At the end of day or colon appears in the Display Window. If a pad is pressed and no operation after cooking program setting, 6 minutes later, the oven will beep twice between programmed stages. The display...
... door is opened or Stop/Reset Button is pressed once during oven operation, Start Button must be heard. Beep Sound: When a pad is heard, the unit did not or cannot accept the instruction. At the end of day or colon appears in the Display Window. If a pad is pressed and no operation after cooking program setting, 6 minutes later, the oven will beep twice between programmed stages. The display...
User Manual
Page 14
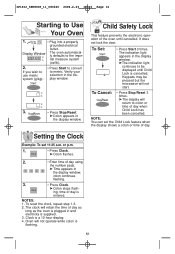
... defaults to Use Your Oven 1. • Plug into a properly grounded electrical outlet. ing; rial measure system (oz/lb). 2. To reset the clock, repeat step 1-3. 2. If you wish to use metric system (g/kg): • Press Start to convert to colon or time of day using the number pads. ➤Time appears in the display window. To Cancel: • Press Stop/Reset 3 times. ➤The display will not operate while colon...
... defaults to Use Your Oven 1. • Plug into a properly grounded electrical outlet. ing; rial measure system (oz/lb). 2. To reset the clock, repeat step 1-3. 2. If you wish to use metric system (g/kg): • Press Start to convert to colon or time of day using the number pads. ➤Time appears in the display window. To Cancel: • Press Stop/Reset 3 times. ➤The display will not operate while colon...
User Manual
Page 15
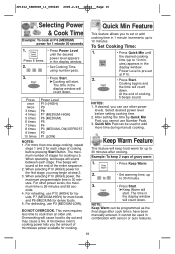
... minutes after cook time/s have been manually entered. to • Set warming time, up to dry out and may begin at step 2. 3. The time in combination with sensor or auto features. 13 The maximum number of cooking before setting cooking time. 2. For other power levels. For reheating, use other power levels, the maximum time is 5. Power Level is 30 minutes. Cooking begins and the time will count down. After setting the time by...
... minutes after cook time/s have been manually entered. to • Set warming time, up to dry out and may begin at step 2. 3. The time in combination with sensor or auto features. 13 The maximum number of cooking before setting cooking time. 2. For other power levels. For reheating, use other power levels, the maximum time is 5. Power Level is 30 minutes. Cooking begins and the time will count down. After setting the time by...
User Manual
Page 16
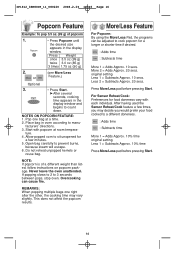
... cooking time may decide you may vary slightly. Start with each individual. Open bag carefully to 3 seconds between pops, stop oven. NOTE: If popcorn is of popcorn 1. 2. More/Less Feature For Popcorn: By using the More/Less Pad, the programs can cause fire. More 2 = Adds Approx. 20 secs. Place bag in the display window. Overcooking can be adjusted to cook popcorn...
... cooking time may decide you may vary slightly. Start with each individual. Open bag carefully to 3 seconds between pops, stop oven. NOTE: If popcorn is of popcorn 1. 2. More/Less Feature For Popcorn: By using the More/Less Pad, the programs can cause fire. More 2 = Adds Approx. 20 secs. Place bag in the display window. Overcooking can be adjusted to cook popcorn...
User Manual
Page 19
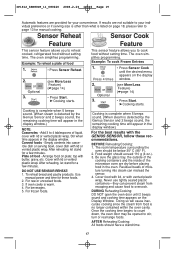
... will appear in the display window.) NOTE: Casseroles - Cover with vented plastic wrap. If oven cavity is warm. 4. Food weight should have a stand time. 17 The oven simplifies programming. After reheating, let stand for manual cooking. DO NOT USE SENSOR REHEAT: 1. Cooking is complete when 5 beeps sound. (When steam is detected by the Genius Sensor and 2 beeps sound, the remaining cooking time will appear in the display window.) For the...
... will appear in the display window.) NOTE: Casseroles - Cover with vented plastic wrap. If oven cavity is warm. 4. Food weight should have a stand time. 17 The oven simplifies programming. After reheating, let stand for manual cooking. DO NOT USE SENSOR REHEAT: 1. Cooking is complete when 5 beeps sound. (When steam is detected by the Genius Sensor and 2 beeps sound, the remaining cooking time will appear in the display window.) For the...
User Manual
Page 22
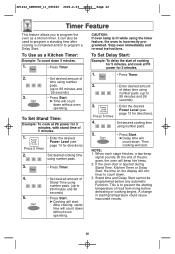
... finishes, a two-beep signal sounds. Stand time and Delay Start cannot be used to program a standing time after cooking is opened during Stand Time, Kitchen Timer or Delay Start, the time on the display will continue to count down without oven operating. This is incorrectly programmed. Press 5 times • Enter the desired Power Level (see page 13 for directions). 2. Stop oven immediately and re-read instructions. Then cooking will beep five times. 2. If the oven door is completed...
... finishes, a two-beep signal sounds. Stand time and Delay Start cannot be used to program a standing time after cooking is opened during Stand Time, Kitchen Timer or Delay Start, the time on the display will continue to count down without oven operating. This is incorrectly programmed. Press 5 times • Enter the desired Power Level (see page 13 for directions). 2. Stop oven immediately and re-read instructions. Then cooking will beep five times. 2. If the oven door is completed...
User Manual
Page 24
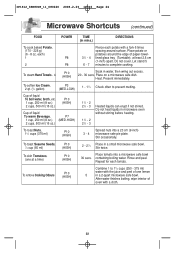
To steam Hand Towels - 4 P10 (HIGH) Soak in microwave oven without stirring before heating. Place on a microwave safe dish. Stir occasionally. Rinse and peel. Repeat for each potato with a fork 6 times spacing around the edge of paper-towellined glass tray (Turntable), at a time) P10 (HIGH) Place tomato into a 23 cm (9-inch) 3 - 4 microwave safe pie plate. Do not cover. Do not heat liquids in water, then wring...
To steam Hand Towels - 4 P10 (HIGH) Soak in microwave oven without stirring before heating. Place on a microwave safe dish. Stir occasionally. Rinse and peel. Repeat for each potato with a fork 6 times spacing around the edge of paper-towellined glass tray (Turntable), at a time) P10 (HIGH) Place tomato into a 23 cm (9-inch) 3 - 4 microwave safe pie plate. Do not cover. Do not heat liquids in water, then wring...
User Manual
Page 26
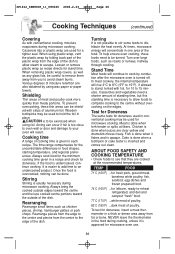
... paper towels. Cooking time A range of aluminum foil. The time range compensates for microwave oven use. 24 Fish is done when it is to see that they are clear yellow and drumstick moves freely. Cake is done when a toothpick or cake tester is undercooked, continue cooking. ABOUT FOOD SAFETY AND COOKING TEMPERATURE • Check foods to be turned. When removing plastic wrap covers, as...
... paper towels. Cooking time A range of aluminum foil. The time range compensates for microwave oven use. 24 Fish is done when it is to see that they are clear yellow and drumstick moves freely. Cake is done when a toothpick or cake tester is undercooked, continue cooking. ABOUT FOOD SAFETY AND COOKING TEMPERATURE • Check foods to be turned. When removing plastic wrap covers, as...

User Manual
Page 27
... Operating Instructions. During cooking, steam and warm air are normal: The oven causes interference with your Microwave Oven (see page 9). The Glass Tray wobbles. Close the oven door securely. cancel the previous program and enter new program. properly. Deactivate LOCK by pressing Start button 3 times. Oven will not turn on cooler surfaces such as mixers, vacuums, blow dryers, etc. replace main fuse. Start Button was activated by pressing Stop/Reset button 3 times. Main circuit breaker or main Reset main circuit breaker or fuse...
... Operating Instructions. During cooking, steam and warm air are normal: The oven causes interference with your Microwave Oven (see page 9). The Glass Tray wobbles. Close the oven door securely. cancel the previous program and enter new program. properly. Deactivate LOCK by pressing Start button 3 times. Oven will not turn on cooler surfaces such as mixers, vacuums, blow dryers, etc. replace main fuse. Start Button was activated by pressing Stop/Reset button 3 times. Main circuit breaker or main Reset main circuit breaker or fuse...
User Manual
Page 28
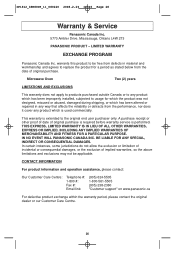
... is used commercially. CONTACT INFORMATION For product information and operation assistance, please contact: Our Customer Care Centre: Telephone #: 1-800 #: Fax #: Email link: (905) 624-5505 1-800-561-5505 (905) 238-2360 "Customer support" on www.panasonic.ca For defective product exchange within the warranty period, please contact the original dealer or our Customer Care Centre. 26 This warranty is performed. Microwave Oven...
... is used commercially. CONTACT INFORMATION For product information and operation assistance, please contact: Our Customer Care Centre: Telephone #: 1-800 #: Fax #: Email link: (905) 624-5505 1-800-561-5505 (905) 238-2360 "Customer support" on www.panasonic.ca For defective product exchange within the warranty period, please contact the original dealer or our Customer Care Centre. 26 This warranty is performed. Microwave Oven...
User Manual
Page 29
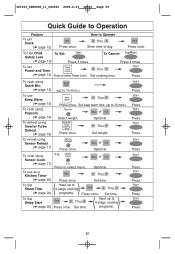
... to select Power Level. Set cooking time. or Optional. Thru Set time. Press. To cook using Sensor Reheat (☛ page 17) Press once. To set Clock (☛ page 12) Press once. Set time. ( ) Input up to select menu. Press. Press. To Use Child To Set: Safety Lock (☛ page 12) Press 3 times. Press. IP1812_38W80CP_11_080220 2008.2.20 16:03 Page 29 Quick Guide to 10 mins.) To use as a Kitchen Timer Thru...
... to select Power Level. Set cooking time. or Optional. Thru Set time. Press. To cook using Sensor Reheat (☛ page 17) Press once. To set Clock (☛ page 12) Press once. Set time. ( ) Input up to select menu. Press. Press. To Use Child To Set: Safety Lock (☛ page 12) Press 3 times. Press. IP1812_38W80CP_11_080220 2008.2.20 16:03 Page 29 Quick Guide to 10 mins.) To use as a Kitchen Timer Thru...


