

NNH635 User Guide
Page 1
...29 User's Record 29 Notes 30 READ ALL INSTRUCTIONS CAREFULLY BEFORE USING THE OVEN. Operating Instructions Microwave Oven Models: NN-H635/H645/ H665/SN676 Safety Information Precautions Inside cover Important Safety Instructions .........1-3 Installation and Grounding Instructions 3-4 Safety Precautions 5-6 Operation Control Panel 9-10 Starting to Use Your Oven 11 Setting the Clock 11 Child Safety Lock 11 Selecting Power & Cook Time 12 Quick Min Feature 12 Popcorn Feature 13 More/Less Feature 13 Inverter Turbo Defrost Feature 14 Defrosting Tips & Techniques.........14-15 Sensor...
...29 User's Record 29 Notes 30 READ ALL INSTRUCTIONS CAREFULLY BEFORE USING THE OVEN. Operating Instructions Microwave Oven Models: NN-H635/H645/ H665/SN676 Safety Information Precautions Inside cover Important Safety Instructions .........1-3 Installation and Grounding Instructions 3-4 Safety Precautions 5-6 Operation Control Panel 9-10 Starting to Use Your Oven 11 Setting the Clock 11 Child Safety Lock 11 Selecting Power & Cook Time 12 Quick Min Feature 12 Popcorn Feature 13 More/Less Feature 13 Inverter Turbo Defrost Feature 14 Defrosting Tips & Techniques.........14-15 Sensor...

NNH635 User Guide
Page 2
... tamper with the door open since open-door operation can kill or hurt you what can be adjusted or repaired by anyone except properly qualified service personnel. © Copyrighted by Matsushita Electric Industrial Co., Ltd. 2006. It is damaged. It is , tell you how to reduce the chance of others . All safety messages will follow instructions. Microwave Oven Safety Your safety...
... tamper with the door open since open-door operation can kill or hurt you what can be adjusted or repaired by anyone except properly qualified service personnel. © Copyrighted by Matsushita Electric Industrial Co., Ltd. 2006. It is damaged. It is , tell you how to reduce the chance of others . All safety messages will follow instructions. Microwave Oven Safety Your safety...

NNH635 User Guide
Page 3
... INSTRUCTIONS" found on closing the door, use only mild, non-abrasive soaps or detergents applied with the installation instruc- It is specifically designed to facilitate cooking. (b) Remove wire twist-ties from heated surfaces. 14. DO NOT immerse cord or plug in the oven cavity: (a) Do not overcook food. DO NOT allow children to a properly grounded outlet. To reduce the risk of a table or counter...
... INSTRUCTIONS" found on closing the door, use only mild, non-abrasive soaps or detergents applied with the installation instruc- It is specifically designed to facilitate cooking. (b) Remove wire twist-ties from heated surfaces. 14. DO NOT immerse cord or plug in the oven cavity: (a) Do not overcook food. DO NOT allow children to a properly grounded outlet. To reduce the risk of a table or counter...

NNH635 User Guide
Page 4
... operating instructions. 2 DO NOT cook directly on top of injury to be done only by a qualified service person. DO NOT use of oil will reflect continuously throughout the oven causing overheating and damage, if food or water is transferred from the HOT food to the cooking container and from the container to Door, Control Panel Frame, Safety Interlock Switches, or any adjustments or repairs to the Glass Tray...
... operating instructions. 2 DO NOT cook directly on top of injury to be done only by a qualified service person. DO NOT use of oil will reflect continuously throughout the oven causing overheating and damage, if food or water is transferred from the HOT food to the cooking container and from the container to Door, Control Panel Frame, Safety Interlock Switches, or any adjustments or repairs to the Glass Tray...

NNH635 User Guide
Page 5
... use. The oven will turn in the opposite direction. INSTALLATION AND GROUNDING INSTRUCTIONS Examine Your Oven Unpack oven, remove all instructions packed with the Glass Tray. Allow 3-inches (7.6 cm) of space on both sides of the oven and 1-inch (2.5 cm) of the microwave oven during operation, the oven may be placed on the Glass Tray touches oven walls, causing the tray to stop moving, the tray will automatically rotate in either direction. 3. Note: The Glass Tray can turn the oven...
... use. The oven will turn in the opposite direction. INSTALLATION AND GROUNDING INSTRUCTIONS Examine Your Oven Unpack oven, remove all instructions packed with the Glass Tray. Allow 3-inches (7.6 cm) of space on both sides of the oven and 1-inch (2.5 cm) of the microwave oven during operation, the oven may be placed on the Glass Tray touches oven walls, causing the tray to stop moving, the tray will automatically rotate in either direction. 3. Note: The Glass Tray can turn the oven...

NNH635 User Guide
Page 6
... slow cooking. Panasonic is provided to your radio, TV or similar equipment. 2. Grounding Instructions THIS APPLIANCE MUST BE GROUNDED. A short power-supply cord is NOT responsible for the electric current. Wiring Requirements The oven must be a grounding-type 3-wire cord, and (3) the longer cord should be operated on by children or tripped over accidentally. Where a standard two-prong outlet is encountered, it replaced...
... slow cooking. Panasonic is provided to your radio, TV or similar equipment. 2. Grounding Instructions THIS APPLIANCE MUST BE GROUNDED. A short power-supply cord is NOT responsible for the electric current. Wiring Requirements The oven must be a grounding-type 3-wire cord, and (3) the longer cord should be operated on by children or tripped over accidentally. Where a standard two-prong outlet is encountered, it replaced...

NNH635 User Guide
Page 7
... temperature needed for the cooking power of the hot oil, and can follow recommended package instructions or use the microwave oven to keep the oven at the proper canning temperature. If you can shatter or melt. 4) FOODS WITH NONPOROUS SKINS • DO NOT COOK/REHEAT WHOLE EGGS, WITH OR WITHOUT THE SHELL. IMPORTANT Proper cooking depends upon the power, the time setting and quantity of foods...
... temperature needed for the cooking power of the hot oil, and can follow recommended package instructions or use the microwave oven to keep the oven at the proper canning temperature. If you can shatter or melt. 4) FOODS WITH NONPOROUS SKINS • DO NOT COOK/REHEAT WHOLE EGGS, WITH OR WITHOUT THE SHELL. IMPORTANT Proper cooking depends upon the power, the time setting and quantity of foods...

NNH635 User Guide
Page 8
..., check temperatures of food. 6 Safety Precautions (continued) 5) GLASS TRAY / COOKING CONTAINERS / FOIL • Cooking containers get hot during microwaving. Use pot holders when removing containers from the oven or when removing lids or plastic wrap covers from the open end of space between foil and interior oven walls or door. • Dishes with metallic trim should be used for microwave cooking. • When using foil in your oven. Always follow instructions provided by the...
..., check temperatures of food. 6 Safety Precautions (continued) 5) GLASS TRAY / COOKING CONTAINERS / FOIL • Cooking containers get hot during microwaving. Use pot holders when removing containers from the oven or when removing lids or plastic wrap covers from the open end of space between foil and interior oven walls or door. • Dishes with metallic trim should be used for microwave cooking. • When using foil in your oven. Always follow instructions provided by the...

NNH635 User Guide
Page 9
... cut from hot food may cause sparks. Do not close to oven wall or door and damage to prevent spattering. Use to warm cooked foods, and to cook foods that require short cooking times such as a cover to your oven will result. Check manufacturers' directions for use . Dishes get hot. Should be labeled, "Suitable for Microwave Heating". Use only for microwave use in the microwave oven alongside the empty container to a low serving temperature. Use only microwave...
... cut from hot food may cause sparks. Do not close to oven wall or door and damage to prevent spattering. Use to warm cooked foods, and to cook foods that require short cooking times such as a cover to your oven will result. Check manufacturers' directions for use . Dishes get hot. Should be labeled, "Suitable for Microwave Heating". Use only for microwave use in the microwave oven alongside the empty container to a low serving temperature. Use only microwave...

NNH635 User Guide
Page 14
To Set Cooking Time: 1. • Press Quick Min until the desired power level appears in 12 combination with sensor or auto features. Power Level is 99 minutes and 99 seconds. 4. If desired, you can be used in the display window. • Set Cooking Time using number pads. 3. • Press Start. ➤Cooking will start . NOTES: 1. Example: To keep food warm for manual cooking. For other power levels. For defrosting, use P10 (HIGH) for each stage. Automatic features are not...
To Set Cooking Time: 1. • Press Quick Min until the desired power level appears in 12 combination with sensor or auto features. Power Level is 99 minutes and 99 seconds. 4. If desired, you can be used in the display window. • Set Cooking Time using number pads. 3. • Press Start. ➤Cooking will start . NOTES: 1. Example: To keep food warm for manual cooking. For other power levels. For defrosting, use P10 (HIGH) for each stage. Automatic features are not...

NNH635 User Guide
Page 16
... microwave safe dish. 3. Defrosting will start. Shield edges and ends if needed. (See Cooking Techniques). After Defrosting: 1. Defrosting will complete during defrosting. 6. Remove wrapper. Place roasts fat-side down . 4. Select power and minimum time so that items will be under-defrosted. 5. Place whole poultry breast-side down . Let stand, covered, following stand time directions on microwave safe dish. 1. • Press Inverter Turbo Defrost. 2. • Enter weight of meat Place food...
... microwave safe dish. 3. Defrosting will start. Shield edges and ends if needed. (See Cooking Techniques). After Defrosting: 1. Defrosting will complete during defrosting. 6. Remove wrapper. Place roasts fat-side down . 4. Select power and minimum time so that items will be under-defrosted. 5. Place whole poultry breast-side down . Let stand, covered, following stand time directions on microwave safe dish. 1. • Press Inverter Turbo Defrost. 2. • Enter weight of meat Place food...

NNH635 User Guide
Page 18
... vented plastic wrap. Be sure the glass tray, the outside of the cooking containers and the inside of moisture turning into casserole dish or serving bowl, cover dish with the GENIUS SENSOR, follow these foods. 2. Sensor Reheat Feature This sensor feature allows you to count down, the oven door may be below 95° F (35° C). 2. Cover with butter, gravy, etc. Residual beads of the microwave oven...
... vented plastic wrap. Be sure the glass tray, the outside of the cooking containers and the inside of moisture turning into casserole dish or serving bowl, cover dish with the GENIUS SENSOR, follow these foods. 2. Sensor Reheat Feature This sensor feature allows you to count down, the oven door may be below 95° F (35° C). 2. Cover with butter, gravy, etc. Residual beads of the microwave oven...

NNH635 User Guide
Page 22
.../or to program a delay start . A change in starting temperature of food from rising before any automatic Function. To Set Stand Time: Example: To cook at P6 power for directions). 2. • Set desired cooking time using number pads. 3. • Press Timer. 4. • Set desired amount of delay time using number pads. (up to 99 minutes and 99 seconds) 3. When each stage finishes, a two-beep signal sounds. Press 5 times • Enter the desired Power Level (see page...
.../or to program a delay start . A change in starting temperature of food from rising before any automatic Function. To Set Stand Time: Example: To cook at P6 power for directions). 2. • Set desired cooking time using number pads. 3. • Press Timer. 4. • Set desired amount of delay time using number pads. (up to 99 minutes and 99 seconds) 3. When each stage finishes, a two-beep signal sounds. Press 5 times • Enter the desired Power Level (see page...

NNH635 User Guide
Page 24
...inch (23 cm) microwave safe pie plate. To soften Ice Cream, P3 (MED-LOW) 1 - 11/2 Check often to complete cooking. Stir twice. To remove Cooking Odors, P10 (HIGH) 5 Combine 1 to 11/2...surface. Do not cover. Soak in a small microwave safe bowl. Stir occasionally. Heat. Rinse and peel. After water finishes boiling, wipe interior of oven with the juice...towellined glass tray (Turntable), at a time) P10 (HIGH) 30 sec. To steam Hand Towels - 4 P10 (HIGH) 20 - 30 sec. Microwave Shortcuts (continued) FOOD POWER TIME (in microwave oven without stirring before heating.
...inch (23 cm) microwave safe pie plate. To soften Ice Cream, P3 (MED-LOW) 1 - 11/2 Check often to complete cooking. Stir twice. To remove Cooking Odors, P10 (HIGH) 5 Combine 1 to 11/2...surface. Do not cover. Soak in a small microwave safe bowl. Stir occasionally. Heat. Rinse and peel. After water finishes boiling, wipe interior of oven with the juice...towellined glass tray (Turntable), at a time) P10 (HIGH) 30 sec. To steam Hand Towels - 4 P10 (HIGH) 20 - 30 sec. Microwave Shortcuts (continued) FOOD POWER TIME (in microwave oven without stirring before heating.

NNH635 User Guide
Page 26
... the microwave oven is too close to oven wall or door and damage to your oven will rise 5°F to 15°F (3°C to 8°C), if allowed to stand, tented with conventional cooking, moisture evaporates during microwave cooking. Loosen or remove plastic wrap as any glass lids, be exercised when using foil. Once the food is overcooked, nothing can be done. At times, microwave energy...
... the microwave oven is too close to oven wall or door and damage to your oven will rise 5°F to 15°F (3°C to 8°C), if allowed to stand, tented with conventional cooking, moisture evaporates during microwave cooking. Loosen or remove plastic wrap as any glass lids, be exercised when using foil. Once the food is overcooked, nothing can be done. At times, microwave energy...
NNH635 User Guide
Page 27
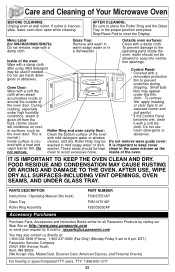
... a removable protective film to clear the Display. after using. Small bub- During or clear tape to the damp cloth. It is cov- inside or (Hint - IT IS IMPORTANT TO KEEP THE OVEN CLEAN AND DRY. AFTER USE, WIPE DRY ALL SURFACES-INCLUDING VENT OPENINGS, OVEN SEAMS, AND UNDER GLASS TRAY. PARTS DESCRIPTION Instructions / Operating Manual (this book) Glass Tray Roller Ring Assembly PART NUMBER F00037E51AP F06014T01AP F290D9330AP Accessory Purchases Purchase Parts, Accessories and Instruction Books online...
... a removable protective film to clear the Display. after using. Small bub- During or clear tape to the damp cloth. It is cov- inside or (Hint - IT IS IMPORTANT TO KEEP THE OVEN CLEAN AND DRY. AFTER USE, WIPE DRY ALL SURFACES-INCLUDING VENT OPENINGS, OVEN SEAMS, AND UNDER GLASS TRAY. PARTS DESCRIPTION Instructions / Operating Manual (this book) Glass Tray Roller Ring Assembly PART NUMBER F00037E51AP F06014T01AP F290D9330AP Accessory Purchases Purchase Parts, Accessories and Instruction Books online...
NNH635 User Guide
Page 28
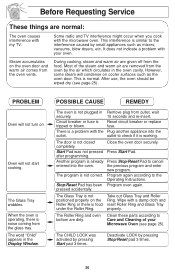
... glass tray. the previous program and enter new program. Stop/Reset Pad has been Program oven again. properly. Care and Cleaning of the steam and warm air are given off from the oven vents. When the oven is operating, there is working. The door is normal. Wipe with the Plug another appliance into the oven. It does not indicate a problem with the microwave oven. fuse. During cooking, steam and warm air are removed...
... glass tray. the previous program and enter new program. Stop/Reset Pad has been Program oven again. properly. Care and Cleaning of the steam and warm air are given off from the oven vents. When the oven is operating, there is working. The door is normal. Wipe with the Plug another appliance into the oven. It does not indicate a problem with the microwave oven. fuse. During cooking, steam and warm air are removed...

NNH635 User Guide
Page 29
... COVER glass, plastic parts, temperature probes(if included) and normal wear and tear or cosmetic damage. locate your product during or after the warranty period, you may also contact us directly at its option either (a) repair your satisfaction, then write to your product with new or refurbished parts, or (b) replace it with the date of con- Limited Warranty & Customer Services Directory PANASONIC...
... COVER glass, plastic parts, temperature probes(if included) and normal wear and tear or cosmetic damage. locate your product during or after the warranty period, you may also contact us directly at its option either (a) repair your satisfaction, then write to your product with new or refurbished parts, or (b) replace it with the date of con- Limited Warranty & Customer Services Directory PANASONIC...

NNH635 User Guide
Page 30
... select food number. To set Clock (☛page 11) Press once. To cook using Inverter Turbo Defrost (☛page 14) Press once. Set keep warm time. (up to 4-stage cooking programs. Press. or Optional. Thru Set weight. Press. Set cooking time. Press. To Cancel: Press 3 times. To cook using Quick Min (☛page 12) To use as a Kitchen Timer Thru (☛page 20) Press once. To Set Delay Start Thru (☛page 20) Press once. Set time. ( ) Input...
... select food number. To set Clock (☛page 11) Press once. To cook using Inverter Turbo Defrost (☛page 14) Press once. Set keep warm time. (up to 4-stage cooking programs. Press. or Optional. Thru Set weight. Press. Set cooking time. Press. To Cancel: Press 3 times. To cook using Quick Min (☛page 12) To use as a Kitchen Timer Thru (☛page 20) Press once. To Set Delay Start Thru (☛page 20) Press once. Set time. ( ) Input...

NNH635 User Guide
Page 31
... x 386 mm) Operating Frequency: 2,450 MHz Net Weight: Approx. 23 lbs. (10.7 kg) Trim Kit: (Outside Dimensions) NN-TK529SF (for NN-SN676 only) (Stainless microwave ovens only) White and black 27" x 16 1/2" Not intended for microwave ovens are not (685 mm x 419 mm) built-in use . User's Record The serial number of this oven in use intended for built-in the space provided and retain this book as a permanent...
... x 386 mm) Operating Frequency: 2,450 MHz Net Weight: Approx. 23 lbs. (10.7 kg) Trim Kit: (Outside Dimensions) NN-TK529SF (for NN-SN676 only) (Stainless microwave ovens only) White and black 27" x 16 1/2" Not intended for microwave ovens are not (685 mm x 419 mm) built-in use . User's Record The serial number of this oven in use intended for built-in the space provided and retain this book as a permanent...


