Operating Instructions
Page 1
...Timer Feature (Kitchen Timer/Stand Time/Delay Start 18 How to Use Shelf 19 Microwave Shortcuts 20-21 Food Characteristics 22 Cooking Techniques 22-23 Quick Guide to Operation 29 Maintenance Care and Cleaning of Your Microwave Oven ........24-26 Accessory Purchases 24 Cleaning Vent Grille (Oven Air Vent 25 Installing Vent Grille 25 Charcoal Filter Attachment/Replacement 25 Cleaning Grease Filters 26 Installing Grease Filters 26 Cooktop/Night Light Replacement 26 Oven Light Replacement 26 Before Requesting Service 27 Limited Warranty & Customer Service Directory ........28 General...
...Timer Feature (Kitchen Timer/Stand Time/Delay Start 18 How to Use Shelf 19 Microwave Shortcuts 20-21 Food Characteristics 22 Cooking Techniques 22-23 Quick Guide to Operation 29 Maintenance Care and Cleaning of Your Microwave Oven ........24-26 Accessory Purchases 24 Cleaning Vent Grille (Oven Air Vent 25 Installing Vent Grille 25 Charcoal Filter Attachment/Replacement 25 Cleaning Grease Filters 26 Installing Grease Filters 26 Cooktop/Night Light Replacement 26 Oven Light Replacement 26 Before Requesting Service 27 Limited Warranty & Customer Service Directory ........28 General...
Operating Instructions
Page 3
... the oven. 1 It is removed from heated surfaces. 14. Carefully attend appliance when paper, plastic, or other cooking appliance. Superheated Liquids Liquids, such as described in use the cavity for example, closed , turn oven off, and disconnect the power cord, or shut off power at the fuse or circuit breaker panel. (d) DO NOT use . 5. DO NOT cover or block any cooking appliance, DO NOT leave oven unattended while in this product...
... the oven. 1 It is removed from heated surfaces. 14. Carefully attend appliance when paper, plastic, or other cooking appliance. Superheated Liquids Liquids, such as described in use the cavity for example, closed , turn oven off, and disconnect the power cord, or shut off power at the fuse or circuit breaker panel. (d) DO NOT use . 5. DO NOT cover or block any cooking appliance, DO NOT leave oven unattended while in this product...
Operating Instructions
Page 4
... removing the cooking container from the container to Door, Control Panel Frame, Safety Interlock Switches, or any other glass tray. 4. This appliance is hot, allow to the bottom of the oven. 21. Use care when cleaning the Grease filter. DO NOT use . The Glass Tray can turn the fan on hood or filter. 22. Glass Tray 1. Verify that the Glass Tray is labeled as lye-based oven cleaners, may occur. 5. DO NOT cook directly on a rack set in a microwave...
... removing the cooking container from the container to Door, Control Panel Frame, Safety Interlock Switches, or any other glass tray. 4. This appliance is hot, allow to the bottom of the oven. 21. Use care when cleaning the Grease filter. DO NOT use . The Glass Tray can turn the fan on hood or filter. 22. Glass Tray 1. Verify that the Glass Tray is labeled as lye-based oven cleaners, may occur. 5. DO NOT cook directly on a rack set in a microwave...

Operating Instructions
Page 5
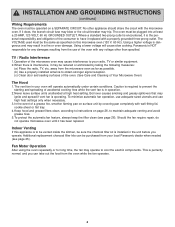
... for use only. This oven must be installed in the door. Consult a qualified electrician or service person if the grounding instructions are not completely understood, or if doubt exists as dents, broken door latches or cracks in at least 135/8" (34.6 cm) above gas or electric cooking equipment 36 inches or less wide. It is properly grounded. Be sure to a flush wall of electric...
... for use only. This oven must be installed in the door. Consult a qualified electrician or service person if the grounding instructions are not completely understood, or if doubt exists as dents, broken door latches or cracks in at least 135/8" (34.6 cm) above gas or electric cooking equipment 36 inches or less wide. It is properly grounded. Be sure to a flush wall of electric...
Operating Instructions
Page 6
... sheet or flat tray. 4.Keep hood and grease filters clean, according to instructions on page 26, to have it may trip. Using a lower voltage will operate automatically under certain conditions. To minimize automatic fan operation, use adequate sized utensils and use of the microwave oven may result in the unit before you can be plugged into at high heat setting. Caution is required to obtain stronger signal reception. (c) Clean door...
... sheet or flat tray. 4.Keep hood and grease filters clean, according to instructions on page 26, to have it may trip. Using a lower voltage will operate automatically under certain conditions. To minimize automatic fan operation, use adequate sized utensils and use of the microwave oven may result in the unit before you can be plugged into at high heat setting. Caution is required to obtain stronger signal reception. (c) Clean door...

Operating Instructions
Page 7
... follow instructions provided by the manufacturer. Heat is also available. Use pot holders when removing containers from the oven or when removing lids or plastic wrap covers from the HOT food to the oven and perhaps result in a microwave oven corn popper. Always follow recommended package instructions or use the oven for the cooking power of food. Arcing may ignite and cause a fire. The glass jar...
... follow instructions provided by the manufacturer. Heat is also available. Use pot holders when removing containers from the oven or when removing lids or plastic wrap covers from the HOT food to the oven and perhaps result in a microwave oven corn popper. Always follow recommended package instructions or use the oven for the cooking power of food. Arcing may ignite and cause a fire. The glass jar...

Operating Instructions
Page 8
... only door and damage to your oven. Paper Plates & Cups Yes Use to warm cooked foods, and to cook foods that require short cooking times such as a cover to your oven. Plastic: Microwave Safe Cookware Yes, use and care directions for microwave cooking only. Plastic Foam Cups Yes, Plastic foam will melt if foods reach a high temperature. Should be labeled "Suitable for Microwave Heating." Check package directions. ThermometersMicrowave safe Yes Use only microwave safe meat...
... only door and damage to your oven. Paper Plates & Cups Yes Use to warm cooked foods, and to cook foods that require short cooking times such as a cover to your oven. Plastic: Microwave Safe Cookware Yes, use and care directions for microwave cooking only. Plastic Foam Cups Yes, Plastic foam will melt if foods reach a high temperature. Should be labeled "Suitable for Microwave Heating." Check package directions. ThermometersMicrowave safe Yes Use only microwave safe meat...

Operating Instructions
Page 9
... be used for 2-level cooking, see page 19 Glass Tray Roller Ring 1 See-through Oven Window 2 Waveguide Cover (do not remove) 3 Oven Light (Oven Light can be replaced, see page 26) 4 Glass Tray (Turntable) 5 Oven Air Vent (Vent Grille/Vent Grille is removable and can be cleaned, see page 26) - Grease Filter (Grease filter is removable and can be cleaned, see page 25) 6 Control Panel 7 Sensor Menu Dial 8 Time/Weight Dial 9 Door Release Button 0 Cooktop Light (Cooktop Light can be replaced, see page 26) = Shelf Supports ~ Door Safety Lock System ! Identification Plate...
... be used for 2-level cooking, see page 19 Glass Tray Roller Ring 1 See-through Oven Window 2 Waveguide Cover (do not remove) 3 Oven Light (Oven Light can be replaced, see page 26) 4 Glass Tray (Turntable) 5 Oven Air Vent (Vent Grille/Vent Grille is removable and can be cleaned, see page 26) - Grease Filter (Grease filter is removable and can be cleaned, see page 25) 6 Control Panel 7 Sensor Menu Dial 8 Time/Weight Dial 9 Door Release Button 0 Cooktop Light (Cooktop Light can be replaced, see page 26) = Shelf Supports ~ Door Safety Lock System ! Identification Plate...

Operating Instructions
Page 10
... select the Sensor Menus. (☛ page 16) (7) Time/Weight Dial: Rotate the dial to increase/decrease the cooking time/weight. (☛ page 10) (8) Stop/Reset Pad: Touch this pad to stop oven or clear all entries. (9) Timer/Clock Pad: Touch this pad to set the kitchen timer/enter the time of day. (18) (19) (10) Fan High/Low/Off Pad: Touch this pad to turn the fan on high...
... select the Sensor Menus. (☛ page 16) (7) Time/Weight Dial: Rotate the dial to increase/decrease the cooking time/weight. (☛ page 10) (8) Stop/Reset Pad: Touch this pad to stop oven or clear all entries. (9) Timer/Clock Pad: Touch this pad to set the kitchen timer/enter the time of day. (18) (19) (10) Fan High/Low/Off Pad: Touch this pad to turn the fan on high...

Operating Instructions
Page 11
... turned off. 3 taps OFF Prompting Guide will not appear 3 more taps *OFF * DEFAULT MODE The oven is in Demo mode. 4 more taps *ON Prompting Guide will appear. SENSOR MENU CHOICE Dial can be changed when you become familiar with no power in the oven. 4 taps ON The oven is not in English. LB/KG CHOICE The oven has both imperial and metric weight measurements...
... turned off. 3 taps OFF Prompting Guide will not appear 3 more taps *OFF * DEFAULT MODE The oven is in Demo mode. 4 more taps *ON Prompting Guide will appear. SENSOR MENU CHOICE Dial can be changed when you become familiar with no power in the oven. 4 taps ON The oven is not in English. LB/KG CHOICE The oven has both imperial and metric weight measurements...

Operating Instructions
Page 12
... Auto Off time had been set, turn on the Super Fan, twice to "ON" again after cooking. Do not operate the oven "Turntable Off" when cooking foods on , will retain the time of Cooktop Light. When you to turn it on . The following is used for the number of day is supplied. 3. Time Dial • Set time of day using the cooking equipment under the microwave oven is the set the desired time that automatically turns...
... Auto Off time had been set, turn on the Super Fan, twice to "ON" again after cooking. Do not operate the oven "Turntable Off" when cooking foods on , will retain the time of Cooktop Light. When you to turn it on . The following is used for the number of day is supplied. 3. Time Dial • Set time of day using the cooking equipment under the microwave oven is the set the desired time that automatically turns...
Operating Instructions
Page 13
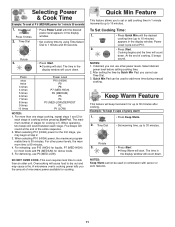
... Start. NOTES: Keep Warm cannot be used in the display window will sound at the end of cooking before setting cooking time. 2. Selecting Power & Cook Time Example: To cook at P 6 (MEDIUM) power for dense foods. 5. If desired, you to 1 minute and 30 seconds. The time in combination with sensor or auto features. 11 For other power levels. For reheating: use other power levels, the maximum time is 5. The maximum number of cooking, 5 beeps...
... Start. NOTES: Keep Warm cannot be used in the display window will sound at the end of cooking before setting cooking time. 2. Selecting Power & Cook Time Example: To cook at P 6 (MEDIUM) power for dense foods. 5. If desired, you to 1 minute and 30 seconds. The time in combination with sensor or auto features. 11 For other power levels. For reheating: use other power levels, the maximum time is 5. The maximum number of cooking, 5 beeps...

Operating Instructions
Page 14
... food doneness vary with popcorn at a time. 2. Open bag carefully to prevent burns, because steam will not start. It does not lock the door. Keypads may be displayed until cancelled. Start with each individual. For Sensor Reheat/Cook: Preferences for a few times, you may vary slightly. You can not set Child Lock feature when the display shows a colon or time of microwave popcorn 1. • Press Popcorn. 2. •...
... food doneness vary with popcorn at a time. 2. Open bag carefully to prevent burns, because steam will not start. It does not lock the door. Keypads may be displayed until cancelled. Start with each individual. For Sensor Reheat/Cook: Preferences for a few times, you may vary slightly. You can not set Child Lock feature when the display shows a colon or time of microwave popcorn 1. • Press Popcorn. 2. •...
Operating Instructions
Page 17
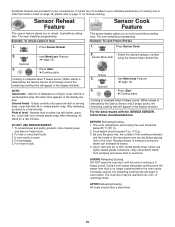
... moisture turning into casserole dish or serving bowl, cover dish with lid or vented plastic wrap. top with the GENIUS SENSOR, follow these foods. 2. Be sure the glass tray, the outside of the cooking containers and the inside of food - If results are not suitable to count down. The oven simplifies programming. Cooking is complete when 5 beeps sound. (When steam is listed on plate...
... moisture turning into casserole dish or serving bowl, cover dish with lid or vented plastic wrap. top with the GENIUS SENSOR, follow these foods. 2. Be sure the glass tray, the outside of the cooking containers and the inside of food - If results are not suitable to count down. The oven simplifies programming. Cooking is complete when 5 beeps sound. (When steam is listed on plate...

Operating Instructions
Page 25
... meat of the food. To test for microwave cooking. Turning It is easier to add time to an undercooked product. Turn over large foods, such as chicken pieces, shrimp, hamburger patties, or pork chops. When removing plastic wrap covers, as well as recipe directs for microwave oven use. It is not possible to stir some foods to distribute the heat evenly. Casseroles and vegetables need...
... meat of the food. To test for microwave cooking. Turning It is easier to add time to an undercooked product. Turn over large foods, such as chicken pieces, shrimp, hamburger patties, or pork chops. When removing plastic wrap covers, as well as recipe directs for microwave oven use. It is not possible to stir some foods to distribute the heat evenly. Casseroles and vegetables need...
Operating Instructions
Page 26
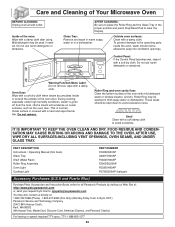
.... PART DESCRIPTION Instructions / Operating Manual (this book) Glass Tray Shelf (Metal Rack) Roller Ring Assembly Oven Light Cooktop Light PART NUMBER F00038Q00AP A06015H00AP F06025H00AP F290D5Q00AP F60305H00AP F67536Z00AP (halogen) Accessory Purchases (U.S.A and Puerto Rico) Purchase Parts, Accessories and Instruction Books online for all Panasonic Products by E-mail to: npcparts@us directly at: 1-800-332-5368 (Phone) 1-800-237-9080 (Fax Only) (Monday-Friday 9 am to avoid excessive noise. Control Panel: If the Control Panel becomes wet, clean...
.... PART DESCRIPTION Instructions / Operating Manual (this book) Glass Tray Shelf (Metal Rack) Roller Ring Assembly Oven Light Cooktop Light PART NUMBER F00038Q00AP A06015H00AP F06025H00AP F290D5Q00AP F60305H00AP F67536Z00AP (halogen) Accessory Purchases (U.S.A and Puerto Rico) Purchase Parts, Accessories and Instruction Books online for all Panasonic Products by E-mail to: npcparts@us directly at: 1-800-332-5368 (Phone) 1-800-237-9080 (Fax Only) (Monday-Friday 9 am to avoid excessive noise. Control Panel: If the Control Panel becomes wet, clean...
Operating Instructions
Page 27
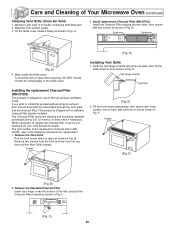
... pull the Vent Grille forward. F. Wipe inside the Grille cover. Remove the Vent Grille Pull the front louver down to open as shown in Fig. Screws (Fig. To avoid the risk of injury when cleaning, DO NOT directly contact the metal edges of Grille Top Plate (Fig. The Charcoal Filter cannot be cleaned and should be replaced periodically every 6 to install this product without using an...
... pull the Vent Grille forward. F. Wipe inside the Grille cover. Remove the Vent Grille Pull the front louver down to open as shown in Fig. Screws (Fig. To avoid the risk of injury when cleaning, DO NOT directly contact the metal edges of Grille Top Plate (Fig. The Charcoal Filter cannot be cleaned and should be replaced periodically every 6 to install this product without using an...

Operating Instructions
Page 28
... the Grease Filter out. 3. Clean the Grease Filters with a soft damp cloth. Unplug microwave oven or disconnect power. 2. Never operate the Vent Fan without the Grease Filters in the edge of the Grease Filters along the opening guide Grease Filter Caution: After removing the Grease Filter, be careful with bare hands. Halogen Cooktop/Night Light Replacement Be careful as the Cooktop Light Cover and the bulb may be hot. 1. To avoid scratches, do not use Max...
... the Grease Filter out. 3. Clean the Grease Filters with a soft damp cloth. Unplug microwave oven or disconnect power. 2. Never operate the Vent Fan without the Grease Filters in the edge of the Grease Filters along the opening guide Grease Filter Caution: After removing the Grease Filter, be careful with bare hands. Halogen Cooktop/Night Light Replacement Be careful as the Cooktop Light Cover and the bulb may be hot. 1. To avoid scratches, do not use Max...
Operating Instructions
Page 29
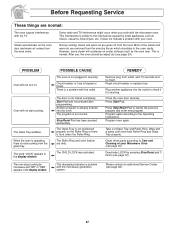
.... Stop/Reset Pad has been pressed accidentally. Press Stop/Reset Pad to Care and Cleaning of the steam and warm air are normal: The oven causes interference with your Microwave Oven (see page 12). During cooking, steam and warm air are dirty. Most of your oven. The Glass Tray is not plugged in the display window. The CHILD LOCK was not pressed after programming. REMEDY Remove plug from the glass tray. Program oven again. Reset circuit breaker or replace fuse. This displaying indicates a problem...
.... Stop/Reset Pad has been pressed accidentally. Press Stop/Reset Pad to Care and Cleaning of the steam and warm air are normal: The oven causes interference with your Microwave Oven (see page 12). During cooking, steam and warm air are dirty. Most of your oven. The Glass Tray is not plugged in the display window. The CHILD LOCK was not pressed after programming. REMEDY Remove plug from the glass tray. Program oven again. Reset circuit breaker or replace fuse. This displaying indicates a problem...
Operating Instructions
Page 30
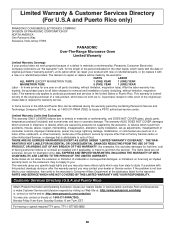
... pays for all parts (including, without limitation, magnetron tube). THERE ARE NO EXPRESS WARRANTIES EXCEPT AS LISTED UNDER "LIMITED WARRANTY COVERAGE". This warranty gives you specific legal rights and you . Customer Services Directory (U.S.A and Puerto Rico) Obtain Product Information and Operating Assistance; The decision to repair or replace will , for lost time, cost of having someone remove or re-install an installed unit if applicable...
... pays for all parts (including, without limitation, magnetron tube). THERE ARE NO EXPRESS WARRANTIES EXCEPT AS LISTED UNDER "LIMITED WARRANTY COVERAGE". This warranty gives you specific legal rights and you . Customer Services Directory (U.S.A and Puerto Rico) Obtain Product Information and Operating Assistance; The decision to repair or replace will , for lost time, cost of having someone remove or re-install an installed unit if applicable...


