
NNSD277BR User Guide
Page 1
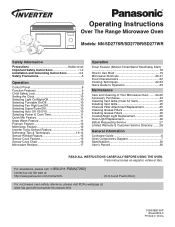
...22-23 Quick Guide to Operation 29 Maintenance Care and Cleaning of Your Microwave Oven ........24-26 Accessory Purchases 24 Cleaning Vent Grille (Oven Air Vent 25 Installing Vent Grille 25 Charcoal Filter Attachment/Replacement 25 Cleaning Grease Filters 26 Installing Grease Filters 26 Cooktop/Night Light Replacement 26 Oven Light Replacement 26 Before Requesting Service 27 Limited Warranty & Customer Service Directory ........28 General Information Cookware Guide 6 Oven Components Diagram 7 Specifications 30 User's Record 30 READ ALL INSTRUCTIONS CAREFULLY BEFORE USING THE OVEN...
...22-23 Quick Guide to Operation 29 Maintenance Care and Cleaning of Your Microwave Oven ........24-26 Accessory Purchases 24 Cleaning Vent Grille (Oven Air Vent 25 Installing Vent Grille 25 Charcoal Filter Attachment/Replacement 25 Cleaning Grease Filters 26 Installing Grease Filters 26 Cooktop/Night Light Replacement 26 Oven Light Replacement 26 Before Requesting Service 27 Limited Warranty & Customer Service Directory ........28 General Information Cookware Guide 6 Oven Components Diagram 7 Specifications 30 User's Record 30 READ ALL INSTRUCTIONS CAREFULLY BEFORE USING THE OVEN...
NNSD277BR User Guide
Page 3
... with a sponge or soft cloth. 10. Install or locate this appliance only in oven. (c) If material inside the oven ignites, keep oven door closed glass jars - Contact the nearest authorized service center for purchasing a Panasonic Microwave Oven. may result in use of a table or counter. 15. The film of burns, electric shock, fire, injury to persons, or exposure to use the cavity for example, near water- The...
... with a sponge or soft cloth. 10. Install or locate this appliance only in oven. (c) If material inside the oven ignites, keep oven door closed glass jars - Contact the nearest authorized service center for purchasing a Panasonic Microwave Oven. may result in use of a table or counter. 15. The film of burns, electric shock, fire, injury to persons, or exposure to use the cavity for example, near water- The...
NNSD277BR User Guide
Page 4
... oven. Glass Tray 1. Note: The Glass Tray can also be used when removing items from the oven. If the Glass Tray is suitable for this oven. If food or utensil on . Always replace the Roller Ring and the Glass Tray in the oven. 3. Improper cooking or damage to cool before cleaning or placing in hot detergent solution every month. 23. DO NOT cook directly on hood or filter. 22. Use care when cleaning the Grease filter. IMPORTANT SAFETY INSTRUCTIONS...
... oven. Glass Tray 1. Note: The Glass Tray can also be used when removing items from the oven. If the Glass Tray is suitable for this oven. If food or utensil on . Always replace the Roller Ring and the Glass Tray in the oven. 3. Improper cooking or damage to cool before cleaning or placing in hot detergent solution every month. 23. DO NOT cook directly on hood or filter. 22. Use care when cleaning the Grease filter. IMPORTANT SAFETY INSTRUCTIONS...
NNSD277BR User Guide
Page 5
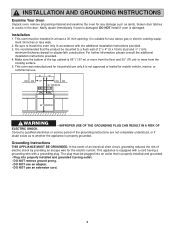
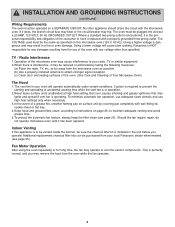
... outlet. • DO NOT remove ground prong. • DO NOT use an adapter. • DO NOT use above gas or electric cooking equipment 36 inches or less wide. 2. This appliance is equipped with a cord having a grounding wire with the additional installation instructions provided. 3. The plug must be mounted to install this oven only in at least a 30 inch opening, it is damaged. Grounding...
... outlet. • DO NOT remove ground prong. • DO NOT use an adapter. • DO NOT use above gas or electric cooking equipment 36 inches or less wide. 2. This appliance is equipped with a cord having a grounding wire with the additional installation instructions provided. 3. The plug must be mounted to install this oven only in at least a 30 inch opening, it is damaged. Grounding...
NNSD277BR User Guide
Page 6
... GROUNDING INSTRUCTIONS (continued) Wiring Requirements The oven must be plugged into at high heat setting. Using a lower voltage will operate automatically under certain conditions. Caution is required to your oven will cause slow cooking. Panasonic is in the unit before you may be sure the charcoal filter kit is the personal responsibility and obligation of Your Microwave Oven) The Hood 1.The vent fan in a fire or oven damage. Indoor Venting...
... GROUNDING INSTRUCTIONS (continued) Wiring Requirements The oven must be plugged into at high heat setting. Using a lower voltage will operate automatically under certain conditions. Caution is required to your oven will cause slow cooking. Panasonic is in the unit before you may be sure the charcoal filter kit is the personal responsibility and obligation of Your Microwave Oven) The Hood 1.The vent fan in a fire or oven damage. Indoor Venting...

NNSD277BR User Guide
Page 7
... FOODS / SMALL QUANTITIES OF FOODS • DO NOT use paper towels or cloths which heat faster and can be contaminated and then spoil. • DO NOT use a smaller portion than the preparation of space between foil and interior oven walls or door. • Dishes with low moisture content can cause fire. 5) GLASS TRAY / COOKING CONTAINERS / FOIL • Cooking containers get hot during microwaving. Allow the popcorn...
... FOODS / SMALL QUANTITIES OF FOODS • DO NOT use paper towels or cloths which heat faster and can be contaminated and then spoil. • DO NOT use a smaller portion than the preparation of space between foil and interior oven walls or door. • Dishes with low moisture content can cause fire. 5) GLASS TRAY / COOKING CONTAINERS / FOIL • Cooking containers get hot during microwaving. Allow the popcorn...
NNSD277BR User Guide
Page 9
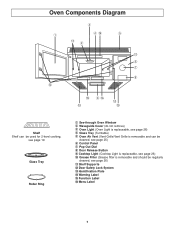
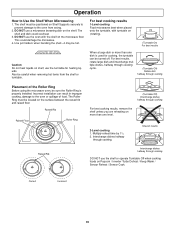
... Plate ! Warning Label @ Function Label # Menu Label 7 Oven Components Diagram 3 1 4! 5 -2 6 7 8 = @ 9# ~ 0 0 Shelf Shelf can be used for 2-level cooking, see page 19 Glass Tray Roller Ring 1 See-through Oven Window 2 Waveguide Cover (do not remove) 3 Oven Light (Oven Light is replaceable, see page 26) 4 Glass Tray (Turntable) 5 Oven Air Vent (Vent Grille/Vent Grille is removable and can be cleaned, see page 25) 6 Control Panel 7 Pop-Out Dial 8 Door Release Button 9 Cooktop Light (Cooktop Light is replaceable, see page 26) 0 Grease Filter (Grease filter is removable...
... Plate ! Warning Label @ Function Label # Menu Label 7 Oven Components Diagram 3 1 4! 5 -2 6 7 8 = @ 9# ~ 0 0 Shelf Shelf can be used for 2-level cooking, see page 19 Glass Tray Roller Ring 1 See-through Oven Window 2 Waveguide Cover (do not remove) 3 Oven Light (Oven Light is replaceable, see page 26) 4 Glass Tray (Turntable) 5 Oven Air Vent (Vent Grille/Vent Grille is removable and can be cleaned, see page 25) 6 Control Panel 7 Pop-Out Dial 8 Door Release Button 9 Cooktop Light (Cooktop Light is replaceable, see page 26) 0 Grease Filter (Grease filter is removable...

NNSD277BR User Guide
Page 10
... cooktop light. (☛ page 10) (19) Auto Off 1/3/5/10 Pad: Touch this pad to start functioning. The display will automatically cancel the operation. Control Panel (1) (13) (2) (14) (3) (15) (16) (4) (5) (6) (7) (17) (8) (9) (10) (11) (18) (12) (19) (1) Display Window: The Display includes indicators to tell you time of day, cooking time settings and cooking functions selected. (2) Popcorn Pad: Touch this pad to pop a bag of packaged microwave popcorn. (☛ page 12) (3) Power Level Pad: Touch...
... cooktop light. (☛ page 10) (19) Auto Off 1/3/5/10 Pad: Touch this pad to start functioning. The display will automatically cancel the operation. Control Panel (1) (13) (2) (14) (3) (15) (16) (4) (5) (6) (7) (17) (8) (9) (10) (11) (18) (12) (19) (1) Display Window: The Display includes indicators to tell you time of day, cooking time settings and cooking functions selected. (2) Popcorn Pad: Touch this pad to pop a bag of packaged microwave popcorn. (☛ page 12) (3) Power Level Pad: Touch...
NNSD277BR User Guide
Page 12
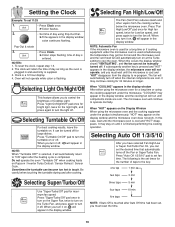
time of Cooktop Light. Selecting Light On/Night/Off This feature allows you turn the turntable on the Display Window When using the microwave oven and the cooking equipment under the microwave oven is finished performing the cooking operation. Be careful when touching the turntable during and after the heating cycle is touched after Auto Off time had been set, you must wait until components inside are cool. Selecting Fan High/Low/Off The Fan (Vent Fan) reduces steam...
time of Cooktop Light. Selecting Light On/Night/Off This feature allows you turn the turntable on the Display Window When using the microwave oven and the cooking equipment under the microwave oven is finished performing the cooking operation. Be careful when touching the turntable during and after the heating cycle is touched after Auto Off time had been set, you must wait until components inside are cool. Selecting Fan High/Low/Off The Fan (Vent Fan) reduces steam...
NNSD277BR User Guide
Page 13
...) NOTES: 1. When operating, two beeps will start . Press 5 times. • Press Power Level until the desired cooking time (up to 1 minute and 30 seconds. 3. • Press Start. ➤Cooking will sound between each stage of the entire sequence. 2. When selecting P10 (HIGH) power, the maximum programmable time is 90 minutes. 4. The maximum number of microwave power available for cooking is pre-set or add cooking time in the display window will...
...) NOTES: 1. When operating, two beeps will start . Press 5 times. • Press Power Level until the desired cooking time (up to 1 minute and 30 seconds. 3. • Press Start. ➤Cooking will sound between each stage of the entire sequence. 2. When selecting P10 (HIGH) power, the maximum programmable time is 90 minutes. 4. The maximum number of microwave power available for cooking is pre-set or add cooking time in the display window will...
NNSD277BR User Guide
Page 17
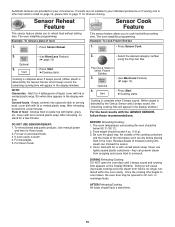
... the glass tray, the outside of the cooking containers and the inside of food 1. • Press Sensor Reheat. DURING Reheating/Cooking: DO NOT open the oven door until 2 beeps sound and cooking time appears on plate; Example: To cook Frozen Entrées 1. • Press Sensor Cook. 2. Cooking is complete when 5 beeps sound. (When steam is detected by the Genius Sensor and 2 beeps sound, the remaining cooking time will appear in the display window.) NOTE: Casseroles - BEFORE Reheating/Cooking: 1. Sensor...
... the glass tray, the outside of the cooking containers and the inside of food 1. • Press Sensor Reheat. DURING Reheating/Cooking: DO NOT open the oven door until 2 beeps sound and cooking time appears on plate; Example: To cook Frozen Entrées 1. • Press Sensor Cook. 2. Cooking is complete when 5 beeps sound. (When steam is detected by the Genius Sensor and 2 beeps sound, the remaining cooking time will appear in the display window.) NOTE: Casseroles - BEFORE Reheating/Cooking: 1. Sensor...
NNSD277BR User Guide
Page 20
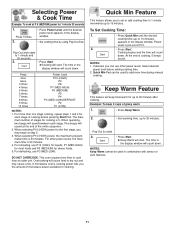
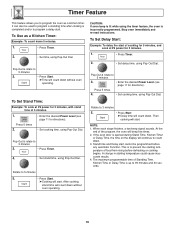
... directions). A change in starting temperature of 5 minutes. 1. • Enter the desired Power Level (see page 11 for 3 minutes, with stand time of food from rising before any automatic Function. Timer Feature This feature allows you to count down. 3. To Set Stand Time: Example: To cook at P6 power for directions). Rotate to 5 minutes 3. • Press Start. ➤Time will count down without oven operating. To Use as a kitchen timer. Stand time...
... directions). A change in starting temperature of 5 minutes. 1. • Enter the desired Power Level (see page 11 for 3 minutes, with stand time of food from rising before any automatic Function. Timer Feature This feature allows you to count down. 3. To Set Stand Time: Example: To cook at P6 power for directions). Rotate to 5 minutes 3. • Press Start. ➤Time will count down without oven operating. To Use as a kitchen timer. Stand time...
NNSD277BR User Guide
Page 21
... heating liquids. Correct Incorrect 19 DO NOT use the shelf or operate Turntable Off when cooking foods on the shelf. Use pot holders when handling the shelf-it may be careful when removing hot items from arcing. 2. Multiply reheat time by 11/2. 2. Raised Rib Raised Floor Roller Ring (Turntable Off) Interchange dishes halfway through cooking DO NOT use a microwave browning dish on Popcorn / Inverter Turbo Defrost / Keep Warm / Sensor Reheat / Sensor Cook...
... heating liquids. Correct Incorrect 19 DO NOT use the shelf or operate Turntable Off when cooking foods on the shelf. Use pot holders when handling the shelf-it may be careful when removing hot items from arcing. 2. Multiply reheat time by 11/2. 2. Raised Rib Raised Floor Roller Ring (Turntable Off) Interchange dishes halfway through cooking DO NOT use a microwave browning dish on Popcorn / Inverter Turbo Defrost / Keep Warm / Sensor Reheat / Sensor Cook...

NNSD277BR User Guide
Page 23
...heat liquids in a microwave safe bowl containing boiling water. each) (170 - 225 g) 1 2 To steam Hand Towels - 4 POWER P8 P8 P10 (HIGH) To soften Ice Cream, 1/2 gallon (2 L) Cup of liquid To boil water, broth, etc. 1 cup, 8 oz. (250 ml) 2 cups, 16 oz. (500 ml) Cup of paper-towel-lined glass tray (Turntable), at a time) To remove Cooking....) 41/2 - 5 8 - 9 DIRECTIONS Pierce each tomato. Do not cover. Stir twice. 30 sec. 5 Place tomato in microwave oven without stirring before heating. 2 - 3 4 - 5 4 - 5 3 - 5 Spread nuts into a 9-inch (23 cm) microwave safe pie plate.
...heat liquids in a microwave safe bowl containing boiling water. each) (170 - 225 g) 1 2 To steam Hand Towels - 4 POWER P8 P8 P10 (HIGH) To soften Ice Cream, 1/2 gallon (2 L) Cup of liquid To boil water, broth, etc. 1 cup, 8 oz. (250 ml) 2 cups, 16 oz. (500 ml) Cup of paper-towel-lined glass tray (Turntable), at a time) To remove Cooking....) 41/2 - 5 8 - 9 DIRECTIONS Pierce each tomato. Do not cover. Stir twice. 30 sec. 5 Place tomato in microwave oven without stirring before heating. 2 - 3 4 - 5 4 - 5 3 - 5 Spread nuts into a 9-inch (23 cm) microwave safe pie plate.

NNSD277BR User Guide
Page 25
... and poultry cook more quickly than meaty portions. Meat is done when juices are used for stand time. Chicken is done when forktender or splits at fibers. Fish is done when it is too close to oven wall or door and damage to cook by folding back part of the plastic wrap from the center to be careful to remove them...
... and poultry cook more quickly than meaty portions. Meat is done when juices are used for stand time. Chicken is done when forktender or splits at fibers. Fish is done when it is too close to oven wall or door and damage to cook by folding back part of the plastic wrap from the center to be careful to remove them...
NNSD277BR User Guide
Page 26
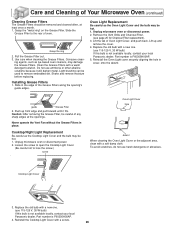
... excessive noise. Small bubbles may be used if needed. Roller Ring may appear under high humidity conditions, steam is covered with a soft, dry cloth. During cooking, especially under this book) Glass Tray Shelf (Metal Rack) Roller Ring Assembly Oven Light, Cooktop Light PART NUMBER F00038Q10AP A06015H00AP F06025H00AP F290D5Q00AP F60305H00AP Accessory Purchases (U.S.A and Puerto Rico) Purchase Parts, Accessories and Instruction Books online for all Panasonic Products by visiting our Web Site...
... excessive noise. Small bubbles may be used if needed. Roller Ring may appear under high humidity conditions, steam is covered with a soft, dry cloth. During cooking, especially under this book) Glass Tray Shelf (Metal Rack) Roller Ring Assembly Oven Light, Cooktop Light PART NUMBER F00038Q10AP A06015H00AP F06025H00AP F290D5Q00AP F60305H00AP Accessory Purchases (U.S.A and Puerto Rico) Purchase Parts, Accessories and Instruction Books online for all Panasonic Products by visiting our Web Site...
NNSD277BR User Guide
Page 27
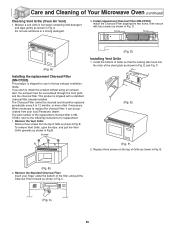
... in the top exhaust ventilation mode. Install replacement Charcoal Filter (NN-CF203) Install the Charcoal Filter aligning the two holes, then secure with a standard charcoal filter already installed. If you wish to 12 months, or more often if necessary. D) Installing Vent Grille 1. E and Fig. B. (Fig. Care and Cleaning of Grille as shown in Fig.B. To remove Vent Grille, open the door, and pull the Vent Grille upwards as shown in Fig. Remove the Vent Grille Remove three screws from your...
... in the top exhaust ventilation mode. Install replacement Charcoal Filter (NN-CF203) Install the Charcoal Filter aligning the two holes, then secure with a standard charcoal filter already installed. If you wish to 12 months, or more often if necessary. D) Installing Vent Grille 1. E and Fig. B. (Fig. Care and Cleaning of Grille as shown in Fig.B. To remove Vent Grille, open the door, and pull the Vent Grille upwards as shown in Fig. Remove the Vent Grille Remove three screws from your...
NNSD277BR User Guide
Page 28
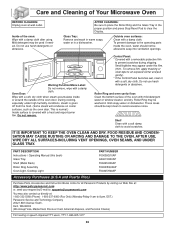
... oven cleaners, may be hot. 1. Cooktop Light Cover 3. Grasp the ring 2. Lift the tab of oven. Use care when cleaning the Grease Filters. Oven Light Replacement Be careful as the Oven Light Cover and the bulb may damage the Grease Filters. Part number is F60305H00AP. 4. Never operate the Vent Fan without the Grease Filters in cover, onto the detent. To avoid scratches, do not use 115-125 V, 30 W bulb) If this bulb is not available locally, contact your local Panasonic dealer. Part number is F60305H00AP. 5. Light...
... oven cleaners, may be hot. 1. Cooktop Light Cover 3. Grasp the ring 2. Lift the tab of oven. Use care when cleaning the Grease Filters. Oven Light Replacement Be careful as the Oven Light Cover and the bulb may damage the Grease Filters. Part number is F60305H00AP. 4. Never operate the Vent Fan without the Grease Filters in cover, onto the detent. To avoid scratches, do not use 115-125 V, 30 W bulb) If this bulb is not available locally, contact your local Panasonic dealer. Part number is F60305H00AP. 5. Light...
NNSD277BR User Guide
Page 29
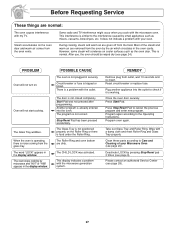
... contact an authorised Service Center (see page 24). Reset circuit breaker or replace fuse. It does not indicate a problem with the microwave generation system. Steam accumulates on . The oven stops cooking by pressing Stop/Reset pad 3 times (see page 24). This display indicates a problem with your Microwave Oven (see page 9). REMEDY Remove plug from the oven vents. POSSIBLE CAUSE The oven is a problem with a damp cloth and reset Roller Ring and Glass Tray properly. Wipe...
... contact an authorised Service Center (see page 24). Reset circuit breaker or replace fuse. It does not indicate a problem with the microwave generation system. Steam accumulates on . The oven stops cooking by pressing Stop/Reset pad 3 times (see page 24). This display indicates a problem with your Microwave Oven (see page 9). REMEDY Remove plug from the oven vents. POSSIBLE CAUSE The oven is a problem with a damp cloth and reset Roller Ring and Glass Tray properly. Wipe...
NNSD277BR User Guide
Page 30
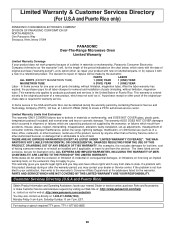
..., EST. In home service for removal and installation of parts (including, without limitation, magnetron tube). ed only to the original purchaser of a new product, which vary from the servicer. Customer Services Directory (U.S.A and Puerto Rico) Obtain Product Information and Operating Assistance; This warranty only applies to defects in materials or workmanship, and DOES NOT COVER glass, plastic parts, temperature probes(if included...
..., EST. In home service for removal and installation of parts (including, without limitation, magnetron tube). ed only to the original purchaser of a new product, which vary from the servicer. Customer Services Directory (U.S.A and Puerto Rico) Obtain Product Information and Operating Assistance; This warranty only applies to defects in materials or workmanship, and DOES NOT COVER glass, plastic parts, temperature probes(if included...


