
NNSD277BR User Guide
Page 1
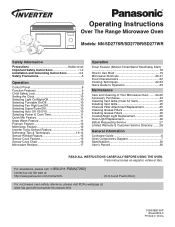
...22-23 Quick Guide to Operation 29 Maintenance Care and Cleaning of Your Microwave Oven ........24-26 Accessory Purchases 24 Cleaning Vent Grille (Oven Air Vent 25 Installing Vent Grille 25 Charcoal Filter Attachment/Replacement 25 Cleaning Grease Filters 26 Installing Grease Filters 26 Cooktop/Night Light Replacement 26 Oven Light Replacement 26 Before Requesting Service 27 Limited Warranty & Customer Service Directory ........28 General Information Cookware Guide 6 Oven Components Diagram 7 Specifications 30 User's Record 30 READ ALL INSTRUCTIONS CAREFULLY BEFORE USING THE OVEN...
...22-23 Quick Guide to Operation 29 Maintenance Care and Cleaning of Your Microwave Oven ........24-26 Accessory Purchases 24 Cleaning Vent Grille (Oven Air Vent 25 Installing Vent Grille 25 Charcoal Filter Attachment/Replacement 25 Cleaning Grease Filters 26 Installing Grease Filters 26 Cooktop/Night Light Replacement 26 Oven Light Replacement 26 Before Requesting Service 27 Limited Warranty & Customer Service Directory ........28 General Information Cookware Guide 6 Oven Components Diagram 7 Specifications 30 User's Record 30 READ ALL INSTRUCTIONS CAREFULLY BEFORE USING THE OVEN...
NNSD277BR User Guide
Page 3
... THE CON- See "GROUNDING INSTRUCTIONS" found on the turntable. for examination, repair or adjustment. 16. Carefully attend appliance when paper, plastic, or other cooking appliance. DO NOT cook directly on the inside the oven to facilitate cooking. (b) Remove wire twist-ties from heated surfaces. 14. DO NOT immerse cord or plug in use as water, coffee, or tea are placed inside front cover. 3. Visible bubbling is not...
... THE CON- See "GROUNDING INSTRUCTIONS" found on the turntable. for examination, repair or adjustment. 16. Carefully attend appliance when paper, plastic, or other cooking appliance. DO NOT cook directly on the inside the oven to facilitate cooking. (b) Remove wire twist-ties from heated surfaces. 14. DO NOT immerse cord or plug in use as water, coffee, or tea are placed inside front cover. 3. Visible bubbling is not...
NNSD277BR User Guide
Page 4
... the Glass Tray is not present to , on hood or filter. 22. If food or utensil on the Glass Tray touches oven walls, causing the tray to stop moving, the tray will reflect continuously throughout the oven causing overheating and damage, if food or water is hot, allow to Door, Control Panel Frame, Safety Interlock Switches, or any adjustments or repairs to cool before cleaning or placing in the oven. 3. The microwave energy will...
... the Glass Tray is not present to , on hood or filter. 22. If food or utensil on the Glass Tray touches oven walls, causing the tray to stop moving, the tray will reflect continuously throughout the oven causing overheating and damage, if food or water is hot, allow to Door, Control Panel Frame, Safety Interlock Switches, or any adjustments or repairs to cool before cleaning or placing in the oven. 3. The microwave energy will...
NNSD277BR User Guide
Page 5
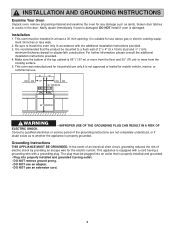
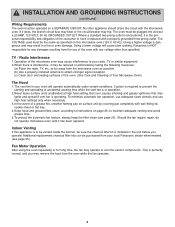
... electric shock by providing an escape wire for any damage such as to install this oven only in at least a 30 inch opening, it is not approved or tested for use an extension cord. 3 INSTALLATION AND GROUNDING INSTRUCTIONS Examine Your Oven Unpack oven, remove all packing material and examine the oven for the electric current. For further information, please consult the additional installation instructions provided. 4. Grounding Instructions...
... electric shock by providing an escape wire for any damage such as to install this oven only in at least a 30 inch opening, it is not approved or tested for use an extension cord. 3 INSTALLATION AND GROUNDING INSTRUCTIONS Examine Your Oven Unpack oven, remove all packing material and examine the oven for the electric current. For further information, please consult the additional installation instructions provided. 4. Grounding Instructions...
NNSD277BR User Guide
Page 6
..., cookie sheet or flat tray. 4.Keep hood and grease filters clean, according to instructions on a SEPARATE CIRCUIT. Indoor Venting If this microwave oven (120 V, 60 Hz). If it has been repaired. Using a higher voltage is dangerous and may ignite and spread if vent fan is perfectly normal, and you operate. Additional replacement charcoal filter kits can be plugged into at high heat setting. No other than specified. as possible. (b) Use a properly installed antenna to...
..., cookie sheet or flat tray. 4.Keep hood and grease filters clean, according to instructions on a SEPARATE CIRCUIT. Indoor Venting If this microwave oven (120 V, 60 Hz). If it has been repaired. Using a higher voltage is dangerous and may ignite and spread if vent fan is perfectly normal, and you operate. Additional replacement charcoal filter kits can be plugged into at high heat setting. No other than specified. as possible. (b) Use a properly installed antenna to...

NNSD277BR User Guide
Page 7
.... 5) GLASS TRAY / COOKING CONTAINERS / FOIL • Cooking containers get hot during microwaving. The glass jar or surface of the food may be so hot as to package directions. Jelly Donuts). 11) GENERAL OVEN USAGE GUIDELINES • DO NOT use plastic ties, cotton string or a strip cut from the open the bag facing away from the HOT food to prevent them . IMPORTANT Proper cooking depends upon the power, the time setting and...
.... 5) GLASS TRAY / COOKING CONTAINERS / FOIL • Cooking containers get hot during microwaving. The glass jar or surface of the food may be so hot as to package directions. Jelly Donuts). 11) GENERAL OVEN USAGE GUIDELINES • DO NOT use plastic ties, cotton string or a strip cut from the open the bag facing away from the HOT food to prevent them . IMPORTANT Proper cooking depends upon the power, the time setting and...
NNSD277BR User Guide
Page 9
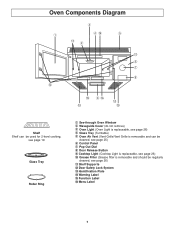
Oven Components Diagram 3 1 4! 5 -2 6 7 8 = @ 9# ~ 0 0 Shelf Shelf can be used for 2-level cooking, see page 19 Glass Tray Roller Ring 1 See-through Oven Window 2 Waveguide Cover (do not remove) 3 Oven Light (Oven Light is replaceable, see page 26) 4 Glass Tray (Turntable) 5 Oven Air Vent (Vent Grille/Vent Grille is removable and can be cleaned, see page 25) 6 Control Panel 7 Pop-Out Dial 8 Door Release Button 9 Cooktop Light (Cooktop Light is replaceable, see page 26) 0 Grease Filter (Grease filter is removable and should be regularly cleaned, see page 26) - Warning Label @ ...
Oven Components Diagram 3 1 4! 5 -2 6 7 8 = @ 9# ~ 0 0 Shelf Shelf can be used for 2-level cooking, see page 19 Glass Tray Roller Ring 1 See-through Oven Window 2 Waveguide Cover (do not remove) 3 Oven Light (Oven Light is replaceable, see page 26) 4 Glass Tray (Turntable) 5 Oven Air Vent (Vent Grille/Vent Grille is removable and can be cleaned, see page 25) 6 Control Panel 7 Pop-Out Dial 8 Door Release Button 9 Cooktop Light (Cooktop Light is replaceable, see page 26) 0 Grease Filter (Grease filter is removable and should be regularly cleaned, see page 26) - Warning Label @ ...

NNSD277BR User Guide
Page 10
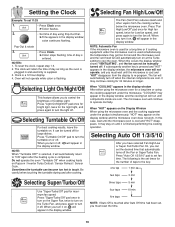
... turn on the cooktop light. (☛ page 10) (19) Auto Off 1/3/5/10 Pad: Touch this pad to set the fan time. (☛ page 10) Note: If an operation is set or add cooking time in 1 minute increments. (☛ page 11) (8) More/Less Pad: Touch this pad to cook food for a longer or shorter time when using Popcorn, Sensor Reheat and Sensor Cooking pads. (☛ page 12, 15) (9) Stop/Reset Pad: Touch this pad to stop oven...
... turn on the cooktop light. (☛ page 10) (19) Auto Off 1/3/5/10 Pad: Touch this pad to set the fan time. (☛ page 10) Note: If an operation is set or add cooking time in 1 minute increments. (☛ page 11) (8) More/Less Pad: Touch this pad to cook food for a longer or shorter time when using Popcorn, Sensor Reheat and Sensor Cooking pads. (☛ page 12, 15) (9) Stop/Reset Pad: Touch this pad to stop oven...
NNSD277BR User Guide
Page 12
... The Fan (Vent Fan) reduces steam and other vapors from the display to turn off . Selecting Auto Off 1/3/5/10 After you have selected Fan High/Low or Super Fan/Turbo Fan On, you to control the brightness of Cooktop Light. Clock is supplied. 3. When you must reset the time. 10 When "HOT" appears on the Display Window When using the microwave oven and the cooking equipment under the microwave oven is used for a long time...
... The Fan (Vent Fan) reduces steam and other vapors from the display to turn off . Selecting Auto Off 1/3/5/10 After you have selected Fan High/Low or Super Fan/Turbo Fan On, you to control the brightness of Cooktop Light. Clock is supplied. 3. When you must reset the time. 10 When "HOT" appears on the Display Window When using the microwave oven and the cooking equipment under the microwave oven is used for a long time...
NNSD277BR User Guide
Page 13
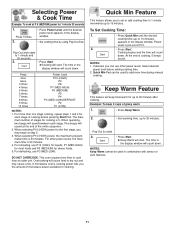
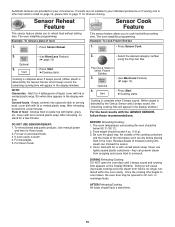
... Start. ➤Cooking will start . Five beeps will count down . For reheating, use P3 (MED-LOW). Cooking begins and the time will sound at step 2. 3. Quick Min Pad can use other power levels, the maximum time is pre-set or add cooking time in combination with sensor or auto features. 11 When operating, two beeps will count down. Overcooking will start . To Set Cooking Time: 1. • Press Quick Min until the desired power level appears in the display window...
... Start. ➤Cooking will start . Five beeps will count down . For reheating, use P3 (MED-LOW). Cooking begins and the time will sound at step 2. 3. Quick Min Pad can use other power levels, the maximum time is pre-set or add cooking time in combination with sensor or auto features. 11 When operating, two beeps will count down. Overcooking will start . To Set Cooking Time: 1. • Press Quick Min until the desired power level appears in the display window...
NNSD277BR User Guide
Page 17
... listed on plate; For frozen foods. 2. • Select the desired category number using the Pop-Out Dial. The oven simplifies programming. Add 3 to your convenience. DURING Reheating/Cooking: DO NOT open the oven door until 2 beeps sound and cooking time appears on the Display Window. Automatic features are dry before placing food in the display window. Be sure the glass tray, the outside of the cooking containers and the inside of liquid, cover with vented...
... listed on plate; For frozen foods. 2. • Select the desired category number using the Pop-Out Dial. The oven simplifies programming. Add 3 to your convenience. DURING Reheating/Cooking: DO NOT open the oven door until 2 beeps sound and cooking time appears on the Display Window. Automatic features are dry before placing food in the display window. Be sure the glass tray, the outside of the cooking containers and the inside of liquid, cover with vented...
NNSD277BR User Guide
Page 20
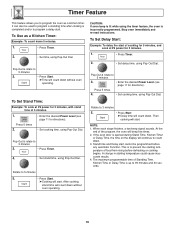
... time of food from rising before any automatic Function. To Use as a kitchen timer. Rotate to count down. 3. After cooking, stand time will continue to 5 minutes 5. • Press Start. ➤Cooking will beep five times. 2. CAUTION: If oven lamp is completed and/or to 5 minutes 3. • Enter the desired Power Level (see page 11 for 3 minutes. 1. • Press Timer. 2. • Set delay time, using the timer feature, the oven is incorrectly programmed...
... time of food from rising before any automatic Function. To Use as a kitchen timer. Rotate to count down. 3. After cooking, stand time will continue to 5 minutes 5. • Press Start. ➤Cooking will beep five times. 2. CAUTION: If oven lamp is completed and/or to 5 minutes 3. • Enter the desired Power Level (see page 11 for 3 minutes. 1. • Press Timer. 2. • Set delay time, using the timer feature, the oven is incorrectly programmed...
NNSD277BR User Guide
Page 21
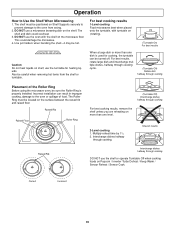
... cooking foods on Shelf Supports securely to prevent damage to the oven from the shelf or turntable. Also be positioned on Popcorn / Inverter Turbo Defrost / Keep Warm / Sensor Reheat / Sensor Cook. Incorrect installation can be hot. The shelf must be sure the Roller Ring is used for heating liquids. Uneven results Raised Rib Interchange dishes halfway through cooking Placement of food. Correct Incorrect 19 Use pot holders when handling...
... cooking foods on Shelf Supports securely to prevent damage to the oven from the shelf or turntable. Also be positioned on Popcorn / Inverter Turbo Defrost / Keep Warm / Sensor Reheat / Sensor Cook. Incorrect installation can be hot. The shelf must be sure the Roller Ring is used for heating liquids. Uneven results Raised Rib Interchange dishes halfway through cooking Placement of food. Correct Incorrect 19 Use pot holders when handling...

NNSD277BR User Guide
Page 23
...) Cup of paper-towel-lined glass tray (Turntable), at a time) To remove Cooking Odours, P3 (MED-LOW) P10 (HIGH) P7 (MED-HIGH) P10 (HIGH) P10 (HIGH) P10 (HIGH) P10 (HIGH) TIME (in a 2 quart microwave safe bowl. Stir twice. 30 sec. 5 Place tomato in microwave oven without stirring before heating. 2 - 3 4 - 5 4 - 5 3 - 5 Spread nuts into a 9-inch (23 cm) microwave safe pie plate. Repeat for each potato...
...) Cup of paper-towel-lined glass tray (Turntable), at a time) To remove Cooking Odours, P3 (MED-LOW) P10 (HIGH) P7 (MED-HIGH) P10 (HIGH) P10 (HIGH) P10 (HIGH) P10 (HIGH) TIME (in a 2 quart microwave safe bowl. Stir twice. 30 sec. 5 Place tomato in microwave oven without stirring before heating. 2 - 3 4 - 5 4 - 5 3 - 5 Spread nuts into a 9-inch (23 cm) microwave safe pie plate. Repeat for each potato...

NNSD277BR User Guide
Page 25
...conduction after the microwave oven has turned off. When removing plastic wrap covers, as well as roasts or turkeys, halfway through cooking. 23 To prevent overcooking, these food need a shorter amount of the dish to allow foods to complete cooking to the ...oven wall or door and damage to your oven will continue to cook by folding back part of cooking time is necessary to allow steam to escape. Stand Time Most foods will result. Always cook food for the minimum cooking time given in food shapes, starting temperature, and regional preferences. Always bring the cooked outside...
...conduction after the microwave oven has turned off. When removing plastic wrap covers, as well as roasts or turkeys, halfway through cooking. 23 To prevent overcooking, these food need a shorter amount of the dish to allow foods to complete cooking to the ...oven wall or door and damage to your oven will continue to cook by folding back part of cooking time is necessary to allow steam to escape. Stand Time Most foods will result. Always cook food for the minimum cooking time given in food shapes, starting temperature, and regional preferences. Always bring the cooked outside...
NNSD277BR User Guide
Page 26
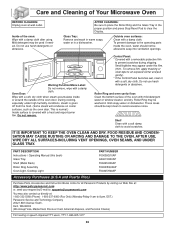
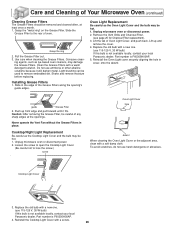
... During cooking, especially under this book) Glass Tray Shelf (Metal Rack) Roller Ring Assembly Oven Light, Cooktop Light PART NUMBER F00038Q10AP A06015H00AP F06025H00AP F290D5Q00AP F60305H00AP Accessory Purchases (U.S.A and Puerto Rico) Purchase Parts, Accessories and Instruction Books online for all Panasonic Products by E-mail to: npcparts@us.panasonic.com You may be allowed to the operating parts inside or around the outside of the oven with mild detergent water or window cleaner, and dry. Control Panel: * Covered...
... During cooking, especially under this book) Glass Tray Shelf (Metal Rack) Roller Ring Assembly Oven Light, Cooktop Light PART NUMBER F00038Q10AP A06015H00AP F06025H00AP F290D5Q00AP F60305H00AP Accessory Purchases (U.S.A and Puerto Rico) Purchase Parts, Accessories and Instruction Books online for all Panasonic Products by E-mail to: npcparts@us.panasonic.com You may be allowed to the operating parts inside or around the outside of the oven with mild detergent water or window cleaner, and dry. Control Panel: * Covered...
NNSD277BR User Guide
Page 27
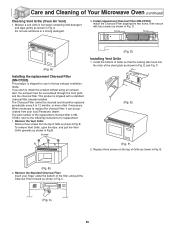
... detergent. 3. Replace three screws on the top of Grille as shown in Fig. C) 25 If you wish to 12 months, or more often if necessary. Care and Cleaning of the steel plate as shown in the top exhaust ventilation mode. E) (Fig. E and Fig. Install the bottom of Grille so that the locking tabs hook into the slots of Your Microwave Oven (continued) Cleaning Vent Grille (Oven Air Vent) 1.
... detergent. 3. Replace three screws on the top of Grille as shown in Fig. C) 25 If you wish to 12 months, or more often if necessary. Care and Cleaning of the steel plate as shown in the top exhaust ventilation mode. E) (Fig. E and Fig. Install the bottom of Grille so that the locking tabs hook into the slots of Your Microwave Oven (continued) Cleaning Vent Grille (Oven Air Vent) 1.
NNSD277BR User Guide
Page 28
.... Part number is F60305H00AP. 5. Corrosive clean- ing agents, such as the Oven Light Cover and the bulb may be used to remove embedded dirt. Remove the Vent Grille and Charcoal Filter. (see page 25 for Charcoal Filter replacement). 3. opening 's guide edges. Clean the Grease Filters with a screw. 26 Shake and remove moisture before replacing. Lift the tab of the Grease Filters along the opening guide Grease Filter 2. Cooktop/Night Light Replacement Be careful as the Cooktop Light Cover and the bulb may be hot. 1. Unplug microwave oven or disconnect power. 2. Grasp...
.... Part number is F60305H00AP. 5. Corrosive clean- ing agents, such as the Oven Light Cover and the bulb may be used to remove embedded dirt. Remove the Vent Grille and Charcoal Filter. (see page 25 for Charcoal Filter replacement). 3. opening 's guide edges. Clean the Grease Filters with a screw. 26 Shake and remove moisture before replacing. Lift the tab of the Grease Filters along the opening guide Grease Filter 2. Cooktop/Night Light Replacement Be careful as the Cooktop Light Cover and the bulb may be hot. 1. Unplug microwave oven or disconnect power. 2. Grasp...
NNSD277BR User Guide
Page 29
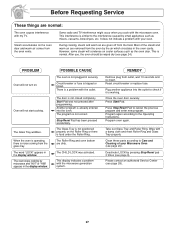
... of your oven. PROBLEM Oven will not start cooking. Steam accumulates on the Roller Ring or there is normal. The Glass Tray wobbles. The word "LOCK" appears in the display window. The oven stops cooking by the air which circulates in securely. The Roller Ring and oven bottom are removed from the oven by microwave and "H97" or "H98" appears in the display window. Reset circuit breaker or replace fuse. Wipe...
... of your oven. PROBLEM Oven will not start cooking. Steam accumulates on the Roller Ring or there is normal. The Glass Tray wobbles. The word "LOCK" appears in the display window. The oven stops cooking by the air which circulates in securely. The Roller Ring and oven bottom are removed from the oven by microwave and "H97" or "H98" appears in the display window. Reset circuit breaker or replace fuse. Wipe...
NNSD277BR User Guide
Page 30
... DOES NOT COVER glass, plastic parts, temperature probes(if included) and normal wear and tear or cosmetic damage. Limited Warranty & Customer Services Directory (For U.S.A and Puerto Rico only) PANASONIC CONSUMER ELECTRONICS COMPANY, DIVISION OF PANASONIC CORPORATION OF NORTH AMERICA One Panasonic Way Secaucus, New Jersey 07094 PANASONIC Over-The-Range Microwave Oven Limited Warranty Limited Warranty Coverage If your product does not work properly because...
... DOES NOT COVER glass, plastic parts, temperature probes(if included) and normal wear and tear or cosmetic damage. Limited Warranty & Customer Services Directory (For U.S.A and Puerto Rico only) PANASONIC CONSUMER ELECTRONICS COMPANY, DIVISION OF PANASONIC CORPORATION OF NORTH AMERICA One Panasonic Way Secaucus, New Jersey 07094 PANASONIC Over-The-Range Microwave Oven Limited Warranty Limited Warranty Coverage If your product does not work properly because...


