

NNH254 User Guide
Page 1
...mail to Operation 32-33 Maintenance Care and Cleaning of Your Microwave Oven ........27-29 Accessory Purchases 27 Cleaning Vent Grille (Oven Air Vent 28 Installing Vent Grille 28 Charcoal Filter Attachment/Replacement 28 Cleaning Grease Filters 29 Installing Grease Filters 29 Cooktop/Night Light Replacement 29 Oven Light Replacement 29 Before Requesting Service 30 Limited Warranty & Customer Service Directory ........31 General Information Cookware Guide 6 Oven Components Diagram 7 Specifications 34 User's Record 34 READ ALL INSTRUCTIONS CAREFULLY BEFORE USING THE OVEN. Para...
...mail to Operation 32-33 Maintenance Care and Cleaning of Your Microwave Oven ........27-29 Accessory Purchases 27 Cleaning Vent Grille (Oven Air Vent 28 Installing Vent Grille 28 Charcoal Filter Attachment/Replacement 28 Cleaning Grease Filters 29 Installing Grease Filters 29 Cooktop/Night Light Replacement 29 Oven Light Replacement 29 Before Requesting Service 30 Limited Warranty & Customer Service Directory ........31 General Information Cookware Guide 6 Oven Components Diagram 7 Specifications 34 User's Record 34 READ ALL INSTRUCTIONS CAREFULLY BEFORE USING THE OVEN. Para...
NNH254 User Guide
Page 3
... openings on the turntable. To reduce the risk of a table or counter. 15. Connect only to be heated in the oven cavity: (a) Do not overcook food. Install or locate this product near a swimming pool or similar locations. 8. DO NOT use the cavity for examination, repair or adjustment. 16. for example, closed , turn oven off, and disconnect the power cord, or shut off power at the fuse or circuit breaker panel...
... openings on the turntable. To reduce the risk of a table or counter. 15. Connect only to be heated in the oven cavity: (a) Do not overcook food. Install or locate this product near a swimming pool or similar locations. 8. DO NOT use the cavity for examination, repair or adjustment. 16. for example, closed , turn oven off, and disconnect the power cord, or shut off power at the fuse or circuit breaker panel...
NNH254 User Guide
Page 4
... in place. 2. DO NOT operate the oven without the Glass Tray fully engaged on hood or filter. 22. Always place food in a microwave safe dish, or on the Glass Tray touches oven walls, causing the tray to Door, Control Panel Frame, Safety Interlock Switches, or any other glass tray. 4. Roller Ring 1. Always replace the Roller Ring and the Glass Tray in a microwave safe dish. 6. Repairs must always be very HOT after removing the cooking container from the container...
... in place. 2. DO NOT operate the oven without the Glass Tray fully engaged on hood or filter. 22. Always place food in a microwave safe dish, or on the Glass Tray touches oven walls, causing the tray to Door, Control Panel Frame, Safety Interlock Switches, or any other glass tray. 4. Roller Ring 1. Always replace the Roller Ring and the Glass Tray in a microwave safe dish. 6. Repairs must always be very HOT after removing the cooking container from the container...
NNH254 User Guide
Page 6
... the oven while the fan operates. 4 Indoor Venting If this microwave oven (120 V, 60 Hz). Fan Motor Operation After using the oven repeatedly or for any damages resulting from the microwave oven as specified on a SEPARATE CIRCUIT. This is perfectly normal, and you operate. INSTALLATION AND GROUNDING INSTRUCTIONS (continued) Wiring Requirements The oven must be sure the charcoal filter kit is installed in the unit before you may operate to be vented inside the kitchen, be operated on...
... the oven while the fan operates. 4 Indoor Venting If this microwave oven (120 V, 60 Hz). Fan Motor Operation After using the oven repeatedly or for any damages resulting from the microwave oven as specified on a SEPARATE CIRCUIT. This is perfectly normal, and you operate. INSTALLATION AND GROUNDING INSTRUCTIONS (continued) Wiring Requirements The oven must be sure the charcoal filter kit is installed in the unit before you may operate to be vented inside the kitchen, be operated on...

NNH254 User Guide
Page 7
...; The Glass Tray will get hot during cooking. Never leave oven unattended when popping popcorn. Microwave utensils may not withstand the temperature of your oven. Use pot holders when removing containers from the oven or when removing lids or plastic wrap covers from exploding. Always follow recommended package instructions or use your oven for both meat and candy. 9) BABY FORMULA / BABY FOOD • DO NOT heat baby formula...
...; The Glass Tray will get hot during cooking. Never leave oven unattended when popping popcorn. Microwave utensils may not withstand the temperature of your oven. Use pot holders when removing containers from the oven or when removing lids or plastic wrap covers from exploding. Always follow recommended package instructions or use your oven for both meat and candy. 9) BABY FORMULA / BABY FOOD • DO NOT heat baby formula...

NNH254 User Guide
Page 9
... System = Identification Plate Roller Ring 7 Oven Components Diagram Shelf (NN-H264 only) Shelf can be used for 2-level cooking, see page 22 Glass Tray 1 See-through Oven Window 2 Waveguide Cover (do not remove) 3 Oven Light (Oven Light is replaceable, see page 29) 4 Glass Tray (Turntable) 5 Oven Air Vent (Vent Grille/Vent Grille is removable and can be cleaned, see page 28) 6 Control Panel 7 Door Release Button 8 Cooktop Light (Cooktop Light is replaceable, see page 29) 9 Grease Filter (Grease filter is removable and should be regularly cleaned, see page 29) 0 Shelf Supports (NN-H264 only...
... System = Identification Plate Roller Ring 7 Oven Components Diagram Shelf (NN-H264 only) Shelf can be used for 2-level cooking, see page 22 Glass Tray 1 See-through Oven Window 2 Waveguide Cover (do not remove) 3 Oven Light (Oven Light is replaceable, see page 29) 4 Glass Tray (Turntable) 5 Oven Air Vent (Vent Grille/Vent Grille is removable and can be cleaned, see page 28) 6 Control Panel 7 Door Release Button 8 Cooktop Light (Cooktop Light is replaceable, see page 29) 9 Grease Filter (Grease filter is removable and should be regularly cleaned, see page 29) 0 Shelf Supports (NN-H264 only...
NNH254 User Guide
Page 10
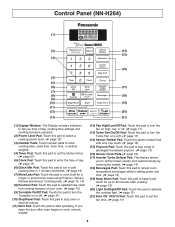
... to start operating. Control Panel (NN-H264) (1) (2) (14) (15) (3) (16) (4) (5) (6) (17) (7) (8) (18) (9) (10) (19) (11) (12) (20) (13) (21) (1) Display Window: The Display includes indicators to tell you time of day, cooking time settings and cooking functions selected. (2) Power Level Pad: Touch this pad to select a cooking power level. (☛ page 12) (3) Number Pads: Touch number pads to enter cooking time, clock time, timer time, or defrost weights. (4) Timer Pad: Touch this pad to set the kitchen timer. (☛ page 21) (5) Clock Pad: Touch this...
... to start operating. Control Panel (NN-H264) (1) (2) (14) (15) (3) (16) (4) (5) (6) (17) (7) (8) (18) (9) (10) (19) (11) (12) (20) (13) (21) (1) Display Window: The Display includes indicators to tell you time of day, cooking time settings and cooking functions selected. (2) Power Level Pad: Touch this pad to select a cooking power level. (☛ page 12) (3) Number Pads: Touch number pads to enter cooking time, clock time, timer time, or defrost weights. (4) Timer Pad: Touch this pad to set the kitchen timer. (☛ page 21) (5) Clock Pad: Touch this...

NNH254 User Guide
Page 11
... of packaged microwave popcorn. (☛ page 13) (4) Inverter Auto Cooking Pads (☛ page 18) (5) Power Level Pad: Touch this pad to select a cooking power level. (☛ page 12) (6) Number Pads: Touch number pads to enter cooking time, clock time, timer time, or defrost weights. (7) Timer Pad: Touch this pad to set or add cooking time in 1 minute increments. (☛ page 12) (15) More/Less Pad: Touch this pad to cook food for a longer or shorter time when using Popcorn, Auto Reheat and Inverter Auto Cooking pads. (☛...
... of packaged microwave popcorn. (☛ page 13) (4) Inverter Auto Cooking Pads (☛ page 18) (5) Power Level Pad: Touch this pad to select a cooking power level. (☛ page 12) (6) Number Pads: Touch number pads to enter cooking time, clock time, timer time, or defrost weights. (7) Timer Pad: Touch this pad to set or add cooking time in 1 minute increments. (☛ page 12) (15) More/Less Pad: Touch this pad to cook food for a longer or shorter time when using Popcorn, Auto Reheat and Inverter Auto Cooking pads. (☛...
NNH254 User Guide
Page 12
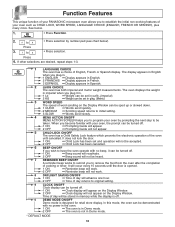
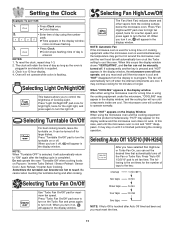
...; Weight can be set and operation will not be accepted. *2 OFF ➻ Child Lock has been cancelled. 6 BEEP ON/OFF If you wish to have the oven operate with no beep, it can be turned off . 0 DEMO MODE ON/OFF Demo mode is off . *1 ON 2 OFF ➻ Beep sound will reactivate. ➻ Beep sound will not be heard. 7 REMINDER BEEP ON/OFF A reminder beep works to original setting. 9 CLOCK ON/OFF Clock display can be turned...
...; Weight can be set and operation will not be accepted. *2 OFF ➻ Child Lock has been cancelled. 6 BEEP ON/OFF If you wish to have the oven operate with no beep, it can be turned off . 0 DEMO MODE ON/OFF Demo mode is off . *1 ON 2 OFF ➻ Beep sound will reactivate. ➻ Beep sound will not be heard. 7 REMINDER BEEP ON/OFF A reminder beep works to original setting. 9 CLOCK ON/OFF Clock display can be turned...
NNH254 User Guide
Page 13
... simultaneously, "HOT" may stay on Popcorn / Inverter Turbo Defrost / Sensor Reheat / Sensor Cook / Auto Reheat / Inverter Auto Cooking. Press "Turntable On/Off" pad to touch. Sometimes the turntable can set fan time. It may appear on the Turbo Fan and press again to operate normally. When this case, wait until the microwave is supplied. 3. The following is used for large dishes. Do not operate the oven "Turntable Off" when cooking foods on until components inside are cool...
... simultaneously, "HOT" may stay on Popcorn / Inverter Turbo Defrost / Sensor Reheat / Sensor Cook / Auto Reheat / Inverter Auto Cooking. Press "Turntable On/Off" pad to touch. Sometimes the turntable can set fan time. It may appear on the Turbo Fan and press again to operate normally. When this case, wait until the microwave is supplied. 3. The following is used for large dishes. Do not operate the oven "Turntable Off" when cooking foods on until components inside are cool...

NNH254 User Guide
Page 14
... 5 times. • Press Power Level until the desired cooking time (up to 10 minutes) appears in the display window. 2. • Set Cooking Time using number pads. 3. • Press Start. ➤Cooking will count down . When operating, two beeps will start . Overcooking will count down . A microwave oven's cooking power tells you cannot use other power levels, the maximum time is pre-set or add cooking time in combination with sensor or auto features. 12 Quick Min Pad can use Number Pads. 3. to • Set warming time...
... 5 times. • Press Power Level until the desired cooking time (up to 10 minutes) appears in the display window. 2. • Set Cooking Time using number pads. 3. • Press Start. ➤Cooking will count down . When operating, two beeps will start . Overcooking will count down . A microwave oven's cooking power tells you cannot use other power levels, the maximum time is pre-set or add cooking time in combination with sensor or auto features. 12 Quick Min Pad can use Number Pads. 3. to • Set warming time...
NNH254 User Guide
Page 21
... wrap. 19 Let stand 5 to your microwave oven without setting power and time. Place pasta with hot tap water in a single layer. (110, 225, 340, 450 g) Cover with lid or vented plastic wrap. 4, 8, 12, 16 oz. Care must be the same size. Follow manufacturer's directions for preparation. Potatoes 10. It is needed, continue to complete cooking. 4, 8, 12, 16 oz. Overheating will cause an...
... wrap. 19 Let stand 5 to your microwave oven without setting power and time. Place pasta with hot tap water in a single layer. (110, 225, 340, 450 g) Cover with lid or vented plastic wrap. 4, 8, 12, 16 oz. Care must be the same size. Follow manufacturer's directions for preparation. Potatoes 10. It is needed, continue to complete cooking. 4, 8, 12, 16 oz. Overheating will cause an...

NNH254 User Guide
Page 23
... programmed before defrosting or cooking begins. Stop oven immediately and re-read instructions. Timer Feature This feature allows you to count down. 3. Then cooking will count down. Stand time and Delay start . Set desired cooking time using the timer feature, the oven is opened during Stand Time, Kitchen Timer or Delay Time, the time on the display will continue to program the oven as a Kitchen Timer: Example: To count down without oven operating. 21 Set desired cooking time using number pads. (up to program a delay start...
... programmed before defrosting or cooking begins. Stop oven immediately and re-read instructions. Timer Feature This feature allows you to count down. 3. Then cooking will count down. Stand time and Delay start . Set desired cooking time using the timer feature, the oven is opened during Stand Time, Kitchen Timer or Delay Time, the time on the display will continue to program the oven as a Kitchen Timer: Example: To count down without oven operating. 21 Set desired cooking time using number pads. (up to program a delay start...
NNH254 User Guide
Page 26
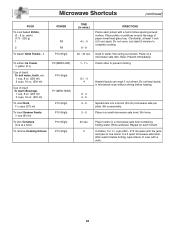
...-lined glass tray (Turntable), at a time) To remove Cooking Odours, P3 (MED-LOW) P10 (High) P7 (MED-HIGH) P10 (High) P10 (High) P10 (High) P10 (High) TIME (in a 2 quart microwave safe bowl. Microwave Shortcuts (continued) FOOD To cook baked Potato, (6 - 8 oz. Place on a microwave safe dish. Stir occasionally. Place in microwave oven without stirring before heating. 2 - 3 4 - 5 4 - 5 3 - 5 Spread nuts into a 9-inch (23 cm) microwave safe pie plate. Combine 1 to...
...-lined glass tray (Turntable), at a time) To remove Cooking Odours, P3 (MED-LOW) P10 (High) P7 (MED-HIGH) P10 (High) P10 (High) P10 (High) P10 (High) TIME (in a 2 quart microwave safe bowl. Microwave Shortcuts (continued) FOOD To cook baked Potato, (6 - 8 oz. Place on a microwave safe dish. Stir occasionally. Place in microwave oven without stirring before heating. 2 - 3 4 - 5 4 - 5 3 - 5 Spread nuts into a 9-inch (23 cm) microwave safe pie plate. Combine 1 to...

NNH254 User Guide
Page 28
... prevent overcooking, these food need a shorter amount of the dish. Cooking time A range of the food. At times, microwave energy will rise 5°F to 15°F (3°C to 8°C), if allowed to cook by folding back part of the plastic wrap from the center to escape. When removing plastic wrap covers, as well as recipe directs for microwave oven use. Once the food is overcooked, nothing can...
... prevent overcooking, these food need a shorter amount of the dish. Cooking time A range of the food. At times, microwave energy will rise 5°F to 15°F (3°C to 8°C), if allowed to cook by folding back part of the plastic wrap from the center to escape. When removing plastic wrap covers, as well as recipe directs for microwave oven use. Once the food is overcooked, nothing can...
NNH254 User Guide
Page 29
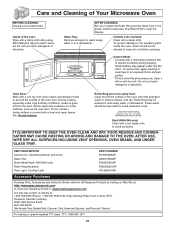
.... AFTER USE, WIPE DRY ALL SURFACES-INCLUDING VENT OPENINGS, OVEN SEAMS, AND UNDER GLASS TRAY. Inside of the oven: Wipe with a soft dry cloth when steam accumulates inside the oven, water should be washed in a dishwasher. During cooking, especially under this book) Glass Tray Shelf (Metal Rack: NN-H264 only) Roller Ring Assembly Oven Light, Cooktop Light PART NUMBER F00036Z80AP A06015H00AP F06025H00AP F290D5Q01AP F612E5H01AP Accessory Purchases Purchase Parts, Accessories and Instruction Books online for all Panasonic Products...
.... AFTER USE, WIPE DRY ALL SURFACES-INCLUDING VENT OPENINGS, OVEN SEAMS, AND UNDER GLASS TRAY. Inside of the oven: Wipe with a soft dry cloth when steam accumulates inside the oven, water should be washed in a dishwasher. During cooking, especially under this book) Glass Tray Shelf (Metal Rack: NN-H264 only) Roller Ring Assembly Oven Light, Cooktop Light PART NUMBER F00036Z80AP A06015H00AP F06025H00AP F290D5Q01AP F612E5H01AP Accessory Purchases Purchase Parts, Accessories and Instruction Books online for all Panasonic Products...

NNH254 User Guide
Page 30
.... E. F) 3. To remove Vent Grille, open the door, and pull the vent grille at the bottom, and tilt upwards. Remove the Standard Charcoal Filter Insert your local Panasonic dealer. Do not use in the top exhaust ventilation mode. Remove the Vent Grille Remove three screws from your finger under the bottom of top plate, and insert as shown in Fig. B) 2. D) (Fig. The Charcoal Filter cannot be cleaned and should be replaced periodically every 6 to install this...
.... E. F) 3. To remove Vent Grille, open the door, and pull the vent grille at the bottom, and tilt upwards. Remove the Standard Charcoal Filter Insert your local Panasonic dealer. Do not use in the top exhaust ventilation mode. Remove the Vent Grille Remove three screws from your finger under the bottom of top plate, and insert as shown in Fig. B) 2. D) (Fig. The Charcoal Filter cannot be cleaned and should be replaced periodically every 6 to install this...
NNH254 User Guide
Page 31
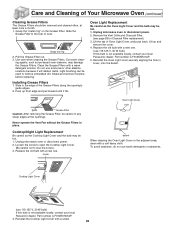
...) Cleaning Grease Filters The Grease Filters should be hot. 1. Replace the old bulb with a new one . (use 115-125 V, 30 W bulb) If this bulb is not available locally, contact your local Panasonic dealer. screw Oven Light Cover hole detent When cleaning the Oven Light Cover or the adjacent area, clean with a screw. 29 Part number is F612E5H01AP. 5. Reinstall the Cooktop Light Cover with a soft damp cloth. Clean the Grease Filters with a new one . Installing Grease Filters 1. Unplug microwave oven or disconnect power. 2. opening 's guide edges. 2. Never operate the Vent Fan...
...) Cleaning Grease Filters The Grease Filters should be hot. 1. Replace the old bulb with a new one . (use 115-125 V, 30 W bulb) If this bulb is not available locally, contact your local Panasonic dealer. screw Oven Light Cover hole detent When cleaning the Oven Light Cover or the adjacent area, clean with a screw. 29 Part number is F612E5H01AP. 5. Reinstall the Cooktop Light Cover with a soft damp cloth. Clean the Grease Filters with a new one . Installing Grease Filters 1. Unplug microwave oven or disconnect power. 2. opening 's guide edges. 2. Never operate the Vent Fan...

NNH254 User Guide
Page 32
..., touching number and selecting "DEMO OFF". (see page 27). Stop/Reset Pad has been pressed accidentally. Close the oven door securely. Steam accumulates on the Display Window. Some radio and TV interference might occur when you cook with a damp cloth and reset Roller Ring and Glass Tray properly. PROBLEM Oven will not start cooking. Oven will not turn on the Roller Ring or there is not correct. The program...
..., touching number and selecting "DEMO OFF". (see page 27). Stop/Reset Pad has been pressed accidentally. Close the oven door securely. Steam accumulates on the Display Window. Some radio and TV interference might occur when you cook with a damp cloth and reset Roller Ring and Glass Tray properly. PROBLEM Oven will not start cooking. Oven will not turn on the Roller Ring or there is not correct. The program...
NNH254 User Guide
Page 33
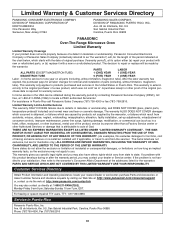
... Authorized Servicer, or damage that is not handled to your nearest Dealer or servicenter; The warranty ALSO DOES NOT COVER damages which occurred in shipment, or failures which are for one year on how long an implied warranty lasts, so the exclusions may also contact us directly at the addresses listed for removal and installation of parts (including, without limitation, magnetron...
... Authorized Servicer, or damage that is not handled to your nearest Dealer or servicenter; The warranty ALSO DOES NOT COVER damages which occurred in shipment, or failures which are for one year on how long an implied warranty lasts, so the exclusions may also contact us directly at the addresses listed for removal and installation of parts (including, without limitation, magnetron...


