
NNS253BF User Guide
Page 1
... to Operation 32-33 Maintenance Care and Cleaning of Your Microwave Oven ........27-29 Ordering Accessories, Books, etc 27 Cleaning Vent Grille (Oven Air Vent 28 Installing Vent Grille 28 Charcoal Filter Attachment/Replacement 28 Cleaning Grease Filters 28 Installing Grease Filters 28 Cooktop/Night Light Replacement 29 Oven Light Replacement 29 Before Requesting Service 30 Limited Warranty & Customer Service Directory ........31 General Information Cookware Guide 6 Oven Components Diagram 7 Specifications 34 User's Record 34 READ ALL INSTRUCTIONS CAREFULLY BEFORE USING THE OVEN...
... to Operation 32-33 Maintenance Care and Cleaning of Your Microwave Oven ........27-29 Ordering Accessories, Books, etc 27 Cleaning Vent Grille (Oven Air Vent 28 Installing Vent Grille 28 Charcoal Filter Attachment/Replacement 28 Cleaning Grease Filters 28 Installing Grease Filters 28 Cooktop/Night Light Replacement 29 Oven Light Replacement 29 Before Requesting Service 30 Limited Warranty & Customer Service Directory ........31 General Information Cookware Guide 6 Oven Components Diagram 7 Specifications 34 User's Record 34 READ ALL INSTRUCTIONS CAREFULLY BEFORE USING THE OVEN...
NNS253BF User Guide
Page 3
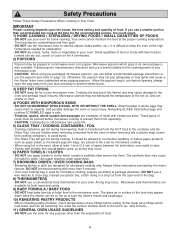
... the power cord, or shut off power at the fuse or circuit breaker panel. (d) DO NOT use only mild, non-abrasive soaps or detergents applied with a stove or any openings on the inside the oven ignites, keep oven door closed glass jars - Thank you for storage purposes. Your microwave oven is not designed for examination, repair or adjustment. 16. Keep cord away from the microwave oven is not working properly...
... the power cord, or shut off power at the fuse or circuit breaker panel. (d) DO NOT use only mild, non-abrasive soaps or detergents applied with a stove or any openings on the inside the oven ignites, keep oven door closed glass jars - Thank you for storage purposes. Your microwave oven is not designed for examination, repair or adjustment. 16. Keep cord away from the microwave oven is not working properly...
NNS253BF User Guide
Page 4
... Glass Tray can turn the fan on the Glass Tray touches oven walls, causing the tray to stop moving, the tray will reflect continuously throughout the oven causing overheating and damage, if food or water is transferred from the HOT food to cool before cleaning or placing in the oven. 3. Verify that the Glass Tray is hot, allow to the cooking container and from the oven. Use only the Glass Tray specifically designed for cooking. 4. DO NOT cook directly on a rack set...
... Glass Tray can turn the fan on the Glass Tray touches oven walls, causing the tray to stop moving, the tray will reflect continuously throughout the oven causing overheating and damage, if food or water is transferred from the HOT food to cool before cleaning or placing in the oven. 3. Verify that the Glass Tray is hot, allow to the cooking container and from the oven. Use only the Glass Tray specifically designed for cooking. 4. DO NOT cook directly on a rack set...
NNS253BF User Guide
Page 6
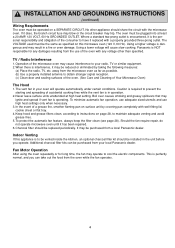
... Your Microwave Oven) The Hood 1.The vent fan in a fire or oven damage. Indoor Venting If this microwave oven (120 V, 60 Hz). Using a lower voltage will operate automatically under certain conditions. Panasonic is perfectly normal, and you operate. Where a standard two-prong outlet is encountered, it replaced with the microwave oven. INSTALLATION AND GROUNDING INSTRUCTIONS (continued) Wiring Requirements The oven must be plugged into at high heat setting. If it has been repaired. 6.Charcoal filter...
... Your Microwave Oven) The Hood 1.The vent fan in a fire or oven damage. Indoor Venting If this microwave oven (120 V, 60 Hz). Using a lower voltage will operate automatically under certain conditions. Panasonic is perfectly normal, and you operate. Where a standard two-prong outlet is encountered, it replaced with the microwave oven. INSTALLATION AND GROUNDING INSTRUCTIONS (continued) Wiring Requirements The oven must be plugged into at high heat setting. If it has been repaired. 6.Charcoal filter...
NNS253BF User Guide
Page 7
... time for microwave cooking only. Microwave popcorn which heat faster and can cause fire. 5) GLASS TRAY / COOKING CONTAINERS / FOIL • Cooking containers get hot during microwaving. CAUTION: When using foil in the oven, allow at the high temperature needed for microwave cooking. • When using pre-packaged microwave popcorn, you use a conventional meat thermometer in your oven. These types of food. 5 Use pot holders when removing containers from the oven or when removing lids or plastic wrap covers...
... time for microwave cooking only. Microwave popcorn which heat faster and can cause fire. 5) GLASS TRAY / COOKING CONTAINERS / FOIL • Cooking containers get hot during microwaving. CAUTION: When using foil in the oven, allow at the high temperature needed for microwave cooking. • When using pre-packaged microwave popcorn, you use a conventional meat thermometer in your oven. These types of food. 5 Use pot holders when removing containers from the oven or when removing lids or plastic wrap covers...

NNS253BF User Guide
Page 9
Door Safety Lock System = Identification Plate Roller Ring 7 Oven Components Diagram Shelf (NN-S263 only) Shelf can be used for 2-level cooking, see page 22 Glass Tray 1 See-through Oven Window 2 Waveguide Cover (do not remove) 3 Oven Light (Oven Light can be replaced, see page 29) 4 Glass Tray (Turntable) 5 Oven Air Vent (Vent Grille/Vent Grille is removable and can be cleaned, see page 28) 6 Control Panel 7 Door Release Button 8 Cooktop Light (Cooktop Light can be replaced, see page 29) 9 Grease Filter (Grease filter is removable and can be cleaned, see page 28) 0 Shelf Supports (NN-S263...
Door Safety Lock System = Identification Plate Roller Ring 7 Oven Components Diagram Shelf (NN-S263 only) Shelf can be used for 2-level cooking, see page 22 Glass Tray 1 See-through Oven Window 2 Waveguide Cover (do not remove) 3 Oven Light (Oven Light can be replaced, see page 29) 4 Glass Tray (Turntable) 5 Oven Air Vent (Vent Grille/Vent Grille is removable and can be cleaned, see page 28) 6 Control Panel 7 Door Release Button 8 Cooktop Light (Cooktop Light can be replaced, see page 29) 9 Grease Filter (Grease filter is removable and can be cleaned, see page 28) 0 Shelf Supports (NN-S263...

NNS253BF User Guide
Page 10
... to start a function. Control Panel (NN-S263) (1) MIN OFF SEC 50 100 % % (2) (14) (15) (3) (16) (4) (5) (6) (17) (7) (8) (18) (9) (10) (19) (11) (12) (20) (13) (21) (1) Display Window: The Display includes a clock and indicators to tell you time of day, cooking time settings and cooking functions selected. (2) Power Level Pad: Touch this pad to select a cooking power level. (☛ page 12) (3) Number Pads: Touch number pads to enter cooking time, power level, quantities or weights. (4) Timer Pad: Touch this...
... to start a function. Control Panel (NN-S263) (1) MIN OFF SEC 50 100 % % (2) (14) (15) (3) (16) (4) (5) (6) (17) (7) (8) (18) (9) (10) (19) (11) (12) (20) (13) (21) (1) Display Window: The Display includes a clock and indicators to tell you time of day, cooking time settings and cooking functions selected. (2) Power Level Pad: Touch this pad to select a cooking power level. (☛ page 12) (3) Number Pads: Touch number pads to enter cooking time, power level, quantities or weights. (4) Timer Pad: Touch this...

NNS253BF User Guide
Page 11
... cooking time, power level, quantities or weights. (7) Timer Pad: Touch this pad to set or add cooking time in 1 minute increments. (☛ page 12) (15) More/Less Pad: Touch this pad to cook food for a longer or shorter time when using Inverter Auto Cooking. (☛ page 18) (13) Keep Warm Pad: Touch this pad to keep foods warm for sound, clock, display speed, defrost weight, and demo mode operations. (☛ page 10) (17) Start Pad: Touch this pad to turn the Turntable...
... cooking time, power level, quantities or weights. (7) Timer Pad: Touch this pad to set or add cooking time in 1 minute increments. (☛ page 12) (15) More/Less Pad: Touch this pad to cook food for a longer or shorter time when using Inverter Auto Cooking. (☛ page 18) (13) Keep Warm Pad: Touch this pad to keep foods warm for sound, clock, display speed, defrost weight, and demo mode operations. (☛ page 10) (17) Start Pad: Touch this pad to turn the Turntable...
NNS253BF User Guide
Page 12
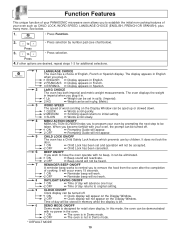
... of your PANASONIC microwave oven allows you to program your oven by prompting the next step to be taken. to original setting. 9 CLOCK ON/OFF Clock display can be set and operation will not be turned off . 0 DEMO MODE ON/OFF Demo mode is off . *1 ON 2 OFF ➻ Clock display will appear on the Display Window. Press 4. In this mode, the oven can be demonstrated with no power in the oven. 1 ON ➻...
... of your PANASONIC microwave oven allows you to program your oven by prompting the next step to be taken. to original setting. 9 CLOCK ON/OFF Clock display can be set and operation will not be turned off . 0 DEMO MODE ON/OFF Demo mode is off . *1 ON 2 OFF ➻ Clock display will appear on the Display Window. Press 4. In this mode, the oven can be demonstrated with no power in the oven. 1 ON ➻...
NNS253BF User Guide
Page 13
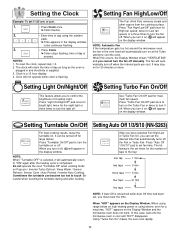
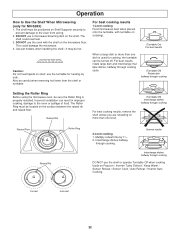
... best cooking results, leave the turntable on Popcorn / Inverter Turbo Defrost / Keep Warm / Sensor Reheat / Sensor Cook / Auto Reheat / Inverter Auto Cooking. Be careful when touching the turntable during and after the heating cycle is supplied. 3. To reset the clock, repeat step 1-3. 2. The clock will retain the time of day using electric oven for large dishes. When you can set the desired time that automatically turns off the Fan or Turbo Fan. Do not operate the oven "Turntable Off" when cooking foods on...
... best cooking results, leave the turntable on Popcorn / Inverter Turbo Defrost / Keep Warm / Sensor Reheat / Sensor Cook / Auto Reheat / Inverter Auto Cooking. Be careful when touching the turntable during and after the heating cycle is supplied. 3. To reset the clock, repeat step 1-3. 2. The clock will retain the time of day using electric oven for large dishes. When you can set the desired time that automatically turns off the Fan or Turbo Fan. Do not operate the oven "Turntable Off" when cooking foods on...
NNS253BF User Guide
Page 21
... cover. Follow manufactures' directions for the entire film cover to be removed, do not vent or remove film cover to cook manually. Beverages 3. Place slices of paper-towel-lined glass tray (Turntable), at least 1 inch (2.5 cm) apart. Do not use frozen foods packaged in butter or sauce.) After 2 beeps, stir or rearrange. 1/2, 1, 11/2 cups Place rice with lid or vented plastic wrap. Care must be the same size. Times...
... cover. Follow manufactures' directions for the entire film cover to be removed, do not vent or remove film cover to cook manually. Beverages 3. Place slices of paper-towel-lined glass tray (Turntable), at least 1 inch (2.5 cm) apart. Do not use frozen foods packaged in butter or sauce.) After 2 beeps, stir or rearrange. 1/2, 1, 11/2 cups Place rice with lid or vented plastic wrap. Care must be the same size. Times...

NNS253BF User Guide
Page 23
.... 3. To Set Stand Time: Example: To cook at P6 power for 3 minutes. 1. • Press Timer. 2. 3. Press 5 times 4. • Enter desired amount of delay time using number pads. (up to 99 minutes and 99 seconds) • Enter the desired Power Level (see page 12 for directions). Then cooking will count down without oven operating. After cooking, stand time will start. When each stage finishes, a two-beep signal sounds. If the oven door is...
.... 3. To Set Stand Time: Example: To cook at P6 power for 3 minutes. 1. • Press Timer. 2. 3. Press 5 times 4. • Enter desired amount of delay time using number pads. (up to 99 minutes and 99 seconds) • Enter the desired Power Level (see page 12 for directions). Then cooking will count down without oven operating. After cooking, stand time will start. When each stage finishes, a two-beep signal sounds. If the oven door is...
NNS253BF User Guide
Page 24
... best cooking results 1-Level cooking Food microwaves best when placed onto the turntable, with the shelf on the surface between the raised rib and raised floor. Incorrect installation can be positioned on Popcorn / Inverter Turbo Defrost / Keep Warm / Sensor Reheat / Sensor Cook / Auto Reheat / Inverter Auto Cooking. Raised Floor Raised Rib Roller Ring 2-Level cooking 1. Multiply reheat time by 11/2. 2. The shelf must be sure the Roller Ring is used for heating...
... best cooking results 1-Level cooking Food microwaves best when placed onto the turntable, with the shelf on the surface between the raised rib and raised floor. Incorrect installation can be positioned on Popcorn / Inverter Turbo Defrost / Keep Warm / Sensor Reheat / Sensor Cook / Auto Reheat / Inverter Auto Cooking. Raised Floor Raised Rib Roller Ring 2-Level cooking 1. Multiply reheat time by 11/2. 2. The shelf must be sure the Roller Ring is used for heating...
NNS253BF User Guide
Page 26
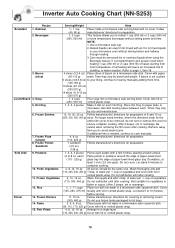
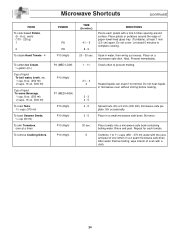
.... Combine 1 to 11/2 cups (250 - 375 ml) water with the juice and peel of one at a time) To remove Cooking Odors, POWER P8 P8 P10 (High) P3 (MED-LOW) P10 (High) P7 (MED-HIGH) P10 (High) P10 (High) P10 (High) P10 (High) TIME (in mins.) 41/2 - 5 8 - 9 DIRECTIONS Pierce each potato with a cloth. 24 Microwave Shortcuts (continued) FOOD To cook baked...
.... Combine 1 to 11/2 cups (250 - 375 ml) water with the juice and peel of one at a time) To remove Cooking Odors, POWER P8 P8 P10 (High) P3 (MED-LOW) P10 (High) P7 (MED-HIGH) P10 (High) P10 (High) P10 (High) P10 (High) TIME (in mins.) 41/2 - 5 8 - 9 DIRECTIONS Pierce each potato with a cloth. 24 Microwave Shortcuts (continued) FOOD To cook baked...
NNS253BF User Guide
Page 28
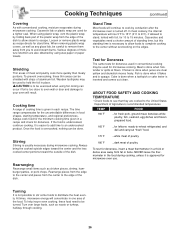
... exercised when using plastic wrap, vent the plastic wrap by conduction after the microwave oven is easier to add time to distribute the heat evenly. CAUTION is done when forktender or splits at fibers. Cooking Techniques (continued) Covering As with conventional cooking, moisture evaporates during microwave cooking. Loosen or remove plastic wrap as any glass lids, be done. Cooking time A range of poultry. TEMP FOOD 160˚...
... exercised when using plastic wrap, vent the plastic wrap by conduction after the microwave oven is easier to add time to distribute the heat evenly. CAUTION is done when forktender or splits at fibers. Cooking Techniques (continued) Covering As with conventional cooking, moisture evaporates during microwave cooking. Loosen or remove plastic wrap as any glass lids, be done. Cooking time A range of poultry. TEMP FOOD 160˚...
NNS253BF User Guide
Page 29
... Ring Assembly Oven Light, Cooktop Light PART NUMBER F00035V10AP A06015H00AP F06025H00AP F290D5Q00AP F60305H00AP For pricing quotes, call or write the Parts & Literature Department at wall outlet. Inside of harsh detergents or abrasives is given off from the food. (Some steam will condense on the Control Panel. The use harsh detergents or abrasives on cooler surfaces, such as the oven door. Outside oven surfaces: Clean with a removable protective film to clear the Display.
... Ring Assembly Oven Light, Cooktop Light PART NUMBER F00035V10AP A06015H00AP F06025H00AP F290D5Q00AP F60305H00AP For pricing quotes, call or write the Parts & Literature Department at wall outlet. Inside of harsh detergents or abrasives is given off from the food. (Some steam will condense on the Control Panel. The use harsh detergents or abrasives on cooler surfaces, such as the oven door. Outside oven surfaces: Clean with a removable protective film to clear the Display.
NNS253BF User Guide
Page 30
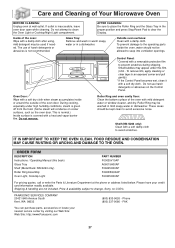
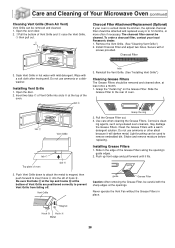
... with 2 screws provided. Slide the Grease Filter to the rear of Vent Grille are positioned correctly to prevent Vent Grille from falling off. Grasp the ring 2. Pull the Grease Filter out. 3. Slide in the edge of Vent Grille and 2 raise the Vent Grille, 3 then pull out. guide Grease Filter Caution: After removing the Grease Filter, be removed and cleaned. 1. Charcoal Filter 3. Open the door. 2. Do not use ammonia or a dishwasher. Installing Grease Filters 1. Care and Cleaning of Your Microwave Oven (continued) Cleaning Vent Grille (Oven Air Vent) Vent Grille can be...
... with 2 screws provided. Slide the Grease Filter to the rear of Vent Grille are positioned correctly to prevent Vent Grille from falling off. Grasp the ring 2. Pull the Grease Filter out. 3. Slide in the edge of Vent Grille and 2 raise the Vent Grille, 3 then pull out. guide Grease Filter Caution: After removing the Grease Filter, be removed and cleaned. 1. Charcoal Filter 3. Open the door. 2. Do not use ammonia or a dishwasher. Installing Grease Filters 1. Care and Cleaning of Your Microwave Oven (continued) Cleaning Vent Grille (Oven Air Vent) Vent Grille can be...
NNS253BF User Guide
Page 31
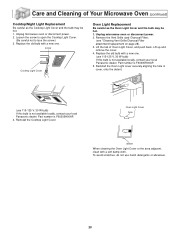
... Charcoal Filter). (see "Cleaning Vent Grille/Charcoal Filter attachment/replacement on page 28). 3. Lift up and remove the cover. 4. Reinstall the Oven Light cover securely aligning the hole in cover, onto the detent. (use 115-125 V, 30 W bulb) If this bulb is F60305H00AP. 5. screw Cooktop Light Cover Oven Light Replacement Be careful as the Cooktop Light Cover and the bulb may be hot. 1. Part number is not available locally, contact your local Panasonic dealer. Replace the old bulb with a soft damp cloth. Unplug microwave oven or disconnect power...
... Charcoal Filter). (see "Cleaning Vent Grille/Charcoal Filter attachment/replacement on page 28). 3. Lift up and remove the cover. 4. Reinstall the Oven Light cover securely aligning the hole in cover, onto the detent. (use 115-125 V, 30 W bulb) If this bulb is F60305H00AP. 5. screw Cooktop Light Cover Oven Light Replacement Be careful as the Cooktop Light Cover and the bulb may be hot. 1. Part number is not available locally, contact your local Panasonic dealer. Replace the old bulb with a soft damp cloth. Unplug microwave oven or disconnect power...
NNS253BF User Guide
Page 32
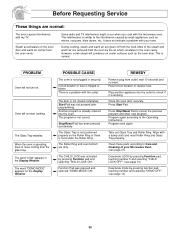
... steam will not start cooking. The Glass Tray wobbles. Stop/Reset Pad has been pressed accidentally. Function Pad was not pressed after programming. Clean these parts according to the interference caused by pressing Function pad and selecting "CHILD LOCK ON". During cooking, steam and warm air are removed from the oven by pressing function pad, touching number and selecting "DEMO OFF". (see page 10) Deactivate mode by the...
... steam will not start cooking. The Glass Tray wobbles. Stop/Reset Pad has been pressed accidentally. Function Pad was not pressed after programming. Clean these parts according to the interference caused by pressing Function pad and selecting "CHILD LOCK ON". During cooking, steam and warm air are removed from the oven by pressing function pad, touching number and selecting "DEMO OFF". (see page 10) Deactivate mode by the...
NNS253BF User Guide
Page 33
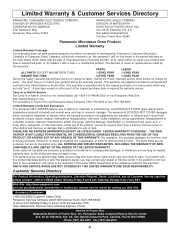
..., misapplication, alteration, faulty installation, set-up adjustments, misadjustment of consumer controls, improper maintenance, power line surge, lightning damage, modification, or commercial use (such as in materials or workmanship, Panasonic Consumer Electronics Company or Panasonic Sales Company (collectively referred to as is". This warranty only applies to 10:30 am Saturday; A purchase receipt or other Authorized Servicer, or damage that...
..., misapplication, alteration, faulty installation, set-up adjustments, misadjustment of consumer controls, improper maintenance, power line surge, lightning damage, modification, or commercial use (such as in materials or workmanship, Panasonic Consumer Electronics Company or Panasonic Sales Company (collectively referred to as is". This warranty only applies to 10:30 am Saturday; A purchase receipt or other Authorized Servicer, or damage that...


