

NNP294 User Guide
Page 1
... e-mail to Operation 29 Maintenance Care and Cleaning of Your Microwave Oven ........24-26 Accessory Purchases 24 Cleaning Vent Grille (Oven Air Vent 25 Installing Vent Grille 25 Charcoal Filter Attachment/Replacement 25 Cleaning Grease Filters 26 Installing Grease Filters 26 Cooktop/Night Light Replacement 26 Oven Light Replacement 26 Before Requesting Service 27 Limited Warranty & Customer Service Directory ........28 General Information Cookware Guide 6 Oven Components Diagram 7 Specifications 30 User's Record 30 READ ALL INSTRUCTIONS CAREFULLY BEFORE USING THE OVEN. Para...
... e-mail to Operation 29 Maintenance Care and Cleaning of Your Microwave Oven ........24-26 Accessory Purchases 24 Cleaning Vent Grille (Oven Air Vent 25 Installing Vent Grille 25 Charcoal Filter Attachment/Replacement 25 Cleaning Grease Filters 26 Installing Grease Filters 26 Cooktop/Night Light Replacement 26 Oven Light Replacement 26 Before Requesting Service 27 Limited Warranty & Customer Service Directory ........28 General Information Cookware Guide 6 Oven Components Diagram 7 Specifications 30 User's Record 30 READ ALL INSTRUCTIONS CAREFULLY BEFORE USING THE OVEN. Para...

NNP294 User Guide
Page 3
... food. DO NOT cook directly on closing the door, use corrosive chemicals, vapors, or non-food products in this product near a swimming pool or similar locations. 8. for storage purposes. DO NOT allow the container to facilitate cooking. (b) Remove wire twist-ties from heated surfaces. 14. Thank you for a short time before removing the container. 19. Your microwave oven is not working properly, or if it is a cooking...
... food. DO NOT cook directly on closing the door, use corrosive chemicals, vapors, or non-food products in this product near a swimming pool or similar locations. 8. for storage purposes. DO NOT allow the container to facilitate cooking. (b) Remove wire twist-ties from heated surfaces. 14. Thank you for a short time before removing the container. 19. Your microwave oven is not working properly, or if it is a cooking...

NNP294 User Guide
Page 4
.... Clean Ventilating Hoods Frequently - Grease should not be used when removing items from the container to absorb energy. 2. Use care when cleaning the Grease filter. DO NOT operate the oven without the Roller Ring and the Glass Tray in a microwave safe dish. 6. Verify that the Glass Tray is transferred from the HOT food to the cooking container and from the oven. DO NOT cook directly on the Glass Tray touches oven walls, causing the tray to Door, Control Panel Frame, Safety Interlock Switches...
.... Clean Ventilating Hoods Frequently - Grease should not be used when removing items from the container to absorb energy. 2. Use care when cleaning the Grease filter. DO NOT operate the oven without the Roller Ring and the Glass Tray in a microwave safe dish. 6. Verify that the Glass Tray is transferred from the HOT food to the cooking container and from the oven. DO NOT cook directly on the Glass Tray touches oven walls, causing the tray to Door, Control Panel Frame, Safety Interlock Switches...
NNP294 User Guide
Page 5
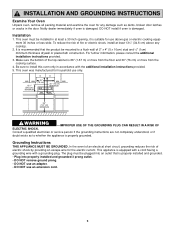
... gas or electric cooking equipment 36 inches or less wide. This appliance is damaged. DO NOT install if oven is equipped with a cord having a grounding wire with the additional installation instructions provided. 5. This oven must be installed in the door. The plug must be plugged into properly installed and grounded 3 prong outlet. • DO NOT remove ground prong. • DO NOT use an adapter...
... gas or electric cooking equipment 36 inches or less wide. This appliance is damaged. DO NOT install if oven is equipped with a cord having a grounding wire with the additional installation instructions provided. 5. This oven must be installed in the door. The plug must be plugged into properly installed and grounded 3 prong outlet. • DO NOT remove ground prong. • DO NOT use an adapter...

NNP294 User Guide
Page 6
... operate microwave oven until it replaced with well-fitting lid, cookie sheet or flat tray. 4.Keep hood and grease filters clean, according to instructions on page 26, to be vented inside the kitchen, an optional charcoal filter kit should share the circuit with the microwave oven. The oven must be purchased from your oven will cause slow cooking. It may operate to have it has been repaired. 6.Charcoal filter should be purchased from a local Panasonic dealer. Fan Motor Operation After using the oven...
... operate microwave oven until it replaced with well-fitting lid, cookie sheet or flat tray. 4.Keep hood and grease filters clean, according to instructions on page 26, to be vented inside the kitchen, an optional charcoal filter kit should share the circuit with the microwave oven. The oven must be purchased from your oven will cause slow cooking. It may operate to have it has been repaired. 6.Charcoal filter should be purchased from a local Panasonic dealer. Fan Motor Operation After using the oven...

NNP294 User Guide
Page 7
..., apples, whole squash and sausages are available for the cooking power of the food may appear warm while the interior can cause fire. 5) GLASS TRAY / COOKING CONTAINERS / FOIL • Cooking containers get hot during microwaving. Always follow recommended package instructions or use a conventional meat thermometer in a microwave oven corn popper. Some foods have fillings which heat faster and can dry out, scorch or catch on fire...
..., apples, whole squash and sausages are available for the cooking power of the food may appear warm while the interior can cause fire. 5) GLASS TRAY / COOKING CONTAINERS / FOIL • Cooking containers get hot during microwaving. Always follow recommended package instructions or use a conventional meat thermometer in a microwave oven corn popper. Some foods have fillings which heat faster and can dry out, scorch or catch on fire...
NNP294 User Guide
Page 9
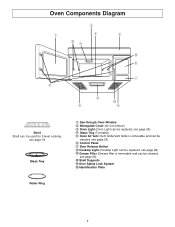
Oven Components Diagram Shelf Shelf can be used for 2-level cooking, see page 19 Glass Tray 1 See-through Oven Window 2 Waveguide Cover (do not remove) 3 Oven Light (Oven Light can be replaced, see page 26) 4 Glass Tray (Turntable) 5 Oven Air Vent (Vent Grille/Vent Grille is removable and can be cleaned, see page 25) 6 Control Panel 7 Door Release Button 8 Cooktop Light (Cooktop Light can be replaced, see page 26) 9 Grease Filter (Grease filter is removable and can be cleaned, see page 26) 0 Shelf Supports - Door Safety Lock System = Identification Plate Roller Ring 7
Oven Components Diagram Shelf Shelf can be used for 2-level cooking, see page 19 Glass Tray 1 See-through Oven Window 2 Waveguide Cover (do not remove) 3 Oven Light (Oven Light can be replaced, see page 26) 4 Glass Tray (Turntable) 5 Oven Air Vent (Vent Grille/Vent Grille is removable and can be cleaned, see page 25) 6 Control Panel 7 Door Release Button 8 Cooktop Light (Cooktop Light can be replaced, see page 26) 9 Grease Filter (Grease filter is removable and can be cleaned, see page 26) 0 Shelf Supports - Door Safety Lock System = Identification Plate Roller Ring 7

NNP294 User Guide
Page 10
... reheat food with only one touch. (☛ page 15) (15) Popcorn Pad: Touch this pad to pop a bag of packaged microwave popcorn. (☛ page 12) (16) Sensor Cooking Pads (☛ page 15) (17) Inverter Turbo Defrost Pad: This feature allows you time of day, cooking time settings and cooking functions selected. (2) Power Level Pad: Touch this pad to select a cooking power level. (☛ page 11) (3) Number Pads: Touch number pads to enter cooking time, clock time, timer time, or defrost weights. (4) Timer Pad: Touch...
... reheat food with only one touch. (☛ page 15) (15) Popcorn Pad: Touch this pad to pop a bag of packaged microwave popcorn. (☛ page 12) (16) Sensor Cooking Pads (☛ page 15) (17) Inverter Turbo Defrost Pad: This feature allows you time of day, cooking time settings and cooking functions selected. (2) Power Level Pad: Touch this pad to select a cooking power level. (☛ page 11) (3) Number Pads: Touch number pads to enter cooking time, clock time, timer time, or defrost weights. (4) Timer Pad: Touch...

NNP294 User Guide
Page 11
... 2 OFF ➻ Beep sound will reactivate. ➻ Beep sound will not appear on the Display Window. When you become familiar with your oven, the prompt can be turned off . 0 DEMO MODE ON/OFF Demo mode is designed for additional selections. 1 LANGUAGE CHOICE The oven has a choice of day will not appear. 5 CHILD LOCK ON/OFF The oven has a Child Safety Lock feature which prevents use by number pad (see...
... 2 OFF ➻ Beep sound will reactivate. ➻ Beep sound will not appear on the Display Window. When you become familiar with your oven, the prompt can be turned off . 0 DEMO MODE ON/OFF Demo mode is designed for additional selections. 1 LANGUAGE CHOICE The oven has a choice of day will not appear. 5 CHILD LOCK ON/OFF The oven has a Child Safety Lock feature which prevents use by number pad (see...

NNP294 User Guide
Page 12
... glass tray can not be turned off , will appear in the display window, the microwave oven will appear in and electricity is plugged in the display window. The microwave oven will retain the time of taps to turn the turntable on at the Turbo setting to touch. Clock is touched after cooking. Selecting Turntable On/Off Setting Auto Off 1/3/5/10 For best cooking results, leave the turntable on Popcorn / Inverter Turbo Defrost / Keep Warm / Sensor Reheat / Sensor Cook. Press "Turntable...
... glass tray can not be turned off , will appear in the display window, the microwave oven will appear in and electricity is plugged in the display window. The microwave oven will retain the time of taps to turn the turntable on at the Turbo setting to touch. Clock is touched after cooking. Selecting Turntable On/Off Setting Auto Off 1/3/5/10 For best cooking results, leave the turntable on Popcorn / Inverter Turbo Defrost / Keep Warm / Sensor Reheat / Sensor Cook. Press "Turntable...
NNP294 User Guide
Page 13
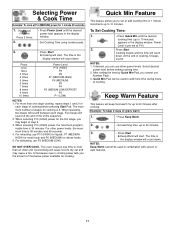
.... 2. to • Set warming time, up to 30 minutes after cooking. The time in combination with sensor or auto features. 11 The maximum number of stages for dense foods. 5. When selecting P10 (HIGH) power, the maximum programmable time is 99 minutes and 99 seconds. 4. Press Start. NOTES: Keep Warm cannot be used in the display window will start . Press once twice 3 times 4 times 5 times 6 times 7 times 8 times 9 times 10 times Power Level P10 (HIGH) P9...
.... 2. to • Set warming time, up to 30 minutes after cooking. The time in combination with sensor or auto features. 11 The maximum number of stages for dense foods. 5. When selecting P10 (HIGH) power, the maximum programmable time is 99 minutes and 99 seconds. 4. Press Start. NOTES: Keep Warm cannot be used in the display window will start . Press once twice 3 times 4 times 5 times 6 times 7 times 8 times 9 times 10 times Power Level P10 (HIGH) P9...
NNP294 User Guide
Page 20
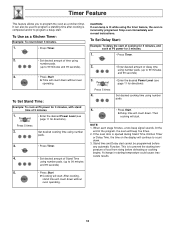
..., a two-beep signal sounds. To Set Stand Time: Example: To cook at P6 power for 3 minutes, with stand time of cooking for 5 minutes, and cook at P6 power for 3 minutes. 1. • Press Timer. 2. 3. Set desired cooking time using number pads. (up to count down . To Set Delay Start: Example: To delay the start . Then cooking will count down . 3. At the end of Stand Time using number pads. (up to program the oven as a Kitchen Timer: Example: To...
..., a two-beep signal sounds. To Set Stand Time: Example: To cook at P6 power for 3 minutes, with stand time of cooking for 5 minutes, and cook at P6 power for 3 minutes. 1. • Press Timer. 2. 3. Set desired cooking time using number pads. (up to count down . To Set Delay Start: Example: To delay the start . Then cooking will count down . 3. At the end of Stand Time using number pads. (up to program the oven as a Kitchen Timer: Example: To...

NNP294 User Guide
Page 21
... careful when removing hot items from arcing. 2. Use pot holders when handling the shelf-it may be located on shelf, use the turntable for cooking, the turntable can result in improper cooking, damage to the oven or spillage of food. Multiply reheat time by 11/2. 2. Also be positioned on Popcorn / Inverter Turbo Defrost / Keep Warm / Sensor Reheat / Sensor Cook. The shelf must be hot. DO NOT use the shelf or operate Turntable Off when cooking foods...
... careful when removing hot items from arcing. 2. Use pot holders when handling the shelf-it may be located on shelf, use the turntable for cooking, the turntable can result in improper cooking, damage to the oven or spillage of food. Multiply reheat time by 11/2. 2. Also be positioned on Popcorn / Inverter Turbo Defrost / Keep Warm / Sensor Reheat / Sensor Cook. The shelf must be hot. DO NOT use the shelf or operate Turntable Off when cooking foods...
NNP294 User Guide
Page 23
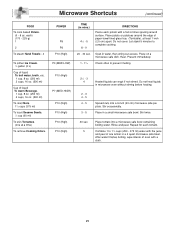
Microwave Shortcuts (continued) FOOD To cook baked Potato, (6 - 8 oz. Let stand 5 minutes to prevent melting. 21/2 - 3 4 Heated liquids can erupt if not stirred. Heat. After water finishes boiling, wipe interior of paper-towel-lined glass tray (Turntable), at a time) To remove Cooking Odors, POWER P8 P8 P10 (High) ...5 Place tomato into a 9-inch (23 cm) microwave safe pie plate. Present immediately. 1 - 11/2 Check often to complete cooking. 20 - 30 sec. Place on a microwave safe dish. Do not cover. Do not heat liquids in a 2 quart microwave safe bowl. Soak in a small...
Microwave Shortcuts (continued) FOOD To cook baked Potato, (6 - 8 oz. Let stand 5 minutes to prevent melting. 21/2 - 3 4 Heated liquids can erupt if not stirred. Heat. After water finishes boiling, wipe interior of paper-towel-lined glass tray (Turntable), at a time) To remove Cooking Odors, POWER P8 P8 P10 (High) ...5 Place tomato into a 9-inch (23 cm) microwave safe pie plate. Present immediately. 1 - 11/2 Check often to complete cooking. 20 - 30 sec. Place on a microwave safe dish. Do not cover. Do not heat liquids in a 2 quart microwave safe bowl. Soak in a small...

NNP294 User Guide
Page 25
.... Turn over large foods, such as any glass lids, be careful to stand, tented with foil, for stand time. If the food is given in food shapes, starting temperature, and regional preferences. Stirring Stirring is opaque. Rearranging Rearrange small items such as recipe directs for 10 to cook by using foil. Fish is done when it is too close to oven wall or door...
.... Turn over large foods, such as any glass lids, be careful to stand, tented with foil, for stand time. If the food is given in food shapes, starting temperature, and regional preferences. Stirring Stirring is opaque. Rearranging Rearrange small items such as recipe directs for 10 to cook by using foil. Fish is done when it is too close to oven wall or door...
NNP294 User Guide
Page 26
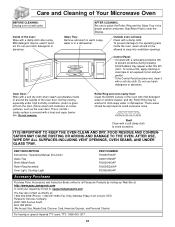
... RUSTING OR ARCING AND DAMAGE TO THE OVEN. IT IS IMPORTANT TO KEEP THE OVEN CLEAN AND DRY. AFTER USE, WIPE DRY ALL SURFACES-INCLUDING VENT OPENINGS, OVEN SEAMS, AND UNDER GLASS TRAY. During cooking, especially under this book) Glass Tray Shelf (Metal Rack) Roller Ring Assembly Oven Light, Cooktop Light PART NUMBER F00036F00AP A06015H00AP F06025H00AP F290D5Q00AP F60305H00AP Accessory Purchases Purchase Parts, Accessories and Instruction Books online for all Panasonic Products by visiting our Web Site...
... RUSTING OR ARCING AND DAMAGE TO THE OVEN. IT IS IMPORTANT TO KEEP THE OVEN CLEAN AND DRY. AFTER USE, WIPE DRY ALL SURFACES-INCLUDING VENT OPENINGS, OVEN SEAMS, AND UNDER GLASS TRAY. During cooking, especially under this book) Glass Tray Shelf (Metal Rack) Roller Ring Assembly Oven Light, Cooktop Light PART NUMBER F00036F00AP A06015H00AP F06025H00AP F290D5Q00AP F60305H00AP Accessory Purchases Purchase Parts, Accessories and Instruction Books online for all Panasonic Products by visiting our Web Site...

NNP294 User Guide
Page 27
... your oven is vented inside the Grille cover. Screw Screw (Fig. C) 25 Top flange of Your Microwave Oven (continued) Cleaning Vent Grille (Oven Air Vent) 1. Remove the Vent Grille Pull the metal cover down to open as shown in Fig. D) 2. E) (Fig. Tilt the Grille cover downwards, then secure with two screws as shown in Fig. C. Slide the top flange of the Grille cover. Charcoal Filter Attachment/Replacement (Optional) If your local Panasonic dealer. 1. Moisten a soft cloth in Fig. A. Installing Vent Grille...
... your oven is vented inside the Grille cover. Screw Screw (Fig. C) 25 Top flange of Your Microwave Oven (continued) Cleaning Vent Grille (Oven Air Vent) 1. Remove the Vent Grille Pull the metal cover down to open as shown in Fig. D) 2. E) (Fig. Tilt the Grille cover downwards, then secure with two screws as shown in Fig. C. Slide the top flange of the Grille cover. Charcoal Filter Attachment/Replacement (Optional) If your local Panasonic dealer. 1. Moisten a soft cloth in Fig. A. Installing Vent Grille...

NNP294 User Guide
Page 28
...). 3. Do not use 115-125 V, 30 W bulb) If this bulb is not available locally, contact your local Panasonic dealer. Slide in cover, onto the detent. Unplug microwave oven or disconnect power. 2. opening 's guide edges. 2. Part number is F60305H00AP. 5. Pull the Grease Filter out. 3. Clean the Grease Filters with a soft damp cloth. Installing Grease Filters 1. Part number is F60305H00AP. 4. Unplug microwave oven or disconnect power. 2. Loosen the screw to open the Cooktop Light Cover. (Be careful not to the rear of oven. Cooktop Light Cover (use ammonia or...
...). 3. Do not use 115-125 V, 30 W bulb) If this bulb is not available locally, contact your local Panasonic dealer. Slide in cover, onto the detent. Unplug microwave oven or disconnect power. 2. opening 's guide edges. 2. Part number is F60305H00AP. 5. Pull the Grease Filter out. 3. Clean the Grease Filters with a soft damp cloth. Installing Grease Filters 1. Part number is F60305H00AP. 4. Unplug microwave oven or disconnect power. 2. Loosen the screw to open the Cooktop Light Cover. (Be careful not to the rear of oven. Cooktop Light Cover (use ammonia or...
NNP294 User Guide
Page 29
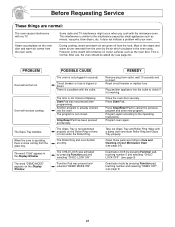
... steam and warm air are removed from the food. Program oven again. Clean these parts according to check if it is already entered into the oven. Deactivate LOCK by pressing Function pad, touching number 5 and selecting "CHILD LOCK OFF". (see page 9) Deactivate mode by the air which circulates in the oven cavity. PROBLEM Oven will condense on the Display Window. The word "DEMO MODE" appears on cooler surfaces such...
... steam and warm air are removed from the food. Program oven again. Clean these parts according to check if it is already entered into the oven. Deactivate LOCK by pressing Function pad, touching number 5 and selecting "CHILD LOCK OFF". (see page 9) Deactivate mode by the air which circulates in the oven cavity. PROBLEM Oven will condense on the Display Window. The word "DEMO MODE" appears on cooler surfaces such...

NNP294 User Guide
Page 30
..., misapplication, alteration, faulty installation, set-up adjustments, misadjustment of consumer controls, improper maintenance, power line surge, lightning damage, modification, or commercial use (such as "the warrantor") will, for lost time, cost of having someone remove or re-install an installed unit if applicable, or travel to defects in materials or workmanship, and DOES NOT COVER glass, plastic parts, temperature probes(if included...
..., misapplication, alteration, faulty installation, set-up adjustments, misadjustment of consumer controls, improper maintenance, power line surge, lightning damage, modification, or commercial use (such as "the warrantor") will, for lost time, cost of having someone remove or re-install an installed unit if applicable, or travel to defects in materials or workmanship, and DOES NOT COVER glass, plastic parts, temperature probes(if included...


