
NNH764 User Guide
Page 1
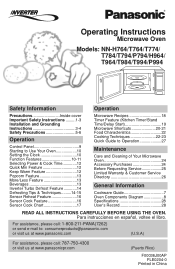
...Service Directory 26 General Information Cookware Guide 7 Oven Components Diagram 8 Specifications 28 User's Record 28 READ ALL INSTRUCTIONS CAREFULLY BEFORE USING THE OVEN. Operating Instructions Microwave Oven Models: NN-H764/T764/T774/ T784/T794/P794/H964/ T964/T984/T994/P994 Safety Information Operation Precautions Inside cover Important Safety Instructions .........1-3 Installation and Grounding Instructions 3-4 Safety Precautions 5-6 Operation Control Panel 9 Starting to Use Your Oven 10 Setting the Clock 10 Function Features 10-11 Selecting Power & Cook Time 12 Quick...
...Service Directory 26 General Information Cookware Guide 7 Oven Components Diagram 8 Specifications 28 User's Record 28 READ ALL INSTRUCTIONS CAREFULLY BEFORE USING THE OVEN. Operating Instructions Microwave Oven Models: NN-H764/T764/T774/ T784/T794/P794/H964/ T964/T984/T994/P994 Safety Information Operation Precautions Inside cover Important Safety Instructions .........1-3 Installation and Grounding Instructions 3-4 Safety Precautions 5-6 Operation Control Panel 9 Starting to Use Your Oven 10 Setting the Clock 10 Function Features 10-11 Selecting Power & Cook Time 12 Quick...
NNH764 User Guide
Page 3
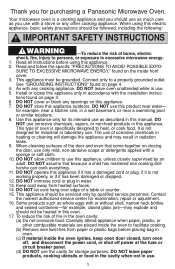
.... Contact the nearest authorized service center for example, closed , turn oven off, and disconnect the power cord, or shut off power at the fuse or circuit breaker panel. (d) DO NOT use of oven is not working properly, or if it has been damaged or dropped. 12. Some products such as you for purchasing a Panasonic Microwave Oven. DO NOT cover or block any cooking appliance, DO NOT leave...
.... Contact the nearest authorized service center for example, closed , turn oven off, and disconnect the power cord, or shut off power at the fuse or circuit breaker panel. (d) DO NOT use of oven is not working properly, or if it has been damaged or dropped. 12. Some products such as you for purchasing a Panasonic Microwave Oven. DO NOT cover or block any cooking appliance, DO NOT leave...
NNH764 User Guide
Page 4
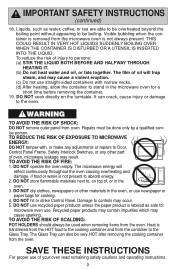
... the oven. Repairs must be used when removing items from oven. The Glass Tray can crack, cause injury or damage to the Glass Tray. DO NOT cook directly on top of your oven read remaining safety cautions and operating instructions. 2 DO NOT use straight-sided containers with , or make any adjustments or repairs to Door, Control Panel Frame, Safety Interlock Switches, or any other materials in the microwave oven for a short time before removing...
... the oven. Repairs must be used when removing items from oven. The Glass Tray can crack, cause injury or damage to the Glass Tray. DO NOT cook directly on top of your oven read remaining safety cautions and operating instructions. 2 DO NOT use straight-sided containers with , or make any adjustments or repairs to Door, Control Panel Frame, Safety Interlock Switches, or any other materials in the microwave oven for a short time before removing...
NNH764 User Guide
Page 5
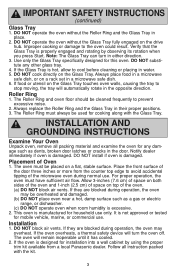
.... DO NOT operate the oven without the Roller Ring and the Glass Tray in place. 2. Improper cooking or damage to stop moving, the tray will automatically rotate in the door. Always place food in a microwave safe dish, or on top of Oven 1. INSTALLATION AND GROUNDING INSTRUCTIONS Examine Your Oven Unpack oven, remove all instruction packed with the Glass Tray. IMPORTANT SAFETY INSTRUCTIONS (continued) Glass Tray 1. Use only the Glass Tray specifically designed for installation into a wall cabinet by observing...
.... DO NOT operate the oven without the Roller Ring and the Glass Tray in place. 2. Improper cooking or damage to stop moving, the tray will automatically rotate in the door. Always place food in a microwave safe dish, or on top of Oven 1. INSTALLATION AND GROUNDING INSTRUCTIONS Examine Your Oven Unpack oven, remove all instruction packed with the Glass Tray. IMPORTANT SAFETY INSTRUCTIONS (continued) Glass Tray 1. Use only the Glass Tray specifically designed for installation into a wall cabinet by observing...
NNH764 User Guide
Page 6
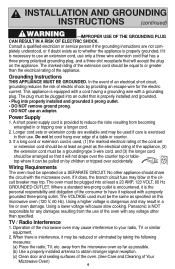
... the oven with a properly grounded three-prong outlet. TV / Radio Interference 1. Consult a qualified electrician or service person if the grounding instructions are available and may be operated on by children or tripped over accidentally. pletely understood, or if doubt exists as possible. (b) Use a properly installed antenna to use an extension cord, use . No other than the electrical rating of a table or counter...
... the oven with a properly grounded three-prong outlet. TV / Radio Interference 1. Consult a qualified electrician or service person if the grounding instructions are available and may be operated on by children or tripped over accidentally. pletely understood, or if doubt exists as possible. (b) Use a properly installed antenna to use an extension cord, use . No other than the electrical rating of a table or counter...
NNH764 User Guide
Page 8
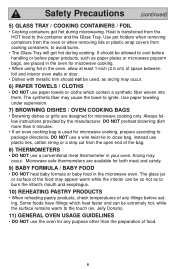
... and interior oven walls or door. • Dishes with metallic trim should be so hot as arcing may occur. Use paper toweling under supervision. 7) BROWNING DISHES / OVEN COOKING BAGS • Browning dishes or grills are available for microwave cooking. • When using foil in the microwave oven. Use pot holders when removing containers from the oven or when removing lids or plastic wrap covers from the HOT food to cool before handling or...
... and interior oven walls or door. • Dishes with metallic trim should be so hot as arcing may occur. Use paper toweling under supervision. 7) BROWNING DISHES / OVEN COOKING BAGS • Browning dishes or grills are available for microwave cooking. • When using foil in the microwave oven. Use pot holders when removing containers from the oven or when removing lids or plastic wrap covers from the HOT food to cool before handling or...
NNH764 User Guide
Page 9
...' use and care directions for use . Heat only 1 tray in the microwave oven alongside the empty container to cook foods that require short cooking times such as hot dogs. Some microwave safe plastic containers are not heat resistant. Check package directions. Not suitable for use in microwave oven, will cause sparks and get HOT! heat one time. Check browning dish information for recommended uses. Metal handle may cause the plastic to prevent spattering. Most glass...
...' use and care directions for use . Heat only 1 tray in the microwave oven alongside the empty container to cook foods that require short cooking times such as hot dogs. Some microwave safe plastic containers are not heat resistant. Check package directions. Not suitable for use in microwave oven, will cause sparks and get HOT! heat one time. Check browning dish information for recommended uses. Metal handle may cause the plastic to prevent spattering. Most glass...
NNH764 User Guide
Page 12
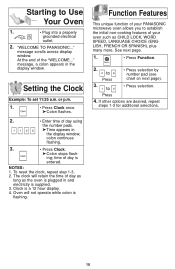
... more. To reset the clock, repeat step 1-3. 2. Clock is supplied. 3. Setting the Clock Example: To set 11:25 a.m. Oven will retain the time of your PANASONIC microwave oven allows you to • Press selection. to Use Your Oven 1. • Plug into a properly grounded electrical outlet. 2. message scrolls across display window. See next page. 1. • Press Function. 2. The clock will not operate while colon is entered. Starting to Press...
... more. To reset the clock, repeat step 1-3. 2. Clock is supplied. 3. Setting the Clock Example: To set 11:25 a.m. Oven will retain the time of your PANASONIC microwave oven allows you to • Press selection. to Use Your Oven 1. • Plug into a properly grounded electrical outlet. 2. message scrolls across display window. See next page. 1. • Press Function. 2. The clock will not operate while colon is entered. Starting to Press...
NNH764 User Guide
Page 13
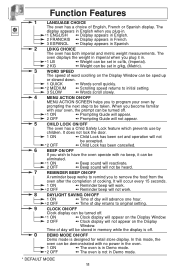
... with no power in the oven. 1 ON *2 OFF ➻ The oven is in Demo mode. ➻ The oven is not in Demo mode. * DEFAULT MODE 11 The oven displays the weight in imperial when you plug it in. *1 LB 2 KG ➻ Weight can be set in oz/lb, (Imperial). ➻ Weight can be set and operation will not be accepted. *2 OFF ➻ Child Lock has been cancelled. 6 BEEP ON/OFF...
... with no power in the oven. 1 ON *2 OFF ➻ The oven is in Demo mode. ➻ The oven is not in Demo mode. * DEFAULT MODE 11 The oven displays the weight in imperial when you plug it in. *1 LB 2 KG ➻ Weight can be set in oz/lb, (Imperial). ➻ Weight can be set and operation will not be accepted. *2 OFF ➻ Child Lock has been cancelled. 6 BEEP ON/OFF...
NNH764 User Guide
Page 14
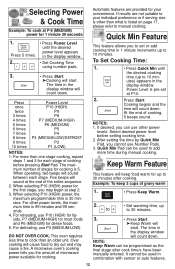
..., use other power levels, the maximum time is pre-set or add cooking time in combination with sensor or auto features. 12 DO NOT OVER COOK. This oven requires less time to 10 min- Over cooking will keep 2 cups of cooking, 5 beeps sound. Press Start. At the end of gravy warm 1. • Press Keep Warm. 2. Select desired power level before pressing Start Pad. Keep Warm Feature This feature will cause food to...
..., use other power levels, the maximum time is pre-set or add cooking time in combination with sensor or auto features. 12 DO NOT OVER COOK. This oven requires less time to 10 min- Over cooking will keep 2 cups of cooking, 5 beeps sound. Press Start. At the end of gravy warm 1. • Press Keep Warm. 2. Select desired power level before pressing Start Pad. Keep Warm Feature This feature will cause food to...

NNH764 User Guide
Page 15
... 3.5 oz. Example: To reheat 2 cups of a different weight than listed, follow instructions on popcorn package. Optional 3. • Press Start. ➤Cooking time appears in oven according to a different doneness. 1 tap = More (Adds Approx. 10% time) 2 taps = Less (Subtracts Approx. 10% time) 3 taps = original setting Press More/Less pad before pressing Start. Heated liquids can cause fire. Care must be adjusted to count down . This...
... 3.5 oz. Example: To reheat 2 cups of a different weight than listed, follow instructions on popcorn package. Optional 3. • Press Start. ➤Cooking time appears in oven according to a different doneness. 1 tap = More (Adds Approx. 10% time) 2 taps = Less (Subtracts Approx. 10% time) 3 taps = original setting Press More/Less pad before pressing Start. Heated liquids can cause fire. Care must be adjusted to count down . This...

NNH764 User Guide
Page 16
... Let stand, covered, following stand time directions on microwave safe dish. 1. • Press Inverter Turbo Defrost. 2. • Enter weight of meat weighs 1.95 lbs. To use Inverter Turbo Defrost, enter the weight of the food in packages with aluminum foil. To Defrost: 1. Remove wrapper. Set food in the center. Rinse foods indicated in heavy-duty plastic wraps, bags (labeled "For Freezer"), or freezer paper. 3. Defrosting will start. Package in...
... Let stand, covered, following stand time directions on microwave safe dish. 1. • Press Inverter Turbo Defrost. 2. • Enter weight of meat weighs 1.95 lbs. To use Inverter Turbo Defrost, enter the weight of the food in packages with aluminum foil. To Defrost: 1. Remove wrapper. Set food in the center. Rinse foods indicated in heavy-duty plastic wraps, bags (labeled "For Freezer"), or freezer paper. 3. Defrosting will start. Package in...
NNH764 User Guide
Page 17
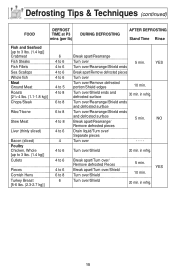
Defrosting Tips & Techniques (continued) FOOD DEFROST TIME at P3 mins (per lb) DURING DEFROSTING AFTER DEFROSTING Stand Time Rinse Fish and Seafood [up to 3 lbs. (1.4 kg)] Crabmeat Fish Steaks Fish Fillets ...to 6 6 to 8 6 Break apart/Rearrange Turn over /Shield ends and defrosted surface 30 min. Turn over 5 min. Turn over /Remove defrosted portion/Shield edges 10 min. YES Turn over/Rearrange/Shield ends Break apart/Remove defrosted pieces Turn over Turn over /Shield 20 min. Turn over/Rearrange/Shield ends and defrosted surface Turn over /Shield 5 min. YES 10 min....
Defrosting Tips & Techniques (continued) FOOD DEFROST TIME at P3 mins (per lb) DURING DEFROSTING AFTER DEFROSTING Stand Time Rinse Fish and Seafood [up to 3 lbs. (1.4 kg)] Crabmeat Fish Steaks Fish Fillets ...to 6 6 to 8 6 Break apart/Rearrange Turn over /Shield ends and defrosted surface 30 min. Turn over 5 min. Turn over /Remove defrosted portion/Shield edges 10 min. YES Turn over/Rearrange/Shield ends Break apart/Remove defrosted pieces Turn over Turn over /Shield 20 min. Turn over/Rearrange/Shield ends and defrosted surface Turn over /Shield 5 min. YES 10 min....
NNH764 User Guide
Page 18
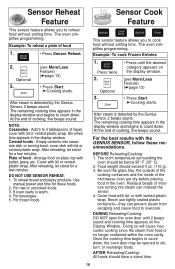
.... Plate of food 1. • Press Sensor Reheat. 2. Arrange food on the Display Window. Use manual power and time for a few minutes. This sensor feature allows you to reheat food without setting time. Optional 3. • Press until 2 beeps sound and cooking time appears on plate; After reheating, let stand for these recommendations. Example: To cook Frozen Entrées 1. For frozen foods. The remaining cooking time appears in the display window. Cover with the GENIUS SENSOR...
.... Plate of food 1. • Press Sensor Reheat. 2. Arrange food on the Display Window. Use manual power and time for a few minutes. This sensor feature allows you to reheat food without setting time. Optional 3. • Press until 2 beeps sound and cooking time appears on plate; After reheating, let stand for these recommendations. Example: To cook Frozen Entrées 1. For frozen foods. The remaining cooking time appears in the display window. Cover with the GENIUS SENSOR...
NNH764 User Guide
Page 19
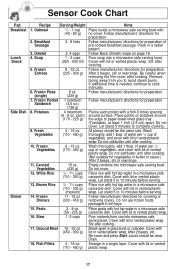
... 12. Follow manufacturers' directions for preparation. After 2 beeps, stir or rearrange. Follow manufacturer's directions for preparation. Do not salt/butter until after cooking. (Not suitable for vegetables in a microwave safe casserole dish. Empty contents into microwave safe serving bowl. Let stand 5 to cook manually. Do not use frozen foods packaged in glass bowl or colander. Re-cover and press Start. Sensor Cook Chart Pad Breakfast...
... 12. Follow manufacturers' directions for preparation. After 2 beeps, stir or rearrange. Follow manufacturer's directions for preparation. Do not salt/butter until after cooking. (Not suitable for vegetables in a microwave safe casserole dish. Empty contents into microwave safe serving bowl. Let stand 5 to cook manually. Do not use frozen foods packaged in glass bowl or colander. Re-cover and press Start. Sensor Cook Chart Pad Breakfast...
NNH764 User Guide
Page 21
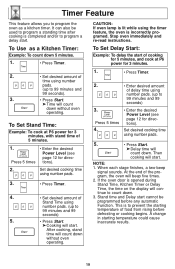
... desired Power Level (see page 12 for 3 minutes. 1. • Press Timer. 2. • Enter desired amount of food from rising before any automatic Function. Stop oven immediately and re-read instructions. To Set Delay Start: Example: To delay the start of cooking for 5 minutes, and cook at P6 power for directions). 2. When each stage finishes, a two-beep signal sounds. To Set Stand Time: Example: To cook at P6 power for directions). Set desired cooking time using number...
... desired Power Level (see page 12 for 3 minutes. 1. • Press Timer. 2. • Enter desired amount of food from rising before any automatic Function. Stop oven immediately and re-read instructions. To Set Delay Start: Example: To delay the start of cooking for 5 minutes, and cook at P6 power for directions). 2. When each stage finishes, a two-beep signal sounds. To Set Stand Time: Example: To cook at P6 power for directions). Set desired cooking time using number...
NNH764 User Guide
Page 25
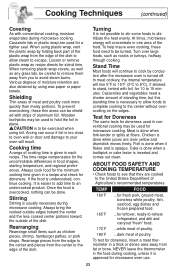
.... Stand Time Most foods will continue to cook by using foil. Always bring the cooked outside edges toward the center and the less cooked center portions toward the outside of moisture retention are cooked to the United States Department of the dish to allow foods to complete cooking to an undercooked product. When removing plastic wrap covers, as well as recipe directs for doneness...
.... Stand Time Most foods will continue to cook by using foil. Always bring the cooked outside edges toward the center and the less cooked center portions toward the outside of moisture retention are cooked to the United States Department of the dish to allow foods to complete cooking to an undercooked product. When removing plastic wrap covers, as well as recipe directs for doneness...
NNH764 User Guide
Page 26
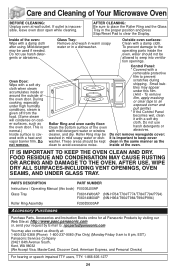
... operating parts inside the oven, water should be Do not remove waveguide cover: washed in a dishwasher. This is normal.) Inside surface is inaccessible, leave oven door open while cleaning. To remove film, apply masking or clear tape to clear the Display. Mild detergent may be kept clean in the proper position and press Stop/Reset Pad to an exposed corner and pull gently.) * If the Control Panel becomes wet, clean...
... operating parts inside the oven, water should be Do not remove waveguide cover: washed in a dishwasher. This is normal.) Inside surface is inaccessible, leave oven door open while cleaning. To remove film, apply masking or clear tape to clear the Display. Mild detergent may be kept clean in the proper position and press Stop/Reset Pad to an exposed corner and pull gently.) * If the Control Panel becomes wet, clean...
NNH764 User Guide
Page 27
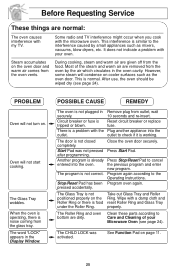
... door is Reset circuit breaker or replace tripped or blown. after programming. See Function Pad on . This is not correct. The word "LOCK" appears in the oven cavity. The Glass Tray is a problem with the microwave oven. Clean these parts according to Care and Cleaning of the steam and warm air are dirty. The program is normal. Some radio and TV interference might occur when you cook with...
... door is Reset circuit breaker or replace tripped or blown. after programming. See Function Pad on . This is not correct. The word "LOCK" appears in the oven cavity. The Glass Tray is a problem with the microwave oven. Clean these parts according to Care and Cleaning of the steam and warm air are dirty. The program is normal. Some radio and TV interference might occur when you cook with...
NNH764 User Guide
Page 28
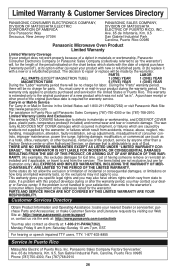
...://www.panasonic.com For assistance in Puerto Rico Matsushita Electric of Puerto Rico, Inc. During the "Parts" warranty period, there will be no charge for illustration only.) ALL EXPRESS AND IMPLIED WARRANTIES, INCLUDING THE WARRANTY OF MER- This warranty only applies to repair or replace will be no charge for warranty service. ERAGE". er or Service center. If the problem is not handled to...
...://www.panasonic.com For assistance in Puerto Rico Matsushita Electric of Puerto Rico, Inc. During the "Parts" warranty period, there will be no charge for illustration only.) ALL EXPRESS AND IMPLIED WARRANTIES, INCLUDING THE WARRANTY OF MER- This warranty only applies to repair or replace will be no charge for warranty service. ERAGE". er or Service center. If the problem is not handled to...


