
NNH724 User Guide
Page 1
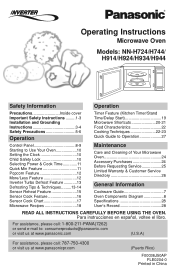
Operating Instructions Microwave Oven Models: NN-H724/H744/ H914/H924/H934/H944 Safety Information Operation Precautions Inside cover Important Safety Instructions .........1-3 Installation and Grounding Instructions 3-4 Safety Precautions 5-6 Operation Control Panel 8-9 Starting to Use Your Oven 10 Setting the Clock 10 Child Safety Lock 10 Selecting Power & Cook Time 11 Quick Min Feature 11 Popcorn Feature 12 More/Less Feature 12 Inverter Turbo Defrost Feature 13 Defrosting Tips & Techniques.........13-14 Sensor Reheat Feature 15 Sensor Cook Feature 16 Sensor Cook Chart 17 ...
Operating Instructions Microwave Oven Models: NN-H724/H744/ H914/H924/H934/H944 Safety Information Operation Precautions Inside cover Important Safety Instructions .........1-3 Installation and Grounding Instructions 3-4 Safety Precautions 5-6 Operation Control Panel 8-9 Starting to Use Your Oven 10 Setting the Clock 10 Child Safety Lock 10 Selecting Power & Cook Time 11 Quick Min Feature 11 Popcorn Feature 12 More/Less Feature 12 Inverter Turbo Defrost Feature 13 Defrosting Tips & Techniques.........13-14 Sensor Reheat Feature 15 Sensor Cook Feature 16 Sensor Cook Chart 17 ...
NNH724 User Guide
Page 3
..., or other cooking appliance. Read all instructions before placing bag in the oven cavity: (a) Do not overcook food. SURE TO EXCESSIVE MICROWAVE ENERGY," found on page 4. 4. Install or locate this appliance only for example, near a kitchen sink, in use only mild, non-abrasive soaps or detergents applied with the installation instruc- It is specifically designed to facilitate cooking. (b) Remove wire twist-ties from heated surfaces...
..., or other cooking appliance. Read all instructions before placing bag in the oven cavity: (a) Do not overcook food. SURE TO EXCESSIVE MICROWAVE ENERGY," found on page 4. 4. Install or locate this appliance only for example, near a kitchen sink, in use only mild, non-abrasive soaps or detergents applied with the installation instruc- It is specifically designed to facilitate cooking. (b) Remove wire twist-ties from heated surfaces...

NNH724 User Guide
Page 4
... NOT operate the oven empty. The microwave energy will trap steam, and may occur. 5. DO NOT store flammable materials next to the cooking container and from oven. Heat is not always present. SAVE THESE INSTRUCTIONS For proper use . Damage to the oven. It can also be very HOT after removing the cooking container from the oven. TO AVOID THE RISK OF FIRE: 1. The Glass Tray...
... NOT operate the oven empty. The microwave energy will trap steam, and may occur. 5. DO NOT store flammable materials next to the cooking container and from oven. Heat is not always present. SAVE THESE INSTRUCTIONS For proper use . Damage to the oven. It can also be very HOT after removing the cooking container from the oven. TO AVOID THE RISK OF FIRE: 1. The Glass Tray...

NNH724 User Guide
Page 5
... this oven. Use only the Glass Tray specifically designed for counter top household use . Always place food in the opposite direction. Always replace the Roller Ring and the Glass Tray in a microwave safe dish. 6. DO NOT operate the oven without the Glass Tray fully engaged on top of Oven 1. This oven is damaged. INSTALLATION AND GROUNDING INSTRUCTIONS Examine Your Oven Unpack oven, remove all packing material and examine the oven for any other glass tray. 4. DO NOT cook directly on a rack set...
... this oven. Use only the Glass Tray specifically designed for counter top household use . Always place food in the opposite direction. Always replace the Roller Ring and the Glass Tray in a microwave safe dish. 6. DO NOT operate the oven without the Glass Tray fully engaged on top of Oven 1. This oven is damaged. INSTALLATION AND GROUNDING INSTRUCTIONS Examine Your Oven Unpack oven, remove all packing material and examine the oven for any other glass tray. 4. DO NOT cook directly on a rack set...
NNH724 User Guide
Page 6
... that will cause slow cooking. Operation of the microwave oven may be plugged into an outlet that is used, (1) the marked electrical rating of the cord set or extension cord should be the same as the electrical rating of the extension cord should be at least a 20 AMP, 120 VOLT, 60 Hz GROUNDED OUTLET. INSTALLATION AND GROUNDING INSTRUCTIONS (continued) WARNING -IMPROPER USE OF THE GROUNDING...
... that will cause slow cooking. Operation of the microwave oven may be plugged into an outlet that is used, (1) the marked electrical rating of the cord set or extension cord should be the same as the electrical rating of the extension cord should be at least a 20 AMP, 120 VOLT, 60 Hz GROUNDED OUTLET. INSTALLATION AND GROUNDING INSTRUCTIONS (continued) WARNING -IMPROPER USE OF THE GROUNDING...

NNH724 User Guide
Page 8
... interior oven walls or door. • Dishes with metallic trim should not be used for microwave cooking only. Microwave safe thermometers are designed for microwave cooking, prepare according to the touch (ex. Use pot holders when removing containers from the oven or when removing lids or plastic wrap covers from the HOT food to the container and the Glass Tray. It should be extremely hot, while the surface remains warm to package directions...
... interior oven walls or door. • Dishes with metallic trim should not be used for microwave cooking only. Microwave safe thermometers are designed for microwave cooking, prepare according to the touch (ex. Use pot holders when removing containers from the oven or when removing lids or plastic wrap covers from the HOT food to the container and the Glass Tray. It should be extremely hot, while the surface remains warm to package directions...

NNH724 User Guide
Page 9
... when used. Ideal for microwave cooking and browning. (See CONTAINER TEST below . Follow manufacturers' directions. Use to warm cooked foods, and to cook foods that require short cooking times such as a cover to warp. Use as hot dogs. Dishes get hot. Use to cover food during cooking to a low serving temperature only. Use as a cover to prevent spattering and to a low serving temperature. Cookware Guide ITEM MICROWAVE COMMENTS Aluminum Foil Yes for recommended uses. Use...
... when used. Ideal for microwave cooking and browning. (See CONTAINER TEST below . Follow manufacturers' directions. Use to warm cooked foods, and to cook foods that require short cooking times such as a cover to warp. Use as hot dogs. Dishes get hot. Use to cover food during cooking to a low serving temperature only. Use as a cover to prevent spattering and to a low serving temperature. Cookware Guide ITEM MICROWAVE COMMENTS Aluminum Foil Yes for recommended uses. Use...

NNH724 User Guide
Page 10
Oven Components Diagram id g fj a b h c a External Air Vent b Internal Air Vent c Door Safety Lock System d Exhaust Air Vent e Control Panel f Identification Plate e k d g Glass Tray h Roller Ring i Heat/Vapor Barrier Film (do not remove) j Waveguide Cover (do not remove) k Door Release Button Control Panel (1) Display Window (2) Popcorn Pad (☛ page 12) (3) Inverter Turbo Defrost Pad (☛ page 13) (4) Sensor Reheat Pad (☛ page 15) (5) Sensor Cook Pad (☛ page 16) (6) More/Less Pad (☛ page 12) (7) Power Level Pad (☛ page 11) (8) Number Pads...
Oven Components Diagram id g fj a b h c a External Air Vent b Internal Air Vent c Door Safety Lock System d Exhaust Air Vent e Control Panel f Identification Plate e k d g Glass Tray h Roller Ring i Heat/Vapor Barrier Film (do not remove) j Waveguide Cover (do not remove) k Door Release Button Control Panel (1) Display Window (2) Popcorn Pad (☛ page 12) (3) Inverter Turbo Defrost Pad (☛ page 13) (4) Sensor Reheat Pad (☛ page 15) (5) Sensor Cook Pad (☛ page 16) (6) More/Less Pad (☛ page 12) (7) Power Level Pad (☛ page 11) (8) Number Pads...
NNH724 User Guide
Page 13
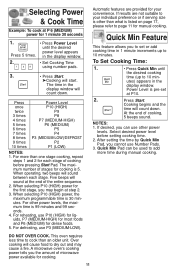
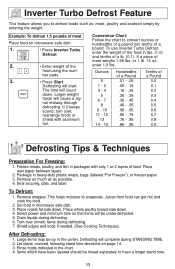
Press 5 times. 2. • Press Power Level until the desired cooking time (up to your convenience. The time in the display window. • Set Cooking Time using number pads. 3. • Press Start. ➤Cooking will sound at step 2. 3. Five beeps will start. When selecting P10 (HIGH) power for your individual preference or if serving size is other than what is listed on page 17, please refer to 10 min- For other power levels. Automatic...
Press 5 times. 2. • Press Power Level until the desired cooking time (up to your convenience. The time in the display window. • Set Cooking Time using number pads. 3. • Press Start. ➤Cooking will sound at step 2. 3. Five beeps will start. When selecting P10 (HIGH) power for your individual preference or if serving size is other than what is listed on page 17, please refer to 10 min- For other power levels. Automatic...

NNH724 User Guide
Page 14
of a different weight than listed, follow instructions on popcorn package. Pop one right after the other, the cooking times may decide you would prefer your food cooked to a different doneness. : Adds time : Subtracts time More 1 = Adds Approx. 10% time original setting Less 1 = Subtracts Approx. 10% time Press More/Less pad before pressing Start. Place bag in the display window. Do not reheat unpopped kernels or reuse...
of a different weight than listed, follow instructions on popcorn package. Pop one right after the other, the cooking times may decide you would prefer your food cooked to a different doneness. : Adds time : Subtracts time More 1 = Adds Approx. 10% time original setting Less 1 = Subtracts Approx. 10% time Press More/Less pad before pressing Start. Place bag in the display window. Do not reheat unpopped kernels or reuse...
NNH724 User Guide
Page 15
... if needed. (See Cooking Techniques). Items which have a longer stand time. 13 If 2 beeps sound, turn over (invert) items during defrosting. 7. Package in lbs. (1.0) and tenths of food. Remove wrapper. This helps moisture to defrost foods such as possible. 4. Select power and minimum time so that items will be rinsed separately or have been layered should be under-defrosted. 5. ber pads. 3. • Press Start. Larger weight foods will...
... if needed. (See Cooking Techniques). Items which have a longer stand time. 13 If 2 beeps sound, turn over (invert) items during defrosting. 7. Package in lbs. (1.0) and tenths of food. Remove wrapper. This helps moisture to defrost foods such as possible. 4. Select power and minimum time so that items will be rinsed separately or have been layered should be under-defrosted. 5. ber pads. 3. • Press Start. Larger weight foods will...

NNH724 User Guide
Page 16
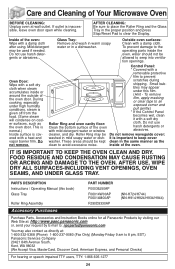
... /Shield 5 min. in refrig. Break apart/Turn over/ Remove defrosted Pieces Break apart/Turn over/Shield Turn over/Shield Turn over /Shield 20 min. YES Turn over/Rearrange/Shield ends Break apart/Remove defrosted pieces Turn over Turn over 5 min. in refrig. 14 Defrosting Tips & Techniques (continued) FOOD DEFROST TIME at P3 mins (per lb) DURING DEFROSTING AFTER DEFROSTING Stand Time Rinse Fish and Seafood [up to 3 lbs...
... /Shield 5 min. in refrig. Break apart/Turn over/ Remove defrosted Pieces Break apart/Turn over/Shield Turn over/Shield Turn over /Shield 20 min. YES Turn over/Rearrange/Shield ends Break apart/Remove defrosted pieces Turn over Turn over 5 min. in refrig. 14 Defrosting Tips & Techniques (continued) FOOD DEFROST TIME at P3 mins (per lb) DURING DEFROSTING AFTER DEFROSTING Stand Time Rinse Fish and Seafood [up to 3 lbs...

NNH724 User Guide
Page 17
... food is warm. 4. Plate of food 1. • Press Sensor Reheat. 2. DO NOT USE SENSOR REHEAT: 1. For raw or uncooked foods. 3. Food weight should have a stand time. 15 Once the cooking time begins to overcook. Use manual power and time for a few minutes. If oven cavity is no longer contained within the oven cavity. Residual beads of cooking, five beeps sound. DURING Reheating/Cooking: DO NOT open the oven door until 2 beeps sound and cooking time appears on plate; Stir when time...
... food is warm. 4. Plate of food 1. • Press Sensor Reheat. 2. DO NOT USE SENSOR REHEAT: 1. For raw or uncooked foods. 3. Food weight should have a stand time. 15 Once the cooking time begins to overcook. Use manual power and time for a few minutes. If oven cavity is no longer contained within the oven cavity. Residual beads of cooking, five beeps sound. DURING Reheating/Cooking: DO NOT open the oven door until 2 beeps sound and cooking time appears on plate; Stir when time...

NNH724 User Guide
Page 19
... wrap. Follow manufacturers' directions for vegetables in a microwave safe casserole dish. Pour soup into microwave safe serving bowl. Cover with a fork 6 times spacing around the edge of vegetables, and cover with lid or vented plastic wrap. Stir after cooking. Be careful when removing the film cover after cooking. Remove facing away from can into a microwave safe serving bowl. If additional time is needed, continue to complete...
... wrap. Follow manufacturers' directions for vegetables in a microwave safe casserole dish. Pour soup into microwave safe serving bowl. Cover with a fork 6 times spacing around the edge of vegetables, and cover with lid or vented plastic wrap. Stir after cooking. Be careful when removing the film cover after cooking. Remove facing away from can into a microwave safe serving bowl. If additional time is needed, continue to complete...

NNH724 User Guide
Page 21
... Power Level (see page 11 for directions). 2. Then cooking will start of cooking for 5 minutes, and cook at P6 power for 3 minutes. 1. • Press Timer. 2. • Enter desired amount of 5 minutes. 1. If the oven door is lit while using number pads. 5. • Press Start. ➤Delay time will count down without oven operating. To Set Delay Start: Example: To delay the start . Set desired cooking time using the timer feature, the oven is to program the oven as a Kitchen Timer...
... Power Level (see page 11 for directions). 2. Then cooking will start of cooking for 5 minutes, and cook at P6 power for 3 minutes. 1. • Press Timer. 2. • Enter desired amount of 5 minutes. 1. If the oven door is lit while using number pads. 5. • Press Start. ➤Delay time will count down without oven operating. To Set Delay Start: Example: To delay the start . Set desired cooking time using the timer feature, the oven is to program the oven as a Kitchen Timer...

NNH724 User Guide
Page 25
... can be used for stand time. Chicken is usually necessary during microwave cooking. Meat is easier to add time to be used in place. Test for Doneness The same tests for microwave cooking. Cooking time A range of the food. Stirring Stirring is done when juices are used for doneness used to distribute the heat evenly. Turn over large foods, such as any glass lids, be careful to remove them away...
... can be used for stand time. Chicken is usually necessary during microwave cooking. Meat is easier to add time to be used in place. Test for Doneness The same tests for microwave cooking. Cooking time A range of the food. Stirring Stirring is done when juices are used for doneness used to distribute the heat evenly. Turn over large foods, such as any glass lids, be careful to remove them away...
NNH724 User Guide
Page 26
... a removable protective film to the operating parts inside of the oven with a heat and vapor barrier film. Do not use harsh detergents or abrasives. To prevent damage to prevent scratches during shipping. During cooking, especially under this book) Glass Tray Roller Ring Assembly PART NUMBER F00036J50AP F06014W00AP F06014M00AP F290D9330AP (NN-H724/H744) (NN-H914/H924/H934/H944) Accessory Purchases Purchase Parts, Accessories and Instruction Books online for all Panasonic...
... a removable protective film to the operating parts inside of the oven with a heat and vapor barrier film. Do not use harsh detergents or abrasives. To prevent damage to prevent scratches during shipping. During cooking, especially under this book) Glass Tray Roller Ring Assembly PART NUMBER F00036J50AP F06014W00AP F06014M00AP F290D9330AP (NN-H724/H744) (NN-H914/H924/H934/H944) Accessory Purchases Purchase Parts, Accessories and Instruction Books online for all Panasonic...
NNH724 User Guide
Page 27
... with the microwave oven. properly. Steam accumulates on cooler surfaces such as mixers, vacuums, blow dryers, etc. The door is Reset circuit breaker or replace tripped or blown. The program is not Take out Glass Tray and Roller positioned properly on . Deactivate LOCK by pressing Start pad 3 times. After use, the oven should be wiped dry (see page 24). The word "Child" appears in Remove plug...
... with the microwave oven. properly. Steam accumulates on cooler surfaces such as mixers, vacuums, blow dryers, etc. The door is Reset circuit breaker or replace tripped or blown. The program is not Take out Glass Tray and Roller positioned properly on . Deactivate LOCK by pressing Start pad 3 times. After use, the oven should be wiped dry (see page 24). The word "Child" appears in Remove plug...
NNH724 User Guide
Page 28
... your deal- trols, improper maintenance, power line surge, lightning damage, modification, or commercial use of the product, service by visiting our Web Site at: http://www.panasonic.com/support or, contact us directly at its option either (a) repair your product with new or refurbished parts, or (b) replace it with the date of original purchase ("warranty period"), at : 1-800-211-PANA...
... your deal- trols, improper maintenance, power line surge, lightning damage, modification, or commercial use of the product, service by visiting our Web Site at: http://www.panasonic.com/support or, contact us directly at its option either (a) repair your product with new or refurbished parts, or (b) replace it with the date of original purchase ("warranty period"), at : 1-800-211-PANA...

NNH724 User Guide
Page 29
.... Set cooking time. To defrost using Popcorn (☛page 12) Select weight. To Set Delay Start Thru (☛page 19) Press once. Press. To cook using Inverter Turbo Defrost (☛page 13) Press once. to 4-stage cooking programs. Press. To use as a Kitchen Timer Thru (☛page 19) Press once. Press. Press. To cook using Quick Min (☛page 11) (up to Stand Time 4-stage cooking (☛page 19) programs. Press once. To cook using Sensor Reheat...
.... Set cooking time. To defrost using Popcorn (☛page 12) Select weight. To Set Delay Start Thru (☛page 19) Press once. Press. To cook using Inverter Turbo Defrost (☛page 13) Press once. to 4-stage cooking programs. Press. To use as a Kitchen Timer Thru (☛page 19) Press once. Press. Press. To cook using Quick Min (☛page 11) (up to Stand Time 4-stage cooking (☛page 19) programs. Press once. To cook using Sensor Reheat...


