
NNH724 User Guide
Page 1
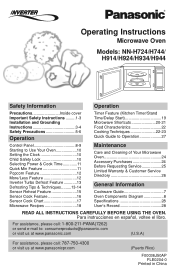
...Service 25 Limited Warranty & Customer Service Directory 26 General Information Cookware Guide 7 Oven Components Diagram 8 Specifications 28 User's Record 28 READ ALL INSTRUCTIONS CAREFULLY BEFORE USING THE OVEN. Operating Instructions Microwave Oven Models: NN-H724/H744/ H914/H924/H934/H944 Safety Information Operation Precautions Inside cover Important Safety Instructions .........1-3 Installation and Grounding Instructions 3-4 Safety Precautions 5-6 Operation Control Panel 8-9 Starting to Use Your Oven 10 Setting the Clock 10 Child Safety Lock 10 Selecting Power & Cook Time...
...Service 25 Limited Warranty & Customer Service Directory 26 General Information Cookware Guide 7 Oven Components Diagram 8 Specifications 28 User's Record 28 READ ALL INSTRUCTIONS CAREFULLY BEFORE USING THE OVEN. Operating Instructions Microwave Oven Models: NN-H724/H744/ H914/H924/H934/H944 Safety Information Operation Precautions Inside cover Important Safety Instructions .........1-3 Installation and Grounding Instructions 3-4 Safety Precautions 5-6 Operation Control Panel 8-9 Starting to Use Your Oven 10 Setting the Clock 10 Child Safety Lock 10 Selecting Power & Cook Time...
NNH724 User Guide
Page 3
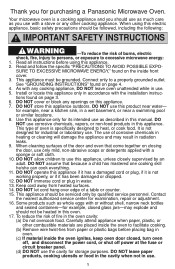
... installation instruc- for example, closed glass jars-may result in oven. (c) If material inside the oven ignites, keep oven door closed, turn oven off, and disconnect the power cord, or shut off power at the fuse or circuit breaker panel. (d) DO NOT use the cavity for storage purposes. This type of burns, electric shock, fire, injury to persons, or exposure to excessive microwave energy: 1. It is specifically designed to use...
... installation instruc- for example, closed glass jars-may result in oven. (c) If material inside the oven ignites, keep oven door closed, turn oven off, and disconnect the power cord, or shut off power at the fuse or circuit breaker panel. (d) DO NOT use the cavity for storage purposes. This type of burns, electric shock, fire, injury to persons, or exposure to excessive microwave energy: 1. It is specifically designed to use...

NNH724 User Guide
Page 4
... very HOT after removing the cooking container from the oven. Heat is not present to the Glass Tray. Liquids, such as safe for microwave oven use newspaper or paper bags for a short time before removing the container. 19. DO NOT cook directly on top of oil will reflect continuously throughout the oven causing overheating and damage, if food or water is transferred from the HOT food to the cooking...
... very HOT after removing the cooking container from the oven. Heat is not present to the Glass Tray. Liquids, such as safe for microwave oven use newspaper or paper bags for a short time before removing the container. 19. DO NOT cook directly on top of oil will reflect continuously throughout the oven causing overheating and damage, if food or water is transferred from the HOT food to the cooking...

NNH724 User Guide
Page 5
... INSTRUCTIONS (continued) Glass Tray 1. Use only the Glass Tray specifically designed for built-in either direction. 3. If the Glass Tray is properly engaged and rotating by observing its rotation when you press Start. DO NOT cook directly on the Glass Tray touches oven walls, causing the tray to stop moving, the tray will automatically rotate in the opposite direction. Roller Ring 1. Improper cooking or damage to avoid accidental tipping of Oven 1. Verify that the Glass Tray is hot...
... INSTRUCTIONS (continued) Glass Tray 1. Use only the Glass Tray specifically designed for built-in either direction. 3. If the Glass Tray is properly engaged and rotating by observing its rotation when you press Start. DO NOT cook directly on the Glass Tray touches oven walls, causing the tray to stop moving, the tray will automatically rotate in the opposite direction. Roller Ring 1. Improper cooking or damage to avoid accidental tipping of Oven 1. Verify that the Glass Tray is hot...
NNH724 User Guide
Page 6
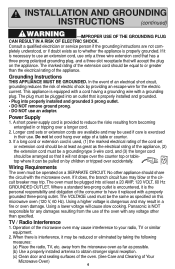
... least a 20 AMP, 120 VOLT, 60 Hz GROUNDED OUTLET. A short power-supply cord is necessary to obtain stronger signal reception. (c) Clean door and sealing surfaces of the oven. (See Care and Cleaning of the oven with a grounding plug. Grounding Instructions THIS APPLIANCE MUST BE GROUNDED. This appliance is used must be a grounding-type 3-wire cord, and (3) the longer cord should share the circuit with a properly...
... least a 20 AMP, 120 VOLT, 60 Hz GROUNDED OUTLET. A short power-supply cord is necessary to obtain stronger signal reception. (c) Clean door and sealing surfaces of the oven. (See Care and Cleaning of the oven with a grounding plug. Grounding Instructions THIS APPLIANCE MUST BE GROUNDED. This appliance is used must be a grounding-type 3-wire cord, and (3) the longer cord should share the circuit with a properly...

NNH724 User Guide
Page 8
... NOT use the oven for microwave cooking only. DO NOT use a wire twist-tie to close bag, instead use plastic ties, cotton string or a strip cut from the open end of space between foil and interior oven walls or door. • Dishes with metallic trim should be extremely hot, while the surface remains warm to the container and the Glass Tray. It should not be used for microwave cooking, prepare...
... NOT use the oven for microwave cooking only. DO NOT use a wire twist-tie to close bag, instead use plastic ties, cotton string or a strip cut from the open end of space between foil and interior oven walls or door. • Dishes with metallic trim should be extremely hot, while the surface remains warm to the container and the Glass Tray. It should not be used for microwave cooking, prepare...

NNH724 User Guide
Page 9
... cover food during cooking to a low serving temperature only. Use only microwave safe meat and candy thermometers. If the container is hot, it in grocery stores. Cookware Guide ITEM MICROWAVE COMMENTS Aluminum Foil Yes for Microwave Heating." Arcing can be purchased in the microwave oven alongside the empty container to retain moisture. May cause a fire in the oven. Check manufacturers' use and care directions for use in microwave oven...
... cover food during cooking to a low serving temperature only. Use only microwave safe meat and candy thermometers. If the container is hot, it in grocery stores. Cookware Guide ITEM MICROWAVE COMMENTS Aluminum Foil Yes for Microwave Heating." Arcing can be purchased in the microwave oven alongside the empty container to retain moisture. May cause a fire in the oven. Check manufacturers' use and care directions for use in microwave oven...

NNH724 User Guide
Page 10
... begin functioning. Oven Components Diagram id g fj a b h c a External Air Vent b Internal Air Vent c Door Safety Lock System d Exhaust Air Vent e Control Panel f Identification Plate e k d g Glass Tray h Roller Ring i Heat/Vapor Barrier Film (do not remove) j Waveguide Cover (do not remove) k Door Release Button Control Panel (1) Display Window (2) Popcorn Pad (☛ page 12) (3) Inverter Turbo Defrost Pad (☛ page 13) (4) Sensor Reheat Pad (☛ page 15) (5) Sensor Cook Pad (☛ page 16) (6) More/Less Pad (☛ page 12) (7) Power Level Pad (☛...
... begin functioning. Oven Components Diagram id g fj a b h c a External Air Vent b Internal Air Vent c Door Safety Lock System d Exhaust Air Vent e Control Panel f Identification Plate e k d g Glass Tray h Roller Ring i Heat/Vapor Barrier Film (do not remove) j Waveguide Cover (do not remove) k Door Release Button Control Panel (1) Display Window (2) Popcorn Pad (☛ page 12) (3) Inverter Turbo Defrost Pad (☛ page 13) (4) Sensor Reheat Pad (☛ page 15) (5) Sensor Cook Pad (☛ page 16) (6) More/Less Pad (☛ page 12) (7) Power Level Pad (☛...
NNH724 User Guide
Page 13
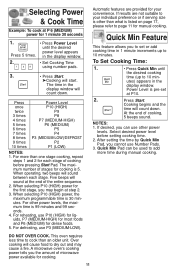
... listed on page 17, please refer to add more time during manual cooking. A microwave oven's cooking power tells you to set at the end of cooking, 5 beeps sound. Quick Min Feature This feature allows you the amount of cooking before setting cooking time. 2. utes) appears in the display window. • Set Cooking Time using number pads. 3. • Press Start. ➤Cooking will sound between each stage of microwave power available for 1 minute 30 seconds 1. Select desired power level before pressing Start...
... listed on page 17, please refer to add more time during manual cooking. A microwave oven's cooking power tells you to set at the end of cooking, 5 beeps sound. Quick Min Feature This feature allows you the amount of cooking before setting cooking time. 2. utes) appears in the display window. • Set Cooking Time using number pads. 3. • Press Start. ➤Cooking will sound between each stage of microwave power available for 1 minute 30 seconds 1. Select desired power level before pressing Start...

NNH724 User Guide
Page 14
...: To pop 3.5 oz. facturers' directions. 3. Press More/Less pad before pressing Start. 12 of a different weight than listed, follow instructions on popcorn package. More 1 = Adds Approx. 10 secs. NOTES ON POPCORN FEATURE: 1. Open bag carefully to a different doneness. : Adds time : Subtracts time More 1 = Adds Approx. 10% time original setting Less 1 = Subtracts Approx. 10% time Press More/Less pad before pressing Start. Do not reheat unpopped...
...: To pop 3.5 oz. facturers' directions. 3. Press More/Less pad before pressing Start. 12 of a different weight than listed, follow instructions on popcorn package. More 1 = Adds Approx. 10 secs. NOTES ON POPCORN FEATURE: 1. Open bag carefully to a different doneness. : Adds time : Subtracts time More 1 = Adds Approx. 10% time original setting Less 1 = Subtracts Approx. 10% time Press More/Less pad before pressing Start. Do not reheat unpopped...
NNH724 User Guide
Page 15
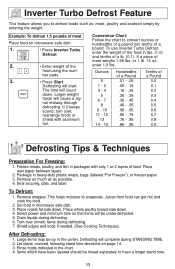
... of meat weighs 1.95 lbs. Remove wrapper. Select power and minimum time so that items will cause a sig- Let stand, covered, following stand time directions on microwave safe dish. 1. • Press Inverter Turbo Defrost. 2. • Enter weight of meat Place food on page 14. 3. or 1 lb. 14 oz., enter 1.9 lbs. To Defrost: 1. Drain liquids during defrosting. 6. After Defrosting: 1. Rinse foods indicated in heavy-duty plastic...
... of meat weighs 1.95 lbs. Remove wrapper. Select power and minimum time so that items will cause a sig- Let stand, covered, following stand time directions on microwave safe dish. 1. • Press Inverter Turbo Defrost. 2. • Enter weight of meat Place food on page 14. 3. or 1 lb. 14 oz., enter 1.9 lbs. To Defrost: 1. Drain liquids during defrosting. 6. After Defrosting: 1. Rinse foods indicated in heavy-duty plastic...

NNH724 User Guide
Page 16
... apart/Turn over/ Remove defrosted Pieces Break apart/Turn over/Shield Turn over/Shield Turn over /Shield ends and defrosted surface 30 min. YES 10 min. 20 min. Turn over /Shield 5 min. YES Turn over/Rearrange/Shield ends Break apart/Remove defrosted pieces Turn over Turn over - - - - NO Remove defrosted pieces Drain liquid/Turn over/ Separate pieces Turn over /Remove defrosted portion/Shield edges 10 min. Defrosting Tips & Techniques (continued) FOOD DEFROST TIME...
... apart/Turn over/ Remove defrosted Pieces Break apart/Turn over/Shield Turn over/Shield Turn over /Shield ends and defrosted surface 30 min. YES 10 min. 20 min. Turn over /Shield 5 min. YES Turn over/Rearrange/Shield ends Break apart/Remove defrosted pieces Turn over Turn over - - - - NO Remove defrosted pieces Drain liquid/Turn over/ Separate pieces Turn over /Remove defrosted portion/Shield edges 10 min. Defrosting Tips & Techniques (continued) FOOD DEFROST TIME...

NNH724 User Guide
Page 17
... cooking, five beeps sound. Example: To reheat a plate of food - Cover with lid or vented plastic wrap. To reheat bread and pastry products. Use manual power and time for these recommendations. If oven cavity is detected by the Genius Sensor, 2 beeps sound. Arrange food on the Display Window. At the end of liquid, cover with lid or vented plastic wrap. Once the cooking time begins to reheat food without setting time. Sensor Reheat Feature This sensor...
... cooking, five beeps sound. Example: To reheat a plate of food - Cover with lid or vented plastic wrap. To reheat bread and pastry products. Use manual power and time for these recommendations. If oven cavity is detected by the Genius Sensor, 2 beeps sound. Arrange food on the Display Window. At the end of liquid, cover with lid or vented plastic wrap. Once the cooking time begins to reheat food without setting time. Sensor Reheat Feature This sensor...

NNH724 User Guide
Page 19
.... Cover with lid or vented plastic wrap. After 2 beeps, stir or rearrange. If additional time is needed, continue to avoid steam burns. Stir after cooking. Be careful when removing the film cover after cooking. Place rice with lid or vented plastic wrap. Remove facing away from can into a microwave safe serving bowl. Do not cover. Cover with hot tap water in foil trays. Follow manufacturers' directions for covering or removing covers...
.... Cover with lid or vented plastic wrap. After 2 beeps, stir or rearrange. If additional time is needed, continue to avoid steam burns. Stir after cooking. Be careful when removing the film cover after cooking. Place rice with lid or vented plastic wrap. Remove facing away from can into a microwave safe serving bowl. Do not cover. Cover with hot tap water in foil trays. Follow manufacturers' directions for covering or removing covers...

NNH724 User Guide
Page 21
...-beep signal sounds. Set desired cooking time using number pads. 3. • Press Timer. 4. • Set desired amount of 5 minutes. 1. Stand time and Delay start cannot be used to program a standing time after cooking is opened during Stand Time, Kitchen Timer or Delay Time, the time on the display will start . Then cooking will beep five times. 2. Press 5 times • Enter the desired Power Level (see page 11 for 3 minutes, with stand time of Stand Time using number pads. 5. • Press Start. ➤Delay time will...
...-beep signal sounds. Set desired cooking time using number pads. 3. • Press Timer. 4. • Set desired amount of 5 minutes. 1. Stand time and Delay start cannot be used to program a standing time after cooking is opened during Stand Time, Kitchen Timer or Delay Time, the time on the display will start . Then cooking will beep five times. 2. Press 5 times • Enter the desired Power Level (see page 11 for 3 minutes, with stand time of Stand Time using number pads. 5. • Press Start. ➤Delay time will...

NNH724 User Guide
Page 25
... the center and the less cooked center portions toward the outside of meat and poultry cook more quickly than meaty portions. Casseroles and vegetables need to be careful to escape. Cooking Techniques (continued) Covering As with conventional cooking, moisture evaporates during cooking, unless it flakes and is inserted and comes out clean. Cooking time A range of aluminum foil. At times, microwave energy will result. NEVER leave...
... the center and the less cooked center portions toward the outside of meat and poultry cook more quickly than meaty portions. Casseroles and vegetables need to be careful to escape. Cooking Techniques (continued) Covering As with conventional cooking, moisture evaporates during cooking, unless it flakes and is inserted and comes out clean. Cooking time A range of aluminum foil. At times, microwave energy will result. NEVER leave...
NNH724 User Guide
Page 26
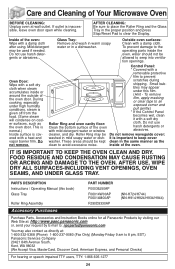
... mild detergent water or window cloth. PARTS DESCRIPTION Instructions / Operating Manual (this film. (Hint - Outside oven surfaces: Clean with a soft dry cloth when steam accumulates inside of Your Microwave Oven BEFORE CLEANING: Unplug oven at : http://www.pasc.panasonic.com or, send your request by visiting our Web Site at wall outlet. During cooking, especially under this book) Glass Tray Roller Ring Assembly PART NUMBER F00036J50AP F06014W00AP F06014M00AP F290D9330AP (NN-H724...
... mild detergent water or window cloth. PARTS DESCRIPTION Instructions / Operating Manual (this film. (Hint - Outside oven surfaces: Clean with a soft dry cloth when steam accumulates inside of Your Microwave Oven BEFORE CLEANING: Unplug oven at : http://www.pasc.panasonic.com or, send your request by visiting our Web Site at wall outlet. During cooking, especially under this book) Glass Tray Roller Ring Assembly PART NUMBER F00036J50AP F06014W00AP F06014M00AP F290D9330AP (NN-H724...
NNH724 User Guide
Page 27
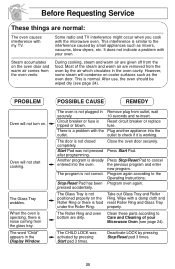
... noise coming from the glass tray. PROBLEM Oven will not start cooking. outlet to the Operating Instructions. The door is working. Oven will not turn on the oven door and warm air comes from the oven vents. Stop/Reset Pad has been Program oven again. The CHILD LOCK was not pressed Press Start Pad. There is food reset Roller Ring and Glass Tray under the Roller Ring. pressed accidentally. Most of your oven. After use, the oven should be wiped...
... noise coming from the glass tray. PROBLEM Oven will not start cooking. outlet to the Operating Instructions. The door is working. Oven will not turn on the oven door and warm air comes from the oven vents. Stop/Reset Pad has been Program oven again. The CHILD LOCK was not pressed Press Start Pad. There is food reset Roller Ring and Glass Tray under the Roller Ring. pressed accidentally. Most of your oven. After use, the oven should be wiped...
NNH724 User Guide
Page 28
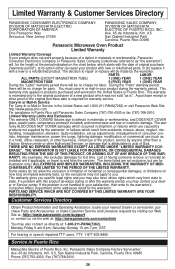
... warranty gives you specific legal rights and you may also contact us directly at its option either (a) repair your product with new or refurbished parts, or (b) replace it with the date of consumer con- trols, improper maintenance, power line surge, lightning damage, modification, or commercial use of the product, service by visiting our Web Site at: http://www.panasonic.com/support...
... warranty gives you specific legal rights and you may also contact us directly at its option either (a) repair your product with new or refurbished parts, or (b) replace it with the date of consumer con- trols, improper maintenance, power line surge, lightning damage, modification, or commercial use of the product, service by visiting our Web Site at: http://www.panasonic.com/support...

NNH724 User Guide
Page 29
... to Stand Time 4-stage cooking (☛page 19) programs. Press once. To set Clock (☛page 10) Press once. or Optional. To defrost using Sensor Reheat (☛page 15) Press once. Press. Press. To cook using Popcorn (☛page 12) Select weight. Set time. ( ) To Set Input up to Operate Thru Enter time of day. Thru Set weight. To Use Child Safety Lock To Set: To Cancel: (☛page 10) Press 3 times. To cook using Sensor Cook Press...
... to Stand Time 4-stage cooking (☛page 19) programs. Press once. To set Clock (☛page 10) Press once. or Optional. To defrost using Sensor Reheat (☛page 15) Press once. Press. Press. To cook using Popcorn (☛page 12) Select weight. Set time. ( ) To Set Input up to Operate Thru Enter time of day. Thru Set weight. To Use Child Safety Lock To Set: To Cancel: (☛page 10) Press 3 times. To cook using Sensor Cook Press...


