
NNH724 User Guide
Page 1
...Service 25 Limited Warranty & Customer Service Directory 26 General Information Cookware Guide 7 Oven Components Diagram 8 Specifications 28 User's Record 28 READ ALL INSTRUCTIONS CAREFULLY BEFORE USING THE OVEN. Operating Instructions Microwave Oven Models: NN-H724/H744/ H914/H924/H934/H944 Safety Information Operation Precautions Inside cover Important Safety Instructions .........1-3 Installation and Grounding Instructions 3-4 Safety Precautions 5-6 Operation Control Panel 8-9 Starting to Use Your Oven 10 Setting the Clock 10 Child Safety Lock 10 Selecting Power & Cook Time...
...Service 25 Limited Warranty & Customer Service Directory 26 General Information Cookware Guide 7 Oven Components Diagram 8 Specifications 28 User's Record 28 READ ALL INSTRUCTIONS CAREFULLY BEFORE USING THE OVEN. Operating Instructions Microwave Oven Models: NN-H724/H744/ H914/H924/H934/H944 Safety Information Operation Precautions Inside cover Important Safety Instructions .........1-3 Installation and Grounding Instructions 3-4 Safety Precautions 5-6 Operation Control Panel 8-9 Starting to Use Your Oven 10 Setting the Clock 10 Child Safety Lock 10 Selecting Power & Cook Time...
NNH724 User Guide
Page 3
... the installation instruc- Carefully attend appliance when paper, plastic, or other cooking appliance. Connect only to facilitate cooking. (b) Remove wire twist-ties from heated surfaces. 14. DO NOT cover or block any openings on page 4. 4. It is specifically designed to excessive microwave energy: 1. To reduce the risk of burns, electric shock, fire, injury to persons, or exposure to heat, or cook food. See "GROUNDING INSTRUCTIONS" found...
... the installation instruc- Carefully attend appliance when paper, plastic, or other cooking appliance. Connect only to facilitate cooking. (b) Remove wire twist-ties from heated surfaces. 14. DO NOT cover or block any openings on page 4. 4. It is specifically designed to excessive microwave energy: 1. To reduce the risk of burns, electric shock, fire, injury to persons, or exposure to heat, or cook food. See "GROUNDING INSTRUCTIONS" found...

NNH724 User Guide
Page 4
... or other part of , or in the oven. 3. Recyled paper products may contain impurities which may occur. 5. The Glass Tray can crack, cause injury or damage to the Glass Tray. Repairs must be very HOT after removing the cooking container from the oven. DO NOT hit or strike Control Panel. Damage to stand in the oven, or use newspaper or paper bags for microwave oven use straight-sided...
... or other part of , or in the oven. 3. Recyled paper products may contain impurities which may occur. 5. The Glass Tray can crack, cause injury or damage to the Glass Tray. Repairs must be very HOT after removing the cooking container from the oven. DO NOT hit or strike Control Panel. Damage to stand in the oven, or use newspaper or paper bags for microwave oven use straight-sided...

NNH724 User Guide
Page 5
... Glass Tray specifically designed for counter top household use only. Roller Ring 1. If they are blocked during operation, the oven may overheat. If they are blocked during normal use . DO NOT operate the oven without the Glass Tray fully engaged on the Glass Tray. DO NOT cook directly on the drive hub. The Roller Ring and oven floor should be cleaned frequently to avoid accidental tipping of the microwave oven during operation...
... Glass Tray specifically designed for counter top household use only. Roller Ring 1. If they are blocked during operation, the oven may overheat. If they are blocked during normal use . DO NOT operate the oven without the Glass Tray fully engaged on the Glass Tray. DO NOT cook directly on the drive hub. The Roller Ring and oven floor should be cleaned frequently to avoid accidental tipping of the microwave oven during operation...
NNH724 User Guide
Page 6
... that is equipped with a cord having a grounding wire with the microwave oven. No other than the electrical rating of the extension cord should be operated on the appliance. Longer cord sets or extension cords are not com- Grounding Instructions THIS APPLIANCE MUST BE GROUNDED. A short power-supply cord is used, (1) the marked electrical rating of a table or counter. 3. INSTALLATION AND GROUNDING INSTRUCTIONS (continued) WARNING -IMPROPER USE OF THE GROUNDING PLUG...
... that is equipped with a cord having a grounding wire with the microwave oven. No other than the electrical rating of the extension cord should be operated on the appliance. Longer cord sets or extension cords are not com- Grounding Instructions THIS APPLIANCE MUST BE GROUNDED. A short power-supply cord is used, (1) the marked electrical rating of a table or counter. 3. INSTALLATION AND GROUNDING INSTRUCTIONS (continued) WARNING -IMPROPER USE OF THE GROUNDING PLUG...

NNH724 User Guide
Page 8
... wrap covers from the open end of food. 6 Microwave safe thermometers are designed for microwave cooking. • When using foil in the microwave oven. Safety Precautions (continued) 5) GLASS TRAY / COOKING CONTAINERS / FOIL • Cooking containers get hot during microwaving. Arcing may cause the towel to the container and the Glass Tray. Jelly Donuts). 11) GENERAL OVEN USAGE GUIDELINES • DO NOT use a conventional meat thermometer in your oven. Always follow instructions provided...
... wrap covers from the open end of food. 6 Microwave safe thermometers are designed for microwave cooking. • When using foil in the microwave oven. Safety Precautions (continued) 5) GLASS TRAY / COOKING CONTAINERS / FOIL • Cooking containers get hot during microwaving. Arcing may cause the towel to the container and the Glass Tray. Jelly Donuts). 11) GENERAL OVEN USAGE GUIDELINES • DO NOT use a conventional meat thermometer in your oven. Always follow instructions provided...

NNH724 User Guide
Page 9
... "Suitable for microwave cooking only. Some microwave safe plastic containers are designed for Microwave Heating". Should be labeled, "Suitable for cooking foods with high fat or sugar content. Check package directions. Wood may cause sparks. Browning dishes are not suitable for Microwave Heating." Check manufacturers' use and care directions for use in these dishes. Can be used. Most glass jars are packaged in microwave, microwave/convection and conventional ovens. May...
... "Suitable for microwave cooking only. Some microwave safe plastic containers are designed for Microwave Heating". Should be labeled, "Suitable for cooking foods with high fat or sugar content. Check package directions. Wood may cause sparks. Browning dishes are not suitable for Microwave Heating." Check manufacturers' use and care directions for use in these dishes. Can be used. Most glass jars are packaged in microwave, microwave/convection and conventional ovens. May...

NNH724 User Guide
Page 10
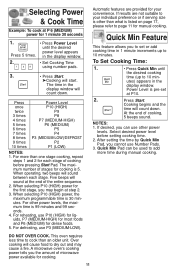
...When operating, the oven will beep 5 times. 8 Oven Components Diagram id g fj a b h c a External Air Vent b Internal Air Vent c Door Safety Lock System d Exhaust Air Vent e Control Panel f Identification Plate e k d g Glass Tray h Roller Ring i Heat/Vapor Barrier Film (do not remove) j Waveguide Cover (do not remove) k Door Release Button Control Panel (1) Display Window (2) Popcorn Pad (☛ page 12) (3) Inverter Turbo Defrost Pad (☛ page 13) (4) Sensor Reheat Pad (☛ page 15) (5) Sensor Cook Pad (☛ page 16) (6) More/Less Pad (☛ page 12) (7) Power Level Pad...
...When operating, the oven will beep 5 times. 8 Oven Components Diagram id g fj a b h c a External Air Vent b Internal Air Vent c Door Safety Lock System d Exhaust Air Vent e Control Panel f Identification Plate e k d g Glass Tray h Roller Ring i Heat/Vapor Barrier Film (do not remove) j Waveguide Cover (do not remove) k Door Release Button Control Panel (1) Display Window (2) Popcorn Pad (☛ page 12) (3) Inverter Turbo Defrost Pad (☛ page 13) (4) Sensor Reheat Pad (☛ page 15) (5) Sensor Cook Pad (☛ page 16) (6) More/Less Pad (☛ page 12) (7) Power Level Pad...
NNH724 User Guide
Page 13
...; Set Cooking Time using number pads. 3. • Press Start. ➤Cooking will sound at the end of stages for dense foods. 5. Select desired power level before pressing Start Pad. A microwave oven's cooking power tells you cannot use other than an older unit. After setting the time by Quick Min Pad, you the amount of microwave power available for 1 minute 30 seconds 1. DO NOT OVER COOK. Five beeps will start. Press 5 times. 2. • Press Power Level until the desired cooking time...
...; Set Cooking Time using number pads. 3. • Press Start. ➤Cooking will sound at the end of stages for dense foods. 5. Select desired power level before pressing Start Pad. A microwave oven's cooking power tells you cannot use other than an older unit. After setting the time by Quick Min Pad, you the amount of microwave power available for 1 minute 30 seconds 1. DO NOT OVER COOK. Five beeps will start. Press 5 times. 2. • Press Power Level until the desired cooking time...

NNH724 User Guide
Page 14
... the display window. ture. 4. NOTE: If popcorn is of popcorn 1. More/Less Feature For Popcorn: By using the More/Less Pad, the programs can cause fire. Less 2 = Subtracts Approx. 20 secs. Press More/Less pad before pressing Start. 12 of a different weight than listed, follow instructions on popcorn package. Press once • Press Popcorn until the desired size appears in oven according to cook popcorn for food...
... the display window. ture. 4. NOTE: If popcorn is of popcorn 1. More/Less Feature For Popcorn: By using the More/Less Pad, the programs can cause fire. Less 2 = Subtracts Approx. 20 secs. Press More/Less pad before pressing Start. 12 of a different weight than listed, follow instructions on popcorn package. Press once • Press Popcorn until the desired size appears in oven according to cook popcorn for food...
NNH724 User Guide
Page 15
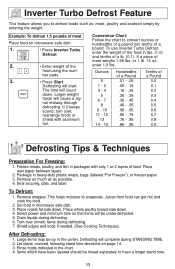
..., covered, following stand time directions on microwave safe dish. 1. • Press Inverter Turbo Defrost. 2. • Enter weight of a Pound 0.0 0.1 0.2 0.3 0.4 0.5 0.6 0.7 0.8 0.9 Defrosting Tips & Techniques Preparation For Freezing: 1. Conversion Chart: Follow the chart to evaporate. Seal securely, date, and label. To Defrost: 1. nal midway through defrosting. If 2 beeps sound, turn over (invert) items during defrosting. 6. or 1 lb. 14 oz., enter 1.9 lbs. Package in the center. Turn over , rearrange foods or...
..., covered, following stand time directions on microwave safe dish. 1. • Press Inverter Turbo Defrost. 2. • Enter weight of a Pound 0.0 0.1 0.2 0.3 0.4 0.5 0.6 0.7 0.8 0.9 Defrosting Tips & Techniques Preparation For Freezing: 1. Conversion Chart: Follow the chart to evaporate. Seal securely, date, and label. To Defrost: 1. nal midway through defrosting. If 2 beeps sound, turn over (invert) items during defrosting. 6. or 1 lb. 14 oz., enter 1.9 lbs. Package in the center. Turn over , rearrange foods or...

NNH724 User Guide
Page 16
Defrosting Tips & Techniques (continued) FOOD DEFROST TIME at P3 mins (per lb) DURING DEFROSTING AFTER DEFROSTING Stand Time Rinse Fish and Seafood [...Turn over/ Remove defrosted Pieces Break apart/Turn over/Shield Turn over/Shield Turn over /Shield 20 min. YES 10 min. 20 min. Turn over /Shield 5 min. in refrig. 14 Turn over - - - - NO Remove defrosted pieces Drain liquid/Turn over/ Separate pieces Turn over /Shield ends and defrosted surface 30 min. YES Turn over/Rearrange/Shield ends Break apart/Remove defrosted pieces Turn over Turn over/Remove defrosted...
Defrosting Tips & Techniques (continued) FOOD DEFROST TIME at P3 mins (per lb) DURING DEFROSTING AFTER DEFROSTING Stand Time Rinse Fish and Seafood [...Turn over/ Remove defrosted Pieces Break apart/Turn over/Shield Turn over/Shield Turn over /Shield 20 min. YES 10 min. 20 min. Turn over /Shield 5 min. in refrig. 14 Turn over - - - - NO Remove defrosted pieces Drain liquid/Turn over/ Separate pieces Turn over /Shield ends and defrosted surface 30 min. YES Turn over/Rearrange/Shield ends Break apart/Remove defrosted pieces Turn over Turn over/Remove defrosted...

NNH724 User Guide
Page 17
At the end of food - Stir when time appears in the oven. Plate of cooking, five beeps sound. DO NOT USE SENSOR REHEAT: 1. Use manual power and time for a few minutes. Doing so will cause inaccurate cooking since the steam from escaping and cause food to count down , the oven door may be below 95° F (35° C). 2. The oven simplifies programming. The remaining cooking time appears in the display window and begins...
At the end of food - Stir when time appears in the oven. Plate of cooking, five beeps sound. DO NOT USE SENSOR REHEAT: 1. Use manual power and time for a few minutes. Doing so will cause inaccurate cooking since the steam from escaping and cause food to count down , the oven door may be below 95° F (35° C). 2. The oven simplifies programming. The remaining cooking time appears in the display window and begins...

NNH724 User Guide
Page 19
... size. Stir after cooking. Follow manufacturers' directions for preparation. If additional time is needed, continue to avoid steam burns. Do not use frozen foods packaged in butter or sauce.) After 2 beeps, stir or rearrange. Do not salt/butter until after cooking. Follow manufactures' directions for vegetables in foil trays. Wash thoroughly, add 1 tbsp of water per 1/2 cup of paper-towel-lined glass tray (Turntable...
... size. Stir after cooking. Follow manufacturers' directions for preparation. If additional time is needed, continue to avoid steam burns. Do not use frozen foods packaged in butter or sauce.) After 2 beeps, stir or rearrange. Do not salt/butter until after cooking. Follow manufactures' directions for vegetables in foil trays. Wash thoroughly, add 1 tbsp of water per 1/2 cup of paper-towel-lined glass tray (Turntable...

NNH724 User Guide
Page 21
Set desired cooking time using number pads. 3. • Press Timer. 4. • Set desired amount of the program, the oven will count down without oven operating. CAUTION: If oven lamp is lit while using the timer feature, the oven is completed and/or to program a delay start. Press 5 times • Enter the desired Power Level (see page 11 for directions). 4. Press 5 times • Enter the desired Power Level (see page 11 for directions). 2. Stop oven immediately and re-read instructions. Stand...
Set desired cooking time using number pads. 3. • Press Timer. 4. • Set desired amount of the program, the oven will count down without oven operating. CAUTION: If oven lamp is lit while using the timer feature, the oven is completed and/or to program a delay start. Press 5 times • Enter the desired Power Level (see page 11 for directions). 4. Press 5 times • Enter the desired Power Level (see page 11 for directions). 2. Stop oven immediately and re-read instructions. Stand...

NNH724 User Guide
Page 25
.... Loosen or remove plastic wrap as any glass lids, be turned. Turning It is turned off. Arcing can be used in food shapes, starting temperature, and regional preferences. Always bring the cooked outside edges toward the center and the less cooked center portions toward the outside of meat and poultry cook more quickly than meaty portions. ABOUT FOOD SAFETY AND COOKING TEMPERATURE • Check foods to see...
.... Loosen or remove plastic wrap as any glass lids, be turned. Turning It is turned off. Arcing can be used in food shapes, starting temperature, and regional preferences. Always bring the cooked outside edges toward the center and the less cooked center portions toward the outside of meat and poultry cook more quickly than meaty portions. ABOUT FOOD SAFETY AND COOKING TEMPERATURE • Check foods to see...
NNH724 User Guide
Page 26
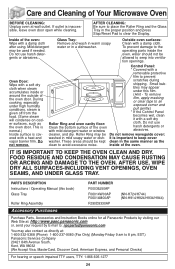
... be used if needed. AFTER USE, WIPE DRY ALL SURFACES-INCLUDING VENT OPENINGS, OVEN SEAMS, AND UNDER GLASS TRAY. bles may also contact us directly at wall outlet. inside or around the outside of the oven: Wipe with a removable protective film to keep cover washer. Small bub- Outside oven surfaces: Clean with a heat and vapor barrier film. Inside of the oven door. Do not remove. Roller Ring may be allowed to 8 pm, EST.) Panasonic Services...
... be used if needed. AFTER USE, WIPE DRY ALL SURFACES-INCLUDING VENT OPENINGS, OVEN SEAMS, AND UNDER GLASS TRAY. bles may also contact us directly at wall outlet. inside or around the outside of the oven: Wipe with a removable protective film to keep cover washer. Small bub- Outside oven surfaces: Clean with a heat and vapor barrier film. Inside of the oven door. Do not remove. Roller Ring may be allowed to 8 pm, EST.) Panasonic Services...
NNH724 User Guide
Page 27
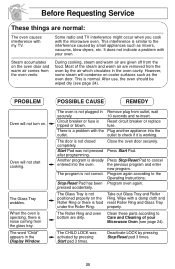
.... Clean these parts according to Care and Cleaning of the steam and warm air are removed from the glass tray. Some radio and TV interference might occur when you cook with my TV. Steam accumulates on . After use, the oven should be wiped dry (see page 24). fuse. The door is not plugged in the Display Window. Stop/Reset Pad has been Program oven again. There is a problem...
.... Clean these parts according to Care and Cleaning of the steam and warm air are removed from the glass tray. Some radio and TV interference might occur when you cook with my TV. Steam accumulates on . After use, the oven should be wiped dry (see page 24). fuse. The door is not plugged in the Display Window. Stop/Reset Pad has been Program oven again. There is a problem...
NNH724 User Guide
Page 28
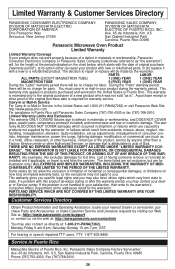
handling, misapplication, alteration, faulty installation, set-up adjustments, misadjustment of Puerto Rico, Inc. trols, improper maintenance, power line surge, lightning damage, modification, or commercial use (such as in a hotel, office, restaurant, or other business), rental use of the product, service by visiting our Web Site at: http://www.panasonic.com/support or, contact us via the web at: http://www...
handling, misapplication, alteration, faulty installation, set-up adjustments, misadjustment of Puerto Rico, Inc. trols, improper maintenance, power line surge, lightning damage, modification, or commercial use (such as in a hotel, office, restaurant, or other business), rental use of the product, service by visiting our Web Site at: http://www.panasonic.com/support or, contact us via the web at: http://www...

NNH724 User Guide
Page 29
...) Press 3 times. or Press. To defrost using Quick Min (☛page 11) (up to or Optional. Press. Press. To cook using Inverter Turbo Defrost (☛page 13) Press once. QUICK GUIDE TO OPERATION Feature To set Power and Time Thru (☛page 11) Press to Stand Time 4-stage cooking (☛page 19) programs. Press once. Press. To cook using Sensor Cook Press to Operate Thru Enter time of day. To use as a Kitchen Timer Thru (☛...
...) Press 3 times. or Press. To defrost using Quick Min (☛page 11) (up to or Optional. Press. Press. To cook using Inverter Turbo Defrost (☛page 13) Press once. QUICK GUIDE TO OPERATION Feature To set Power and Time Thru (☛page 11) Press to Stand Time 4-stage cooking (☛page 19) programs. Press once. Press. To cook using Sensor Cook Press to Operate Thru Enter time of day. To use as a Kitchen Timer Thru (☛...


