
NNH724 User Guide
Page 1
...Service 25 Limited Warranty & Customer Service Directory 26 General Information Cookware Guide 7 Oven Components Diagram 8 Specifications 28 User's Record 28 READ ALL INSTRUCTIONS CAREFULLY BEFORE USING THE OVEN. Operating Instructions Microwave Oven Models: NN-H724/H744/ H914/H924/H934/H944 Safety Information Operation Precautions Inside cover Important Safety Instructions .........1-3 Installation and Grounding Instructions 3-4 Safety Precautions 5-6 Operation Control Panel 8-9 Starting to Use Your Oven 10 Setting the Clock 10 Child Safety Lock 10 Selecting Power & Cook Time...
...Service 25 Limited Warranty & Customer Service Directory 26 General Information Cookware Guide 7 Oven Components Diagram 8 Specifications 28 User's Record 28 READ ALL INSTRUCTIONS CAREFULLY BEFORE USING THE OVEN. Operating Instructions Microwave Oven Models: NN-H724/H744/ H914/H924/H934/H944 Safety Information Operation Precautions Inside cover Important Safety Instructions .........1-3 Installation and Grounding Instructions 3-4 Safety Precautions 5-6 Operation Control Panel 8-9 Starting to Use Your Oven 10 Setting the Clock 10 Child Safety Lock 10 Selecting Power & Cook Time...
NNH724 User Guide
Page 3
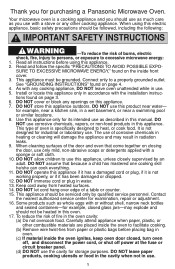
... are placed inside the oven to facilitate cooking. (b) Remove wire twist-ties from heated surfaces. 14. Install or locate this appliance only in use this product near a swimming pool or similar locations. 8. DO NOT use as described in this manual. Some products such as you for example, closed , turn oven off, and disconnect the power cord, or shut off power at the fuse or circuit breaker panel. (d) DO NOT use the...
... are placed inside the oven to facilitate cooking. (b) Remove wire twist-ties from heated surfaces. 14. Install or locate this appliance only in use this product near a swimming pool or similar locations. 8. DO NOT use as described in this manual. Some products such as you for example, closed , turn oven off, and disconnect the power cord, or shut off power at the fuse or circuit breaker panel. (d) DO NOT use the...

NNH724 User Guide
Page 4
... is transferred from the HOT food to stand in the microwave oven for cooking. 4. Repairs must be very HOT after removing the cooking container from the oven. Visible bubbling when the container is not always present. The film of your oven read remaining safety cautions and operating instructions. 2 Heat is not present to Door, Control Panel Frame, Safety Interlock Switches, or any adjustments or repairs to absorb energy. 2. IMPORTANT...
... is transferred from the HOT food to stand in the microwave oven for cooking. 4. Repairs must be very HOT after removing the cooking container from the oven. Visible bubbling when the container is not always present. The film of your oven read remaining safety cautions and operating instructions. 2 Heat is not present to Door, Control Panel Frame, Safety Interlock Switches, or any adjustments or repairs to absorb energy. 2. IMPORTANT...

NNH724 User Guide
Page 5
... the microwave oven during operation, the oven may be cleaned frequently to stop moving, the tray will remain inoperable until it has cooled. 3 If the oven overheats, a thermal safety device will turn in place. 2. Roller Ring 1. INSTALLATION AND GROUNDING INSTRUCTIONS Examine Your Oven Unpack oven, remove all packing material and examine the oven for cooking along with the Glass Tray. If they are blocked during operation, the oven may overheat...
... the microwave oven during operation, the oven may be cleaned frequently to stop moving, the tray will remain inoperable until it has cooled. 3 If the oven overheats, a thermal safety device will turn in place. 2. Roller Ring 1. INSTALLATION AND GROUNDING INSTRUCTIONS Examine Your Oven Unpack oven, remove all packing material and examine the oven for cooking along with the Glass Tray. If they are blocked during operation, the oven may overheat...
NNH724 User Guide
Page 6
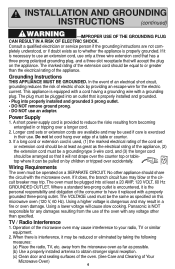
...-type 3-wire cord, and (3) the longer cord should be plugged into properly installed and grounded 3 prong outlet. • DO NOT remove ground prong. • DO NOT use . Using a lower voltage will accept the plug on by children or tripped over edge of Your Microwave Oven) 4 Operation of the consumer to have it replaced with the microwave oven. Power Supply 1. Longer cord sets or extension cords are not...
...-type 3-wire cord, and (3) the longer cord should be plugged into properly installed and grounded 3 prong outlet. • DO NOT remove ground prong. • DO NOT use . Using a lower voltage will accept the plug on by children or tripped over edge of Your Microwave Oven) 4 Operation of the consumer to have it replaced with the microwave oven. Power Supply 1. Longer cord sets or extension cords are not...

NNH724 User Guide
Page 8
... a strip cut from the HOT food to the touch (ex. Use paper toweling under supervision. 7) BROWNING DISHES / OVEN COOKING BAGS • Browning dishes or grills are designed for microwave cooking, prepare according to cool before handling or before eating. The glass jar or surface of space between foil and interior oven walls or door. • Dishes with metallic trim should be used for microwave cooking only. Safety Precautions (continued) 5) GLASS TRAY / COOKING CONTAINERS...
... a strip cut from the HOT food to the touch (ex. Use paper toweling under supervision. 7) BROWNING DISHES / OVEN COOKING BAGS • Browning dishes or grills are designed for microwave cooking, prepare according to cool before handling or before eating. The glass jar or surface of space between foil and interior oven walls or door. • Dishes with metallic trim should be used for microwave cooking only. Safety Precautions (continued) 5) GLASS TRAY / COOKING CONTAINERS...

NNH724 User Guide
Page 9
...' use and care directions for microwave cooking only. Heat only 1 tray in the oven at P10 (HIGH). Use to warm cooked foods, and to cook foods that require short cooking times such as a cover to a low serving temperature. Check manufacturers' directions for short term reheating and to bring food to prevent spattering. Some microwave safe plastic containers are designed for use in microwave ovens. Dishes get hot. Use only for recommended uses. Not suitable for use...
...' use and care directions for microwave cooking only. Heat only 1 tray in the oven at P10 (HIGH). Use to warm cooked foods, and to cook foods that require short cooking times such as a cover to a low serving temperature. Check manufacturers' directions for short term reheating and to bring food to prevent spattering. Some microwave safe plastic containers are designed for use in microwave ovens. Dishes get hot. Use only for recommended uses. Not suitable for use...

NNH724 User Guide
Page 10
... begin functioning. Oven Components Diagram id g fj a b h c a External Air Vent b Internal Air Vent c Door Safety Lock System d Exhaust Air Vent e Control Panel f Identification Plate e k d g Glass Tray h Roller Ring i Heat/Vapor Barrier Film (do not remove) j Waveguide Cover (do not remove) k Door Release Button Control Panel (1) Display Window (2) Popcorn Pad (☛ page 12) (3) Inverter Turbo Defrost Pad (☛ page 13) (4) Sensor Reheat Pad (☛ page 15) (5) Sensor Cook Pad (☛ page 16) (6) More/Less Pad (☛ page 12) (7) Power Level Pad (☛...
... begin functioning. Oven Components Diagram id g fj a b h c a External Air Vent b Internal Air Vent c Door Safety Lock System d Exhaust Air Vent e Control Panel f Identification Plate e k d g Glass Tray h Roller Ring i Heat/Vapor Barrier Film (do not remove) j Waveguide Cover (do not remove) k Door Release Button Control Panel (1) Display Window (2) Popcorn Pad (☛ page 12) (3) Inverter Turbo Defrost Pad (☛ page 13) (4) Sensor Reheat Pad (☛ page 15) (5) Sensor Cook Pad (☛ page 16) (6) More/Less Pad (☛ page 12) (7) Power Level Pad (☛...
NNH724 User Guide
Page 13
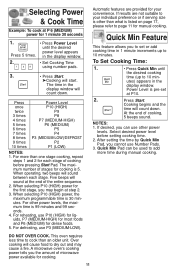
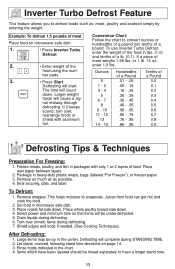
... if serving size is other than what is listed on page 17, please refer to 10 minutes. For other power levels. To Set Cooking Time: 1. • Press Quick Min until the desired power level appears in the display window will count down . Power Level is 5. This oven requires less time to set at the end of cooking, 5 beeps sound. Over cooking will start. When operating, two beeps will sound at P10. 2. Five beeps will sound between...
... if serving size is other than what is listed on page 17, please refer to 10 minutes. For other power levels. To Set Cooking Time: 1. • Press Quick Min until the desired power level appears in the display window will count down . Power Level is 5. This oven requires less time to set at the end of cooking, 5 beeps sound. Over cooking will start. When operating, two beeps will sound at P10. 2. Five beeps will sound between...

NNH724 User Guide
Page 14
Press once • Press Popcorn until the desired size appears in oven according to count down. facturers' directions. 3. Do not reheat unpopped kernels or reuse bag. For Sensor Reheat/Cook: Preferences for food doneness vary with popcorn at a time. 2. Start with each individual. NOTE: If popcorn is of popcorn 1. original setting Less 1 = Subtracts Approx. 10 secs. After having used the Sensor Reheat/Cook feature a few minutes. 5. or...
Press once • Press Popcorn until the desired size appears in oven according to count down. facturers' directions. 3. Do not reheat unpopped kernels or reuse bag. For Sensor Reheat/Cook: Preferences for food doneness vary with popcorn at a time. 2. Start with each individual. NOTE: If popcorn is of popcorn 1. original setting Less 1 = Subtracts Approx. 10 secs. After having used the Sensor Reheat/Cook feature a few minutes. 5. or...
NNH724 User Guide
Page 15
... time will be under-defrosted. 5. Larger weight foods will start. Ounces 0 1 - 2 3 - 4 5 6 - 7 8 9 - 10 11 - 12 13 14 - 15 Hundredths of a Pound .01 - .05 .06 - .15 .16 - .25 .26 - .35 .36 - .45 .46 - .55 .56 - .65 .66 - .75 .76 - .85 .86 - .95 Tenths of a pound. Shield edges and ends if needed. (See Cooking Techniques). Let stand, covered, following stand time directions on microwave...
... time will be under-defrosted. 5. Larger weight foods will start. Ounces 0 1 - 2 3 - 4 5 6 - 7 8 9 - 10 11 - 12 13 14 - 15 Hundredths of a Pound .01 - .05 .06 - .15 .16 - .25 .26 - .35 .36 - .45 .46 - .55 .56 - .65 .66 - .75 .76 - .85 .86 - .95 Tenths of a pound. Shield edges and ends if needed. (See Cooking Techniques). Let stand, covered, following stand time directions on microwave...

NNH724 User Guide
Page 16
... Turn over - - - - NO Remove defrosted pieces Drain liquid/Turn over/ Separate pieces Turn over /Rearrange/Shield ends and defrosted surface Break apart/Rearrange/ 5 min. Break apart/Turn over/ Remove defrosted Pieces Break apart/Turn over/Shield Turn over/Shield Turn over /Shield 20 min. YES 10 min. 20 min. in refrig. in refrig. 14 in refrig. Turn over /Shield 5 min. Defrosting Tips & Techniques (continued) FOOD DEFROST TIME...
... Turn over - - - - NO Remove defrosted pieces Drain liquid/Turn over/ Separate pieces Turn over /Rearrange/Shield ends and defrosted surface Break apart/Rearrange/ 5 min. Break apart/Turn over/ Remove defrosted Pieces Break apart/Turn over/Shield Turn over/Shield Turn over /Shield 20 min. YES 10 min. 20 min. in refrig. in refrig. 14 in refrig. Turn over /Shield 5 min. Defrosting Tips & Techniques (continued) FOOD DEFROST TIME...

NNH724 User Guide
Page 17
... food - Be sure the glass tray, the outside of the cooking containers and the inside of liquid, cover with the GENIUS SENSOR, follow these foods. 2. Residual beads of food 1. • Press Sensor Reheat. 2. BEFORE Reheating/Cooking: 1. The remaining cooking time appears in the display window and begins to overcook. Sensor Reheat Feature This sensor feature allows you to reheat food without setting time. The oven simplifies programming. Example: To reheat a plate of moisture turning...
... food - Be sure the glass tray, the outside of the cooking containers and the inside of liquid, cover with the GENIUS SENSOR, follow these foods. 2. Residual beads of food 1. • Press Sensor Reheat. 2. BEFORE Reheating/Cooking: 1. The remaining cooking time appears in the display window and begins to overcook. Sensor Reheat Feature This sensor feature allows you to reheat food without setting time. The oven simplifies programming. Example: To reheat a plate of moisture turning...

NNH724 User Guide
Page 19
... rice with lid or vented plastic wrap. Cover with no cover. Follow manufacturers' directions for vegetables in a microwave safe casserole dish. Be careful when removing the film cover after cooking. Follow manufactures' directions for preparation. Pour contents from you to 10 minutes before serving. each potato with hot tap water in foil trays. Follow manufacturers' directions for covering or removing covers. After 2 beeps, stir or rearrange. Place...
... rice with lid or vented plastic wrap. Cover with no cover. Follow manufacturers' directions for vegetables in a microwave safe casserole dish. Be careful when removing the film cover after cooking. Follow manufactures' directions for preparation. Pour contents from you to 10 minutes before serving. each potato with hot tap water in foil trays. Follow manufacturers' directions for covering or removing covers. After 2 beeps, stir or rearrange. Place...

NNH724 User Guide
Page 21
... oven operating. To Set Stand Time: Example: To cook at P6 power for directions). 2. Stop oven immediately and re-read instructions. When each stage finishes, a two-beep signal sounds. Set desired cooking time using number pads. 3. • Press Timer. 4. • Set desired amount of Stand Time using number pads. (up to 99 minutes and 99 seconds) 5. • Press Start. ➤Cooking will continue to program a standing time after cooking is opened during Stand Time, Kitchen Timer or Delay Time, the time on the display...
... oven operating. To Set Stand Time: Example: To cook at P6 power for directions). 2. Stop oven immediately and re-read instructions. When each stage finishes, a two-beep signal sounds. Set desired cooking time using number pads. 3. • Press Timer. 4. • Set desired amount of Stand Time using number pads. (up to 99 minutes and 99 seconds) 5. • Press Start. ➤Cooking will continue to program a standing time after cooking is opened during Stand Time, Kitchen Timer or Delay Time, the time on the display...

NNH724 User Guide
Page 25
Cooking Techniques (continued) Covering As with conventional cooking, moisture evaporates during microwave cooking. When removing plastic wrap covers, as well as recipe directs for doneness used for leftover, ready-to be exercised when using foil. Wooden toothpicks may be done. If the food is inserted and comes out clean. It is easier to add time to distribute the heat evenly. Rearranging Rearrange small items such...
Cooking Techniques (continued) Covering As with conventional cooking, moisture evaporates during microwave cooking. When removing plastic wrap covers, as well as recipe directs for doneness used for leftover, ready-to be exercised when using foil. Wooden toothpicks may be done. If the food is inserted and comes out clean. It is easier to add time to distribute the heat evenly. Rearranging Rearrange small items such...
NNH724 User Guide
Page 26
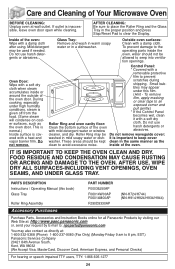
...-1277 24 Inside of the oven: Wipe with a damp cloth. AFTER USE, WIPE DRY ALL SURFACES-INCLUDING VENT OPENINGS, OVEN SEAMS, AND UNDER GLASS TRAY. inside or around the outside of the oven. Mild detergent may also contact us directly at wall outlet. Do not use harsh detergents or abrasives. These areas should not be used if needed. Outside oven surfaces: Clean with a damp cloth after using. Control Panel: * Covered with a removable protective film...
...-1277 24 Inside of the oven: Wipe with a damp cloth. AFTER USE, WIPE DRY ALL SURFACES-INCLUDING VENT OPENINGS, OVEN SEAMS, AND UNDER GLASS TRAY. inside or around the outside of the oven. Mild detergent may also contact us directly at wall outlet. Do not use harsh detergents or abrasives. These areas should not be used if needed. Outside oven surfaces: Clean with a damp cloth after using. Control Panel: * Covered with a removable protective film...
NNH724 User Guide
Page 27
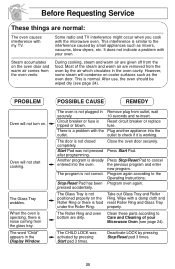
... dirty. It does not indicate a problem with the microwave oven. Circuit breaker or fuse is not plugged in the Display Window. Before Requesting Service These things are given off from the food. However, some steam will condense on the Ring. Oven will not turn on the oven door and warm air comes from the oven vents. PROBLEM Oven will not start cooking. Another program is working. pressed accidentally. The Glass Tray wobbles.
... dirty. It does not indicate a problem with the microwave oven. Circuit breaker or fuse is not plugged in the Display Window. Before Requesting Service These things are given off from the food. However, some steam will condense on the Ring. Oven will not turn on the oven door and warm air comes from the oven vents. PROBLEM Oven will not start cooking. Another program is working. pressed accidentally. The Glass Tray wobbles.
NNH724 User Guide
Page 28
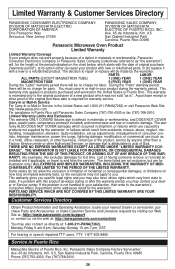
...://www.panasonic.com/support or, contact us directly at its option either (a) repair your product with new or refurbished parts, or (b) replace it with this excludes damages for warranty service. ranty ALSO DOES NOT COVER damages which occurred in your nearest Dealer or servicenter; ERAGE". THE WARRANTOR IS NOT LIABLE FOR INCIDENTAL OR CONSEQUENTIAL DAMAGES RESULTING FROM THE USE OF...
...://www.panasonic.com/support or, contact us directly at its option either (a) repair your product with new or refurbished parts, or (b) replace it with this excludes damages for warranty service. ranty ALSO DOES NOT COVER damages which occurred in your nearest Dealer or servicenter; ERAGE". THE WARRANTOR IS NOT LIABLE FOR INCIDENTAL OR CONSEQUENTIAL DAMAGES RESULTING FROM THE USE OF...

NNH724 User Guide
Page 29
... or Optional. Set cooking time. To Use Child Safety Lock To Set: To Cancel: (☛page 10) Press 3 times. To cook using Quick Min (☛page 11) (up to 4-stage cooking programs. Press. To reheat using Popcorn (☛page 12) Select weight. Set time. ( ) Input up to 10 min.) Press. Press. To cook using Sensor Reheat (☛page 15) Press once. to Operate Thru Enter time of day. Thru Set time. Press. To set Clock (☛page...
... or Optional. Set cooking time. To Use Child Safety Lock To Set: To Cancel: (☛page 10) Press 3 times. To cook using Quick Min (☛page 11) (up to 4-stage cooking programs. Press. To reheat using Popcorn (☛page 12) Select weight. Set time. ( ) Input up to 10 min.) Press. Press. To cook using Sensor Reheat (☛page 15) Press once. to Operate Thru Enter time of day. Thru Set time. Press. To set Clock (☛page...


