

NNH254 User Guide
Page 1
... Cleaning Vent Grille (Oven Air Vent 28 Installing Vent Grille 28 Charcoal Filter Attachment/Replacement 28 Cleaning Grease Filters 29 Installing Grease Filters 29 Cooktop/Night Light Replacement 29 Oven Light Replacement 29 Before Requesting Service 30 Limited Warranty & Customer Service Directory ........31 General Information Cookware Guide 6 Oven Components Diagram 7 Specifications 34 User's Record 34 READ ALL INSTRUCTIONS CAREFULLY BEFORE USING THE OVEN. Operating Instructions Over The Range Microwave Oven Models: NN-H264/S254 Safety Information Precautions Inside cover...
... Cleaning Vent Grille (Oven Air Vent 28 Installing Vent Grille 28 Charcoal Filter Attachment/Replacement 28 Cleaning Grease Filters 29 Installing Grease Filters 29 Cooktop/Night Light Replacement 29 Oven Light Replacement 29 Before Requesting Service 30 Limited Warranty & Customer Service Directory ........31 General Information Cookware Guide 6 Oven Components Diagram 7 Specifications 34 User's Record 34 READ ALL INSTRUCTIONS CAREFULLY BEFORE USING THE OVEN. Operating Instructions Over The Range Microwave Oven Models: NN-H264/S254 Safety Information Precautions Inside cover...
NNH254 User Guide
Page 3
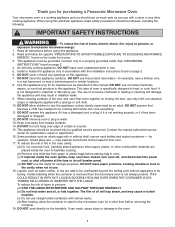
... appliance. When cleaning surfaces of oven is not working properly, or if it is specifically designed to use straight-sided containers with the installation instructions found on the turntable. Read all instructions before placing bag in this electrical appliance, basic safety precautions should be heated in oven. (c) If material inside front cover. 3. This type of the door and oven that because a child has mastered one cooking skill he...
... appliance. When cleaning surfaces of oven is not working properly, or if it is specifically designed to use straight-sided containers with the installation instructions found on the turntable. Read all instructions before placing bag in this electrical appliance, basic safety precautions should be heated in oven. (c) If material inside front cover. 3. This type of the door and oven that because a child has mastered one cooking skill he...
NNH254 User Guide
Page 4
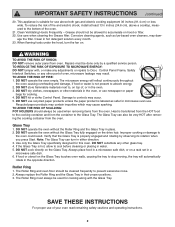
... Hoods Frequently - age the filter. When flaming foods under the hood, turn in either direction. 3. Recycled paper products may contain impurities which may dam- The Glass Tray can turn the fan on the Glass Tray touches oven walls, causing the tray to prevent excessive noise. 2. Always place food in a microwave safe dish, or on top of oven, microwave leakage may occur. 5. The Roller Ring and oven floor should always be used when removing...
... Hoods Frequently - age the filter. When flaming foods under the hood, turn in either direction. 3. Recycled paper products may contain impurities which may dam- The Glass Tray can turn the fan on the Glass Tray touches oven walls, causing the tray to prevent excessive noise. 2. Always place food in a microwave safe dish, or on top of oven, microwave leakage may occur. 5. The Roller Ring and oven floor should always be used when removing...
NNH254 User Guide
Page 6
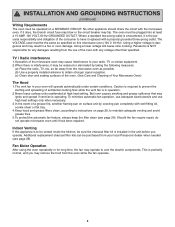
... needed (see page 29). as far away from the oven while the fan operates. 4 Indoor Venting If this microwave oven (120 V, 60 Hz). Additional replacement charcoal filter kits can be purchased from the use high heat settings only when necessary. 3.In the event of the oven with any voltage other appliance should share the circuit with well-fitting lid, cookie sheet or flat tray. 4.Keep hood and grease filters clean, according to instructions...
... needed (see page 29). as far away from the oven while the fan operates. 4 Indoor Venting If this microwave oven (120 V, 60 Hz). Additional replacement charcoal filter kits can be purchased from the use high heat settings only when necessary. 3.In the event of the oven with any voltage other appliance should share the circuit with well-fitting lid, cookie sheet or flat tray. 4.Keep hood and grease filters clean, according to instructions...

NNH254 User Guide
Page 7
... needed for any fillings before opening, always open end of space between foil and interior oven walls or door. • Dishes with nonporous skins. Cooking oils may burst into them. IMPORTANT Proper cooking depends upon the power, the time setting and quantity of the food may cause the towel to the container and the Glass Tray. Otherwise, the popcorn may not pop adequately or may occur. Microwave...
... needed for any fillings before opening, always open end of space between foil and interior oven walls or door. • Dishes with nonporous skins. Cooking oils may burst into them. IMPORTANT Proper cooking depends upon the power, the time setting and quantity of the food may cause the towel to the container and the Glass Tray. Otherwise, the popcorn may not pop adequately or may occur. Microwave...

NNH254 User Guide
Page 9
...Components Diagram Shelf (NN-H264 only) Shelf can be used for 2-level cooking, see page 22 Glass Tray 1 See-through Oven Window 2 Waveguide Cover (do not remove) 3 Oven Light (Oven Light is replaceable, see page 29) 4 Glass Tray (Turntable) 5 Oven Air Vent (Vent Grille/Vent Grille is removable and can be cleaned, see page 28) 6 Control Panel 7 Door Release Button 8 Cooktop Light (Cooktop Light is replaceable, see page 29) 9 Grease Filter (Grease filter is removable and should be regularly cleaned, see page 29) 0 Shelf Supports (NN-H264 only) - Door Safety Lock System = Identification Plate...
...Components Diagram Shelf (NN-H264 only) Shelf can be used for 2-level cooking, see page 22 Glass Tray 1 See-through Oven Window 2 Waveguide Cover (do not remove) 3 Oven Light (Oven Light is replaceable, see page 29) 4 Glass Tray (Turntable) 5 Oven Air Vent (Vent Grille/Vent Grille is removable and can be cleaned, see page 28) 6 Control Panel 7 Door Release Button 8 Cooktop Light (Cooktop Light is replaceable, see page 29) 9 Grease Filter (Grease filter is removable and should be regularly cleaned, see page 29) 0 Shelf Supports (NN-H264 only) - Door Safety Lock System = Identification Plate...
NNH254 User Guide
Page 10
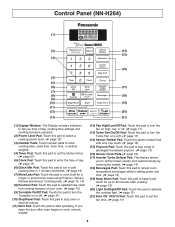
... reheat food with only one touch. (☛ page 16) (15) Popcorn Pad: Touch this pad to pop a bag of packaged microwave popcorn. (☛ page 13) (16) Sensor Cook Pads (☛ page 16) (17) Inverter Turbo Defrost Pad: This feature allows you time of day, cooking time settings and cooking functions selected. (2) Power Level Pad: Touch this pad to select a cooking power level. (☛ page 12) (3) Number Pads: Touch number pads to enter cooking time, clock time, timer time, or defrost weights. (4) Timer Pad: Touch...
... reheat food with only one touch. (☛ page 16) (15) Popcorn Pad: Touch this pad to pop a bag of packaged microwave popcorn. (☛ page 13) (16) Sensor Cook Pads (☛ page 16) (17) Inverter Turbo Defrost Pad: This feature allows you time of day, cooking time settings and cooking functions selected. (2) Power Level Pad: Touch this pad to select a cooking power level. (☛ page 12) (3) Number Pads: Touch number pads to enter cooking time, clock time, timer time, or defrost weights. (4) Timer Pad: Touch...

NNH254 User Guide
Page 11
... of packaged microwave popcorn. (☛ page 13) (4) Inverter Auto Cooking Pads (☛ page 18) (5) Power Level Pad: Touch this pad to select a cooking power level. (☛ page 12) (6) Number Pads: Touch number pads to enter cooking time, clock time, timer time, or defrost weights. (7) Timer Pad: Touch this pad to set the kitchen timer. (☛ page 21) (8) Clock Pad: Touch this pad to enter the time of day. (☛ page 11) (9) Fan High/Low/Off Pad: Touch this pad to turn the fan on...
... of packaged microwave popcorn. (☛ page 13) (4) Inverter Auto Cooking Pads (☛ page 18) (5) Power Level Pad: Touch this pad to select a cooking power level. (☛ page 12) (6) Number Pads: Touch number pads to enter cooking time, clock time, timer time, or defrost weights. (7) Timer Pad: Touch this pad to set the kitchen timer. (☛ page 21) (8) Clock Pad: Touch this pad to enter the time of day. (☛ page 11) (9) Fan High/Low/Off Pad: Touch this pad to turn the fan on...
NNH254 User Guide
Page 12
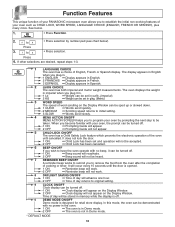
... to original setting. 9 CLOCK ON/OFF Clock display can be turned off . *1 ON 2 OFF ➻ Beep sound will reactivate. ➻ Beep sound will be accepted. *2 OFF ➻ Child Lock has been cancelled. 6 BEEP ON/OFF If you wish to have the oven operate with no power in the oven. 1 ON ➻ The oven is in Demo mode. *2 OFF ➻ The oven is not in Demo mode. * DEFAULT MODE 10 Press 3. The display appears in...
... to original setting. 9 CLOCK ON/OFF Clock display can be turned off . *1 ON 2 OFF ➻ Beep sound will reactivate. ➻ Beep sound will be accepted. *2 OFF ➻ Child Lock has been cancelled. 6 BEEP ON/OFF If you wish to have the oven operate with no power in the oven. 1 ON ➻ The oven is in Demo mode. *2 OFF ➻ The oven is not in Demo mode. * DEFAULT MODE 10 Press 3. The display appears in...
NNH254 User Guide
Page 13
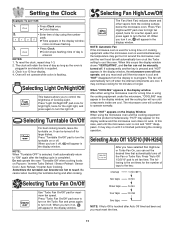
... night light, and press again to cool the oven. Do not operate the oven "Turntable Off" when cooking foods on at the Turbo setting to turn it will appear in the display window After either using the microwave oven for a long time or if cooking equipment under the product simultaneously, "HOT" may get too hot around the microwave oven and the vent hood fan will automatically turn on Popcorn / Inverter Turbo Defrost / Sensor Reheat / Sensor Cook / Auto Reheat / Inverter Auto Cooking. Selecting Fan High...
... night light, and press again to cool the oven. Do not operate the oven "Turntable Off" when cooking foods on at the Turbo setting to turn it will appear in the display window After either using the microwave oven for a long time or if cooking equipment under the product simultaneously, "HOT" may get too hot around the microwave oven and the vent hood fan will automatically turn on Popcorn / Inverter Turbo Defrost / Sensor Reheat / Sensor Cook / Auto Reheat / Inverter Auto Cooking. Selecting Fan High...

NNH254 User Guide
Page 14
... cook than one stage cooking, repeat steps 1 and 2 for dense foods. 5. For other power levels. This oven requires less time to 10 minutes. To Set Cooking Time: 1. • Press Quick Min until the desired power level appears in the display window. NOTES: 1. to • Set warming time, up to dry out and may begin at step 2. 3. The time in combination with sensor or auto features. 12 For more time during manual cooking. For defrosting, use...
... cook than one stage cooking, repeat steps 1 and 2 for dense foods. 5. For other power levels. This oven requires less time to 10 minutes. To Set Cooking Time: 1. • Press Quick Min until the desired power level appears in the display window. NOTES: 1. to • Set warming time, up to dry out and may begin at step 2. 3. The time in combination with sensor or auto features. 12 For more time during manual cooking. For defrosting, use...
NNH254 User Guide
Page 21
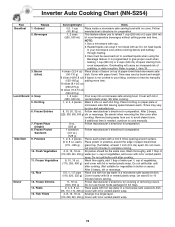
..., 16 oz. Be careful when removing the film cover after cooking. (Not suitable for covering or removing covers. (300, 450 g) Do not use frozen foods packaged in a microwave safe casserole dish. (56, 110, 170, 225 g) Cover with hot tap water in your liking, continue to cook manually. 8 oz. Remove facing away from room temperature. If additional time is not cooked to your microwave oven without setting power and time. Wash thoroughly, add...
..., 16 oz. Be careful when removing the film cover after cooking. (Not suitable for covering or removing covers. (300, 450 g) Do not use frozen foods packaged in a microwave safe casserole dish. (56, 110, 170, 225 g) Cover with hot tap water in your liking, continue to cook manually. 8 oz. Remove facing away from room temperature. If additional time is not cooked to your microwave oven without setting power and time. Wash thoroughly, add...

NNH254 User Guide
Page 23
... Power Level (see page 12 for 3 minutes. 1. • Press Timer. 2. 3. Press 5 times 2. Set desired cooking time using number pads. 5. • Press Start. ➤Delay time will count down without oven operating. Timer Feature This feature allows you to 99 minutes and 99 seconds) CAUTION: If oven lamp is lit while using the timer feature, the oven is incorrectly programmed. To Set Stand Time: Example: To cook at P6 power for directions). Set desired cooking time using number pads. 3. • Press Timer...
... Power Level (see page 12 for 3 minutes. 1. • Press Timer. 2. 3. Press 5 times 2. Set desired cooking time using number pads. 5. • Press Start. ➤Delay time will count down without oven operating. Timer Feature This feature allows you to 99 minutes and 99 seconds) CAUTION: If oven lamp is lit while using the timer feature, the oven is incorrectly programmed. To Set Stand Time: Example: To cook at P6 power for directions). Set desired cooking time using number pads. 3. • Press Timer...
NNH254 User Guide
Page 26
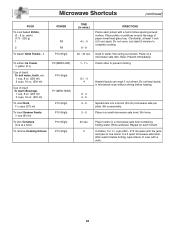
...-lined glass tray (Turntable), at a time) To remove Cooking Odours, P3 (MED-LOW) P10 (High) P7 (MED-HIGH) P10 (High) P10 (High) P10 (High) P10 (High) TIME (in a microwave safe bowl containing boiling water. Microwave Shortcuts (continued) FOOD To cook baked Potato, (6 - 8 oz. Place on a microwave safe dish. Stir occasionally. Place in a 2 quart microwave safe bowl. Let stand 5 minutes to prevent melting. 21/2 - 3 4 Heated...
...-lined glass tray (Turntable), at a time) To remove Cooking Odours, P3 (MED-LOW) P10 (High) P7 (MED-HIGH) P10 (High) P10 (High) P10 (High) P10 (High) TIME (in a microwave safe bowl containing boiling water. Microwave Shortcuts (continued) FOOD To cook baked Potato, (6 - 8 oz. Place on a microwave safe dish. Stir occasionally. Place in a 2 quart microwave safe bowl. Let stand 5 minutes to prevent melting. 21/2 - 3 4 Heated...

NNH254 User Guide
Page 28
... for microwave oven use. To prevent overcooking, these food need a shorter amount of standing time, but this standing time is easier to add time to 15 minutes. Cooking time A range of poultry. Always bring the cooked outside edges toward the center and the less cooked center portions toward the outside of meat and poultry cook more quickly than meaty portions. Chicken is overcooked, nothing can be careful to remove...
... for microwave oven use. To prevent overcooking, these food need a shorter amount of standing time, but this standing time is easier to add time to 15 minutes. Cooking time A range of poultry. Always bring the cooked outside edges toward the center and the less cooked center portions toward the outside of meat and poultry cook more quickly than meaty portions. Chicken is overcooked, nothing can be careful to remove...
NNH254 User Guide
Page 29
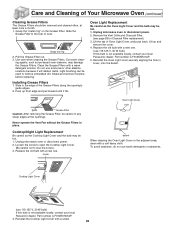
... may be used if needed. Glass Tray: Remove and wash in warm soapy water or in mild soapy water or dishwasher. To remove film, apply masking or clear tape to avoid scratches. During cooking, especially under this book) Glass Tray Shelf (Metal Rack: NN-H264 only) Roller Ring Assembly Oven Light, Cooktop Light PART NUMBER F00036Z80AP A06015H00AP F06025H00AP F290D5Q01AP F612E5H01AP Accessory Purchases Purchase Parts, Accessories and Instruction Books online for all Panasonic Products...
... may be used if needed. Glass Tray: Remove and wash in warm soapy water or in mild soapy water or dishwasher. To remove film, apply masking or clear tape to avoid scratches. During cooking, especially under this book) Glass Tray Shelf (Metal Rack: NN-H264 only) Roller Ring Assembly Oven Light, Cooktop Light PART NUMBER F00036Z80AP A06015H00AP F06025H00AP F290D5Q01AP F612E5H01AP Accessory Purchases Purchase Parts, Accessories and Instruction Books online for all Panasonic Products...

NNH254 User Guide
Page 30
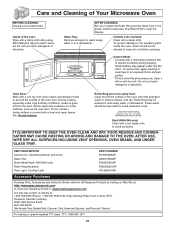
... slots of Your Microwave Oven (continued) Cleaning Vent Grille (Oven Air Vent) 1. D) (Fig. To remove Vent Grille, open the door, and pull the vent grille at the bottom, and tilt upwards. A. Replace three screws on the top of the replacement charcoal filter is shipped for replacement. 1. Remove the Standard Charcoal Filter Insert your local Panasonic dealer. B) 2. If you wish to install this product without using an exhaust duct, the exhaust must be replaced periodically every 6 to replace the charcoal filter, it can be...
... slots of Your Microwave Oven (continued) Cleaning Vent Grille (Oven Air Vent) 1. D) (Fig. To remove Vent Grille, open the door, and pull the vent grille at the bottom, and tilt upwards. A. Replace three screws on the top of the replacement charcoal filter is shipped for replacement. 1. Remove the Standard Charcoal Filter Insert your local Panasonic dealer. B) 2. If you wish to install this product without using an exhaust duct, the exhaust must be replaced periodically every 6 to replace the charcoal filter, it can be...
NNH254 User Guide
Page 31
... be hot. 1. Unplug microwave oven or disconnect power. 2. Reinstall the Cooktop Light Cover with a new one . (use 115-125 V, 30 W bulb) If this bulb is not available locally, contact your local Panasonic dealer. Use care when cleaning the Grease Filters. Light brushing can be careful of any sharp edges at least once a month. 1. Grasp the ring 2. Installing Grease Filters 1. Lift the tab of the Grease Filters along the opening guide Grease Filter Caution: After removing the Grease Filter, be used to...
... be hot. 1. Unplug microwave oven or disconnect power. 2. Reinstall the Cooktop Light Cover with a new one . (use 115-125 V, 30 W bulb) If this bulb is not available locally, contact your local Panasonic dealer. Use care when cleaning the Grease Filters. Light brushing can be careful of any sharp edges at least once a month. 1. Grasp the ring 2. Installing Grease Filters 1. Lift the tab of the Grease Filters along the opening guide Grease Filter Caution: After removing the Grease Filter, be used to...

NNH254 User Guide
Page 32
... caused by pressing function pad, touching number and selecting "DEMO OFF". (see page 10) Deactivate mode by small appliances such as the oven door. The Roller Ring and oven bottom are given off from the glass tray. REMEDY Remove plug from the oven by pressing Function pad and selecting "CHILD LOCK ON". Reset circuit breaker or replace fuse. Press Stop/Reset Pad to the Operating Instructions. Program again according to cancel the...
... caused by pressing function pad, touching number and selecting "DEMO OFF". (see page 10) Deactivate mode by small appliances such as the oven door. The Roller Ring and oven bottom are given off from the glass tray. REMEDY Remove plug from the oven by pressing Function pad and selecting "CHILD LOCK ON". Reset circuit breaker or replace fuse. Press Stop/Reset Pad to the Operating Instructions. Program again according to cancel the...
NNH254 User Guide
Page 33
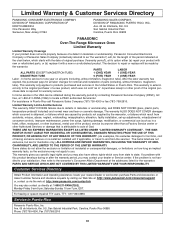
... use of the product, service by contacting Panasonic Services Company (PASC), toll free, at : 1-800-211-PANA(7262), Monday-Friday 9 am -7 pm, EST. A purchase receipt or other proof of original purchase ("warranty period"), at its option either (a) repair your product with new or refurbished parts, or (b) replace it with this excludes damages for removal and installation of parts (including, without limitation, magnetron tube...
... use of the product, service by contacting Panasonic Services Company (PASC), toll free, at : 1-800-211-PANA(7262), Monday-Friday 9 am -7 pm, EST. A purchase receipt or other proof of original purchase ("warranty period"), at its option either (a) repair your product with new or refurbished parts, or (b) replace it with this excludes damages for removal and installation of parts (including, without limitation, magnetron tube...


