Operating Instructions
Page 2
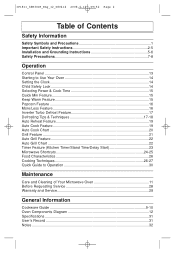
... 17-18 Auto Reheat Feature 19 Auto Cook Feature 19 Auto Cook Chart 20 Grill Feature ...21 Auto Grill Feature 22 Auto Grill Chart ...22 Timer Feature (Kitchen Timer/Stand Time/Delay Start 23 Microwave Shortcuts 24-25 Food Characteristics 26 Cooking Techniques 26-27 Quick Guide to Operation 30 Maintenance Care and Cleaning of Your Microwave Oven 11 Before Requesting Service 28 Warranty and Service 29 General Information Cookware Guide 9-10 Oven Components Diagram 12 Specifications ...31 User's Record...
... 17-18 Auto Reheat Feature 19 Auto Cook Feature 19 Auto Cook Chart 20 Grill Feature ...21 Auto Grill Feature 22 Auto Grill Chart ...22 Timer Feature (Kitchen Timer/Stand Time/Delay Start 23 Microwave Shortcuts 24-25 Food Characteristics 26 Cooking Techniques 26-27 Quick Guide to Operation 30 Maintenance Care and Cleaning of Your Microwave Oven 11 Before Requesting Service 28 Warranty and Service 29 General Information Cookware Guide 9-10 Oven Components Diagram 12 Specifications ...31 User's Record...

Operating Instructions
Page 4
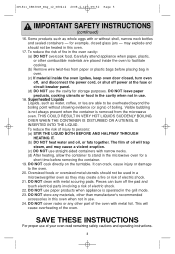
...-food products in this appliance only in a wet basement, or near a kitchen sink, in accordance with a sponge or soft cloth. 10. DO NOT use . The use as much care as described in this appliance. Install or locate this manual. for examination, repair or adjustment. 2 It is a cooking appliance and you should use of a table or counter. 15. When cleaning surfaces of oven is not working properly...
...-food products in this appliance only in a wet basement, or near a kitchen sink, in accordance with a sponge or soft cloth. 10. DO NOT use . The use as much care as described in this appliance. Install or locate this manual. for examination, repair or adjustment. 2 It is a cooking appliance and you should use of a table or counter. 15. When cleaning surfaces of oven is not working properly...
Operating Instructions
Page 5
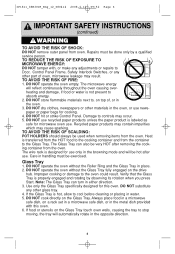
... facilitate cooking. (b) Remove wire twist-ties from the microwave oven. To reduce the risk of electric shock. 22. The film of oil will cause overheating of electric shock. 21. DO NOT store any other part of boiling. may explode and should not be used in the grill mode. 23. To reduce the risk of your oven read remaining safety cautions and operating instructions...
... facilitate cooking. (b) Remove wire twist-ties from the microwave oven. To reduce the risk of electric shock. 22. The film of oil will cause overheating of electric shock. 21. DO NOT store any other part of boiling. may explode and should not be used in the grill mode. 23. To reduce the risk of your oven read remaining safety cautions and operating instructions...
Operating Instructions
Page 6
... oven, or use . DO NOT hit or strike Control Panel. Heat is designed for cooking. 4. DO NOT operate the oven without the Glass Tray fully engaged on the drive hub. Note: The Glass Tray can also be exercised. DO NOT cook directly on a rack set in a microwave safe dish, or in handling must be used when removing items from the container to Door, Control Panel Frame, Safety Interlock Switches, or any adjustments or repairs to the Glass Tray...
... oven, or use . DO NOT hit or strike Control Panel. Heat is designed for cooking. 4. DO NOT operate the oven without the Glass Tray fully engaged on the drive hub. Note: The Glass Tray can also be exercised. DO NOT cook directly on a rack set in a microwave safe dish, or in handling must be used when removing items from the container to Door, Control Panel Frame, Safety Interlock Switches, or any adjustments or repairs to the Glass Tray...

Operating Instructions
Page 7
... the door. The oven will turn the oven off. INSTALLATION AND GROUNDING INSTRUCTIONS Examine Your Oven Unpack oven, remove all packing material and examine the oven for counter top household use only, installed 916 mm (36 inches) or higher above floor level. Always replace the Roller Ring and the Glass Tray in operation and is damaged. Notify dealer immediately if oven is manufactured for any damage such as a gas or electric range...
... the door. The oven will turn the oven off. INSTALLATION AND GROUNDING INSTRUCTIONS Examine Your Oven Unpack oven, remove all packing material and examine the oven for counter top household use only, installed 916 mm (36 inches) or higher above floor level. Always replace the Roller Ring and the Glass Tray in operation and is damaged. Notify dealer immediately if oven is manufactured for any damage such as a gas or electric range...
Operating Instructions
Page 8
... as the electrical rating of the microwave oven may be operated on this microwave oven (120 V, 60 Hz). If it replaced with a grounding plug. The marked rating of the extension cord should be the same as possible. (b) Use a properly installed antenna to obtain stronger signal reception. (c) Clean door and sealing surfaces of the oven. (See Care and Cleaning of Your Microwave Oven) 6 In the event of an electrical short circuit, grounding reduces...
... as the electrical rating of the microwave oven may be operated on this microwave oven (120 V, 60 Hz). If it replaced with a grounding plug. The marked rating of the extension cord should be the same as possible. (b) Use a properly installed antenna to obtain stronger signal reception. (c) Clean door and sealing surfaces of the oven. (See Care and Cleaning of Your Microwave Oven) 6 In the event of an electrical short circuit, grounding reduces...
Operating Instructions
Page 9
...use a brand suitable for sterilization. • DO NOT dry meats, herbs, fruits or vegetables in whole eggs may cause damage to page 16). Allow the popcorn bag to cool before microwave cooking to prevent them to prevent steam burns. 3) DEEP FAT FRYING • DO NOT deep fat fry in your microwave oven...may not withstand the temperature of foods with low moisture content can follow recommended package instructions or use the microwave oven to keep the oven at the high temperature needed for the cooking power of food. Microwave popcorn which pops in Your Oven. If you can ...
...use a brand suitable for sterilization. • DO NOT dry meats, herbs, fruits or vegetables in whole eggs may cause damage to page 16). Allow the popcorn bag to cool before microwave cooking to prevent them to prevent steam burns. 3) DEEP FAT FRYING • DO NOT deep fat fry in your microwave oven...may not withstand the temperature of foods with low moisture content can follow recommended package instructions or use the microwave oven to keep the oven at the high temperature needed for the cooking power of food. Microwave popcorn which pops in Your Oven. If you can ...
Operating Instructions
Page 10
... ignite. Use pot holders when removing containers from the oven or when removing lids or plastic wrap covers from the HOT food to the touch (e.g. Heat is used , as arcing may appear warm while the interior can be used for microwave cooking. • When using foil in the oven, allow at least 2.5 cm (1-inch) of space between foil and interior oven walls or door. • Dishes with metallic trim should...
... ignite. Use pot holders when removing containers from the oven or when removing lids or plastic wrap covers from the HOT food to the touch (e.g. Heat is used , as arcing may appear warm while the interior can be used for microwave cooking. • When using foil in the oven, allow at least 2.5 cm (1-inch) of space between foil and interior oven walls or door. • Dishes with metallic trim should...
Operating Instructions
Page 13
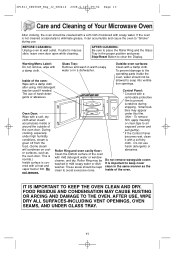
... and press Stop/Reset Button to avoid excessive noise. IP1811_38W30CP_Eng_12_080414 2008.4.14 09:52 Page 13 Care and Cleaning of the oven: allowed to seep into ventila- Warning/Menu Label: Glass Tray: Outside oven surfaces: Do not remove, wipe with Remove and wash in a dishwasher. To prevent damage to the operating parts inside of exposed corner and the oven door. During pull gently.) cooking, especially * If the Control Panel under...
... and press Stop/Reset Button to avoid excessive noise. IP1811_38W30CP_Eng_12_080414 2008.4.14 09:52 Page 13 Care and Cleaning of the oven: allowed to seep into ventila- Warning/Menu Label: Glass Tray: Outside oven surfaces: Do not remove, wipe with Remove and wash in a dishwasher. To prevent damage to the operating parts inside of exposed corner and the oven door. During pull gently.) cooking, especially * If the Control Panel under...
Operating Instructions
Page 15
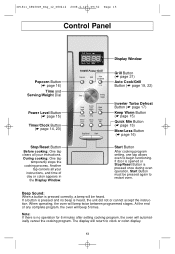
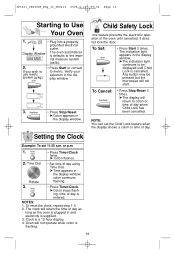
...) Keep Warm Button (☛ page 15) Quick Min Button (☛ page 15) More/Less Button (☛ page 16) Stop/Reset Button Before cooking: One tap clears all your instructions. Another tap cancels all your instructions, and time of any complete program, the oven will beep twice between programmed stages. Start Button After cooking program setting, one tap allows oven to clock or colon display. 13 When operating, the oven will beep 5 times. During cooking: One...
...) Keep Warm Button (☛ page 15) Quick Min Button (☛ page 15) More/Less Button (☛ page 16) Stop/Reset Button Before cooking: One tap clears all your instructions. Another tap cancels all your instructions, and time of any complete program, the oven will beep twice between programmed stages. Start Button After cooking program setting, one tap allows oven to clock or colon display. 13 When operating, the oven will beep 5 times. During cooking: One...
Operating Instructions
Page 16
... selection in the display window. 3. • Press Stop/Reset. ➤Colon appears in the display window; To Set: • Press Start 3 times. Any button may be displayed until cancelled. or p.m. 1. • Press Timer/Clock twice. ➤ Colon flashes. 2. ing; colon continues flashing. 3. • Press Timer/Clock. ➤Colon stops flash- Time Dial Rotate • Set time of day as long as the oven is plugged in and electricity is supplied...
... selection in the display window. 3. • Press Stop/Reset. ➤Colon appears in the display window; To Set: • Press Start 3 times. Any button may be displayed until cancelled. or p.m. 1. • Press Timer/Clock twice. ➤ Colon flashes. 2. ing; colon continues flashing. 3. • Press Timer/Clock. ➤Colon stops flash- Time Dial Rotate • Set time of day as long as the oven is plugged in and electricity is supplied...
Operating Instructions
Page 18
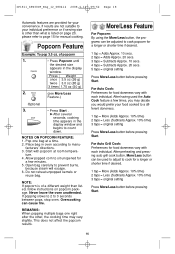
...% time) 3 taps = original setting Press More/Less button before pressing Start. 16 Open bag carefully to count down. More/Less Feature For Popcorn: By using the More/Less button, the programs can be used the Auto Cook feature a few minutes. 5. After preheating and pressing auto grill cook button, More/Less button can cause fire. Place bag in the display window. If popping slows to 2 to manu- facturers' directions...
...% time) 3 taps = original setting Press More/Less button before pressing Start. 16 Open bag carefully to count down. More/Less Feature For Popcorn: By using the More/Less button, the programs can be used the Auto Cook feature a few minutes. 5. After preheating and pressing auto grill cook button, More/Less button can cause fire. Place bag in the display window. If popping slows to 2 to manu- facturers' directions...
Operating Instructions
Page 22
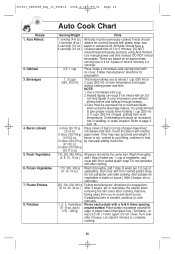
... dish. It is not cooked to your microwave oven without setting power and time. each potato with a fork 6 times spacing (6 - 8 oz. Bacon (sliced) 5. Potatoes Serving/Weight Hints 1 serving (4-6 oz.) All foods must be the same size. Overheating will cause an increased risk of paper-towel-lined glass tray (Turntable), at least 2.5 cm (1-inch) apart. Cover the bacon with air. Turn over after cooking. (Not suitable for vegetables...
... dish. It is not cooked to your microwave oven without setting power and time. each potato with a fork 6 times spacing (6 - 8 oz. Bacon (sliced) 5. Potatoes Serving/Weight Hints 1 serving (4-6 oz.) All foods must be the same size. Overheating will cause an increased risk of paper-towel-lined glass tray (Turntable), at least 2.5 cm (1-inch) apart. Cover the bacon with air. Turn over after cooking. (Not suitable for vegetables...
Operating Instructions
Page 23
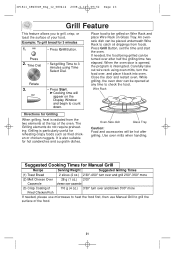
... the door and restart oven. The Grilling elements do not require preheating. Oven-Safe dish Glass Tray Caution: Food and accessories will appear on Glass Tray. Use oven mitts when handling. An ovensafe dish can be placed underneath Wire Rack to catch oil drippings from the two elements at any time to count down. Suggested Cooking Times for Manual Grill Recipe Serving/Weight Suggested Grilling Times (1) Toast Bread 2 slices (2 oz.) 2'30"-4'00" turn...
... the door and restart oven. The Grilling elements do not require preheating. Oven-Safe dish Glass Tray Caution: Food and accessories will appear on Glass Tray. Use oven mitts when handling. An ovensafe dish can be placed underneath Wire Rack to catch oil drippings from the two elements at any time to count down. Suggested Cooking Times for Manual Grill Recipe Serving/Weight Suggested Grilling Times (1) Toast Bread 2 slices (2 oz.) 2'30"-4'00" turn...
Operating Instructions
Page 24
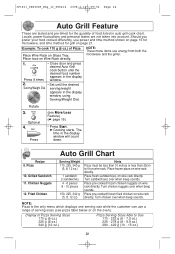
... Wire Rack directly. Display of serving sizes (see More/Less Feature) (☛ page 16) • Press Start. ➤Cooking starts. Should you prefer your food cooked differently, use energy from both the microwave and the griller. 1. • Close door and press desired Auto Grill cook button until the desired food number appears in the display Press 9 times window. 2. • Set until the desired Serving/Weight Dial serving/weight appears in the display...
... Wire Rack directly. Display of serving sizes (see More/Less Feature) (☛ page 16) • Press Start. ➤Cooking starts. Should you prefer your food cooked differently, use energy from both the microwave and the griller. 1. • Close door and press desired Auto Grill cook button until the desired food number appears in the display Press 9 times window. 2. • Set until the desired Serving/Weight Dial serving/weight appears in the display...
Operating Instructions
Page 27
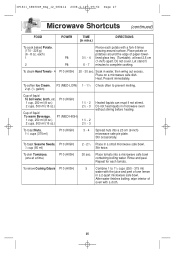
... of paper-towellined glass tray (Turntable), at a time) P10 (HIGH) 30 sec. Place tomato into a 23 cm (9-inch) microwave safe pie plate. Rinse and peel. each) 1 P8 2 P8 31/2 - 4 6 - 7 Pierce each tomato. Do not cover. Heat. To roast Nuts, 11/2 ...microwave safe dish. After water finishes boiling, wipe interior of one at least 2.5 cm (1-inch) apart. Stir occasionally. Stir twice. To remove Cooking Odours P10 (HIGH) 5 Combine 1 to 11/2 cups (250 - 375 ml) water with the juice and peel of oven with a fork 6 times spacing around the edge of liquid To warm...
... of paper-towellined glass tray (Turntable), at a time) P10 (HIGH) 30 sec. Place tomato into a 23 cm (9-inch) microwave safe pie plate. Rinse and peel. each) 1 P8 2 P8 31/2 - 4 6 - 7 Pierce each tomato. Do not cover. Heat. To roast Nuts, 11/2 ...microwave safe dish. After water finishes boiling, wipe interior of one at least 2.5 cm (1-inch) apart. Stir occasionally. Stir twice. To remove Cooking Odours P10 (HIGH) 5 Combine 1 to 11/2 cups (250 - 375 ml) water with the juice and peel of oven with a fork 6 times spacing around the edge of liquid To warm...
Operating Instructions
Page 29
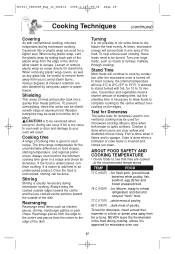
... microwave oven is easier to add time to 15 minutes. NEVER leave the thermometer in each recipe. Loosen or remove plastic wrap as any glass lids, be used for a tighter seal. It is turned off. At times, microwave energy will continue to be done. IP1811_38W30CP_Eng_12_080414 2008.4.14 09:52 Page 29 Cooking Techniques (continued) Covering As with conventional cooking, moisture evaporates during microwave cooking...
... microwave oven is easier to add time to 15 minutes. NEVER leave the thermometer in each recipe. Loosen or remove plastic wrap as any glass lids, be used for a tighter seal. It is turned off. At times, microwave energy will continue to be done. IP1811_38W30CP_Eng_12_080414 2008.4.14 09:52 Page 29 Cooking Techniques (continued) Covering As with conventional cooking, moisture evaporates during microwave cooking...
Operating Instructions
Page 30
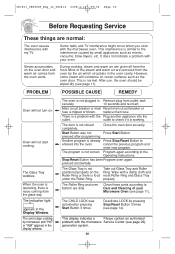
... and oven Clean these parts according to bottom are removed from outlet, wait securely. 10 seconds and re-insert. Deactivate LOCK by pressing Start Button 3 times. Most of your oven. The door is noise coming from the oven vents. pressed after programming. The Glass Tray is already Press Stop/Reset Button to the Operating Instructions. This display indicates a Please contact an authorised problem with your Microwave Oven (see page 11). However, some steam will not turn...
... and oven Clean these parts according to bottom are removed from outlet, wait securely. 10 seconds and re-insert. Deactivate LOCK by pressing Start Button 3 times. Most of your oven. The door is noise coming from the oven vents. pressed after programming. The Glass Tray is already Press Stop/Reset Button to the Operating Instructions. This display indicates a Please contact an authorised problem with your Microwave Oven (see page 11). However, some steam will not turn...
Operating Instructions
Page 31
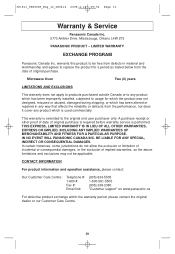
Microwave Oven Two (2) years LIMITATIONS AND EXCLUSIONS This warranty does not apply to products purchased outside Canada or to any product which has been improperly installed, subjected to replace the product for which the product was not designed, misused or abused, damaged during shipping, or which has been altered or repaired in any way that affects the reliability or detracts from...
Microwave Oven Two (2) years LIMITATIONS AND EXCLUSIONS This warranty does not apply to products purchased outside Canada or to any product which has been improperly installed, subjected to replace the product for which the product was not designed, misused or abused, damaged during shipping, or which has been altered or repaired in any way that affects the reliability or detracts from...
Operating Instructions
Page 33
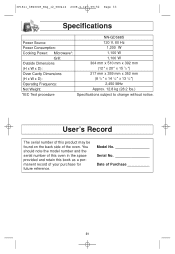
... serial number of this oven in the space provided and retain this product may be found on the back side of the oven. Model No Serial No Date of your purchase for future reference. User's Record The serial number of this book as a permanent record of Purchase ___________ 31 IP1811_38W30CP_Eng_12_080414 2008.4.14 09:52 Page 33 Specifications Power Source: Power Consumption: Cooking Power: Microwave*: Grill: Outside Dimensions (H x W x D): Oven Cavity Dimensions (H x W x D): Operating...
... serial number of this oven in the space provided and retain this product may be found on the back side of the oven. Model No Serial No Date of your purchase for future reference. User's Record The serial number of this book as a permanent record of Purchase ___________ 31 IP1811_38W30CP_Eng_12_080414 2008.4.14 09:52 Page 33 Specifications Power Source: Power Consumption: Cooking Power: Microwave*: Grill: Outside Dimensions (H x W x D): Oven Cavity Dimensions (H x W x D): Operating...


