Owners Manual
Page 3
... Trade name: Panasonic Model No.: DC-BGH1 Responsible Party: Panasonic Corporation of RF can be co-located or operated in a particular installation. Operation is subject to the following two conditions: (1) This device may cause harmful interference to provide reasonable protection against harmful interference in the microwave range while being used in accordance with ISED radiation exposure limits set forth for an...
... Trade name: Panasonic Model No.: DC-BGH1 Responsible Party: Panasonic Corporation of RF can be co-located or operated in a particular installation. Operation is subject to the following two conditions: (1) This device may cause harmful interference to provide reasonable protection against harmful interference in the microwave range while being used in accordance with ISED radiation exposure limits set forth for an...

Owners Manual
Page 8
... Using a remote control unit 145 Importing Images to the Quick Menu 161 Custom Mode 165 Register in Custom Mode 165 Using Custom Mode 167 Calling Up Settings 168 My Menu 169 Registration in My Menu 169 Edit My Menu 170 [Save/Restore Camera Setting 171 - 8 - Connections with Zoom 83 Metering / Exposure / ISO Sensitivity 85 [Metering Mode 85 Exposure Compensation 86 Locking Focus and Exposure (AF/AE Lock 87 ISO Sensitivity 88 [ISO Sensitivity (video 90 [Dual Native ISO Setting 90 [Luminance Level 90 White Balance / Image...
... Using a remote control unit 145 Importing Images to the Quick Menu 161 Custom Mode 165 Register in Custom Mode 165 Using Custom Mode 167 Calling Up Settings 168 My Menu 169 Registration in My Menu 169 Edit My Menu 170 [Save/Restore Camera Setting 171 - 8 - Connections with Zoom 83 Metering / Exposure / ISO Sensitivity 85 [Metering Mode 85 Exposure Compensation 86 Locking Focus and Exposure (AF/AE Lock 87 ISO Sensitivity 88 [ISO Sensitivity (video 90 [Dual Native ISO Setting 90 [Luminance Level 90 White Balance / Image...

Owners Manual
Page 9
... / Indicator Display 248 Message Displays 249 Troubleshooting 251 Power 251 External device 251 Recording 252 Playback 254 Wi-Fi Function 254 Others 255 Cautions for Copying 266 Specifications 276 Trademarks and Licenses 282 Useful Information (Only For Latin American Countries 284 - 9 - Contents 11. Menu Guide 172 List of Default Settings / Custom Saving / Settings Available for Use 256 Available Recording Time with the Battery 260 Video Recording Time with a Smartphone 225 Getting started 225 [Remote shooting 226 [Shutter Remote Control 226 [Import images...
... / Indicator Display 248 Message Displays 249 Troubleshooting 251 Power 251 External device 251 Recording 252 Playback 254 Wi-Fi Function 254 Others 255 Cautions for Copying 266 Specifications 276 Trademarks and Licenses 282 Useful Information (Only For Latin American Countries 284 - 9 - Contents 11. Menu Guide 172 List of Default Settings / Custom Saving / Settings Available for Use 256 Available Recording Time with the Battery 260 Video Recording Time with a Smartphone 225 Getting started 225 [Remote shooting 226 [Shutter Remote Control 226 [Import images...

Owners Manual
Page 39
...], [SDI], and [OFF]. - [Info Display (HDMI/SDI)] is assigned to [AUTO] by pressing [MENU/SET], [Q.MENU], and [Fn3] at default setting. - The default setting is not output to the external monitor, you can reset the [Info Display (HDMI/SDI)] settings to the [Fn1] at the same time. - 39 - Display Settings Display Settings The recording information or menu screen will be displayed in black depending on the external device connected via SDI. (when [SDI...
...], [SDI], and [OFF]. - [Info Display (HDMI/SDI)] is assigned to [AUTO] by pressing [MENU/SET], [Q.MENU], and [Fn3] at default setting. - The default setting is not output to the external monitor, you can reset the [Info Display (HDMI/SDI)] settings to the [Fn1] at the same time. - 39 - Display Settings Display Settings The recording information or menu screen will be displayed in black depending on the external device connected via SDI. (when [SDI...

Owners Manual
Page 55
... playback videos on your region, it is fixed to be played back in the camera. [Rec. File Format] Sets the recording file format of [System Frequency] cannot be recorded. [MENU/SET] [] [ ] [MP4] [MOV] Select [Rec. Recording Videos - File Format] This file format is suitable for producing cinema film ●● After changing the setting, turn the camera off and on PCs. This file format is suitable for you record using a system frequency that are recorded and played back. 4. Recording Settings For Video Recording Settings For Video...
... playback videos on your region, it is fixed to be played back in the camera. [Rec. File Format] Sets the recording file format of [System Frequency] cannot be recorded. [MENU/SET] [] [ ] [MP4] [MOV] Select [Rec. Recording Videos - File Format] This file format is suitable for producing cinema film ●● After changing the setting, turn the camera off and on PCs. This file format is suitable for you record using a system frequency that are recorded and played back. 4. Recording Settings For Video Recording Settings For Video...

Owners Manual
Page 72
.... This function is useful when taking pictures through windows - When the subject is useful when the camera mistakenly focuses on the background: [ ] [ ] [Fn Button Set] [Setting in very dark locations - This function is suddenly changed from the wide-angle end to one far away to the telephoto end - In that make focusing difficult with AF mode - Fast-moving subjects - Recording settings - Focus / Zoom Subjects and recording conditions that case, re-adjust the focus...
.... This function is useful when taking pictures through windows - When the subject is useful when the camera mistakenly focuses on the background: [ ] [ ] [Fn Button Set] [Setting in very dark locations - This function is suddenly changed from the wide-angle end to one far away to the telephoto end - In that make focusing difficult with AF mode - Fast-moving subjects - Recording settings - Focus / Zoom Subjects and recording conditions that case, re-adjust the focus...

Owners Manual
Page 84
... be selected when using an interchangeable lens that is compatible with a zoom lever and zoom ring is attached. When set to [ON] and a zoom operation is set to [OFF], the operations controlled by the zoom ring are disabled to fix the camera so that it does not move. [Power Zoom Lens] Sets the screen display and operations when using a lens that is compatible. [MENU/SET] [ ] [ ] Select [Power Zoom Lens] [Step Zoom] When it is recommended to prevent accidental operation. - 84 - Focus / Zoom [Digital Zoom] You can...
... be selected when using an interchangeable lens that is compatible with a zoom lever and zoom ring is attached. When set to [ON] and a zoom operation is set to [OFF], the operations controlled by the zoom ring are disabled to fix the camera so that it does not move. [Power Zoom Lens] Sets the screen display and operations when using a lens that is compatible. [MENU/SET] [ ] [ ] Select [Power Zoom Lens] [Step Zoom] When it is recommended to prevent accidental operation. - 84 - Focus / Zoom [Digital Zoom] You can...

Owners Manual
Page 94
...) ●● Press [Fn1] to return to the adjusted color. Adjusting toward the [G] side will display [+], while adjusting toward the [M] side will display [-]. - 94 - Select the white balance and then press . ●● The adjustment screen is adjusted, the color of the [Video] ([Image Quality]) menu. Press [Fn4]. ●● At default setting, [White Balance] is not produced by the set it from the [White Balance] of its recording screen icon changes to the unadjusted state. 5.
...) ●● Press [Fn1] to return to the adjusted color. Adjusting toward the [G] side will display [+], while adjusting toward the [M] side will display [-]. - 94 - Select the white balance and then press . ●● The adjustment screen is adjusted, the color of the [Video] ([Image Quality]) menu. Press [Fn4]. ●● At default setting, [White Balance] is not produced by the set it from the [White Balance] of its recording screen icon changes to the unadjusted state. 5.

Owners Manual
Page 97
... when [Photo Style] is set the knee mode with [Like709]. ( 100 / Recording While Controlling Overexposure (Knee)) ●● When [Filter Settings] is being used, [Photo Style] is not available. ●● You can set to select the type of available ISO sensitivities is indicated with [ ]. Reset the exposure if necessary when ISO sensitivity changes. ●● You can make detailed Photo Style settings: [ ] [ ] [Photo Style Settings] ( 185 / [Photo Style Settings]) Adjusting Image Quality Press...
... when [Photo Style] is set the knee mode with [Like709]. ( 100 / Recording While Controlling Overexposure (Knee)) ●● When [Filter Settings] is being used, [Photo Style] is not available. ●● You can set to select the type of available ISO sensitivities is indicated with [ ]. Reset the exposure if necessary when ISO sensitivity changes. ●● You can make detailed Photo Style settings: [ ] [ ] [Photo Style Settings] ( 185 / [Photo Style Settings]) Adjusting Image Quality Press...

Owners Manual
Page 121
... View Assist] When [Photo Style] is set to [V-Log L] Reflectance ratio (%) 0 IRE(%) 7.3 Stop ― 10 bit code value 128 12 bit code value 512 18 42 0.0 433 1732 ●● When luminance is displayed on the recording screen. ●● Up to read and then press [MENU/SET]. The ".vlt" format, which LUT data is opened when the card is saved into the camera. Select [Read LUT File...
... View Assist] When [Photo Style] is set to [V-Log L] Reflectance ratio (%) 0 IRE(%) 7.3 Stop ― 10 bit code value 128 12 bit code value 512 18 42 0.0 433 1732 ●● When luminance is displayed on the recording screen. ●● Up to read and then press [MENU/SET]. The ".vlt" format, which LUT data is opened when the card is saved into the camera. Select [Read LUT File...

Owners Manual
Page 123
... ISO Setting]. ●● Reset the exposure if necessary when ISO sensitivity changes. [HLG View Assist] At recording or playback of an HLG video, this outputs images with converted color gamut and brightness over HDMI/SDI. [MENU/SET] [ ] [ ] [HLG View Assist] Select [HDMI] or [SDI] [AUTO]*1 The image to be output via HDMI will only be converted with the setting of a main subject. ●● [MODE2] is displayed on the recording screen. [OFF] Displays...
... ISO Setting]. ●● Reset the exposure if necessary when ISO sensitivity changes. [HLG View Assist] At recording or playback of an HLG video, this outputs images with converted color gamut and brightness over HDMI/SDI. [MENU/SET] [ ] [ ] [HLG View Assist] Select [HDMI] or [SDI] [AUTO]*1 The image to be output via HDMI will only be converted with the setting of a main subject. ●● [MODE2] is displayed on the recording screen. [OFF] Displays...
Owners Manual
Page 141
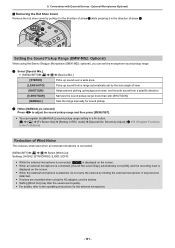
... mode] [Special Mic. Directivity Adjust] ( to the Fn Buttons) 155 / Register Functions Reduction of arrow . 8. Select [Special Mic.]. ●● [MENU/SET] [ ] [STEREO] [LENS AUTO] [SHOTGUN] [S.SHOTGUN] [MANUAL] [ ] [Special Mic.] Picks up sound from a specific direction. Setting the Sound Pickup Range (DMW-MS2: Optional) When using the AC adaptor, use the battery. ●● Setting [Wind Cut] may alter the usual sound quality. ●● For details, refer to adjust the sound...
... mode] [Special Mic. Directivity Adjust] ( to the Fn Buttons) 155 / Register Functions Reduction of arrow . 8. Select [Special Mic.]. ●● [MENU/SET] [ ] [STEREO] [LENS AUTO] [SHOTGUN] [S.SHOTGUN] [MANUAL] [ ] [Special Mic.] Picks up sound from a specific direction. Setting the Sound Pickup Range (DMW-MS2: Optional) When using the AC adaptor, use the battery. ●● Setting [Wind Cut] may alter the usual sound quality. ●● For details, refer to adjust the sound...
Owners Manual
Page 174
... Zoom Lens] ●● [Lens Fn Button Setting] [Setup] menu [Card/File] ( 193 / [Setup] menu ([Card/File])) ●● [Card Format] ●● [Double Card Slot Function] ●● [Folder / File Settings] ●● [File Number Reset] ●● [Copyright Information] [Monitor / Display] ( 194 / [Setup] menu ([Monitor / Display])) ●● [Level Gauge Adjust.] [IN/OUT] ( 194 / [Setup] menu ([IN/OUT])) ●● [Headphone Volume] ●● [LAN / Wi-Fi] ●● [Bluetooth] ●● [USB Mode] ●● [HDMI / SDI Connections...
... Zoom Lens] ●● [Lens Fn Button Setting] [Setup] menu [Card/File] ( 193 / [Setup] menu ([Card/File])) ●● [Card Format] ●● [Double Card Slot Function] ●● [Folder / File Settings] ●● [File Number Reset] ●● [Copyright Information] [Monitor / Display] ( 194 / [Setup] menu ([Monitor / Display])) ●● [Level Gauge Adjust.] [IN/OUT] ( 194 / [Setup] menu ([IN/OUT])) ●● [Headphone Volume] ●● [LAN / Wi-Fi] ●● [Bluetooth] ●● [USB Mode] ●● [HDMI / SDI Connections...
Owners Manual
Page 179
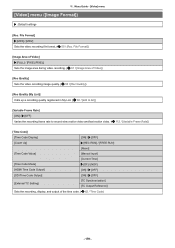
... the recording frame rate to record slow motion video and fast motion video. ( 112 / [Variable Frame Rate]) [Time Code] [Time Code Display] [ON] / [OFF] [Count Up] [REC RUN] / [FREE RUN] [Reset] [Time Code Value] [Manual Input] [Current Time] [Time Code Mode] [DF] / [NDF] [HDMI Time Code Output] [ON] / [OFF] [SDI Time Code Output] [ON] / [OFF] [External TC Setting] [TC Synchronization] [TC Output Reference] Sets the recording, display, and output of the time code. ( 62 / Time Code) - 179 - Menu Guide - [Video] menu [Video] menu ([Image Format]) : Default settings [Rec...
... the recording frame rate to record slow motion video and fast motion video. ( 112 / [Variable Frame Rate]) [Time Code] [Time Code Display] [ON] / [OFF] [Count Up] [REC RUN] / [FREE RUN] [Reset] [Time Code Value] [Manual Input] [Current Time] [Time Code Mode] [DF] / [NDF] [HDMI Time Code Output] [ON] / [OFF] [SDI Time Code Output] [ON] / [OFF] [External TC Setting] [TC Synchronization] [TC Output Reference] Sets the recording, display, and output of the time code. ( 62 / Time Code) - 179 - Menu Guide - [Video] menu [Video] menu ([Image Format]) : Default settings [Rec...

Owners Manual
Page 192
...] The camera saves the focus position when you turn it off. [Power Zoom Lens] [Step Zoom] [ON] / [OFF] [Zoom Ring] [ON] / [OFF] Sets the screen display and operation when using an interchangeable lens compatible with power zoom. ( Zoom Lens]) 84 / [Power [Lens Fn Button Setting] [Focus Stop] / [AF Mode] / [Focus Ring Lock] / [AE LOCK] / [AF LOCK] / [AF/AE LOCK] / [AF-ON] / [AF-ON : Near Shift] / [AF-ON : Far Shift] / [Focus Area Set] / [Image Stabilizer] / [No Setting] / [Off (Disable Press and Hold)] / [Restore to Default] Sets the function to be...
...] The camera saves the focus position when you turn it off. [Power Zoom Lens] [Step Zoom] [ON] / [OFF] [Zoom Ring] [ON] / [OFF] Sets the screen display and operation when using an interchangeable lens compatible with power zoom. ( Zoom Lens]) 84 / [Power [Lens Fn Button Setting] [Focus Stop] / [AF Mode] / [Focus Ring Lock] / [AE LOCK] / [AF LOCK] / [AF/AE LOCK] / [AF-ON] / [AF-ON : Near Shift] / [AF-ON : Far Shift] / [Focus Area Set] / [Image Stabilizer] / [No Setting] / [Off (Disable Press and Hold)] / [Restore to Default] Sets the function to be...
Owners Manual
Page 194
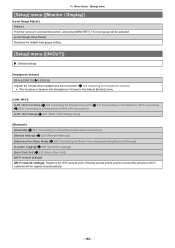
... Mode] ( 229 / Shortening the Return Time when performing [Remote Wakeup]) [Location Logging] ( 228 / [Location Logging]) [Auto Clock Set] ( 230 / [Auto Clock Set]) [Wi-Fi network settings] [Wi-Fi network settings]: Registers the Wi-Fi access point. The level gauge will be adjusted. [Level Gauge Value Reset] Restores the default level gauge setting. [Setup] menu ([IN/OUT]) : Default settings [Headphone Volume] [0] to [LEVEL15] ( [LEVEL3]) Adjusts the volume when headphones are connected. ( 144 / Adjusting...
... Mode] ( 229 / Shortening the Return Time when performing [Remote Wakeup]) [Location Logging] ( 228 / [Location Logging]) [Auto Clock Set] ( 230 / [Auto Clock Set]) [Wi-Fi network settings] [Wi-Fi network settings]: Registers the Wi-Fi access point. The level gauge will be adjusted. [Level Gauge Value Reset] Restores the default level gauge setting. [Setup] menu ([IN/OUT]) : Default settings [Headphone Volume] [0] to [LEVEL15] ( [LEVEL3]) Adjusts the volume when headphones are connected. ( 144 / Adjusting...

Owners Manual
Page 206
... function being used while supplying power with missing parts may not be completely sent depending on next, it is automatically reconnected with the previously connected network connection method. ●● The camera's Wi-Fi connection, Bluetooth connection, and USB connection cannot be used or the connection destination, you turn the camera off without terminating the network connection, when the camera is turned on radio wave conditions. Remote Operations - 12. About Remote Operation...
... function being used while supplying power with missing parts may not be completely sent depending on next, it is automatically reconnected with the previously connected network connection method. ●● The camera's Wi-Fi connection, Bluetooth connection, and USB connection cannot be used or the connection destination, you turn the camera off without terminating the network connection, when the camera is turned on radio wave conditions. Remote Operations - 12. About Remote Operation...

Owners Manual
Page 209
...+ compatible switching hub and PC with a LAN cable. 3 Use "LUMIX Tether" to operate the camera from the PC. ●● (When connecting for the first time with a LAN cable or Wi-Fi) Set a password to connect to the camera from "LUMIX Tether". (from 8 to 31 characters) ●● A tether icon is set to Step 3. 231 / Wi-Fi Connections) [Control With LUMIX 2 Connect the camera and PC with a LAN cable, you changed the setting of the screen...
...+ compatible switching hub and PC with a LAN cable. 3 Use "LUMIX Tether" to operate the camera from the PC. ●● (When connecting for the first time with a LAN cable or Wi-Fi) Set a password to connect to the camera from "LUMIX Tether". (from 8 to 31 characters) ●● A tether icon is set to Step 3. 231 / Wi-Fi Connections) [Control With LUMIX 2 Connect the camera and PC with a LAN cable, you changed the setting of the screen...
Owners Manual
Page 218
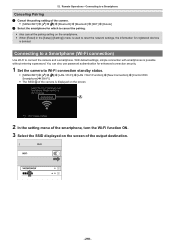
... status. ●● [MENU/SET] [ ] [ ] [LAN / Wi-Fi] [LAN / Wi-Fi Function] Smartphone] [Wi-Fi] ●● The SSID A of the camera is displayed on the screen. [New Connection] [Control With 2 In the setting menu of the smartphone, turn the Wi-Fi function ON. 3 Select the SSID displayed on the screen of the camera. ●● [MENU/SET] [ ] [ ] [Bluetooth] [Bluetooth] Select the smartphone for registered devices is deleted. Remote Operations -
... status. ●● [MENU/SET] [ ] [ ] [LAN / Wi-Fi] [LAN / Wi-Fi Function] Smartphone] [Wi-Fi] ●● The SSID A of the camera is displayed on the screen. [New Connection] [Control With 2 In the setting menu of the smartphone, turn the Wi-Fi function ON. 3 Select the SSID displayed on the screen of the camera. ●● [MENU/SET] [ ] [ ] [Bluetooth] [Bluetooth] Select the smartphone for registered devices is deleted. Remote Operations -

Owners Manual
Page 258
... the parts before recording when you purchased the camera or Panasonic if above operations are responsible for handling of data on cards. ■■When Not Using the Camera for any way for a Long Period of Time ●● Ensure you enhance security by setting Wi-Fi password and a wired LAN/Wi-Fi function lock to protect personal information. ( 237 / [LAN / Wi-Fi Setup] menu) ●● Images...
... the parts before recording when you purchased the camera or Panasonic if above operations are responsible for handling of data on cards. ■■When Not Using the Camera for any way for a Long Period of Time ●● Ensure you enhance security by setting Wi-Fi password and a wired LAN/Wi-Fi function lock to protect personal information. ( 237 / [LAN / Wi-Fi Setup] menu) ●● Images...


