
4-line/16 Ext.phone
Page 2
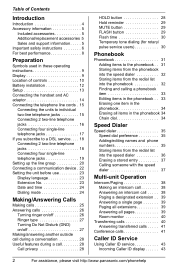
...the telephone line cords . 15 Connecting the units to individual two-line telephone jacks 15 Connecting 2 two-line telephone jacks 16 Connecting four single-line telephone jacks 17 If you subscribe to a DSL service. . . . 18 Connecting 2 two-...the phonebook 34 Chain dial 34 Speed Dialer Speed dialer 35 Speed dial preference 35 Adding/editing names and phone numbers 35 Storing items from the redial list into the speed dialer 36 Erasing a stored entry 37 Calling... Using Caller ID service 43 Incoming Caller ID display 43 2 For assistance, please visit http://www.panasonic.com/phonehelp
...the telephone line cords . 15 Connecting the units to individual two-line telephone jacks 15 Connecting 2 two-line telephone jacks 16 Connecting four single-line telephone jacks 17 If you subscribe to a DSL service. . . . 18 Connecting 2 two-...the phonebook 34 Chain dial 34 Speed Dialer Speed dialer 35 Speed dial preference 35 Adding/editing names and phone numbers 35 Storing items from the redial list into the speed dialer 36 Erasing a stored entry 37 Calling... Using Caller ID service 43 Incoming Caller ID display 43 2 For assistance, please visit http://www.panasonic.com/phonehelp
4-line/16 Ext.phone
Page 3
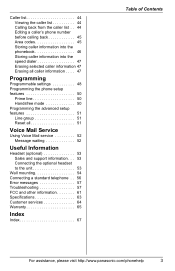
...Viewing the caller list 44 Calling back from the caller list . . 44 Editing a caller's phone number before calling back 45 Area codes 45 Storing caller information into the phonebook 46 Storing caller ...dialer 47 Erasing selected caller information 47 Erasing all caller information . . . . 47 Programming Programmable settings 48 Programming the phone setup features 50 Prime line 50 Handsfree mode 50 Programming the advanced setup features 51 Line group 51 Reset all 51 ... Warranty 65 Index Index 67 Table of Contents For assistance, please visit http://www.panasonic.com/phonehelp 3
...Viewing the caller list 44 Calling back from the caller list . . 44 Editing a caller's phone number before calling back 45 Area codes 45 Storing caller information into the phonebook 46 Storing caller ...dialer 47 Erasing selected caller information 47 Erasing all caller information . . . . 47 Programming Programmable settings 48 Programming the phone setup features 50 Prime line 50 Handsfree mode 50 Programming the advanced setup features 51 Line group 51 Reset all 51 ... Warranty 65 Index Index 67 Table of Contents For assistance, please visit http://www.panasonic.com/phonehelp 3
4-line/16 Ext.phone
Page 9
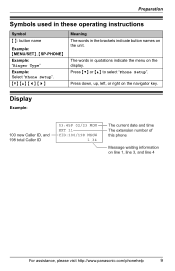
The words in the brackets indicate button names on the unit. Press down, up, left, or right on the navigator key. Press {V} or {^} to select "Phone Setup". Preparation Preparation Symbols used in these operating instructions Symbol { }: button name Example: {MENU/SET}, {SP-PHONE} Example: "Ringer Type" Example: Select "Phone Setup". {V Meaning The words in quotations indicate the menu on the display. Display Example: For assistance, please visit http://www.panasonic.com/phonehelp 9
The words in the brackets indicate button names on the unit. Press down, up, left, or right on the navigator key. Press {V} or {^} to select "Phone Setup". Preparation Preparation Symbols used in these operating instructions Symbol { }: button name Example: {MENU/SET}, {SP-PHONE} Example: "Ringer Type" Example: Select "Phone Setup". {V Meaning The words in quotations indicate the menu on the display. Display Example: For assistance, please visit http://www.panasonic.com/phonehelp 9
4-line/16 Ext.phone
Page 10
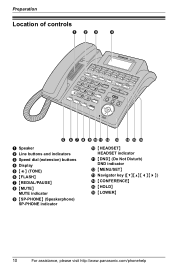
Preparation Location of controls A Speaker B Line buttons and indicators C Speed dial (extension) buttons D Display E {*} (TONE) F {FLASH} G {REDIAL/PAUSE} H {MUTE} MUTE indicator I {SP-PHONE} (Speakerphone) SP-PHONE indicator J {HEADSET} HEADSET indicator K {DND} (Do Not Disturb) DND indicator L {MENU/SET} M Navigator key ({V}{^}{}) N {CONFERENCE} O {HOLD} P {LOWER} 10 For assistance, please visit http://www.panasonic.com/phonehelp
Preparation Location of controls A Speaker B Line buttons and indicators C Speed dial (extension) buttons D Display E {*} (TONE) F {FLASH} G {REDIAL/PAUSE} H {MUTE} MUTE indicator I {SP-PHONE} (Speakerphone) SP-PHONE indicator J {HEADSET} HEADSET indicator K {DND} (Do Not Disturb) DND indicator L {MENU/SET} M Navigator key ({V}{^}{}) N {CONFERENCE} O {HOLD} P {LOWER} 10 For assistance, please visit http://www.panasonic.com/phonehelp
4-line/16 Ext.phone
Page 15
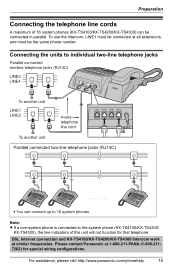
...Note: L If a non-system phone is connected to the system phone (KX-TS4100/KX-TS4200/ KX-TS4300), the line indicators of 16 system phones (KX-TS4100/KX-TS4200/KX-TS4300) can be connected at similar frequencies. For assistance, please visit http://www.panasonic.com/phonehelp 15 To use the ...intercom, LINE1 must be the same phone number. DSL Internet connection and KX-TS4100...
...Note: L If a non-system phone is connected to the system phone (KX-TS4100/KX-TS4200/ KX-TS4300), the line indicators of 16 system phones (KX-TS4100/KX-TS4200/KX-TS4300) can be connected at similar frequencies. For assistance, please visit http://www.panasonic.com/phonehelp 15 To use the ...intercom, LINE1 must be the same phone number. DSL Internet connection and KX-TS4100...
4-line/16 Ext.phone
Page 20
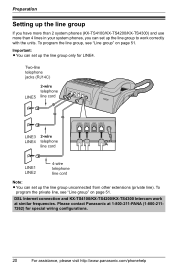
... the line group, see "Line group" on page 51. To program the private line, see "Line group" on page 51. Please contact Panasonic at similar frequencies. DSL Internet connection and KX-TS4100/KX-TS4200/KX-TS4300 Intercom work correctly with the units. Important: L You can set up...). Note: L You can set up the line group only for special wiring configurations. 20 For assistance, please visit http://www.panasonic.com/phonehelp Preparation Setting up the line group If you have more than 2 system phones (KX-TS4100/KX-TS4200/KX-TS4300) and use more than 4 lines in your system...
... the line group, see "Line group" on page 51. To program the private line, see "Line group" on page 51. Please contact Panasonic at similar frequencies. DSL Internet connection and KX-TS4100/KX-TS4200/KX-TS4300 Intercom work correctly with the units. Important: L You can set up...). Note: L You can set up the line group only for special wiring configurations. 20 For assistance, please visit http://www.panasonic.com/phonehelp Preparation Setting up the line group If you have more than 2 system phones (KX-TS4100/KX-TS4200/KX-TS4300) and use more than 4 lines in your system...

4-line/16 Ext.phone
Page 23
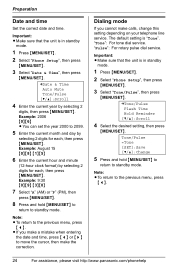
Setting the unit before use Display language Choose whether the display appears in standby mode. 1 Press {MENU/SET}. 2 Select "Phone Setup", then press { MENU/SET} . 3 Select "Language", then press { MENU/SET} . ➔Language Extension No. Language =English [SET]:Save [V/^]:Change 5 Press and hold {MENU/SET} to return to the previous menu, press { Important: L Make sure that the unit is "English". Note: L To return to standby mode. Date & Time [V/^]:Scroll 4 Select the desired setting, then press { MENU/SET} . The default setting is in English or Spanish.
Setting the unit before use Display language Choose whether the display appears in standby mode. 1 Press {MENU/SET}. 2 Select "Phone Setup", then press { MENU/SET} . 3 Select "Language", then press { MENU/SET} . ➔Language Extension No. Language =English [SET]:Save [V/^]:Change 5 Press and hold {MENU/SET} to return to the previous menu, press { Important: L Make sure that the unit is "English". Note: L To return to standby mode. Date & Time [V/^]:Scroll 4 Select the desired setting, then press { MENU/SET} . The default setting is in English or Spanish.
4-line/16 Ext.phone
Page 24
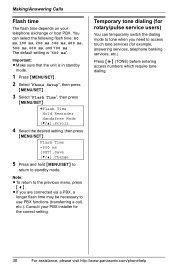
... and day by selecting 2 digits for each , then press { MENU/SET} . Important: L Make sure that the unit is in standby mode. 1 Press {MENU/SET}. 2 Select "Phone Setup", then press { MENU/SET} . 3 Select "Date & Time", then press { MENU/SET} . ➔Date & Time Auto Mute Tone/Pulse [V/^]:Scroll 4 Enter the current year by...
... and day by selecting 2 digits for each , then press { MENU/SET} . Important: L Make sure that the unit is in standby mode. 1 Press {MENU/SET}. 2 Select "Phone Setup", then press { MENU/SET} . 3 Select "Date & Time", then press { MENU/SET} . ➔Date & Time Auto Mute Tone/Pulse [V/^]:Scroll 4 Enter the current year by...
4-line/16 Ext.phone
Page 25
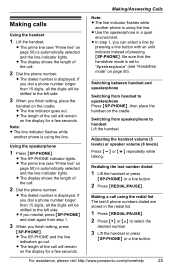
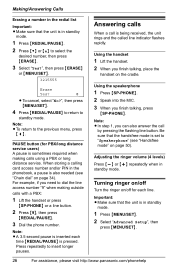
...) Press {-} or {+} repeatedly while talking. For assistance, please visit http://www.panasonic.com/phonehelp 25 L The dialed number is displayed. L The dialed number is displayed. L The length of the call . 2 Dial the phone number. L In step 1, you finish talking, place the handset on page 50...that the handsfree mode is automatically selected and the line indicator lights. Redialing the last number dialed 1 Lift the handset or press {SP-PHONE} or a line button. 2 Press {REDIAL/PAUSE}. Making/Answering Calls Making/Answering Calls Making calls Using the handset 1 Lift the handset...
...) Press {-} or {+} repeatedly while talking. For assistance, please visit http://www.panasonic.com/phonehelp 25 L The dialed number is displayed. L The dialed number is displayed. L The length of the call . 2 Dial the phone number. L In step 1, you finish talking, place the handset on page 50...that the handsfree mode is automatically selected and the line indicator lights. Redialing the last number dialed 1 Lift the handset or press {SP-PHONE} or a line button. 2 Press {REDIAL/PAUSE}. Making/Answering Calls Making/Answering Calls Making calls Using the handset 1 Lift the handset...
4-line/16 Ext.phone
Page 26
Note: L To return to standby mode. L To cancel, select "No?", then press { MENU/SET} . 4 Press {REDIAL/PAUSE} to return to the previous menu, press { Making/Answering Calls Erasing a number in the redial list Important: L Make sure that the unit is in standby mode. 1 Press {REDIAL/PAUSE}. 2 Press {V} or {^} to select the desired number, then press { ERASE} . 3 Select "Yes?", then press {ERASE} or {MENU/SET}. 3215555 Erase Yes?
Note: L To return to standby mode. L To cancel, select "No?", then press { MENU/SET} . 4 Press {REDIAL/PAUSE} to return to the previous menu, press { Making/Answering Calls Erasing a number in the redial list Important: L Make sure that the unit is in standby mode. 1 Press {REDIAL/PAUSE}. 2 Press {V} or {^} to select the desired number, then press { ERASE} . 3 Select "Yes?", then press {ERASE} or {MENU/SET}. 3215555 Erase Yes?
4-line/16 Ext.phone
Page 28
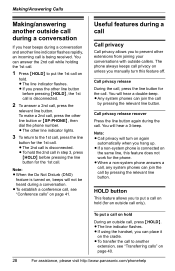
...before pressing the line button for an outside call on page 40. 28 For assistance, please visit http://www.panasonic.com/phonehelp You will hear a 3-beep. L Any system phones can answer the 2nd call while holding the 1st call. 1 Press {HOLD} to another line indicator flashes rapidly... only). Note: L When the Do Not Disturb (DND) feature is being received. L If you press the other line button or {SP-PHONE}, then dial the phone number. Note: L Call privacy will not be heard during a conversation. L The line indicator flashes. Call privacy release recover Press the line...
...before pressing the line button for an outside call on page 40. 28 For assistance, please visit http://www.panasonic.com/phonehelp You will hear a 3-beep. L Any system phones can answer the 2nd call while holding the 1st call. 1 Press {HOLD} to another line indicator flashes rapidly... only). Note: L When the Do Not Disturb (DND) feature is being received. L If you press the other line button or {SP-PHONE}, then dial the phone number. Note: L Call privacy will not be heard during a conversation. L The line indicator flashes. Call privacy release recover Press the line...
4-line/16 Ext.phone
Page 29
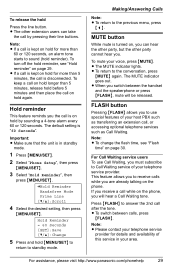
The default setting is in standby mode. 1 Press {MENU/SET}. 2 Select "Phone Setup", then press { MENU/SET} . 3 Select "Hold Reminder", then press {MENU/SET}. ➔Hold Reminder Handsfree Mode Prime Line [V/^]:Scroll 4 Select the desired setting, then ...
The default setting is in standby mode. 1 Press {MENU/SET}. 2 Select "Phone Setup", then press { MENU/SET} . 3 Select "Hold Reminder", then press {MENU/SET}. ➔Hold Reminder Handsfree Mode Prime Line [V/^]:Scroll 4 Select the desired setting, then ...
4-line/16 Ext.phone
Page 30
... ms, 200 ms, 300 ms, 400 ms, 500 ms, 600 ms, and 700 ms. The default setting is in standby mode. 1 Press {MENU/SET}. 2 Select "Phone Setup", then press { MENU/SET} . 3 Select "Flash Time", then press { MENU/SET} . ➔Flash Time Hold Reminder Handsfree Mode [V/^]:Scroll 4 Select the desired setting, then...
... ms, 200 ms, 300 ms, 400 ms, 500 ms, 600 ms, and 700 ms. The default setting is in standby mode. 1 Press {MENU/SET}. 2 Select "Phone Setup", then press { MENU/SET} . 3 Select "Flash Time", then press { MENU/SET} . ➔Flash Time Hold Reminder Handsfree Mode [V/^]:Scroll 4 Select the desired setting, then...

4-line/16 Ext.phone
Page 31
...phonebook (see "Character table" on the display. Phonebook (029) View Records ➔Add New Record [V/^]:Scroll L The total number of entering the phone number. L If required, you can add up to 200 items to standby mode. L To add other items from step 2. 7 Press {... 3 Enter the name (max. 16 characters; Enter the appropriate character or number. L To cancel, select "Cancel", then press {MENU/SET}. 5 Enter the phone number (max. 24 digits). For assistance, please visit http://www.panasonic.com/phonehelp 31 see "Erasing one item in a phone number. L To cancel, select ...
...phonebook (see "Character table" on the display. Phonebook (029) View Records ➔Add New Record [V/^]:Scroll L The total number of entering the phone number. L If required, you can add up to 200 items to standby mode. L To add other items from step 2. 7 Press {... 3 Enter the name (max. 16 characters; Enter the appropriate character or number. L To cancel, select "Cancel", then press {MENU/SET}. 5 Enter the phone number (max. 24 digits). For assistance, please visit http://www.panasonic.com/phonehelp 31 see "Erasing one item in a phone number. L To cancel, select ...

4-line/16 Ext.phone
Page 32
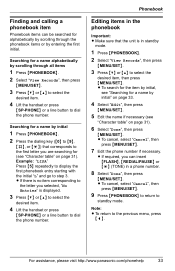
... To SPD", then press { MENU/SET} . 5 Press the speed dial button ({1} to the previous menu, press { Note: L To return to { 16} ). OR Press {LOWER}, then press the speed dial button ({1} to {16}). 6 Press {PHONEBOOK} to return to select the desired item, then press { MENU/SET} . Phonebook Storing items from the phonebook into...
... To SPD", then press { MENU/SET} . 5 Press the speed dial button ({1} to the previous menu, press { Note: L To return to { 16} ). OR Press {LOWER}, then press the speed dial button ({1} to {16}). 6 Press {PHONEBOOK} to return to select the desired item, then press { MENU/SET} . Phonebook Storing items from the phonebook into...
4-line/16 Ext.phone
Page 33
.../SET} . L If there is displayed. 3 Press {V} or {^} to select the desired item. 4 Lift the handset or press {SP-PHONE} or a line button to dial the phone number. Finding and calling a phonebook item Phonebook items can insert {FLASH}, {REDIAL/PAUSE} or {*} (TONE) in standby mode. 1 Press ...3 Press {V} or {^} to select the desired item, then press { MENU/SET} . L To cancel, select "Cancel", then press {MENU/SET}. 7 Edit the phone number if necessary. L To cancel, select "Cancel", then press {MENU/SET}. 9 Press {PHONEBOOK} to return to the previous menu, press { Example: "LISA" Press...
.../SET} . L If there is displayed. 3 Press {V} or {^} to select the desired item. 4 Lift the handset or press {SP-PHONE} or a line button to dial the phone number. Finding and calling a phonebook item Phonebook items can insert {FLASH}, {REDIAL/PAUSE} or {*} (TONE) in standby mode. 1 Press ...3 Press {V} or {^} to select the desired item, then press { MENU/SET} . L To cancel, select "Cancel", then press {MENU/SET}. 7 Edit the phone number if necessary. L To cancel, select "Cancel", then press {MENU/SET}. 9 Press {PHONEBOOK} to return to the previous menu, press { Example: "LISA" Press...
4-line/16 Ext.phone
Page 34
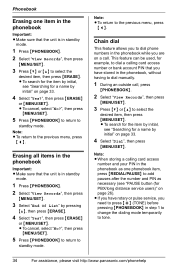
Note: L To return to standby mode. L To cancel, select "No?", then press { MENU/SET} . 5 Press {PHONEBOOK} to return to the previous menu, press { L To search for the item by initial, see "Searching for a name by initial" on page 33. 4 Select "Yes?", then press {ERASE} or {MENU/SET}. Phonebook Erasing one item in the phonebook Important: L Make sure that the unit is in standby mode. 1 Press {PHONEBOOK}. 2 Select "View Records", then press { MENU/SET} . 3 Press {V} or {^} to select the desired item, then press {ERASE}.
Note: L To return to standby mode. L To cancel, select "No?", then press { MENU/SET} . 5 Press {PHONEBOOK} to return to the previous menu, press { L To search for the item by initial, see "Searching for a name by initial" on page 33. 4 Select "Yes?", then press {ERASE} or {MENU/SET}. Phonebook Erasing one item in the phonebook Important: L Make sure that the unit is in standby mode. 1 Press {PHONEBOOK}. 2 Select "View Records", then press { MENU/SET} . 3 Press {V} or {^} to select the desired item, then press {ERASE}.
4-line/16 Ext.phone
Page 35
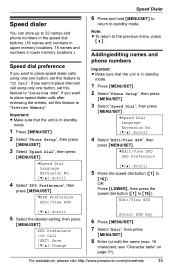
... "CO Call". Speed Dialer Speed dialer You can store up to 32 names and phone numbers in the speed dial buttons. (16 names and numbers in upper memory locations, 16 names and numbers in standby mode. 1 Press {MENU/SET}. 2 Select "Phone Setup", then press { MENU/SET} . 3 Select "Speed Dial", then press { MENU/SET} . ➔...
... "CO Call". Speed Dialer Speed dialer You can store up to 32 names and phone numbers in the speed dial buttons. (16 names and numbers in upper memory locations, 16 names and numbers in standby mode. 1 Press {MENU/SET}. 2 Select "Phone Setup", then press { MENU/SET} . 3 Select "Speed Dial", then press { MENU/SET} . ➔...

4-line/16 Ext.phone
Page 36
L If required, you can insert {FLASH}, {REDIAL/PAUSE} or {*} (TONE) in a phone number. Note: L To return to standby mode. L To cancel, select "Cancel", then press {MENU/SET}. 12Press...} to return to the previous menu, press { L To add the last number dialed, you can press {REDIAL/PAUSE} instead of entering the phone number. 11 Select "Done", then press { MENU/SET} . L To erase the number, press {ERASE} or select "Delete Char", then press... "Done", then press { MENU/SET} . L To cancel, select "Cancel", then press {MENU/SET}. 10Enter (or edit) the phone number (max. 24 digits).
L If required, you can insert {FLASH}, {REDIAL/PAUSE} or {*} (TONE) in a phone number. Note: L To return to standby mode. L To cancel, select "Cancel", then press {MENU/SET}. 12Press...} to return to the previous menu, press { L To add the last number dialed, you can press {REDIAL/PAUSE} instead of entering the phone number. 11 Select "Done", then press { MENU/SET} . L To erase the number, press {ERASE} or select "Delete Char", then press... "Done", then press { MENU/SET} . L To cancel, select "Cancel", then press {MENU/SET}. 10Enter (or edit) the phone number (max. 24 digits).

4-line/16 Ext.phone
Page 37
... menu, press { Note: L To return to standby mode. Erasing a stored entry Important: L Make sure that the unit is in standby mode. 1 Press {MENU/SET}. 2 Select "Phone Setup", then press { MENU/SET} . 3 Select "Speed Dial", then press { MENU/SET} . ➔Speed Dial Language Extension No. [V/^]:Scroll 4 Select "Edit/View SPD", then press...
... menu, press { Note: L To return to standby mode. Erasing a stored entry Important: L Make sure that the unit is in standby mode. 1 Press {MENU/SET}. 2 Select "Phone Setup", then press { MENU/SET} . 3 Select "Speed Dial", then press { MENU/SET} . ➔Speed Dial Language Extension No. [V/^]:Scroll 4 Select "Edit/View SPD", then press...


