
2.4 Ghz Cordless Pho
Page 2
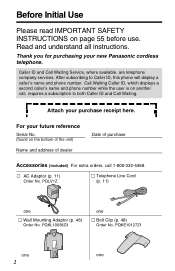
... of the unit) Name and address of dealer Date of purchase Accessories (included) For extra orders, call , requires a subscription to Caller ID, this phone will display a caller's name and phone number. PQKE10127Z1 one one Wall Mounting Adaptor (p. 46) Order No. AC Adaptor (p. 11) Order No. For your new Panasonic cordless telephone. Call Waiting Caller ID, which displays a second caller's name and phone number while the user is on page 55 before use. After subscribing to both Caller ID and Call Waiting. PQKL10038Z3...
... of the unit) Name and address of dealer Date of purchase Accessories (included) For extra orders, call , requires a subscription to Caller ID, this phone will display a caller's name and phone number. PQKE10127Z1 one one Wall Mounting Adaptor (p. 46) Order No. AC Adaptor (p. 11) Order No. For your new Panasonic cordless telephone. Call Waiting Caller ID, which displays a second caller's name and phone number while the user is on page 55 before use. After subscribing to both Caller ID and Call Waiting. PQKL10038Z3...
2.4 Ghz Cordless Pho
Page 3
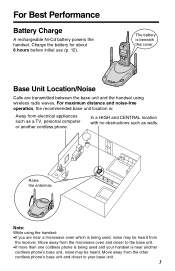
... walls. Base Unit Location/Noise Calls are transmitted between the base unit and the handset using the handset: •If you are near another cordless phone. Raise the antennas. For maximum distance and noise-free operation, the recommended base unit location is beneath this cover. In a HIGH and CENTRAL location with no obstructions such as a TV, personal computer or another cordless phone's base unit, noise may be heard. The battery...
... walls. Base Unit Location/Noise Calls are transmitted between the base unit and the handset using the handset: •If you are near another cordless phone. Raise the antennas. For maximum distance and noise-free operation, the recommended base unit location is beneath this cover. In a HIGH and CENTRAL location with no obstructions such as a TV, personal computer or another cordless phone's base unit, noise may be heard. The battery...

2.4 Ghz Cordless Pho
Page 4
... 6 Display 8 Settings 11 Connections 11 Battery Charge 12 Selecting the Dialing Mode 14 Selecting the Line Mode 15 Programmable Functions 16 Setting the Auto Talk Feature 17 Selecting the Ringer Volume 18 Basic Operation Making Calls 19 Answering Calls 21 Caller ID Service 22 Using the Caller List 24 Viewing the Caller List 24 Calling Back from the Caller List 26 Editing the Caller's Phone Number 27 Storing Caller List Information in the Directory 28 Erasing Caller List Information 29 Advanced Operation One-Touch Dialer 30 Storing a Phone Number in the DIRECT Button...
... 6 Display 8 Settings 11 Connections 11 Battery Charge 12 Selecting the Dialing Mode 14 Selecting the Line Mode 15 Programmable Functions 16 Setting the Auto Talk Feature 17 Selecting the Ringer Volume 18 Basic Operation Making Calls 19 Answering Calls 21 Caller ID Service 22 Using the Caller List 24 Viewing the Caller List 24 Calling Back from the Caller List 26 Editing the Caller's Phone Number 27 Storing Caller List Information in the Directory 28 Erasing Caller List Information 29 Advanced Operation One-Touch Dialer 30 Storing a Phone Number in the DIRECT Button...
2.4 Ghz Cordless Pho
Page 5
... a Voice Mail Access Number 40 Setting the Voice Mail Tone 41 Listening to Voice Mail Messages 42 Special Features 43 Automatic Security Code Setting 43 Handset Locator 43 For Call Waiting Service Users 44 How to Use the PAUSE Button (For Analog PBX Line/Long Distance Service Users 44 Temporary Tone Dialing (For Rotary or Pulse Service Users 44 FLASH Button 45 Useful Information Wall Mounting 46 Using the Belt Clip 48 Using an Optional Headset 48 Battery Replacement 49 Adding Another Phone 50 Before Requesting Help 51 Important Safety Instructions 55...
... a Voice Mail Access Number 40 Setting the Voice Mail Tone 41 Listening to Voice Mail Messages 42 Special Features 43 Automatic Security Code Setting 43 Handset Locator 43 For Call Waiting Service Users 44 How to Use the PAUSE Button (For Analog PBX Line/Long Distance Service Users 44 Temporary Tone Dialing (For Rotary or Pulse Service Users 44 FLASH Button 45 Useful Information Wall Mounting 46 Using the Belt Clip 48 Using an Optional Headset 48 Battery Replacement 49 Adding Another Phone 50 Before Requesting Help 51 Important Safety Instructions 55...

2.4 Ghz Cordless Pho
Page 8
...; (Directory key). Voicemail The display shows the voice mail message(s) is/are no stored items in the directory. No items stored The Caller List is empty or there are recorded (p. 40). To go to be charged. Ringer off When the handset ringer volume is set to the standby mode (p. 13). 8 To search from the most recent call , press Ñ (p. 24). Display The handset shows you instructions and information on the base unit. 12 new calls...
...; (Directory key). Voicemail The display shows the voice mail message(s) is/are no stored items in the directory. No items stored The Caller List is empty or there are recorded (p. 40). To go to be charged. Ringer off When the handset ringer volume is set to the standby mode (p. 13). 8 To search from the most recent call , press Ñ (p. 24). Display The handset shows you instructions and information on the base unit. 12 new calls...
2.4 Ghz Cordless Pho
Page 14
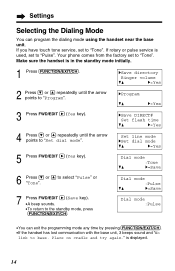
... displayed. 14 Set line mode HSet dial mode GF H=Yes 5 Press FWD/EDIT á (Yes key). is in the standby mode initially. 1 Press (FUNCTION/EXIT/CH). If rotary or pulse service is used, set to "Program". HSave directory Ringer volume GF H=Yes 2 Press Ö or Ñ repeatedly until the arrow points to the standby mode, press (FUNCTION/EXIT/CH). Place on cradle and try again." HSave DIRECT# Set flash time...
... displayed. 14 Set line mode HSet dial mode GF H=Yes 5 Press FWD/EDIT á (Yes key). is in the standby mode initially. 1 Press (FUNCTION/EXIT/CH). If rotary or pulse service is used, set to "Program". HSave directory Ringer volume GF H=Yes 2 Press Ö or Ñ repeatedly until the arrow points to the standby mode, press (FUNCTION/EXIT/CH). Place on cradle and try again." HSave DIRECT# Set flash time...

2.4 Ghz Cordless Pho
Page 15
... FWD/EDIT á (Save key). •A beep sounds. •To return to "Set line mode". HSave directory Ringer volume GF H=Yes HProgram GF H=Yes HSave DIRECT# Set flash time GF H=Yes 4 Press Ö or Ñ repeatedly until the arrow points to "B". Otherwise the Call Waiting Caller ID Feature may not be used (p. 44). Preparation Selecting the Line Mode If the line is connected to a low voltage system such as a PBX, set to base.
... FWD/EDIT á (Save key). •A beep sounds. •To return to "Set line mode". HSave directory Ringer volume GF H=Yes HProgram GF H=Yes HSave DIRECT# Set flash time GF H=Yes 4 Press Ö or Ñ repeatedly until the arrow points to "B". Otherwise the Call Waiting Caller ID Feature may not be used (p. 44). Preparation Selecting the Line Mode If the line is connected to a low voltage system such as a PBX, set to base.

2.4 Ghz Cordless Pho
Page 16
...;. * HSave DIRECT# Set flash time Save mailbox# Voicemail tone Set line mode Set dial mode Talk switching To store a phone number in the directory (p. 33). To store a voice mail access number (p. 40). During programming: *To select a desired function item, press Ö or Ñ repeatedly until the arrow points to base. Then press FWD/EDIT á to go to the next step. •You can program the following function items using the handset near the base unit. See...
...;. * HSave DIRECT# Set flash time Save mailbox# Voicemail tone Set line mode Set dial mode Talk switching To store a phone number in the directory (p. 33). To store a voice mail access number (p. 40). During programming: *To select a desired function item, press Ö or Ñ repeatedly until the arrow points to base. Then press FWD/EDIT á to go to the next step. •You can program the following function items using the handset near the base unit. See...

2.4 Ghz Cordless Pho
Page 17
Preparation Setting the Auto Talk Feature The Auto Talk feature allows you want to use this feature, turn the feature ON by programming. Auto talk :On •You can exit the programming mode any time by lifting the handset off the base unit without pressing (TALK). HProgram GF H=Yes HTalk switching GF H=Yes 5 Press FWD/EDIT á (Yes key). Make sure the handset is in the standby mode initially. 1 Press (FUNCTION/EXIT/CH). 2 Press Ö or...
Preparation Setting the Auto Talk Feature The Auto Talk feature allows you want to use this feature, turn the feature ON by programming. Auto talk :On •You can exit the programming mode any time by lifting the handset off the base unit without pressing (TALK). HProgram GF H=Yes HTalk switching GF H=Yes 5 Press FWD/EDIT á (Yes key). Make sure the handset is in the standby mode initially. 1 Press (FUNCTION/EXIT/CH). 2 Press Ö or...

2.4 Ghz Cordless Pho
Page 18
.... 18 Make sure the handset is ringing. •When you replace the battery, the selected ringer volume setting will flash for about 45 seconds before the handset returns to HIGH, LOW or OFF. Ringer LOW Low High GF Ö Ñ To turn the ringer OFF, press and Ö Ñ hold Ö until the arrow points to the factory set the ringer volume to the standby mode. Press...
.... 18 Make sure the handset is ringing. •When you replace the battery, the selected ringer volume setting will flash for about 45 seconds before the handset returns to HIGH, LOW or OFF. Ringer LOW Low High GF Ö Ñ To turn the ringer OFF, press and Ö Ñ hold Ö until the arrow points to the factory set the ringer volume to the standby mode. Press...

2.4 Ghz Cordless Pho
Page 21
...;rst ring (p. 22). Backlit LCD display The lighted handset display will light when you can also answer a call is received. Answering Calls When a call is received, the unit rings, "Incoming call . If the handset is off the base unit, press (TALK). •You can answer a call by lifting the handset off the base unit, and flash when a call by pressing any dialing button (0) to (9), (*) or (#) (-Any Key Talk). (TALK) Auto Talk If you set the Auto Talk feature to answer a call " is displayed and the CALLER ID indicator flashes quickly.
...;rst ring (p. 22). Backlit LCD display The lighted handset display will light when you can also answer a call is received. Answering Calls When a call is received, the unit rings, "Incoming call . If the handset is off the base unit, press (TALK). •You can answer a call by lifting the handset off the base unit, and flash when a call by pressing any dialing button (0) to (9), (*) or (#) (-Any Key Talk). (TALK) Auto Talk If you set the Auto Talk feature to answer a call " is displayed and the CALLER ID indicator flashes quickly.

2.4 Ghz Cordless Pho
Page 27
... Caller List. 27 a 321-5555 G=Next H=Edit •Each time you can edit a phone number into one of 4 different patterns. Area code - b 234-321-5555 a Phone no . Phone no . c 1 - Phone no . •The order in which patterns a-d are d 1-234-321-5555 displayed depends on how the telephone G=Next H=Edit number is rearranged into one of 4 patterns. c 1-321-5555 G=Next H=Edit d 1 - Basic Operation Editing the Caller's Phone Number...
... Caller List. 27 a 321-5555 G=Next H=Edit •Each time you can edit a phone number into one of 4 different patterns. Area code - b 234-321-5555 a Phone no . Phone no . c 1 - Phone no . •The order in which patterns a-d are d 1-234-321-5555 displayed depends on how the telephone G=Next H=Edit number is rearranged into one of 4 patterns. c 1-321-5555 G=Next H=Edit d 1 - Basic Operation Editing the Caller's Phone Number...

2.4 Ghz Cordless Pho
Page 40
... your voice mail box access number and your telephone company. When voice mail messages are recorded, "Voicemail" and " " will flash. HSave mailbox# Voicemail tone GF H=Yes 4 Enter your access number, up to "Save mailbox#", and press FWD/EDIT á (Yes key). To use this feature, you enter a wrong number, press (CLEAR). Storing a Voice Mail Access Number Make sure the handset is in step 4. Digits are not answered. Callers can answer calls automatically when your access number. Voice Mail Service Voice mail service is an electronic on-line answering system...
... your voice mail box access number and your telephone company. When voice mail messages are recorded, "Voicemail" and " " will flash. HSave mailbox# Voicemail tone GF H=Yes 4 Enter your access number, up to "Save mailbox#", and press FWD/EDIT á (Yes key). To use this feature, you enter a wrong number, press (CLEAR). Storing a Voice Mail Access Number Make sure the handset is in step 4. Digits are not answered. Callers can answer calls automatically when your access number. Voice Mail Service Voice mail service is an electronic on-line answering system...

2.4 Ghz Cordless Pho
Page 41
...; or Ñ repeatedly until the arrow points to "Voicemail tone". Press FWD/EDIT á (Save key). •A beep sounds. •To return to a PBX. Advanced Operation 4 Press Ö or Ñ repeatedly until the arrow points to "On". "Voicemail" and " " will be displayed and the VOICE MAIL indicator on page 40. •You can exit the programming mode any time by a dial tone after a new message has been recorded, set to "Program".
...; or Ñ repeatedly until the arrow points to "Voicemail tone". Press FWD/EDIT á (Save key). •A beep sounds. •To return to a PBX. Advanced Operation 4 Press Ö or Ñ repeatedly until the arrow points to "On". "Voicemail" and " " will be displayed and the VOICE MAIL indicator on page 40. •You can exit the programming mode any time by a dial tone after a new message has been recorded, set to "Program".
2.4 Ghz Cordless Pho
Page 42
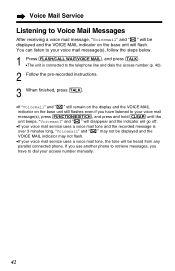
.... •If your voice mail service uses a voice mail tone and the recorded message is connected to the telephone line and dials the access number (p. 40). 2 Follow the pre-recorded instructions. 3 When finished, press (TALK). •If "Voicemail" and " " still remain on the display and the VOICE MAIL indicator on the base unit still flashes even if you have listened to your voice mail message(s), follow the steps below. 1 Press (FLASH/CALL!WAIT/VOICE!MAIL), and press (TALK). •The unit is over...
.... •If your voice mail service uses a voice mail tone and the recorded message is connected to the telephone line and dials the access number (p. 40). 2 Follow the pre-recorded instructions. 3 When finished, press (TALK). •If "Voicemail" and " " still remain on the display and the VOICE MAIL indicator on the base unit still flashes even if you have listened to your voice mail message(s), follow the steps below. 1 Press (FLASH/CALL!WAIT/VOICE!MAIL), and press (TALK). •The unit is over...

2.4 Ghz Cordless Pho
Page 44
... caller, press (FLASH/CALL!WAIT/VOICE!MAIL) again. •The call waiting service cannot be included when redialing. 44 After you hear a call-waiting tone while talking, the unit will not be used when a parallel connected telephone is in your area. How to Use the PAUSE Button (For Analog PBX Line/Long Distance Service Users) We recommend you press (REDIAL/PAUSE) if a pause is required for details. Temporary Tone Dialing (For Rotary or Pulse Service Users) Press (TONE) before entering access numbers...
... caller, press (FLASH/CALL!WAIT/VOICE!MAIL) again. •The call waiting service cannot be included when redialing. 44 After you hear a call-waiting tone while talking, the unit will not be used when a parallel connected telephone is in your area. How to Use the PAUSE Button (For Analog PBX Line/Long Distance Service Users) We recommend you press (REDIAL/PAUSE) if a pause is required for details. Temporary Tone Dialing (For Rotary or Pulse Service Users) Press (TONE) before entering access numbers...
2.4 Ghz Cordless Pho
Page 45
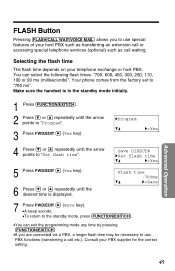
... programming mode any time by pressing (FUNCTION/EXIT/CH). •If you to use special features of your host PBX such as transferring an extension call or accessing special telephone services (optional) such as call etc.). Your phone comes from the factory set to "Program". 3 Press FWD/EDIT á (Yes key). Make sure the handset is displayed. FLASH Button Pressing (FLASH/CALL!WAIT/VOICE!MAIL) allows you are connected via a PBX, a longer flash time may be necessary to use PBX functions (transferring a call waiting. Save DIRECT...
... programming mode any time by pressing (FUNCTION/EXIT/CH). •If you to use special features of your host PBX such as transferring an extension call or accessing special telephone services (optional) such as call etc.). Your phone comes from the factory set to "Program". 3 Press FWD/EDIT á (Yes key). Make sure the handset is displayed. FLASH Button Pressing (FLASH/CALL!WAIT/VOICE!MAIL) allows you are connected via a PBX, a longer flash time may be necessary to use PBX functions (transferring a call waiting. Save DIRECT...

2.4 Ghz Cordless Pho
Page 51
... base unit. •Raise the base unit antennas. •Press (FUNCTION/EXIT/CH) to select a clearer channel. •The ringer volume is set to turn the display on cradle and try again. •Re-install the battery and place the handset on the base unit and unplug the AC adaptor to reset. Before Requesting Help Problem "No link to HIGH or LOW (p. 18). •The handset is in /out, fades. Useful...
... base unit. •Raise the base unit antennas. •Press (FUNCTION/EXIT/CH) to select a clearer channel. •The ringer volume is set to turn the display on cradle and try again. •Re-install the battery and place the handset on the base unit and unplug the AC adaptor to reset. Before Requesting Help Problem "No link to HIGH or LOW (p. 18). •The handset is in /out, fades. Useful...

2.4 Ghz Cordless Pho
Page 52
.... •To answer the call, press (TALK). the Caller List. 52 The unit does not display the caller's name and/or phone number. •You need to subscribe to a Caller ID service from the beginning after hanging up. Before Requesting Help Problem Remedy You cannot program items, such as the dialing mode. •Programming is not possible while the unit is in the talk mode or when viewing the Caller List/directory list. •Do...
.... •To answer the call, press (TALK). the Caller List. 52 The unit does not display the caller's name and/or phone number. •You need to subscribe to a Caller ID service from the beginning after hanging up. Before Requesting Help Problem Remedy You cannot program items, such as the dialing mode. •Programming is not possible while the unit is in the talk mode or when viewing the Caller List/directory list. •Do...

2.4 Ghz Cordless Pho
Page 57
... ensured when using this device must not be reasonably expected to procedures set out in FCC Part 68. Remain on a party line, check with the rules and regulations in FCC Rules and Regulations Subpart E of the unit) Ringer Equivalence 0.1B The particular telephone line to the dispatcher the reason for compliance could void the user's authority to maintain uninterrupted service. In...
... ensured when using this device must not be reasonably expected to procedures set out in FCC Part 68. Remain on a party line, check with the rules and regulations in FCC Rules and Regulations Subpart E of the unit) Ringer Equivalence 0.1B The particular telephone line to the dispatcher the reason for compliance could void the user's authority to maintain uninterrupted service. In...

